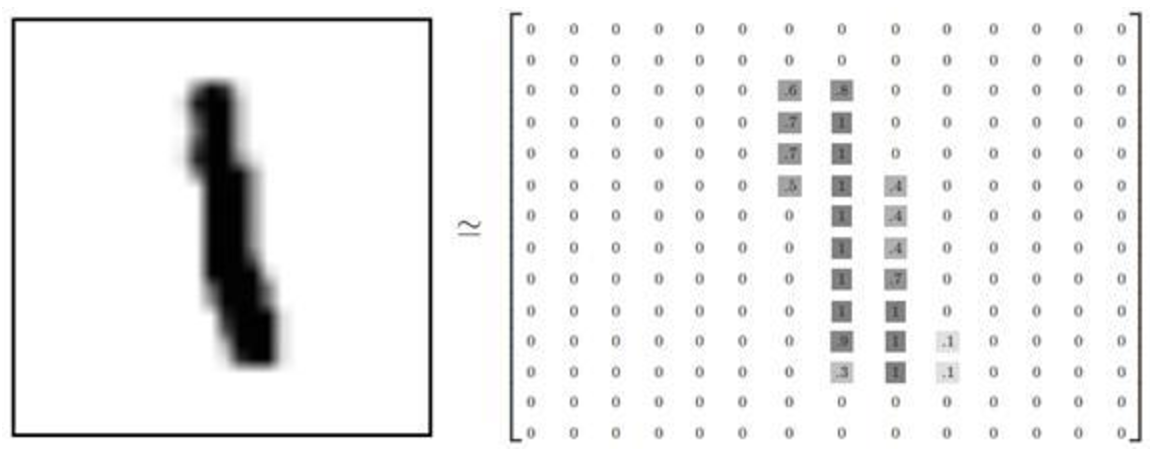
MNIST是一个非常有名的手写体数字识别数据集,在很多资料中,这个数据集都会被用作深度学习的入门样例。
数据集下载网址:http://yann.lecun.com/exdb/mnist/
数据集简介:
1、共有4数据集,下载之后保存在磁盘中(最好放在你代码执行目录下,方便后期使用。)如新建一个文件夹D:*****\MNIST_data存放数据。
train-images-idx3-ubyte.gz: training set images (9912422 bytes)
train-labels-idx1-ubyte.gz: training set labels (28881 bytes)
t10k-images-idx3-ubyte.gz: test set images (1648877 bytes)
t10k-labels-idx1-ubyte.gz: test set labels (4542 bytes)
2、此数据集中,
训练样本:共60000个,其中55000个用于训练,另外5000个用于验证
测试样本:共10000个
3、数据集中像素值
a)使用python读取二进制文件方法读取mnist数据集,则读进来的图像像素值为0-255之间;标签是0-9的数值。
b)采用TensorFlow的封装的函数读取mnist,则读进来的图像像素值为0-1之间;标签是0-1值组成的大小为1*10的行向量。
方法一:使用python的open()和struct.unpack_from()函数操作
【注意:此方法需要将下载的压缩文件解压之后才有使用】
1、首先观察一下mnist的结构,选取train-images为例
TRAINING SET IMAGE FILE (train-images-idx3-ubyte):
[offset] [type] [value] [description]
0000 32 bit integer 0x00000803(2051) magic number #文件头魔数
0004 32 bit integer 60000 number of images #图像个数
0008 32 bit integer 28 number of rows #图像宽度
0012 32 bit integer 28 number of columns #图像高度
0016 unsigned byte ?? pixel #图像像素值
0017 unsigned byte ?? pixel
……..
xxxx unsigned byte ?? pixel
TRAINING SET LABEL FILE (train-labels-idx1-ubyte):
[offset] [type] [value] [description]
0000 32 bit integer 0x00000801(2049) magic number (MSB first)
0004 32 bit integer 60000 number of items
0008 unsigned byte ?? label
0009 unsigned byte ?? label
……..
xxxx unsigned byte ?? label
The labels values are 0 to 9.
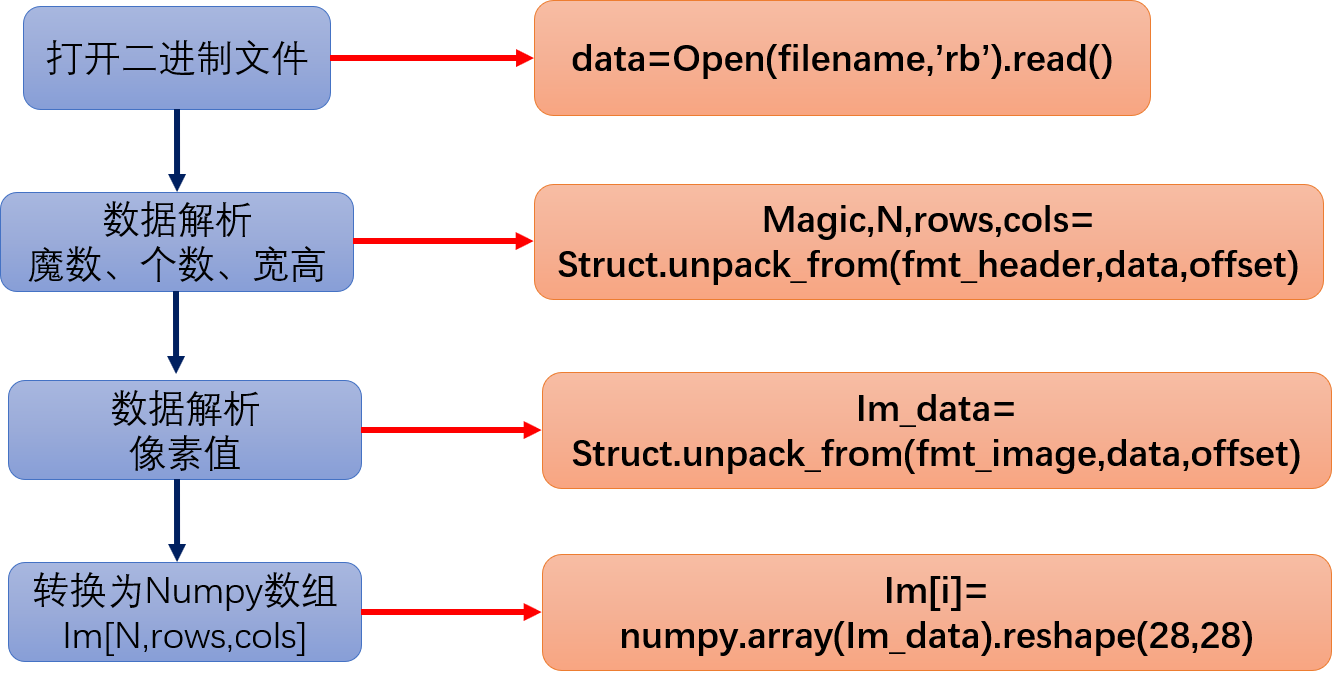
2、读取流程如下:
3、具体代码如下:
import numpy as np
import struct
import matplotlib.pyplot as plt

# 训练集文件
train_images_idx3_ubyte_file = 'MNIST_data/train-images.idx3-ubyte'
# 训练集标签文件
train_labels_idx1_ubyte_file = 'MNIST_data/train-labels.idx1-ubyte'

# 测试集文件
test_images_idx3_ubyte_file = 'MNIST_data/t10k-images.idx3-ubyte'
# 测试集标签文件
test_labels_idx1_ubyte_file = 'MNIST_data/t10k-labels.idx1-ubyte'


def decode_idx3_ubyte(idx3_ubyte_file):
    """ 解析idx3文件的通用函数 :param idx3_ubyte_file: idx3文件路径 :return: 数据集 """
    # 读取二进制数据
    bin_data = open(idx3_ubyte_file, 'rb').read()

    # 解析文件头信息,依次为魔数、图片数量、每张图片高、每张图片宽
    offset = 0
    fmt_header = '>iiii' #因为数据结构中前4行的数据类型都是32位整型,所以采用i格式,但我们需要读取前4行数据,所以需要4个i。我们后面会看到标签集中,只使用2个ii。
    magic_number, num_images, num_rows, num_cols = struct.unpack_from(fmt_header, bin_data, offset)
    print('魔数:%d, 图片数量: %d张, 图片大小: %d*%d' % (magic_number, num_images, num_rows, num_cols))

    # 解析数据集
    image_size = num_rows * num_cols
    offset += struct.calcsize(fmt_header)  #获得数据在缓存中的指针位置,从前面介绍的数据结构可以看出,读取了前4行之后,指针位置(即偏移位置offset)指向0016。
    print(offset)
    fmt_image = '>' + str(image_size) + 'B'  #图像数据像素值的类型为unsigned char型,对应的format格式为B。这里还有加上图像大小784,是为了读取784个B格式数据,如果没有则只会读取一个值(即一副图像中的一个像素值)
    print(fmt_image,offset,struct.calcsize(fmt_image))
    images = np.empty((num_images, num_rows, num_cols))
    #plt.figure()
    for i in range(num_images):
        if (i + 1) % 10000 == 0:
            print('已解析 %d' % (i + 1) + '张')
            print(offset)
        images[i] = np.array(struct.unpack_from(fmt_image, bin_data, offset)).reshape((num_rows, num_cols))
        #print(images[i])
        offset += struct.calcsize(fmt_image)
# plt.imshow(images[i],'gray')
# plt.pause(0.00001)
# plt.show()
    #plt.show()

    return images


def decode_idx1_ubyte(idx1_ubyte_file):
    """ 解析idx1文件的通用函数 :param idx1_ubyte_file: idx1文件路径 :return: 数据集 """
    # 读取二进制数据
    bin_data = open(idx1_ubyte_file, 'rb').read()

    # 解析文件头信息,依次为魔数和标签数
    offset = 0
    fmt_header = '>ii'
    magic_number, num_images = struct.unpack_from(fmt_header, bin_data, offset)
    print('魔数:%d, 图片数量: %d张' % (magic_number, num_images))

    # 解析数据集
    offset += struct.calcsize(fmt_header)
    fmt_image = '>B'
    labels = np.empty(num_images)
    for i in range(num_images):
        if (i + 1) % 10000 == 0:
            print ('已解析 %d' % (i + 1) + '张')
        labels[i] = struct.unpack_from(fmt_image, bin_data, offset)[0]
        offset += struct.calcsize(fmt_image)
    return labels


def load_train_images(idx_ubyte_file=train_images_idx3_ubyte_file):
    """ TRAINING SET IMAGE FILE (train-images-idx3-ubyte): [offset] [type] [value] [description] 0000 32 bit integer 0x00000803(2051) magic number 0004 32 bit integer 60000 number of images 0008 32 bit integer 28 number of rows 0012 32 bit integer 28 number of columns 0016 unsigned byte ?? pixel 0017 unsigned byte ?? pixel ........ xxxx unsigned byte ?? pixel Pixels are organized row-wise. Pixel values are 0 to 255. 0 means background (white), 255 means foreground (black). :param idx_ubyte_file: idx文件路径 :return: n*row*col维np.array对象,n为图片数量 """
    return decode_idx3_ubyte(idx_ubyte_file)


def load_train_labels(idx_ubyte_file=train_labels_idx1_ubyte_file):
    """ TRAINING SET LABEL FILE (train-labels-idx1-ubyte): [offset] [type] [value] [description] 0000 32 bit integer 0x00000801(2049) magic number (MSB first) 0004 32 bit integer 60000 number of items 0008 unsigned byte ?? label 0009 unsigned byte ?? label ........ xxxx unsigned byte ?? label The labels values are 0 to 9. :param idx_ubyte_file: idx文件路径 :return: n*1维np.array对象,n为图片数量 """
    return decode_idx1_ubyte(idx_ubyte_file)


def load_test_images(idx_ubyte_file=test_images_idx3_ubyte_file):
    """ TEST SET IMAGE FILE (t10k-images-idx3-ubyte): [offset] [type] [value] [description] 0000 32 bit integer 0x00000803(2051) magic number 0004 32 bit integer 10000 number of images 0008 32 bit integer 28 number of rows 0012 32 bit integer 28 number of columns 0016 unsigned byte ?? pixel 0017 unsigned byte ?? pixel ........ xxxx unsigned byte ?? pixel Pixels are organized row-wise. Pixel values are 0 to 255. 0 means background (white), 255 means foreground (black). :param idx_ubyte_file: idx文件路径 :return: n*row*col维np.array对象,n为图片数量 """
    return decode_idx3_ubyte(idx_ubyte_file)


def load_test_labels(idx_ubyte_file=test_labels_idx1_ubyte_file):
    """ TEST SET LABEL FILE (t10k-labels-idx1-ubyte): [offset] [type] [value] [description] 0000 32 bit integer 0x00000801(2049) magic number (MSB first) 0004 32 bit integer 10000 number of items 0008 unsigned byte ?? label 0009 unsigned byte ?? label ........ xxxx unsigned byte ?? label The labels values are 0 to 9. :param idx_ubyte_file: idx文件路径 :return: n*1维np.array对象,n为图片数量 """
    return decode_idx1_ubyte(idx_ubyte_file)


if __name__ == '__main__':
    train_images = load_train_images()

    train_labels = load_train_labels()
    # test_images = load_test_images()
    # test_labels = load_test_labels()

    # 查看前十个数据及其标签以读取是否正确
    for i in range(10):
        print(train_labels[i])
        plt.imshow(train_images[i], cmap='gray')
        plt.pause(0.000001)
        plt.show()
    print('done')
方法二:使用TensorFlow封装代码读取
【注意:此方法,对下载的数据集压缩包不需要解压,代码会自己解压。】
TensorFlow的封装让使用MNIST数据集变得更加方便。MNIST数据集是NIST数据集的一个子集,它包含了60000张图片作为训练数据,10000张图片作为测试数据。在MNIST数据集中的每一张图片都代表了0~9中的一个数字。图片的大小都为28*28,且数字都会出现在图片的正中间。
具体读取代码如下:
import tensorflow as tf
import matplotlib.pyplot as plt

''' 读取MNIST数据方法一'''
from tensorflow.examples.tutorials.mnist import input_data
mnist = input_data.read_data_sets('MNIST_data',one_hot=True)
'''1)获得数据集的个数'''
train_nums = mnist.train.num_examples
validation_nums = mnist.validation.num_examples
test_nums = mnist.test.num_examples
print('MNIST数据集的个数')
print(' >>>train_nums=%d' % train_nums,'\n',
      '>>>validation_nums=%d'% validation_nums,'\n',
      '>>>test_nums=%d' % test_nums,'\n')

'''2)获得数据值'''
train_data = mnist.train.images   #所有训练数据
val_data = mnist.validation.images  #(5000,784)
test_data = mnist.test.images       #(10000,784)
print('>>>训练集数据大小:',train_data.shape,'\n',
      '>>>一副图像的大小:',train_data[0].shape)
'''3)获取标签值label=[0,0,...,0,1],是一个1*10的向量'''
train_labels = mnist.train.labels     #(55000,10)
val_labels = mnist.validation.labels  #(5000,10)
test_labels = mnist.test.labels       #(10000,10)

print('>>>训练集标签数组大小:',train_labels.shape,'\n',
      '>>>一副图像的标签大小:',train_labels[1].shape,'\n',
      '>>>一副图像的标签值:',train_labels[0])

'''4)批量获取数据和标签【使用next_batch(batch_size)】'''
batch_size = 100    #每次批量训练100幅图像
batch_xs,batch_ys = mnist.train.next_batch(batch_size)
print('使用mnist.train.next_batch(batch_size)批量读取样本\n')
print('>>>批量读取100个样本:数据集大小=',batch_xs.shape,'\n',
      '>>>批量读取100个样本:标签集大小=',batch_ys.shape)
#xs是图像数据(100,784);ys是标签(100,10)

'''5)显示图像'''
plt.figure()
for i in range(100):
    im = train_data[i].reshape(28,28)
    im = batch_xs[i].reshape(28,28)
    plt.imshow(im,'gray')
    plt.pause(0.0000001)
plt.show()
显示结果:
Extracting MNIST_data\train-images-idx3-ubyte.gz
Extracting MNIST_data\train-labels-idx1-ubyte.gz
Extracting MNIST_data\t10k-images-idx3-ubyte.gz
Extracting MNIST_data\t10k-labels-idx1-ubyte.gz
MNIST数据集的个数
 >>>train_nums=55000
 >>>validation_nums=5000
 >>>test_nums=10000
>>>训练集数据大小: (55000, 784)
 >>>一副图像的大小: (784,)
>>>训练集标签数组大小: (55000, 10)
 >>>一副图像的标签大小: (10,)
 >>>一副图像的标签值: [ 0.  0.  0.  0.  0.  0.  0.  1.  0.  0.] 使用mnist.train.next_batch(batch_size)批量读取样本 >>>批量读取100个样本:数据集大小= (100, 784) >>>批量读取100个样本:标签集大小= (100, 10)
版权声明:本文内容由互联网用户自发贡献,该文观点仅代表作者本人。本站仅提供信息存储空间服务,不拥有所有权,不承担相关法律责任。如发现本站有涉嫌侵权/违法违规的内容, 请发送邮件至 举报,一经查实,本站将立刻删除。
如需转载请保留出处:https://bianchenghao.cn/10726.html


