java常用设计模式详解及应用
java有23种设计模式,用于解决在编程当中遇到的实际问题。本文主要讲解单例模式、工厂模式、适配器模式、装饰模式、代理模式、模板模式、策略模式、观察者模式、委托模式。
(1)单例模式
定义:确保一个类只有一个实例,而且自行实例化并向整个系统提供这个实例。
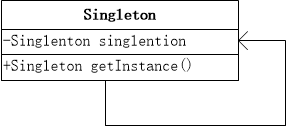
类图:
Singleton 是一个自关联的类。
单例模式实例化对象的机制分两种一种是懒汉式,一种是饿汉式模式。懒汉式就是在调用的时候才实例化对象,而饿汉模式是在加载类的时候就已经实例化对象了。
1、懒汉式单例
public class Singleton {
    private Singleton(){}
    private static Singleton singleton=null;
    public static Singleton getInstance(){
            if (singleton ==null){
                return new Singleton();
            }
       return singleton;
    }
}
这里将Singleton类的构造函数限定为private,来避免外部对象直接创建Singleton的对象 ,只能通过getInstance()方法来实例化对象。
上面这种情况在多线程是也有可能创建出多个对象,
下面是多线程时的改进。
public class Singleton {
    private Singleton(){}
    private static Singleton singleton=null;
    public static Singleton getInstance(){
            if (singleton ==null){
                synchronized (Singleton.class){
                    if (singleton ==null){
                        singleton= new Singleton();
                    }
                }
            }
       return singleton;
    }
}
这里利用synchronized 同步锁,并进行非空双重校验。
2、饿汉式单例
饿汉式单例模式,初始化时就已经实例化对象。
public class Singleton {
    private Singleton(){}
    private static final Singleton singleton=new Singleton();
    public static Singleton getInstance(){
       return singleton;
    }
}
饿汉式在类创建的同时就已经创建好一个静态对象供系统使用,以后就不会变化,所以始终是线程安全的。
饿汉式和懒汉式区别
饿汉式就是类一旦加载,单例初始化就完成了,保证在调用getInstance方法的时候,单例已经存在了;而懒汉式,只在调用getInstance方法的时候才去实例化对象。
实际项目中的应用
例如A系统要通过接口去访问B系统进行数据交互,但是在访问B系统之前要先登录,为了避免在A项目中出现多个登录对象,这个时候就可以使用单例模式将B的登录对象设置成单例。这样可以保证一个应用上面有一个登录实例,但是在集群的环境下,还是会出现多个登录对象。
(2)工厂模式
定义:定义一个创建对象的接口,让其子类自己决定实例化哪一个工厂类,工厂模式使其创建过程延迟到子类进行。
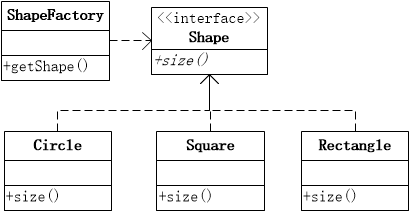
类图:
(1)新建Shape接口
public interface Shape {
	public void draw();
}
(2)新建Circle类
public class Circle implements Shape{
	@Override
	public void draw() {
		System.out.println("I am Circle");
	}
}
(3)新建Square类
public class Square implements Shape{
	@Override
	public void draw() {
		System.out.println("I am Square");
	}
}
(4)新建Rectangle
public class Rectangle implements Shape {
	@Override
	public void draw() {
		System.out.println("I am Rectangle");
	}
}
(5)新建ShapeFactory类
public class ShapeFactory{
	public Shape getShape(String shapeType){
		if ("CIRCLE".equals(shapeType)) {
			return new Circle();
		}else if ("SQUARE".equals(shapeType)) {
			return new Square();
		}else if ("RECTANGLE".equals(shapeType)) {
			return new Rectangle();
		}
		return null;
	}
}
然后调用写一个test类来测试一下
public class factoryTest {
public static void main(String[] args) {
	ShapeFactory shapeFactory=new ShapeFactory();
	Shape shape= shapeFactory.getShape("CIRCLE");
	shape.draw();
}
}
打印的结果是I am Circle。
还有抽象工厂模式,实际是就是对ShapeFactory进行了抽象,这里就不在介绍。
实际项目中的应用
工厂模式在实际项目中的应用会结合后面的策略模式和模板模式一起比较着来介绍。
(3)适配器模式
定义:是作为两个不兼容的接口之间的桥梁。
类图: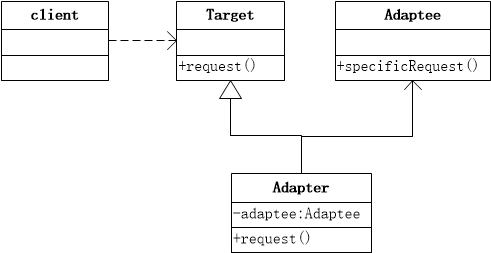
1、Client(客户端):外部使用程序;
2、Target(目标抽象类):定义用户需要的相关接口,作为接口或者抽象类存在;
3、Adaptee(适配者):要被适配的角色,定义类一系列的接口,实现用户需要的一些业务功能;
4、Adapter(适配器):将Adaptee适配到Target上,适配器通常继承目标抽象类,并通过组合(本实例)或者实现适配者接口,从而实现了目标类和适配者之间形成关联关系。
实际项目中的应用
适配器模式在对一些老的项目进行改造升级时很有用,之前在做项目时要对用户登录验证方式进行改造,以前用户登录都是通过CAS,改造后要通过统一用户管理系统对用户进行验证和管理,在这个过程中有本系统的LocalRedisServer和统一用户管理系统的RemoteRedisServer,为了将这二种结合起来使用,就采用了适配器模式,使用新的AdapterRedisServer从而将问题解决。
(4)装饰模式
定义:动态地给一个对象添加一些额外的职责。
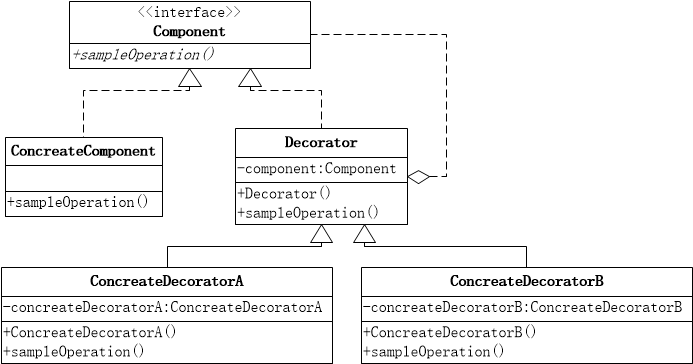
类图:
装饰者模式中的角色有:
1、抽象构建(Component)角色:抽象接口,被装饰对象的接口;
2、具体构建(ConcreateComponent)角色:被装饰的实际对象;
3、装饰(Decorator)角色:装饰者接口;
4、具体装饰(ConcreateComponent)角色:装饰者对象;
(1)新建Component
public interface Component {
	void sampleOperation();
}
(2)新建ConcreateComponent
public class ConcreateComponent implements Component {
	@Override
	public void sampleOperation() {
		System.out.println("I am Component object");
	}
}
(3)新建Decorator
public class Decorator implements Component {
	private Component component;

	public Decorator(Component component) {
		this.component = component;
	}

	@Override
	public void sampleOperation() {
		component.sampleOperation();
	}
}
(4)新建ConcreateDecoratorA
public class ConcreateDecoratorA extends Decorator {
	public ConcreateDecoratorA(Component component) {
		super(component);
	}
	@Override
	public void sampleOperation() {
		super.sampleOperation();
		System.out.println("装饰附加业务功能!");
	}
}
(5)新建test
public class test {
	public static void main(String[] args) {
		Component component = new ConcreateComponent();
		ConcreateDecoratorA concreateDecoratorA = new ConcreateDecoratorA(component);
		concreateDecoratorA.sampleOperation();
	}
}
测试结果为:
I am Component object
装饰附加业务功能!
装饰器模式就是在不改变原结构的基础之上,对原结构添加新的功能,这种设计模式在对项目升级改造或者需求变更的时候很有用处。
(5)代理模式
定义:代理模式给某一个对象提供一个代理对象,并由代理对象控制对原对象的引用。通俗的来讲代理模式就是我们生活中常见的中介。
1、静态代理
静态代理是指预先确定了代理与被代理者的关系。那映射到编程领域的话,就是指代理类与被代理类的依赖关系在编译期间就确定了。
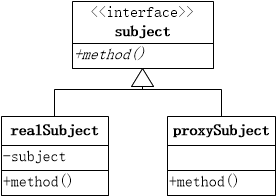
类图:
(1)新建一个subject接口
public interface subject {
	public void method();
}
(2)新建realSubject
public class realSubject implements subject {
	@Override
	public void method() {
		System.out.println("realSubject");
	}
}
(3)新建proxySubject
public class proxySubject implements subject {
	private subject subject;

	@Override
	public void method() {
		if (subject == null) {
			subject = new realSubject();
		}
		subject.method();
	}
}
(4)新建测试类
public class staticProxyTest {
	public static void main(String[] args) {
		proxySubject proxySubject = new proxySubject();
		proxySubject.method();
	}
}
这样就可以通过代理类proxySubject 来调用实际类realSubject。
2、动态代理
动态代理:代理类并不是在java代码中定义的,而是在运行时动态创建的。
动态代理简单实现
在java的java.lang.reflect包下面提供了一个Proxy类和一个InvocationHandler接口,通过这个类和接口可以生成JDK动态代理类和动态代理对象。
InvocationHandler接口是给动态代理类实现的,负责处理被代理对象的操作的,而proxy是用来创建动态代理类实例对象的,因为只有得到了这个对象我们才能调用哪些需要代理的方法。
动态代理的实现以诉讼代理为例。
(1)创建一个诉讼接口ILawSuit
public interface ILawSuit {
 void submit(String proof);//提起诉讼
 void defend();//法庭辩护
}
(2)新建代理类LitigationCategory
public class LitigationCategory implements ILawSuit{
	@Override
	public void submit(String proof) {
		System.out.println("提起诉讼!"+proof);
	}
	@Override
	public void defend() {
		System.out.println("辩护");
	}
}
(3)新建动态代理类DynProxyLawyer
public class DynProxyLawyer implements InvocationHandler{
	private Object target;
	public DynProxyLawyer(Object obj) {
       this.target=obj;
	}

	@Override
	public Object invoke(Object proxy, Method method, Object[] args) throws Throwable {
		System.out.println("案件进展"+method.getName());
		Object res=method.invoke(target, args);
		return res;
	}
}
(4)新建动态代理工厂类
public class ProxyFactory {
	public static Object getDynProxy(Object target){
		InvocationHandler handler=new DynProxyLawyer(target);
		return Proxy.newProxyInstance(target.getClass().getClassLoader(), target.getClass().getInterfaces(),handler);
	}
}
(5)新建测试类
public class DynTest {
public static void main(String[] args) {
	ILawSuit proxy=(ILawSuit) ProxyFactory.getDynProxy(new LitigationCategory());
	proxy.submit("动态代理");
	proxy.defend();
}
}
测试结果:
案件进展submit
提起诉讼!动态代理
案件进展defend
辩护
以上是jdk的动态代理,jdk提供的动态代理伊依赖接口,首先使用接口定义好操作规范。然后通过Proxy类产生的代理对象调用被代理对象的操作,而这个操作又被分发给InvocationHandler接口的invoke方法具体执行。
cglib的动态代理实现
由于jdk只能针对实现了接口的类做动态代理,而不能对没有实现接口的类做动态代理,所以就有了cglib。cglib是一个强大、高性能的code生成类库,它可以在程序运行期间动态扩展类和接口,他的底层实现是使用java字节码操作SAM。这里就不在展开举例了。
动态代理的实际运用:输出日志,账本溯源,性能监控等。
(6)模板模式
定义:完成一组算法,需要分多个步骤,每个步骤根据对象的不同,而实现细节不同,就可以在父类中定义一个完成该事情的总方法,按照完成事件需要的步骤去调用其每个步骤的实现。每个步骤的具体的实现,由子类完成。
类图:
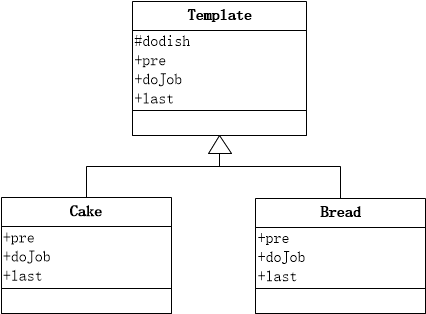
public abstract class Template {
	protected void dodish() {
		this.pre();
		this.dojob();
		this.last();
	}

	public abstract void pre();

	public abstract void dojob();

	public abstract void last();
}
(2)定义Cake类
public class Cake extends Template {

	@Override
	public void pre() {
		System.out.println("cake pre");
	}

	@Override
	public void dojob() {
		System.out.println("cake dojob");
	}

	@Override
	public void last() {
		System.out.println("cake alst");
	}

}
(3)定义Bread类
public class Bread extends Template {

	@Override
	public void pre() {
		System.out.println("Bread pre");
	}

	@Override
	public void dojob() {
		System.out.println("Bread dojob");
	}

	@Override
	public void last() {
		System.out.println("Bread last");
	}

}
(4)定义模板模式测试类
public class TemplateTest {
public static void main(String[] args) {
	Template template=new Cake();
	template.dodish();
    Template template2=new Bread();
    template2.dodish();
}
测试结果:
cake pre
cake dojob
cake alst
Bread pre
Bread dojob
Bread last
模板模式在实际项目运用中很容易和策略模式混淆,主要是看完成一个事情是不是分多个步骤,而且都需要延迟到子类中完成。如果只有一个步骤那么就可考虑采用策略模式。
(7)策略模式
定义:将一组算法封装到鞠具有共同接口的独立的类中。
类图:
(1)实现Strategy接口
public interface Strategy {
	void calc(int num1,int num2);
}
(2)实现AddStrategy
public class AddStrategy implements Strategy{
	@Override
	public void calc(int num1, int num2) {
		System.out.println("和: "+(num1+num2));
	}
}
(3)实现SubStrategy
public class SubStrategy implements Strategy {
	@Override
	public void calc(int num1, int num2) {
		System.out.println("减: "+(num1 - num2));
	}
}
(4)新建测试类
public class testStrategy {
	public static void main(String[] args) {
		Strategy strategy = new AddStrategy();
		strategy.calc(3, 2);
		Strategy strategy2 = new SubStrategy();
		strategy2.calc(3, 2);
	}
}
测试结果:
和: 5
减: 1
策略模式的应用
策略模式在系统中用的比较多,就个人目前的经验来看已经在2个大型系统的核心模块中使用了,一个是费用报销系统中生成凭证,这里不同的报账类型生成凭证的算法是不一样,但都可以抽象为生成凭证;另外一种是在一个考核系统中不同的考核指标计算考核分数是不一样的,但都可以抽象为绩效考核分数计算,在实际的运用中会比较复杂,就绩效考核项目中由于数据源不一致还采用了泛型。
(8)观察者模式
定义:观察者模式定义了一个一对多的依赖关系,让一个或多个观察者对象监听一个主题对象。这样一来,当被观察者状态发生改变时,需要通知相应的观察者,使这些观察者对象能够自动更新。
类图:
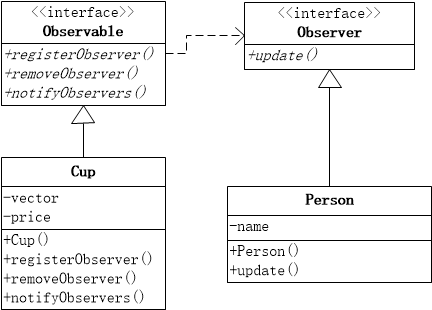
(1)新建一个Observer,Observer是观察者对象的接口
public interface Observer {
	void update(float price);
}
(2)新建一个Person,Person为观察者实际对象
public class Person implements Observer {
	private String name;

	public Person(String name) {
		this.name = name;
	}

	@Override
	public void update(float price) {
		System.out.println(name + "价格更新为:" + price);
	}
}
(3)新建一个被观察者对象接口Observable
public interface Observable {
	// 注册一个观察者
	public void registerObserver(Observer observer);

	// 取消观察者
	public void removeObserver(Observer observer);

	// 通知所有观察者
	public void notifyObservers();
}
(4)新建一个被观察者实际对象Cup
public class Cup implements Observable {
	// 被观察者对象
	private Vector<Observer> vector = new Vector<>();
	private float price;

	public Cup(float price) {
		this.price = price;
	}

	public float getPrice() {
		return price;
	}

	public void setPrice(float price) {
		this.price = price;
		notifyObservers();
	}

	// 注册观察者
	@Override
	public void registerObserver(Observer observer) {
		vector.add(observer);
	}

	// 删除观察者
	@Override
	public void removeObserver(Observer observer) {
		vector.remove(observer);
	}

	// 通知观察者
	@Override
	public void notifyObservers() {
		for (Observer observer : vector) {
			observer.update(price);
		}

	}

}
(5)新建一个观察者模式测试类ObserverTest
public class ObserverTest {
	public static void main(String[] args) {
		// 创建一个被观察者对象
		Cup cup = new Cup(30);
		// 创建2个观察者
		Person person1 = new Person("person1");
		Person person2 = new Person("person2");
		// 注册观察者
		cup.registerObserver(person1);
		cup.registerObserver(person2);
		// 价额变动通知观察者
		cup.setPrice(2);
	}
}
(9)委托模式
定义:有两个对象参与处理同一个请求,接受请求的对象将请求委托给另一个对象来处理。
简单委托模式实现:
(1)新建RealPrinter
public class RealPrinter {
	public void print() {
		System.out.println("RealPrinter is run");
	}
}
(2)新建Printer类
public class Printer {
	RealPrinter realPrinter = new RealPrinter();

	public void print() {
		realPrinter.print();
	}
}
(3)新建Test类
public class Test {
	public static void main(String[] args) {
		Printer printer = new Printer();
		printer.print();
	}
}
执行结果:
RealPrinter is run
以上只是简单介绍了常用的设计模式的类图,并根据类图给出了一定的实例和应用的场景,在实际的运用中情况可能会很复杂,比如多个设计模式联合使用,例如工厂模式+策略模式一起用来解决一组算法问题等等,所以我们需要对常用的设计模式比较了解,然后才能做到在项目中灵活运用,好的代码结构是需要不停雕琢的。本次设计模式的讲解就到此为止,不足之处还请大家批评指正。本文在写作过程中借鉴了其他博客的内容,没有一一列出,在此表示感谢。
未完待续,下一篇会重点介绍不同设计模式的比较。
版权声明:本文内容由互联网用户自发贡献,该文观点仅代表作者本人。本站仅提供信息存储空间服务,不拥有所有权,不承担相关法律责任。如发现本站有涉嫌侵权/违法违规的内容, 请发送邮件至 举报,一经查实,本站将立刻删除。
如需转载请保留出处:https://bianchenghao.cn/10845.html

