本文是Android视图层源码分析系列第二篇文章,通过上一篇文章深入剖析Window组成已经了解到WindowManager.addView(contentView)最终会交给WindowManagerService处理,WindowManagerService会创建这个contentView相关的UI载体Surface,本文的目的就是理清Surface的创建过程,以及它与SurfaceFlinger的关系。
文章比较长,但希望你可以坚持看完,相信会有一定收获的
本文是基于Google Android Repo中的较新的源码分析的。Android UI渲染这一块变化还是比较大的,逻辑可能和网上大部分文章有一些出入。
在本文正式开始之前,我们先来了解一下与SurfaceFlinger相关的基础知识:
- 与SurfaceFlinger相关的基础知识
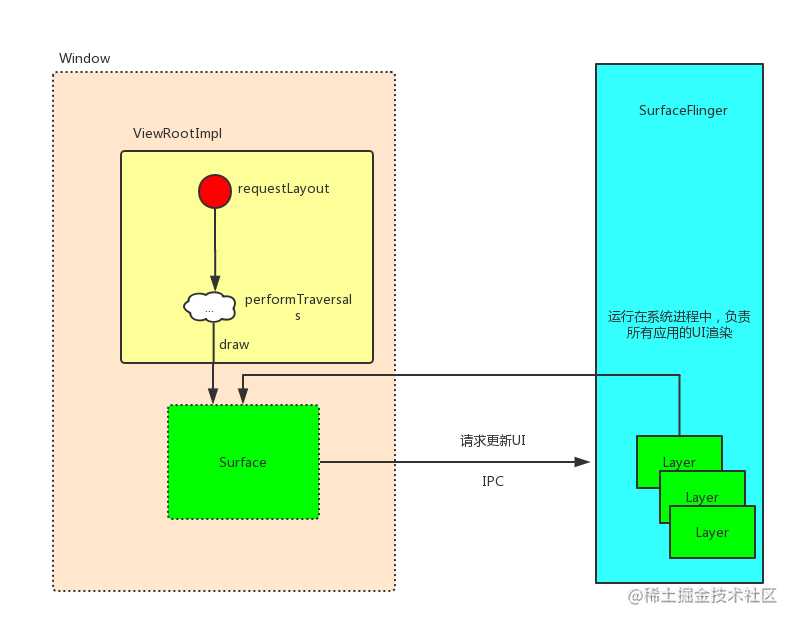
SurfaceFlinger可以说是Android UI渲染体系的核心,在Android系统启动时会启动SurfaceFlinger服务,它的主要作用就是被Android应用程序调用,把绘制(测量,布局,绘制)后的窗口(Surface)渲染到手机屏幕上。所以整个 UI刷新过程可能像下面这张图:

当然实际上的UI渲染原理可没有像上图那样这么简单。为了接下来在源码追踪的过程中不迷路,我们带着下面几个问题来开始分析:
- WindowManagerService是如何管理Window的?
- Surface是如何创建的?
- SurfaceFlinger是如何管理多个应用的UI渲染的?
- SurfaceFlinger中UI渲染的基本单元是什么?
ok,接下来就开始Android UI显示原理之Surface的创建的主要流程分析。由于整个体系的源码流程很复杂,因此在追踪源码时我只贴了一些整个流程分析中的主要节点,并且加了一些注释。
在上一篇文章中我们知道,ViewRootImpl管理着整个view tree。 对于ViewRootImpl.setView(),我们可以简单的把它当做一个UI渲染操作的入口,因此我们就从这个方法开始看:
WindowManagerService对于Window的管理
ViewRootImpl.java
public void setView(View view, WindowManager.LayoutParams attrs, View panelParentView) {
    ...
    //mWindowSession是一个aidl,ViewRootImpl利用它来和WindowManagerService交互
    //mWindow是一个aidl,WindowManagerService可以利用这个对象与服务端交互
    //mAttachInfo可以理解为是一个data bean,可以跨进程传递
    res = mWindowSession.addToDisplay(mWindow, mSeq, mWindowAttributes,
            getHostVisibility(), mDisplay.getDisplayId(), mWinFrame,
            mAttachInfo.mContentInsets, mAttachInfo.mStableInsets,
            mAttachInfo.mOutsets, mAttachInfo.mDisplayCutout, mInputChannel);
    ...
}
即ViewRootImpl.setView()方法会向WindowManagerService请求添加一个Window,mWindowSession.addToDisplay()跨进程最终调用到了WindowManagerService.addWindow():
WindowManagerService.java
public int addWindow(Session session, IWindow client...) {
    ...
    //WindowState用来描述一个Window
    final WindowState win = new WindowState(this, session, client, token, parentWindow,
                appOp[0], seq, attrs, viewVisibility, session.mUid,
                session.mCanAddInternalSystemWindow);
    ...
    win.attach();  //会创建一个SurfaceSession

    mWindowMap.put(client.asBinder(), win); //mWindowMap是WindowManagerService用来保存当前所有Window新的的集合
    ...
    win.mToken.addWindow(win); //一个token下会有多个win state。 其实token与PhoneWindow是一一对应的。
    ...
}
WindowState是WindowManagerService用来描述应用程序的一个Window的对象。上面注释我标注了win.attach(),这个方法可以说是Window与SurfaceFlinger链接的起点,它最终会调用到Session.windowAddedLocked():
Session.java
void windowAddedLocked(String packageName) {
    ...
    if (mSurfaceSession == null) {
        ...
        mSurfaceSession = new SurfaceSession();
        ...
    }
}

//SurfaceSession类的构造方法
public final class SurfaceSession {
    private long mNativeClient; // SurfaceComposerClient*

    public SurfaceSession() {
        mNativeClient = nativeCreate();
    }
这里调用了native方法nativeCreate(),这个方法其实是返回了一个SurfaceComposerClient指针。那这个对象是怎么创建的呢?
SurfaceComposerClient的创建
android_view_SurfaceSession.cpp
static jlong nativeCreate(JNIEnv* env, jclass clazz) {
    SurfaceComposerClient* client = new SurfaceComposerClient(); //构造函数其实并没有做什么
    client->incStrong((void*)nativeCreate);
    return reinterpret_cast<jlong>(client);
}
即构造了一个SurfaceComposerClient对象。并返回它的指针。这个对象一个应用程序就有一个,它是应用程序与SurfaceFlinger沟通的桥梁,为什么这么说呢?在SurfaceComposerClient指针第一次使用时会调用下面这个方法:
//这个方法在第一次使用SurfaceComposerClient的指针的时候会调用
void SurfaceComposerClient::onFirstRef() {
    ....
    sp<ISurfaceComposerClient> conn;
    //sf 就是SurfaceFlinger
    conn = (rootProducer != nullptr) ? sf->createScopedConnection(rootProducer) :
            sf->createConnection();
    ...
}
即通过SurfaceFlinger(它本身具有跨进程通信的能力)创建了一个ISurfaceComposerClient对象:
SurfaceFlinger.cpp
sp<ISurfaceComposerClient> SurfaceFlinger::createConnection() {
    return initClient(new Client(this)); //initClient这个方法其实并没有做什么,
}
即构造了一个Client对象,Client实现了ISurfaceComposerClient接口。是一个可以跨进程通信的aidl对象。即SurfaceComposerClient可以通过它来和SurfaceFlinger通信。除此之外它还可以创建Surface,并且维护一个应用程序的所有Layer(下文会分析到它是什么)。它是一个十分重要的对象,我们先来看一下它的组成,它所涉及的其他东西在下文分析中都会讲到:
Client.h
class Client : public BnSurfaceComposerClient
{
public:
    ...
    void attachLayer(const sp<IBinder>& handle, const sp<Layer>& layer);
    void detachLayer(const Layer* layer);
    ...
private:
    // ISurfaceComposerClient interface。 gbp很重要,它维护这一个应用程序的渲染 Buffer队列
    virtual status_t createSurface(...sp<IBinder>* handle, sp<IGraphicBufferProducer>* gbp);

    virtual status_t destroySurface(const sp<IBinder>& handle);

    //跨进程通信方法
    virtual status_t onTransact(uint32_t code, const Parcel& data, Parcel* reply, uint32_t flags);
    ...

    // constant
    sp<SurfaceFlinger> mFlinger;

    // protected by mLock
    DefaultKeyedVector< wp<IBinder>, wp<Layer> > mLayers; // 一个应用程序的所有Layer
    ...
};
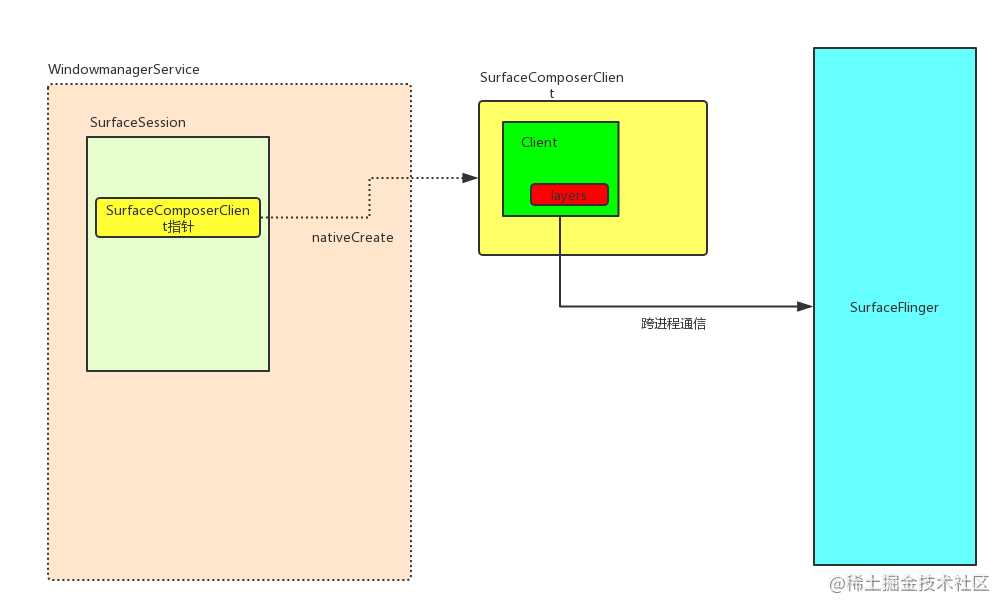
经过上面这一顿源码分析,我们大概知道了ViewRootImpl.setView()所引发的主要操作:
WindowManagerService创建了一个WindowState。用来表示客户端的一个WindowWindowManagerService创建了一个SurfaceSession,SurfaceSession会与SurfaceFlinger构建链接,创建了一个SurfaceComposerClient对象,一个应用程序只具有一个这个对象。SurfaceComposerClient创建了一个Client, 这个对象十分重要,它维护这应用程序的渲染核心数据,并负责与SurfaceFlinger通信。
如下图:

经过上面的步骤,应用程序的ViewRootImpl已经被WindowManagerService识别,并且应用程序已经与SurfaceFlinger建立连接。即创建了SurfaceComposerClient和Client对象
文章开始就已经说了Surface是Window(ViewRootImpl)的UI载体,那Surface是在哪里创建的呢?
Surface的创建
其实一个ViewRootImpl就对应一个Surface。这点可以通过ViewRootImpl的源码看出:
ViewRootImpl.java
public final Surface mSurface = new Surface();
即ViewRootImpl在构造的时候就new 了一个 Surface。但其实这个新new的Surface并没有什么逻辑,它的构造函数是空的。那么Surface到底是在哪里创建的呢?
触发Surface的创建操作
我们还是回到ViewRootImpl.setView()来看一下:
public void setView(View view, WindowManager.LayoutParams attrs, View panelParentView) {
    ...
    requestLayout(); //susion 请求layout。先添加到待渲染队列中
    ...
    res = mWindowSession.addToDisplay(mWindow, ...); //WindowManagerService会创建mWindow对应的WindowState
    ...
}
即在向WindowManagerService请求创建WindowState之前,调用了requestLayout(),这个方法会引起ViewRootImpl所管理的整个view tree的重新渲染。它最终会调用到scheduleTraversals():
void scheduleTraversals() {
    ...
    mChoreographer.postCallback(Choreographer.CALLBACK_TRAVERSAL, mTraversalRunnable, null);
    ...
}
对于Choreographer本文不做详细的分析,可以去参考 Android Choreographer 源码分析的分析来了解这个类。
scheduleTraversals()会通过Choreographer来post一个mTraversalRunnable,Choreographer接收显示系统的时间脉冲(垂直同步信号-VSync信号,16ms发出一次),在下一个frame渲染时控制执行这个mTraversalRunnable。
但是mTraversalRunnable的执行至少要在应用程序与SurfaceFlinger建立连接之后。这是因为渲染操作是由SurfaceFlinger负责调度了,如果应用程序还没有与SurfaceFlinger创建连接,那SurfaceFlinger当然不会渲染这个应用程序。所以在执行完mWindowSession.addToDisplay(mWindow, ...)之后,才会执行mTraversalRunnable:
ViewRootImpl.java
final class TraversalRunnable implements Runnable {
    @Override
    public void run() {
        doTraversal();
    }
}
doTraversal()会调用到ViewRootImpl.performTraversals(),大部分同学可能知道这个方法是一个view tree的measure/layout/draw的控制方法:
private void performTraversals() {
    finalView host = mView; //mView是一个Window的根View,对于Activity来说就是DecorView
    ...
    relayoutWindow(params, viewVisibility, insetsPending);
    ...
    performMeasure(childWidthMeasureSpec, childHeightMeasureSpec);
    ...
    performLayout(lp, mWidth, mHeight);
    ...
    performDraw();
    ...
}
Surface的具体创建就由relayoutWindow(params, viewVisibility, insetsPending)这个方法来完成的。这个方法会通过IPC调用到WindowManagerService.relayoutWindow():
ViewRootImpl.java
private int relayoutWindow(WindowManager.LayoutParams params, ...) throws RemoteException {
    ...
    int relayoutResult = mWindowSession.relayout(mWindow,..., mSurface);
    ...
}
上面我省略了mWindowSession.relayout()方法的很多参数,不过有一个十分重要的参数我没有省略,就是mSurface。前面已经分析了它就是一个空的Surface对象。其实:
真正的Surface创建是由SurfaceControl完成的,应用程序ViewRootImpl的Surface只是一个指针,指向这个Surface
下面就来看一下SurfaceControl是如何创建Surface的:
mWindowSession.relayout()会调用到WindowManagerService.relayoutWindow():
WindowManagerService.java
 //这里的outSurface其实就是ViewRootImpl中的那个Surface
public int relayoutWindow(Session session, IWindow client....Surface outSurface){
    ...
    result = createSurfaceControl(outSurface, result, win, winAnimator);
    ...
}

private int createSurfaceControl(Surface outSurface, int result, WindowState win,WindowStateAnimator winAnimator) {
    ...
    surfaceController = winAnimator.createSurfaceLocked(win.mAttrs.type, win.mOwnerUid);
    ...
    surfaceController.getSurface(outSurface);
}
winAnimator.createSurfaceLocked实际上是创建了一个SurfaceControl。即上面是先构造SurfaceControl,然后在构造Surface。
SurfaceControl的创建
winAnimator.createSurfaceLocked其实是通过SurfaceControl的构造函数创建了一个SurfaceControl对象,这个对象的作用其实就是负责维护Surface,Surface其实也是由这个对象负责创建的,我们看一下这个对象的构造方法:
SurfaceControl.java
long mNativeObject; //成员指针变量,指向native创建的SurfaceControl

private SurfaceControl(SurfaceSession session, String name, int w, int h, int format, int flags, SurfaceControl parent, int windowType, int ownerUid){
    ...
    mNativeObject = nativeCreate(session, name, w, h, format, flags,
        parent != null ? parent.mNativeObject : 0, windowType, ownerUid);
    ...
}
即调用了nativeCreate()并返回一个SurfaceControl指针:
android_view_SurfaceControl.cpp
static jlong nativeCreate(JNIEnv* env, ...) {
    //这个client其实就是前面创建的SurfaceComposerClinent
    sp<SurfaceComposerClient> client(android_view_SurfaceSession_getClient(env, sessionObj));
    sp<SurfaceControl> surface; //创建成功之后,这个指针会指向新创建的SurfaceControl
    status_t err = client->createSurfaceChecked(String8(name.c_str()), w, h, format, &surface, flags, parent, windowType, ownerUid);
    ...
    return reinterpret_cast<jlong>(surface.get()); //返回这个SurfaceControl的地址
}
即调用到SurfaceComposerClient.createSurfaceChecked():
SurfaceComposerClient.cpp
//outSurface会指向新创建的SurfaceControl
status_t SurfaceComposerClient::createSurfaceChecked(...sp<SurfaceControl>* outSurface..)
{
    sp<IGraphicBufferProducer> gbp; //这个对象很重要
    ...
    err = mClient->createSurface(name, w, h, format, flags, parentHandle, windowType, ownerUid, &handle, &gbp);
    if (err == NO_ERROR) {
        //SurfaceControl创建成功, 指针赋值
        *outSurface = new SurfaceControl(this, handle, gbp, true);
    }
    return err;
}
上面这个方法实际上是调用Client.createSurface()来创建一个Surface。在创建时有一个很重要的参数sp<IGraphicBufferProducer> gbp,在下面源码分析中我们也要重点注意它。这是因为应用所渲染的每一帧,实际上都会添加到IGraphicBufferProducer中,来等待SurfaceFlinger的渲染。这个过程我们在下一篇文章中会分析,我们先继续来看一下Surface是如何被Client创建的:
Client.cpp
status_t Client::createSurface(...) {
    ...
    //gbp 直接透传到了SurfaceFlinger
    return mFlinger->createLayer(name, this, w, h, format, flags, windowType, ownerUid, handle, gbp, &parent);
}
??? 不是说好的要创建Surface呢?怎么变成mFlinger->createLayer()? 额,我也不明白这个突然转变,不过我们只要知道:
Surface在SurfaceFlinger中对应的实体其实是Layer
我们继续看一下mFlinger->createLayer()
SurfaceFlinger.cpp
status_t SurfaceFlinger::createLayer(const String8& name,const sp<Client>& client...) {
    status_t result = NO_ERROR;
    sp<Layer> layer; //将要创建的layer
    switch (flags & ISurfaceComposerClient::eFXSurfaceMask) {
        case ISurfaceComposerClient::eFXSurfaceNormal:
            result = createBufferLayer(client,
                    uniqueName, w, h, flags, format,
                    handle, gbp, &layer); // 注意gbp,这时候还没有构造呢!
            break;
            ... //Layer 分为好几种,这里不全部列出
    }
    ...
    result = addClientLayer(client, *handle, *gbp, layer, *parent);  //这个layer和client相关联, 添加到Client的mLayers集合中。
    ...
    return result;
}
从SurfaceFlinger.createLayer()方法可以看出Layer分为好几种。我们这里只对普通的BufferLayer的创建做一下分析,看createBufferLayer():
status_t SurfaceFlinger::createBufferLayer(const sp<Client>& client... sp<Layer>* outLayer)
{
    ...
    sp<BufferLayer> layer = new BufferLayer(this, client, name, w, h, flags);
    status_t err = layer->setBuffers(w, h, format, flags); //设置layer的宽高
    if (err == NO_ERROR) {
        *handle = layer->getHandle(); //创建handle
        *gbp = layer->getProducer(); //创建 gbp IGraphicBufferProducer
        *outLayer = layer; //把新建的layer的指针拷贝给outLayer,这样outLayer就指向了新建的BufferLayer
    }
    return err;
}
前面我说过IGraphicBufferProducer(gbp)是一个很重要的对象,它涉及到SurfaceFlinger的渲染逻辑,下面我们就看一下这个对象的创建逻辑:
IGraphicBufferProducer(gbp)的创建
BufferLayer.cpp
sp<IGraphicBufferProducer> BufferLayer::getProducer() const {
    return mProducer;
}
即mProducer其实是Layer的成员变量,它的创建时机是Layer第一次被使用时:
void BufferLayer::onFirstRef() {
    ...
    BufferQueue::createBufferQueue(&producer, &consumer, true);
    mProducer = new MonitoredProducer(producer, mFlinger, this);
    ...
}
所以mProducer的实例是MonitoredProducer,但其实它只是一个装饰类,它实际功能都委托给构造它的参数producer:
BufferQueue.cpp
void BufferQueue::createBufferQueue(sp<IGraphicBufferProducer>* outProducer,
    ...
    sp<IGraphicBufferProducer> producer(new BufferQueueProducer(core, consumerIsSurfaceFlinger));
    sp<IGraphicBufferConsumer> consumer(new BufferQueueConsumer(core)); //注意这个consumer
    ...
    *outProducer = producer;
    *outConsumer = consumer;
}
所以实际实现mProducer的工作的queueProducer是BufferQueueProducer。
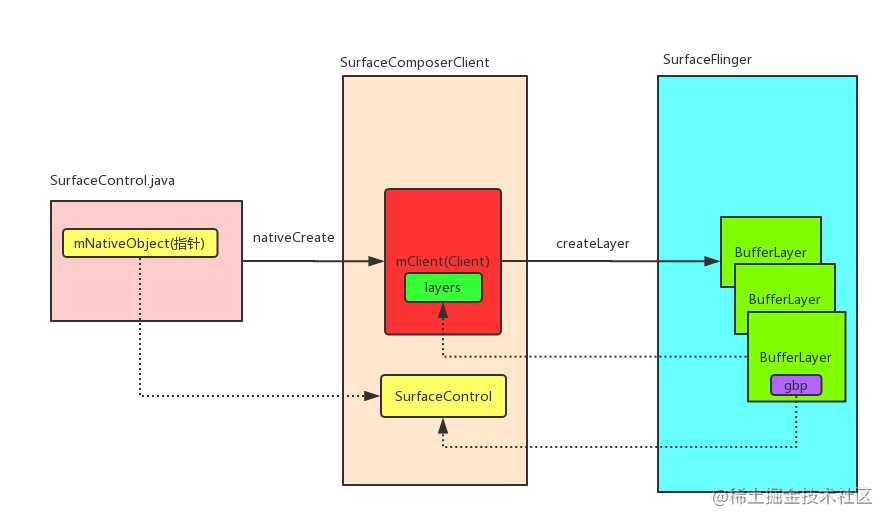
所以构造一个SurfaceControl所做的工作就是创建了一个SurfaceControl,并让SurfaceFlinger创建了一个对应的Layer,Layer中有一个IGraphicBufferProducer,它的实例是BufferQueueProducer。
可以用下面这个图来描述SurfaceControl的创建过程:

从SurfaceControl中获取Surface
我们回看WindowManagerService.createSurfaceControl(), 来看一下java层的Surface对象到底是个什么:
WindowManagerService.java
private int createSurfaceControl(Surface outSurface, int result, WindowState win,WindowStateAnimator winAnimator) {
    ...
    surfaceController = winAnimator.createSurfaceLocked(win.mAttrs.type, win.mOwnerUid);
    ...
    surfaceController.getSurface(outSurface);
}
上面我们已经了解了winAnimator.createSurfaceLocked的整个过程,我们看一下surfaceController.getSurface(outSurface), surfaceController是WindowSurfaceController的实例:
//WindowSurfaceController.java
void getSurface(Surface outSurface) {
    outSurface.copyFrom(mSurfaceControl);
}

//Surface.java
public void copyFrom(SurfaceControl other) {
    ...
    long surfaceControlPtr = other.mNativeObject;
    ...
    long newNativeObject = nativeGetFromSurfaceControl(surfaceControlPtr);
    ...
    mNativeObject = ptr; // mNativeObject指向native创建的Surface
}
即Surface.copyFrom()方法调用nativeGetFromSurfaceControl()来获取一个指针,这个指针是根据前面创建的SurfaceControl的指针来寻找的,即传入的参数surfaceControlPtr:
android_view_Surface.cpp
static jlong nativeGetFromSurfaceControl(JNIEnv* env, jclass clazz, jlong surfaceControlNativeObj) {
    sp<SurfaceControl> ctrl(reinterpret_cast<SurfaceControl *>(surfaceControlNativeObj)); //把java指针转化内native指针
    sp<Surface> surface(ctrl->getSurface()); //直接构造一个Surface,指向 ctrl->getSurface()
    if (surface != NULL) {
        surface->incStrong(&sRefBaseOwner); //强引用
    }
    return reinterpret_cast<jlong>(surface.get());
}
这里的ctrl指向前面创建的SurfaceControl,继续追溯ctrl->getSurface():
SurfaceControl.cpp
sp<Surface> SurfaceControl::getSurface() const {
    Mutex::Autolock _l(mLock);
    if (mSurfaceData == 0) {
        return generateSurfaceLocked();
    }
    return mSurfaceData;
}

sp<Surface> SurfaceControl::generateSurfaceLocked() const {
    //这个mGraphicBufferProducer其实就是上面分析的BufferQueueProducer
    mSurfaceData = new Surface(mGraphicBufferProducer, false);
    return mSurfaceData;
}
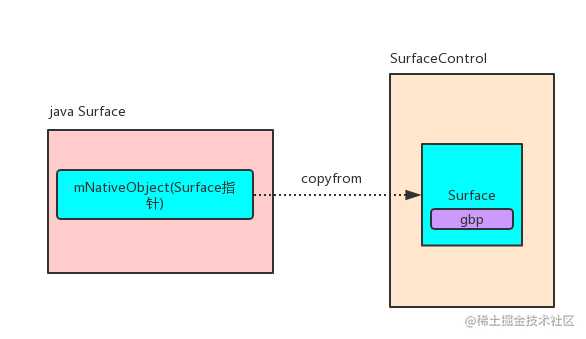
即直接new了一个nativie的Surface返回给java层,java层的Surface指向的就是native层的Surface。
所以Surface的实际创建可以用下图表示:

经过上面这个图,也可以理解SurfaceControl为什么叫SurfaceControl了。
本文到这里已经很长了,对于UI的渲染过程:即ViewRootImpl是如何渲染到Surface到下一篇文章再分析。
欢迎关注我的Android进阶计划看更多干货
欢迎关注我的微信公众号:susion随心

参考文章:
版权声明:本文内容由互联网用户自发贡献,该文观点仅代表作者本人。本站仅提供信息存储空间服务,不拥有所有权,不承担相关法律责任。如发现本站有涉嫌侵权/违法违规的内容, 请发送邮件至 举报,一经查实,本站将立刻删除。
如需转载请保留出处:https://bianchenghao.cn/16098.html
