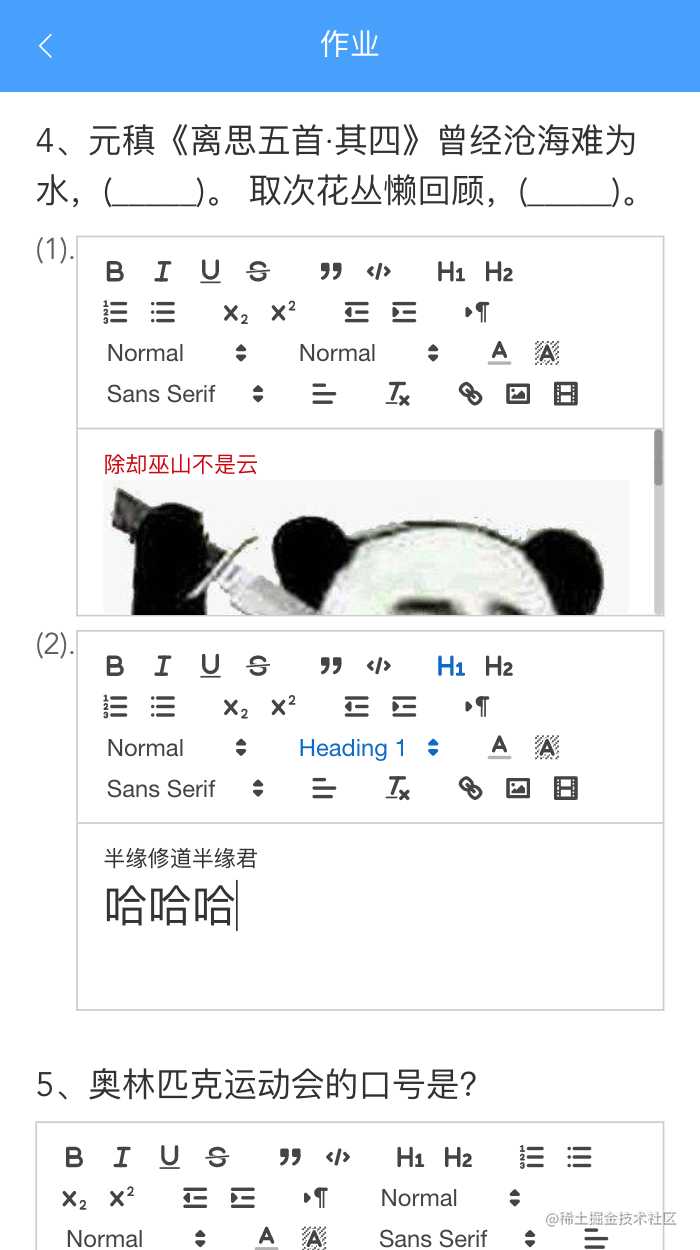
优秀的富文本编辑器有很多,比如:UEditor,wangEditor 等,但并不是每个都能在移动端有很好的表现。
我们暂且不讨论移动端是否真的需要富文本,既然有这需求,就把它实现出来。
失败的尝试
正确的选择是成功的开始,开发之前肯定要做一些调研。
通过各种资料搜集,确定了几个备选的:UEditor,vue-quill-editor,wangEditor,vue-html5-editor ,tinymce。
UEditor 是百度的老牌富文本编辑器,但界面有一股上世纪的感觉,官网最新的一条动态停留在 2016-05-18。官方已经多年不维护了,但民间教程资料很多,所以最后一个尝试吧,其他的搞不定再用 UEditor 。
wangEditor 的确让人眼前一亮,用官方的话来说就是轻量、简洁、易用、开源免费。觉得这个不错,首先在项目中尝试它。遗憾的发现 wangEditor 在移动端的表现有些让人失望,比如我要设置一个 H1 标题,时灵时不灵的,有时能设置成功,有时不能,大多数时候都不成功,不知道是不是我操作的问题。
接下来尝试 vue-html5-editor ,看介绍还挺好的。按照教程一顿操作后,编辑器并没有在页面上如期而至… 排查了好多次都没有找到问题在哪里,算了吧… 还好还有其他选择。
终于找到你
然后尝试用vue-quill-editor,之所以一开始不用,是因为文档都是英文的… 英文文档毕竟没有中文看着舒服,所以先尝试有中文文档的框架。谁曾想其他几个太不争气了,只好用这个。在移动端的效果出人意料的好,看一下真实效果:

完美支持各种文字效果,还能插入图片,编辑器的外观也挺好看,就它了!
在项目中使用
在项目中快速集成,需要两个文档:vue-quill-editor 的 github 主页 和 Quill 官网。
基础的使用方式在 vue-quill-editor 都有介绍,如果想做一些个性化配置,就需要看 Quill 官网 关于各种属性的文档了。
下面说一下我集成的步骤:
1. 安装 vue-quill-editor
npm install vue-quill-editor —save
2. 全局引入
在 main.js 中将 vue-quill-editor 引入项目
import Vue from 'vue'
import VueQuillEditor from 'vue-quill-editor'

// require styles
import 'quill/dist/quill.core.css'
import 'quill/dist/quill.snow.css'
import 'quill/dist/quill.bubble.css'

Vue.use(VueQuillEditor, /* { default global options } */)
其中 Vue.use(VueQuillEditor, /* { default global options } */) 第二个参数是 Quill 的配置。在这里我只改了默认的 placeholder 提示语,所以最后一行应该是:
Vue.use(VueQuillEditor, {
  placeholder: '请输入内容',
});
详细的配置请参考 Quill 官网
3. 代码中使用
直接使用 <quill-editor> 标签即可
<template>
  <!-- bidirectional data binding(双向数据绑定) -->
  <quill-editor v-model="content" ref="myQuillEditor" :options="editorOption" @blur="onEditorBlur($event)" @focus="onEditorFocus($event)" @ready="onEditorReady($event)">
  </quill-editor>
 </template>
完整代码
上图效果的代码如下:
<template>
  <div class="wrapper">
    <div class="title" v-html="title"></div>
    <div class="input-wrapper" v-for="(option,index) in options">
      <div class="sub-title">{{'(' + option.item + ').'}}</div>
      <quill-editor class="editor" v-model="messages[index]" ref="myQuillEditor" @blur="onEditorBlur" @focus="onEditorFocus" @ready="onEditorReady">
      </quill-editor>
    </div>
  </div>
</template>

<script> export default { components: { }, props: { item: { type: Object, required: true }, index: { type: Number, required: true }, }, data() { return { messages: [], } }, methods: { onEditorBlur() { console.log('blur',this.messages) }, onEditorFocus(){ console.log('focus',this.messages) }, onEditorReady(){ console.log('ready',this.messages) } } </script>

<style lang="scss"> .wrapper { width: 100%; display: flex; flex-direction: column; box-sizing: border-box; .title { font-size: $font-size-large; color: $text-main; padding-bottom: px2rem(6); line-height: 150%; } .input-wrapper { display: flex; flex-direction: row; width: 100%; margin: px2rem(5) 0; box-sizing: border-box; .editor{ width: 100%; height: px2rem(200); } .sub-title { font-size: $font-size-normal; color: $text-normal; } .field { flex: 1; border: 1px solid $border-third; } } } div.ql-container.ql-snow{ height: px2rem(100); } div.ql-editor.ql-blank{ height: px2rem(50); } </style>
与公司业务强相关的部分数据和接口做了删减。
有两个点需要注意:
-
编辑器默认的输入框高度很高,导致输入框与其他内容重叠,可通过最后两段样式来更改输入框的高度。
-
可以在一个页面上显示多个富文本输入框,本例中就将输入框放在了
v-for循环里。如何区分每个输入框的值呢?只需在绑定时v-model="messages[index]"利用index绑定对应的数组位置即可。
以上就是 vue-quill-editor 在实际项目中的使用。
今天的文章基于 Vue 的移动端富文本编辑器 vue-quill-editor 实战分享到此就结束了,感谢您的阅读。
版权声明:本文内容由互联网用户自发贡献,该文观点仅代表作者本人。本站仅提供信息存储空间服务,不拥有所有权,不承担相关法律责任。如发现本站有涉嫌侵权/违法违规的内容, 请发送邮件至 举报,一经查实,本站将立刻删除。
如需转载请保留出处:https://bianchenghao.cn/22132.html
