源代码:
http://download.csdn.net/detail/zhuimengandyue/5914779
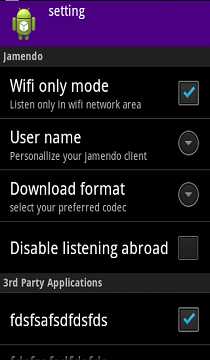
如上图所示效果,实现起来很简单。只需要借助PreferenceScreen类即可。在项目资源文件中新建xml文件夹,在里面新建preferences.xml文件.
根元素为PreferenceScreen 代表显示一整个屏幕,内部嵌套PreferenceCategory标签,表示偏好类别,在PreferenceCategory标签内部可以随便存放复 选框,输入框,列表等显示控件.可包含的控件内容在android.preference包下可查阅.xml文件编写好后,需要加载到activity 中,对于偏好显示的xml加载,可以使用PreferenceActivity中的addPreferencesFromResource(),所以 Activity需要继承PreferenceActivity.
复写activity中的onPreferenceTreeClick 方法,在对屏幕显示的内容进行操作时,会触发此方法,在方法内部通过调用。
preference.xml如下:
<?xml version=”1.0″ encoding=”utf-8″?>
<PreferenceScreen xmlns:android=”http://schemas.android.com/apk/res/android“
>
<PreferenceCategory android:title=”Jamendo” >
<CheckBoxPreference
android:key=”checkbox”
android:summary=”Listen only in wifi network area”
android:title=”Wifi only mode” />
<EditTextPreference
android:dependency=”checkbox”
android:key=”edittextpreffer”
android:summary=”Personallize your jamendo client”
android:title=”User name” />
<ListPreference
android:dependency=”checkbox3″
android:entries=”@array/stream_codecs”
android:entryValues=”@array/stream_codecs_values”
android:key=”listpreffer”
android:summary=”select your preferred codec”
android:title=”Download format” />
<CheckBoxPreference
android:disableDependentsState=”true”
android:key=”checkbox3″
android:summaryOn=”Disable listening abroad”
android:title=”Disable listening abroad” />
</PreferenceCategory>
<PreferenceCategory
android:summary=”lalalalalalalla”
android:title=”3rd Party Applications” >
<CheckBoxPreference
android:key=”checkbox2″
android:summaryOff=”fdsfsddddddddddddddddddddddddddddddd”
android:title=”fdsfsafsdfdsfds” />
<CheckBoxPreference
android:key=”checkbo”
android:summaryOff=”fdsfsddddddddddddddddddddddddddddddd”
android:title=”fdsfsafsdfdsfds” />
<RingtonePreference
android:key=”rengtone”
android:summary=”select rengtone”
android:title=”rengtones” />
<Preference
android:title=”tiantianxiangshang”/>
</PreferenceCategory>
</PreferenceScreen>
setting.xml如下:
<?xml version=”1.0″ encoding=”utf-8″?>
<LinearLayout xmlns:android=”http://schemas.android.com/apk/res/android“
android:layout_width=”fill_parent”
android:layout_height=”fill_parent”
android:orientation=”vertical” >
<LinearLayout
android:layout_width=”fill_parent”
android:layout_height=”wrap_content”
android:gravity=”center”
android:minHeight=”50dip”
android:orientation=”horizontal” >
<LinearLayout
android:layout_width=”fill_parent”
android:layout_height=”wrap_content”
android:gravity=”center_vertical”
android:minHeight=”50dip”
android:orientation=”horizontal”
android:paddingLeft=”13dip”
android:background=”#4b0082″
android:paddingRight=”13dip” >
<ImageView
android:layout_width=”48dip”
android:layout_height=”48dip”
android:src=”@drawable/ic_launcher” >
</ImageView>
<LinearLayout
android:layout_width=”fill_parent”
android:layout_height=”wrap_content”
android:orientation=”vertical”
android:paddingLeft=”13dip” >
<TextView
android:layout_width=”wrap_content”
android:layout_height=”wrap_content”
android:singleLine=”true”
android:text=”setting”
android:textColor=”#ffffff”
android:textSize=”18dip” >
</TextView>
<TextView
android:layout_width=”wrap_content”
android:layout_height=”wrap_content”
android:textColor=”#ffffff”
android:textSize=”12dip” >
</TextView>
<TextView
android:id=”@+id/ItemsCountTextView”
android:layout_width=”wrap_content”
android:layout_height=”wrap_content”
android:layout_gravity=”right”
android:textColor=”#ffffff”
android:textSize=”12dip” >
</TextView>
</LinearLayout>
</LinearLayout>
</LinearLayout>
<ListView
android:id=”@android:id/list”
android:layout_width=”fill_parent”
android:layout_height=”fill_parent”
android:layout_weight=”1″
android:scrollingCache=”false”>
</ListView>
</LinearLayout>
java代码:
package com.example.test;
import android.os.Bundle;
import android.preference.Preference;
import android.preference.PreferenceActivity;
import android.preference.PreferenceScreen;
import android.view.Window;
public class SettingActivity extends PreferenceActivity{
@Override
protected void onCreate(Bundle savedInstanceState) {
// TODO Auto-generated method stub
requestWindowFeature(Window.FEATURE_NO_TITLE);
super.onCreate(savedInstanceState);
addPreferencesFromResource(R.xml.preference);
setContentView(R.layout.setting);
}
@Override
public boolean onPreferenceTreeClick(PreferenceScreen preferenceScreen,
Preference preference) {
// TODO Auto-generated method stub
return super.onPreferenceTreeClick(preferenceScreen, preference);
}
}
重要的几个属性:1、android:dependency=”config_anonymous”这个属性指定该设置项依赖于前面key=”config_anonymous” 的CheckBoxPreference的值,
如果config_anonymous的值为真(即选中状态),则下面的设置项可用,即enabled的,否则为disabled。
但是,如果逻辑刚好相反,即config_anonymous的值为真的时候,需要禁用下面的设置项。要实现这个就需要在CheckBoxPreference上设置了,
即添加android:disableDependentsState=”true”这个属性,这个属性的意思是,当CheckBoxPreference的值为真的时候
2、使用PreferenceActivity时,碰到配置文件的ListPreference有两个属性android:entries,android:entryValues。这两个属性其实就和html的option的显示内容和真实值一样。
android:entries设置的内容是我们在设置时看到的内容,而android:entryValues就是保存在preferences.xml中的值。
今天的文章Android PreferenceScreen介绍分享到此就结束了,感谢您的阅读,如果确实帮到您,您可以动动手指转发给其他人。
版权声明:本文内容由互联网用户自发贡献,该文观点仅代表作者本人。本站仅提供信息存储空间服务,不拥有所有权,不承担相关法律责任。如发现本站有涉嫌侵权/违法违规的内容, 请发送邮件至 举报,一经查实,本站将立刻删除。
如需转载请保留出处:https://bianchenghao.cn/25622.html

