目录
📕 介绍
注:可以直接看整合java
t-io是基于java开发的一个开源的网络编程架构,大家都知道现在手机上或者电脑上都装了很多APP,这些APP都不是一个个在手机上或电脑上孤立的使用,而是能访问其他的地方数据或者与其他节点进行实时聊天,故每个APP中都要有一个对外进行通信的模块,这块内容从编程的角度来看就能通过网络编程框架来实现,t-io就是完成这块的内容的最好的编程软件。
t-io经过创始人谭先生的精心打磨,性能超强,已经达到运营的的级别,用t-io写的程序每秒能处理1000+万条消息,1.9G内存能够支撑30万TCP长连接。
基于tio开发的即时通讯软件谭聊,目前是业界性能最强的全开源销售即时通讯软件。
👍 特点
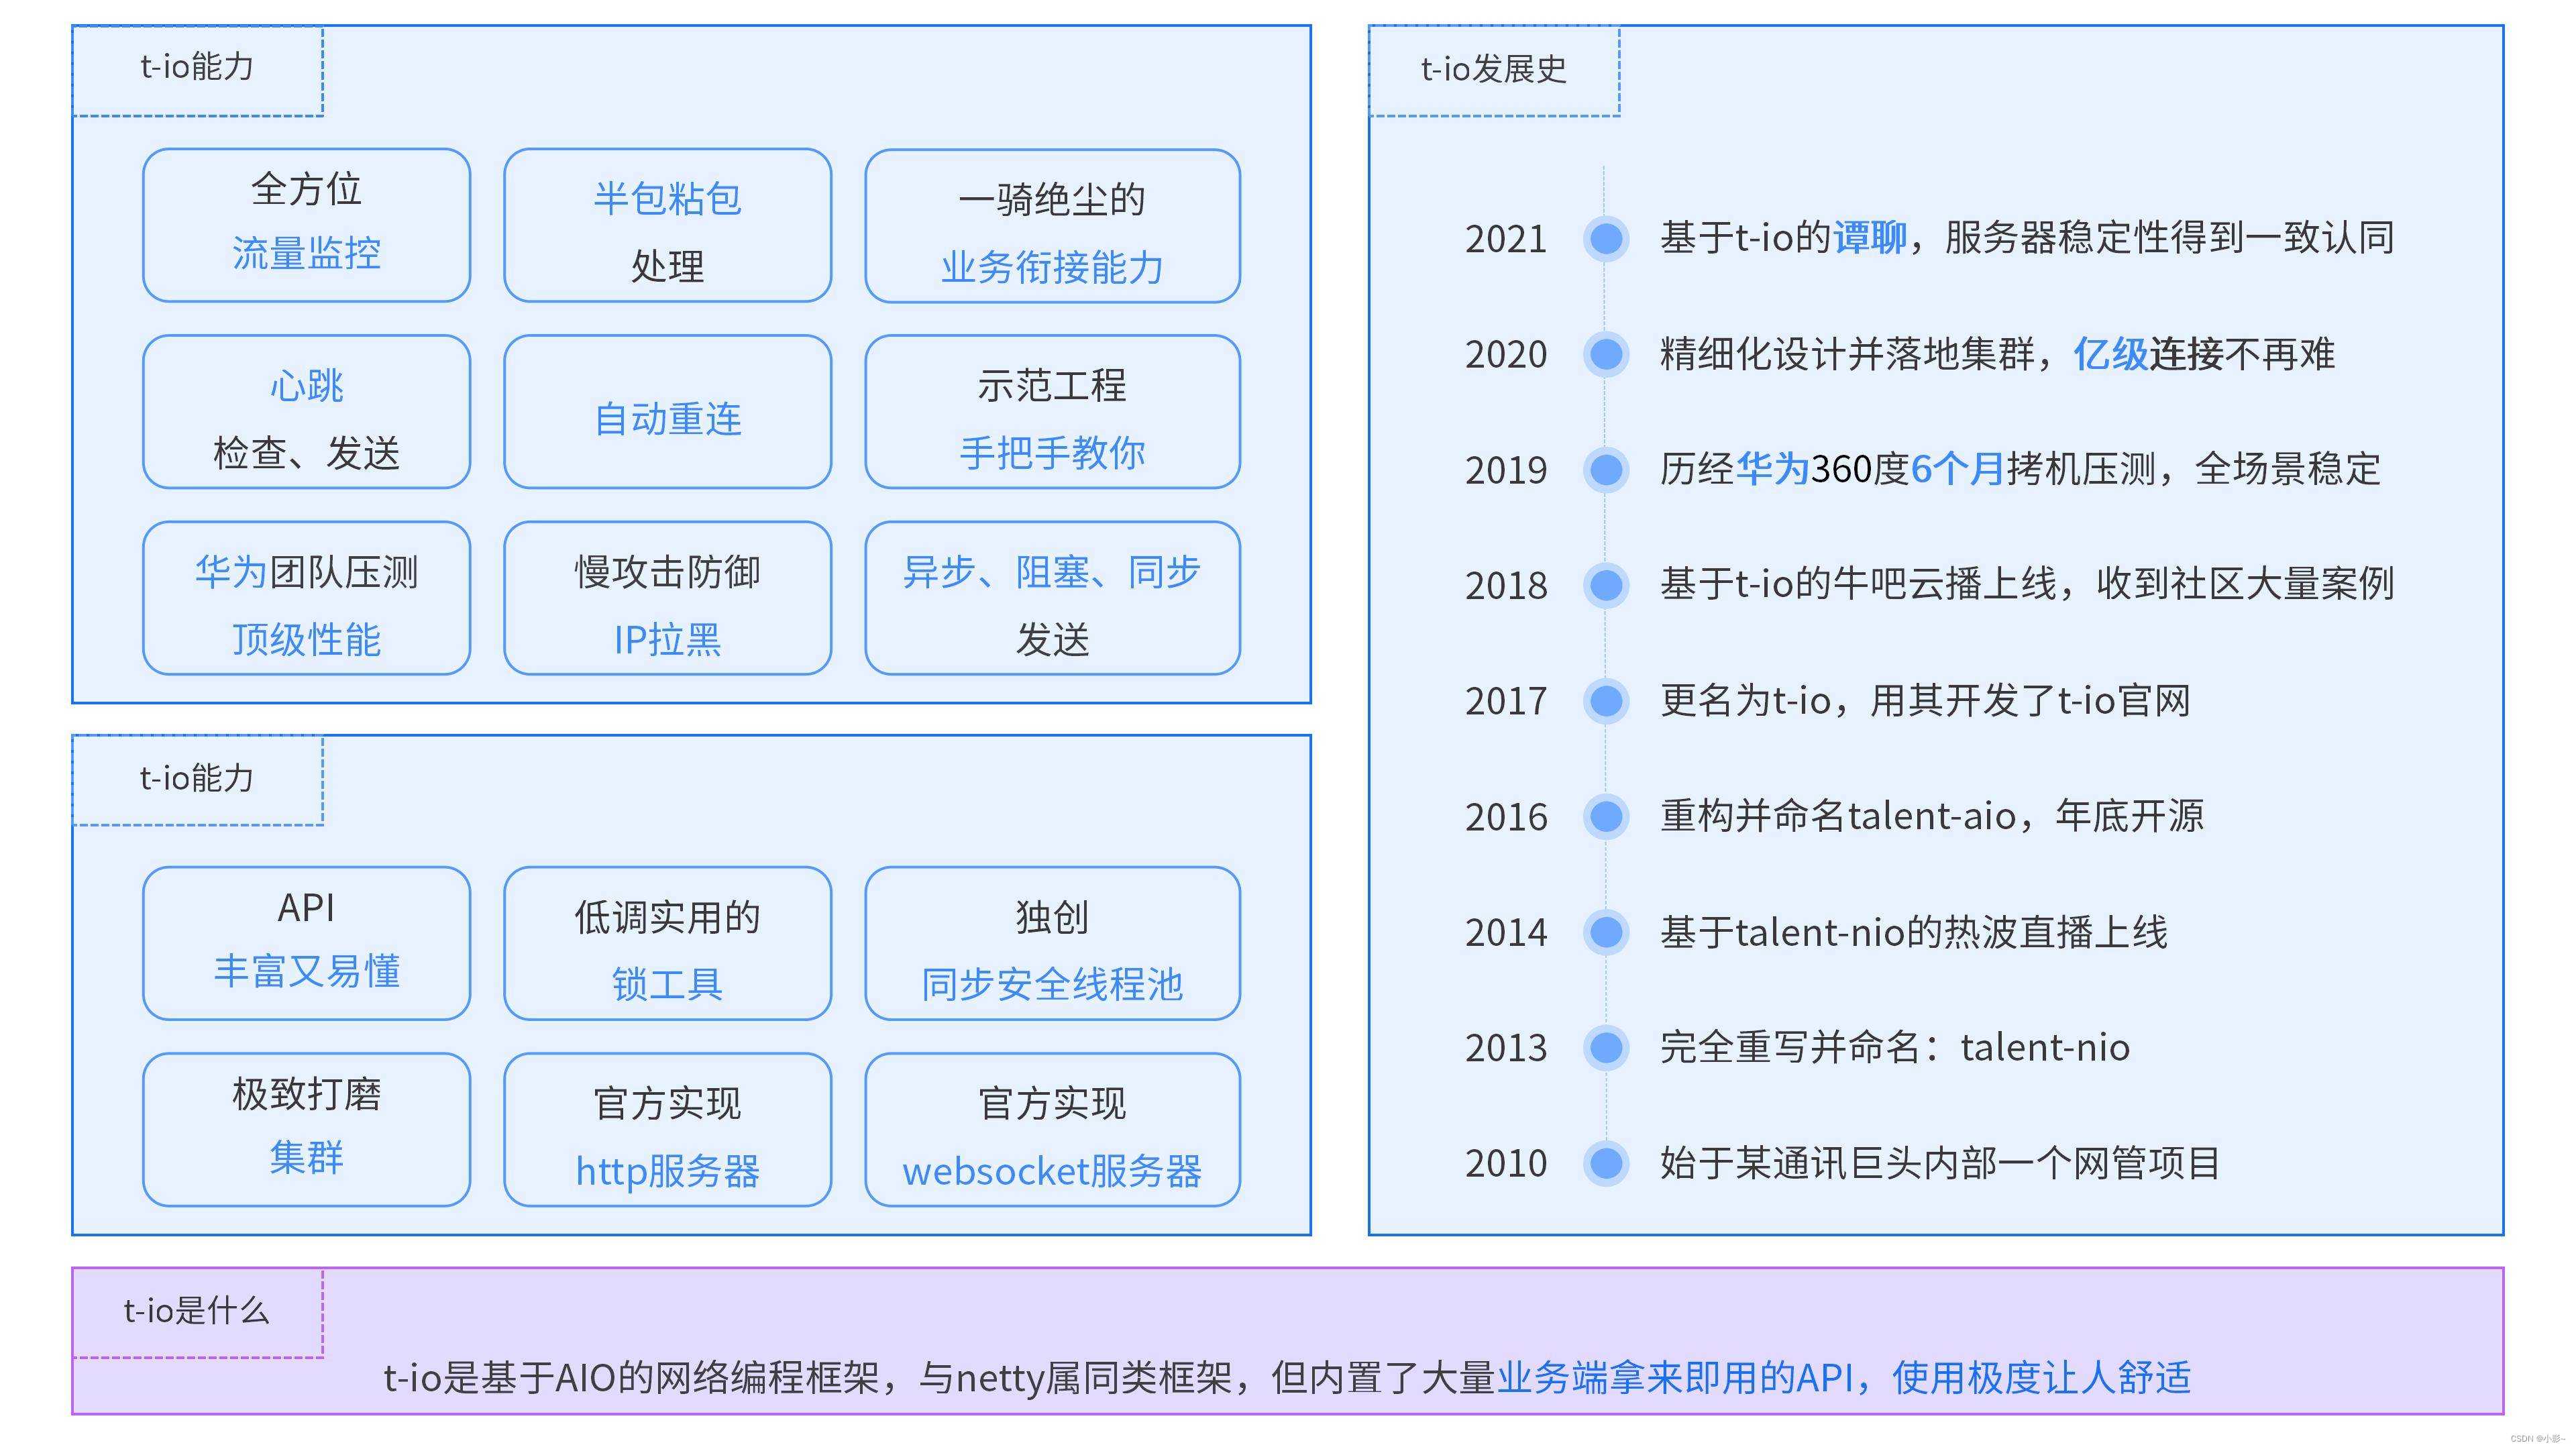
t-io是基于JVM的网络编程框架,和netty属同类,所以netty能做的t-io都能做,考虑到t-io是从项目抽象出来的框架,所以t-io提供了更多的和业务相关的API,大体上t-io具有如下特点和能力
- 内置完备的监控和流控能力
- 内置半包粘包处理
- 一骑绝尘的资源管理能力
- 内置心跳检查和心跳发送能力
- 内置IP拉黑
- 一流性能和稳定性(第三方权威平台TFB提供性能测试和稳定性服务)
- 极其稳定的表现(很多用户还是停在t-io 1.x版本,就是因为太过稳定,不想变动)
- 内置慢攻击防御
- 唯一一个内置异步发送、阻塞发送、同步发送的网络框架
- 唯一内置集群分发消息的能力
- 独创的多端口资源共享能力(譬如一个端口是websocket协议,一个端口是私有的im协议,这两个端口的资源可以共享,这对协议适配极其有用)
- 独创协议适配转换能力(让基于websocket和基于socket的应用看起来像是同一个协议)
- 独一档的资源和业务绑定能力:绑定group、绑定userid、绑定token、绑定bsId,这些绑定几乎囊括了所有业务需求
👏 t-io性能与对比
t-io测试结果:30W长连接并发压力,每秒1051万条聊天消息
netty和t-io对比:
- netty:100秒内生成10000个连接,每个连接每隔2秒发送一条消息,每个连接总共发送200条消息,发消息请求99%的响应时间在1ms以内,其它请求95%的响应时间在10ms以内
- t-io:100秒内生成10000个连接,每个连接每隔2秒发送一条消息,每个连接总共发送200条消息,发消息请求99%的响应时间在1ms以内
- CPU使用率:
- netty:CPU使用率在20%左右
- t-io:CPU使用率在15%左右
💌 使用介绍
🎁 业务数据绑定
资源绑定是指把业务相关的数据和Tcp连接(即ChannelContext)关联起来,譬如ChannelContext-A代表了用户张三,张三的userid是333
Tio.bindUser(ChannelContext-A, "333") t-io目前内置了4种资源绑定,譬如给group加前缀”ios- “,从而标记这个用户使用的是ios
Tio.bindGroup(ChannelContext-A, "333");
Tio.bindGroup(ChannelContext-A, "ios-" + "333");
内置的4种资源绑定方法中,一个ChannelContext是可以绑定到多个groupid的,其它三个绑定都是一对一或多对一的关系,也就是说一个ChannelContext可以同时属于group-a,group-b… …group-n
/**
   * 绑定业务id
   * @param channelContext
   * @param bsId
   */
  public static void bindBsId(ChannelContext channelContext, String bsId) {
      channelContext.tioConfig.bsIds.bind(channelContext, bsId);
  }
  /**
   * 绑定群组
   * @param channelContext
   * @param group
   */
  public static void bindGroup(ChannelContext channelContext, String group) {
      channelContext.tioConfig.groups.bind(group, channelContext);
  }
  /**
   * 绑定token
   * @param channelContext
   * @param token
   */
  public static void bindToken(ChannelContext channelContext, String token) {
      channelContext.tioConfig.tokens.bind(token, channelContext);
  }
  /**
   * 绑定用户
   * @param channelContext
   * @param userid
   */
  public static void bindUser(ChannelContext channelContext, String userid) {
      channelContext.tioConfig.users.bind(userid, channelContext);
}🤷♂️ 业务数据解绑
既然有绑定,就肯定会有解绑,这是个和绑定相反的操作
 /**
   * 解绑业务id
   * @param channelContext
   */
  public static void unbindBsId(ChannelContext channelContext) {
      channelContext.tioConfig.bsIds.unbind(channelContext);
  }
  /**
   * 与所有组解除解绑关系
   * @param channelContext
   */
  public static void unbindGroup(ChannelContext channelContext) {
      channelContext.tioConfig.groups.unbind(channelContext);
  }
  /**
   * 与指定组解除绑定关系
   * @param group
   * @param channelContext
   */
  public static void unbindGroup(String group, ChannelContext channelContext) {
      channelContext.tioConfig.groups.unbind(group, channelContext);
  }
  /**
   * 解除channelContext绑定的token
   * @param channelContext
   */
  public static void unbindToken(ChannelContext channelContext) {
      channelContext.tioConfig.tokens.unbind(channelContext);
  }
  //    org.tio.core.TioConfig.ipBlacklist
  /**
   * 解除channelContext绑定的userid
   * @param channelContext
   */
  public static void unbindUser(ChannelContext channelContext) {
      channelContext.tioConfig.users.unbind(channelContext);
  }
  /**
   * 解除userid的绑定。一般用于多地登录,踢掉前面登录的场景
   * @param tioConfig
   * @param userid
   */
  public static void unbindUser(TioConfig tioConfig, String userid) {
      tioConfig.users.unbind(tioConfig, userid);
  }
👀 异步发送
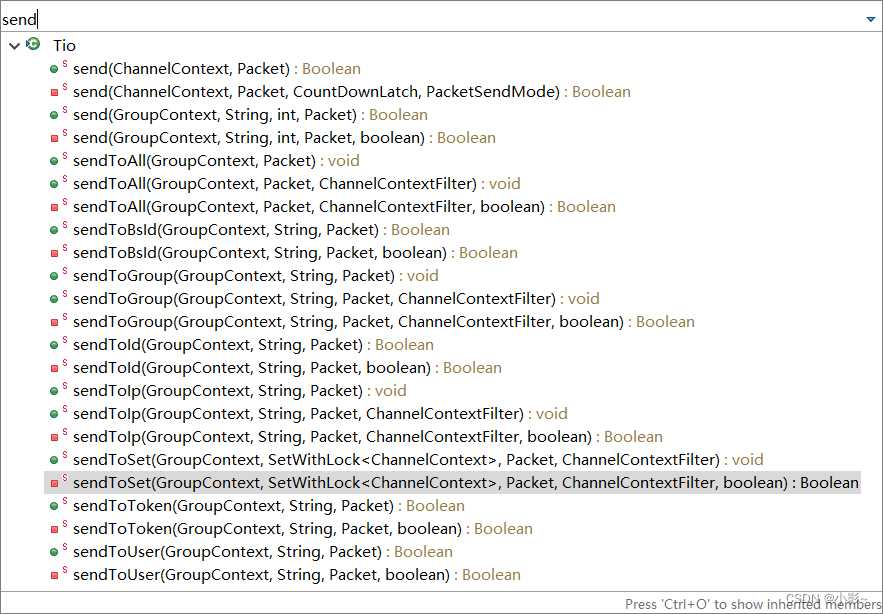
- 异步发送,指的是业务层把Packet丢给t-io后立即返回,返回时Packet并没有被发送,而只是提交到了待发送队列
- 异步发送都是以send开头的
🐱👤 阻塞发送
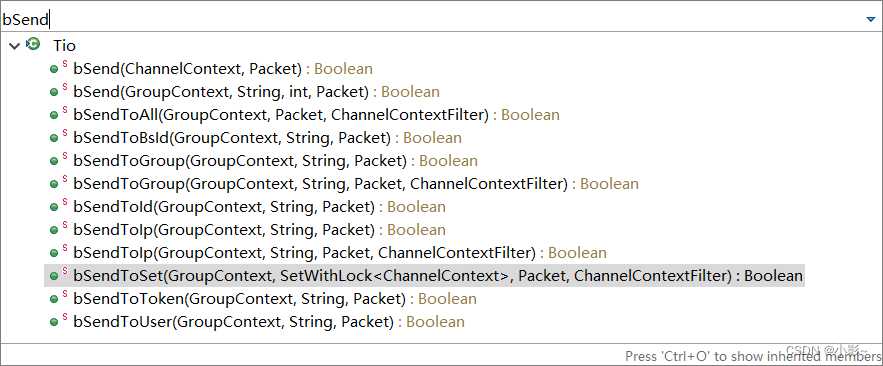
- 阻塞发送:t-io把Packet送给对方后才返回
- 阻塞发送都是以bSend开头的
🙌 获取ChannelContext
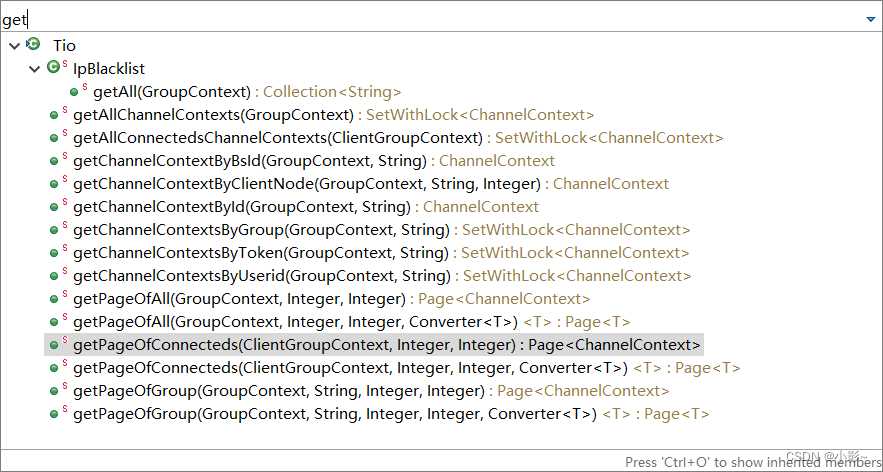
- 前面的业务数据绑定,一个重要的目的就是要根据那些业务标识来获取ChannelContext,譬如你绑定了一个userid,那么后面就可以通过这个userid来获取ChannelContext
- 获取ChannelContext的API都是以get开头的
🐱👓 断开连接和移除连接
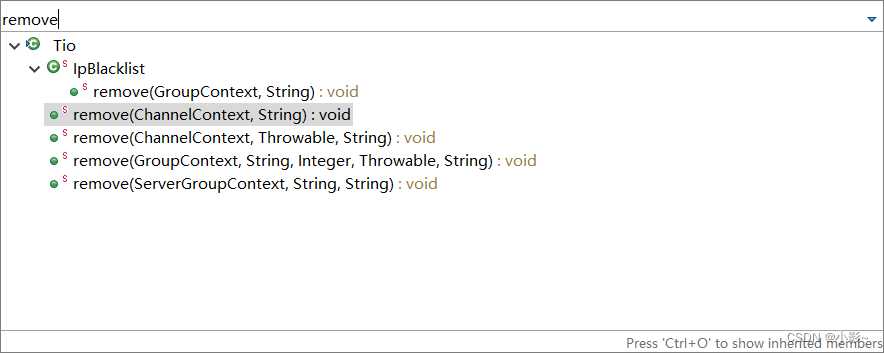
断开连接都是以close开头的方法,指的是把当前已经连上的TCP连接断开掉
移除连接都是以remove开头的方法,指的是彻底抛弃这个连接
🚕Tio.remove()和Tio.close()的区别
Tio.remove:不管是用t-io做TCP服务器还是TCP客户端,调用Tio.remove()后,t-io都会彻底删除TCP连接并释放包括ChannelContext在内的所有和该条TCP连接对应的资源,当然那些和群组、Token的绑定关系也全部释放掉
Tio.close:
- 如果是用t-io做TCP服务器,此方法等价于Tio.remove();
- 如果是用t-io做TCP客户端
- 该方法会断开当前TCP连接
- 如果业务程序配置了重连策略(就是:ReconnConf):
- t-io后面会进行重连操作,也就是说并不会抛弃该条TCP连接对应的ChannelContext对象
- 如果该条TCP连接对应的ChannelContext对象绑定了groupid、userid、token、bsId,那么这些绑定关系会全部释放掉,在重连成功后,业务侧需要再次进行绑定
- 如果业务程序没有配置重连策略(就是:ReconnConf),此方法等价于Tio.remove()
出现网络异常或其它异常时,业务需要主动调用这俩方法吗?
答:不需要的,出现任何网络异常,t-io都会释放掉该条TCP连接对应的全部资源,这也是t-io如此稳定的一大原因。网络编程的很多坑,都是源于资源没释放
🏴 拉黑IP
简单到极致,只需要一行代码
Tio.IpBlacklist.add(tioConfig, channelContext.getClientNode().getIp());🚨 各种流量监控
🛴 ip的监控数据
ip的监控数据定义在IpStat中
private Date start = new Date();
/**
 * 当前统计了多久,单位:毫秒
 */
private long duration;
/**
 * 时长类型,单位:秒,譬如60,3600等
 */
private Long durationType;
/**
 * 客户端ip
 */
private String ip;
/**
 * 解码异常的次数
 */
private AtomicInteger decodeErrorCount = new AtomicInteger();
/**
 * 收到该IP连接请求的次数
 */
private AtomicInteger requestCount = new AtomicInteger();
/**
 * 本IP已发送的字节数
 */
private AtomicLong sentBytes = new AtomicLong();
/**
 * 本IP已发送的packet数
 */
private AtomicLong sentPackets = new AtomicLong();
/**
 * 本IP已处理的字节数
 */
private AtomicLong handledBytes = new AtomicLong();
/**
 * 本IP已处理的packet数
 */
private AtomicLong handledPackets = new AtomicLong();
/**
 * 处理消息包耗时,单位:毫秒
 */
private AtomicLong handledPacketCosts = new AtomicLong();
/**
 * 本IP已接收的字节数
 */
private AtomicLong receivedBytes = new AtomicLong();
/**
 * 本IP已接收了多少次TCP数据包
 */
private AtomicLong receivedTcps = new AtomicLong();
/**
 * 本IP已接收的packet数
 */
private AtomicLong receivedPackets = new AtomicLong();
使用步骤
- 实现IpStatListener
package org.tio.showcase.websocket.server;
public class ShowcaseIpStatListener implements IpStatListener {
    @SuppressWarnings("unused")
    private static Logger log = LoggerFactory.getLogger(ShowcaseIpStatListener.class);
    public static final ShowcaseIpStatListener me = new ShowcaseIpStatListener();
    private ShowcaseIpStatListener() {
    }
    @Override
    public void onExpired(TioConfig tioConfig, IpStat ipStat) {
        //在这里把统计数据入库中或日志
//        if (log.isInfoEnabled()) {
//            log.info("可以把统计数据入库\r\n{}", Json.toFormatedJson(ipStat));
//        }
    }
    @Override
    public void onAfterConnected(ChannelContext channelContext, boolean isConnected, boolean isReconnect, IpStat ipStat) throws Exception {
//        if (log.isInfoEnabled()) {
//            log.info("onAfterConnected\r\n{}", Json.toFormatedJson(ipStat));
//        }
    }
    @Override
    public void onDecodeError(ChannelContext channelContext, IpStat ipStat) {
//        if (log.isInfoEnabled()) {
//            log.info("onDecodeError\r\n{}", Json.toFormatedJson(ipStat));
//        }
    }
    @Override
    public void onAfterSent(ChannelContext channelContext, Packet packet, boolean isSentSuccess, IpStat ipStat) throws Exception {
//        if (log.isInfoEnabled()) {
//            log.info("onAfterSent\r\n{}\r\n{}", packet.logstr(), Json.toFormatedJson(ipStat));
//        }
    }
    @Override
    public void onAfterDecoded(ChannelContext channelContext, Packet packet, int packetSize, IpStat ipStat) throws Exception {
//        if (log.isInfoEnabled()) {
//            log.info("onAfterDecoded\r\n{}\r\n{}", packet.logstr(), Json.toFormatedJson(ipStat));
//        }
    }
    @Override
    public void onAfterReceivedBytes(ChannelContext channelContext, int receivedBytes, IpStat ipStat) throws Exception {
//        if (log.isInfoEnabled()) {
//            log.info("onAfterReceivedBytes\r\n{}", Json.toFormatedJson(ipStat));
//        }
    }
    @Override
    public void onAfterHandled(ChannelContext channelContext, Packet packet, IpStat ipStat, long cost) throws Exception {
//        if (log.isInfoEnabled()) {
//            log.info("onAfterHandled\r\n{}\r\n{}", packet.logstr(), Json.toFormatedJson(ipStat));
//        }
    }
}- 初始化时添加监听器和监控时段
//注意的是:要保证下面两行代码的顺序,不能先addDuration()后setIpStatListener
serverTioConfig.setIpStatListener(ShowcaseIpStatListener.me);
serverTioConfig.ipStats.addDuration(Time.MINUTE_1 * 5);- OK了,什么时候拉黑IP以及把监控数据入库都在ShowcaseIpStatListener中实现哦
👀 获取TCP会话的流量数据
一个TCP会话对应一个ChannelContext对象,每个ChannelContext对象都有一个ChannelStat对象,定义如下
public final ChannelStat stat = new ChannelStat();ChannelStat包含如下字段和方法(已经略过普通的getter和setter)
/**
     * 本次解码失败的次数
     */
    public int                    decodeFailCount                = 0;
    /**
     * 最近一次收到业务消息包的时间(一个完整的业务消息包,一部分消息不算)
     */
    public long                    latestTimeOfReceivedPacket    = SystemTimer.currTime;
    /**
     * 最近一次发送业务消息包的时间(一个完整的业务消息包,一部分消息不算)
     */
    public long                    latestTimeOfSentPacket        = SystemTimer.currTime;
    /**
     * 最近一次收到业务消息包的时间:收到字节就算
     */
    public long                    latestTimeOfReceivedByte    = SystemTimer.currTime;
    /**
     * 最近一次发送业务消息包的时间:发送字节就算
     */
    public long                    latestTimeOfSentByte        = SystemTimer.currTime;
    /**
     * ChannelContext对象创建的时间
     */
    public long                    timeCreated                    = SystemTimer.currTime;
    /**
     * 第一次连接成功的时间
     */
    public Long                    timeFirstConnected            = null;
    /**
     * 连接关闭的时间
     */
    public long                    timeClosed                    = SystemTimer.currTime;
    /**
     * 进入重连队列时间
     */
    public long                    timeInReconnQueue            = SystemTimer.currTime;
    /**
     * 本连接已发送的字节数
     */
    public final AtomicLong        sentBytes                    = new AtomicLong();
    /**
     * 本连接已发送的packet数
     */
    public final AtomicLong        sentPackets                    = new AtomicLong();
    /**
     * 本连接已处理的字节数
     */
    public final AtomicLong        handledBytes                = new AtomicLong();
    /**
     * 本连接已处理的packet数
     */
    public final AtomicLong        handledPackets                = new AtomicLong();
    /**
     * 处理消息包耗时,单位:毫秒
     * 拿这个值除以handledPackets,就是处理每个消息包的平均耗时
     */
    public final AtomicLong        handledPacketCosts            = new AtomicLong();
    /**
     * 本连接已接收的字节数
     */
    public final AtomicLong        receivedBytes                = new AtomicLong();
    /**
     * 本连接已接收了多少次TCP数据包
     */
    public final AtomicLong        receivedTcps                = new AtomicLong();
    /**
     * 本连接已接收的packet数
     */
    public final AtomicLong        receivedPackets                = new AtomicLong();
/**
     * 平均每次TCP接收到的字节数,这个可以用来监控慢攻击,配置PacketsPerTcpReceive定位慢攻击
     */
    public double getBytesPerTcpReceive() {
        if (receivedTcps.get() == 0) {
            return 0;
        }
        double ret = (double) receivedBytes.get() / (double) receivedTcps.get();
        return ret;
    }
    /**
     * 平均每次TCP接收到的业务包数,这个可以用来监控慢攻击,此值越小越有攻击嫌疑
     */
    public double getPacketsPerTcpReceive() {
        if (receivedTcps.get() == 0) {
            return 0;
        }
        double ret = (double) receivedPackets.get() / (double) receivedTcps.get();
        return ret;
    }
    /**
     * 处理packet平均耗时,单位:毫秒
     * @return
     */
    public double getHandledCostsPerPacket() {
        if (handledPackets.get() > 0) {
            return handledPacketCosts.get() / handledPackets.get();
        }
        return 0;
}🐱🚀 监听端口的流量和数据
TioConfig对象有个GroupStat成员,定义如下
public GroupStat groupStat = null;GroupStat有如下一些字段和方法(去掉了简单的getter和setter)
/**
   * 关闭了多少连接
   */
  public final AtomicLong        closed                = new AtomicLong();
  /**
   * 接收到的消息包
   */
  public final AtomicLong        receivedPackets        = new AtomicLong();
  /**
   * 接收到的消息字节数
   */
  public final AtomicLong receivedBytes = new AtomicLong();
  /**
   * 处理了的消息包数
   */
  public final AtomicLong handledPackets = new AtomicLong();
  /**
   * 处理消息包耗时,单位:毫秒
   */
  public final AtomicLong handledPacketCosts = new AtomicLong();
  /**
   * 处理了多少字节
   */
  public final AtomicLong handledBytes = new AtomicLong();
  /**
   * 发送了的消息包数
   */
  public final AtomicLong sentPackets = new AtomicLong();
  /**
   * 发送了的字节数
   */
  public final AtomicLong sentBytes = new AtomicLong();
  /**
   * 本IP已接收了多少次TCP数据包
   */
  public final AtomicLong receivedTcps = new AtomicLong();
  /**
   * 平均每次TCP接收到的字节数,这个可以用来监控慢攻击,配置PacketsPerTcpReceive定位慢攻击
   */
  public double getBytesPerTcpReceive() {
      if (receivedTcps.get() == 0) {
          return 0;
      }
      double ret = (double) receivedBytes.get() / (double) receivedTcps.get();
      return ret;
  }
  /**
   * 平均每次TCP接收到的业务包数,这个可以用来监控慢攻击,此值越小越有攻击嫌疑
   */
  public double getPacketsPerTcpReceive() {
      if (receivedTcps.get() == 0) {
          return 0;
      }
      double ret = (double) receivedPackets.get() / (double) receivedTcps.get();
      return ret;
  }
  /**
   * 处理packet平均耗时,单位:毫秒
   * @return
   */
  public double getHandledCostsPerPacket() {
      if (handledPackets.get() > 0) {
          return handledPacketCosts.get() / handledPackets.get();
      }
      return 0;
  }
对于服务器端的groupStat,它是在ServerTioConfig类中的初始化代码在构造函数中,如下
this.groupStat = new ServerGroupStat();对于客户端的groupStat,它是在ClientTioConfig类中的初始化代码在构造函数中,如下
this.groupStat = new ClientGroupStat();获取GroupStat
GroupStat groupStat = tioConfig.groupStat;
//如果确认是服务器端,则可以用强转方式获得ServerGroupStat对象
ServerGroupStat serverGroupStat = (ServerGroupStat)tioConfig.groupStat;
//如果确认是客户端,则可以用强转方式获得ClientGroupStat对象
ClientGroupStat clientGroupStat = (ClientGroupStat)tioConfig.groupStat;
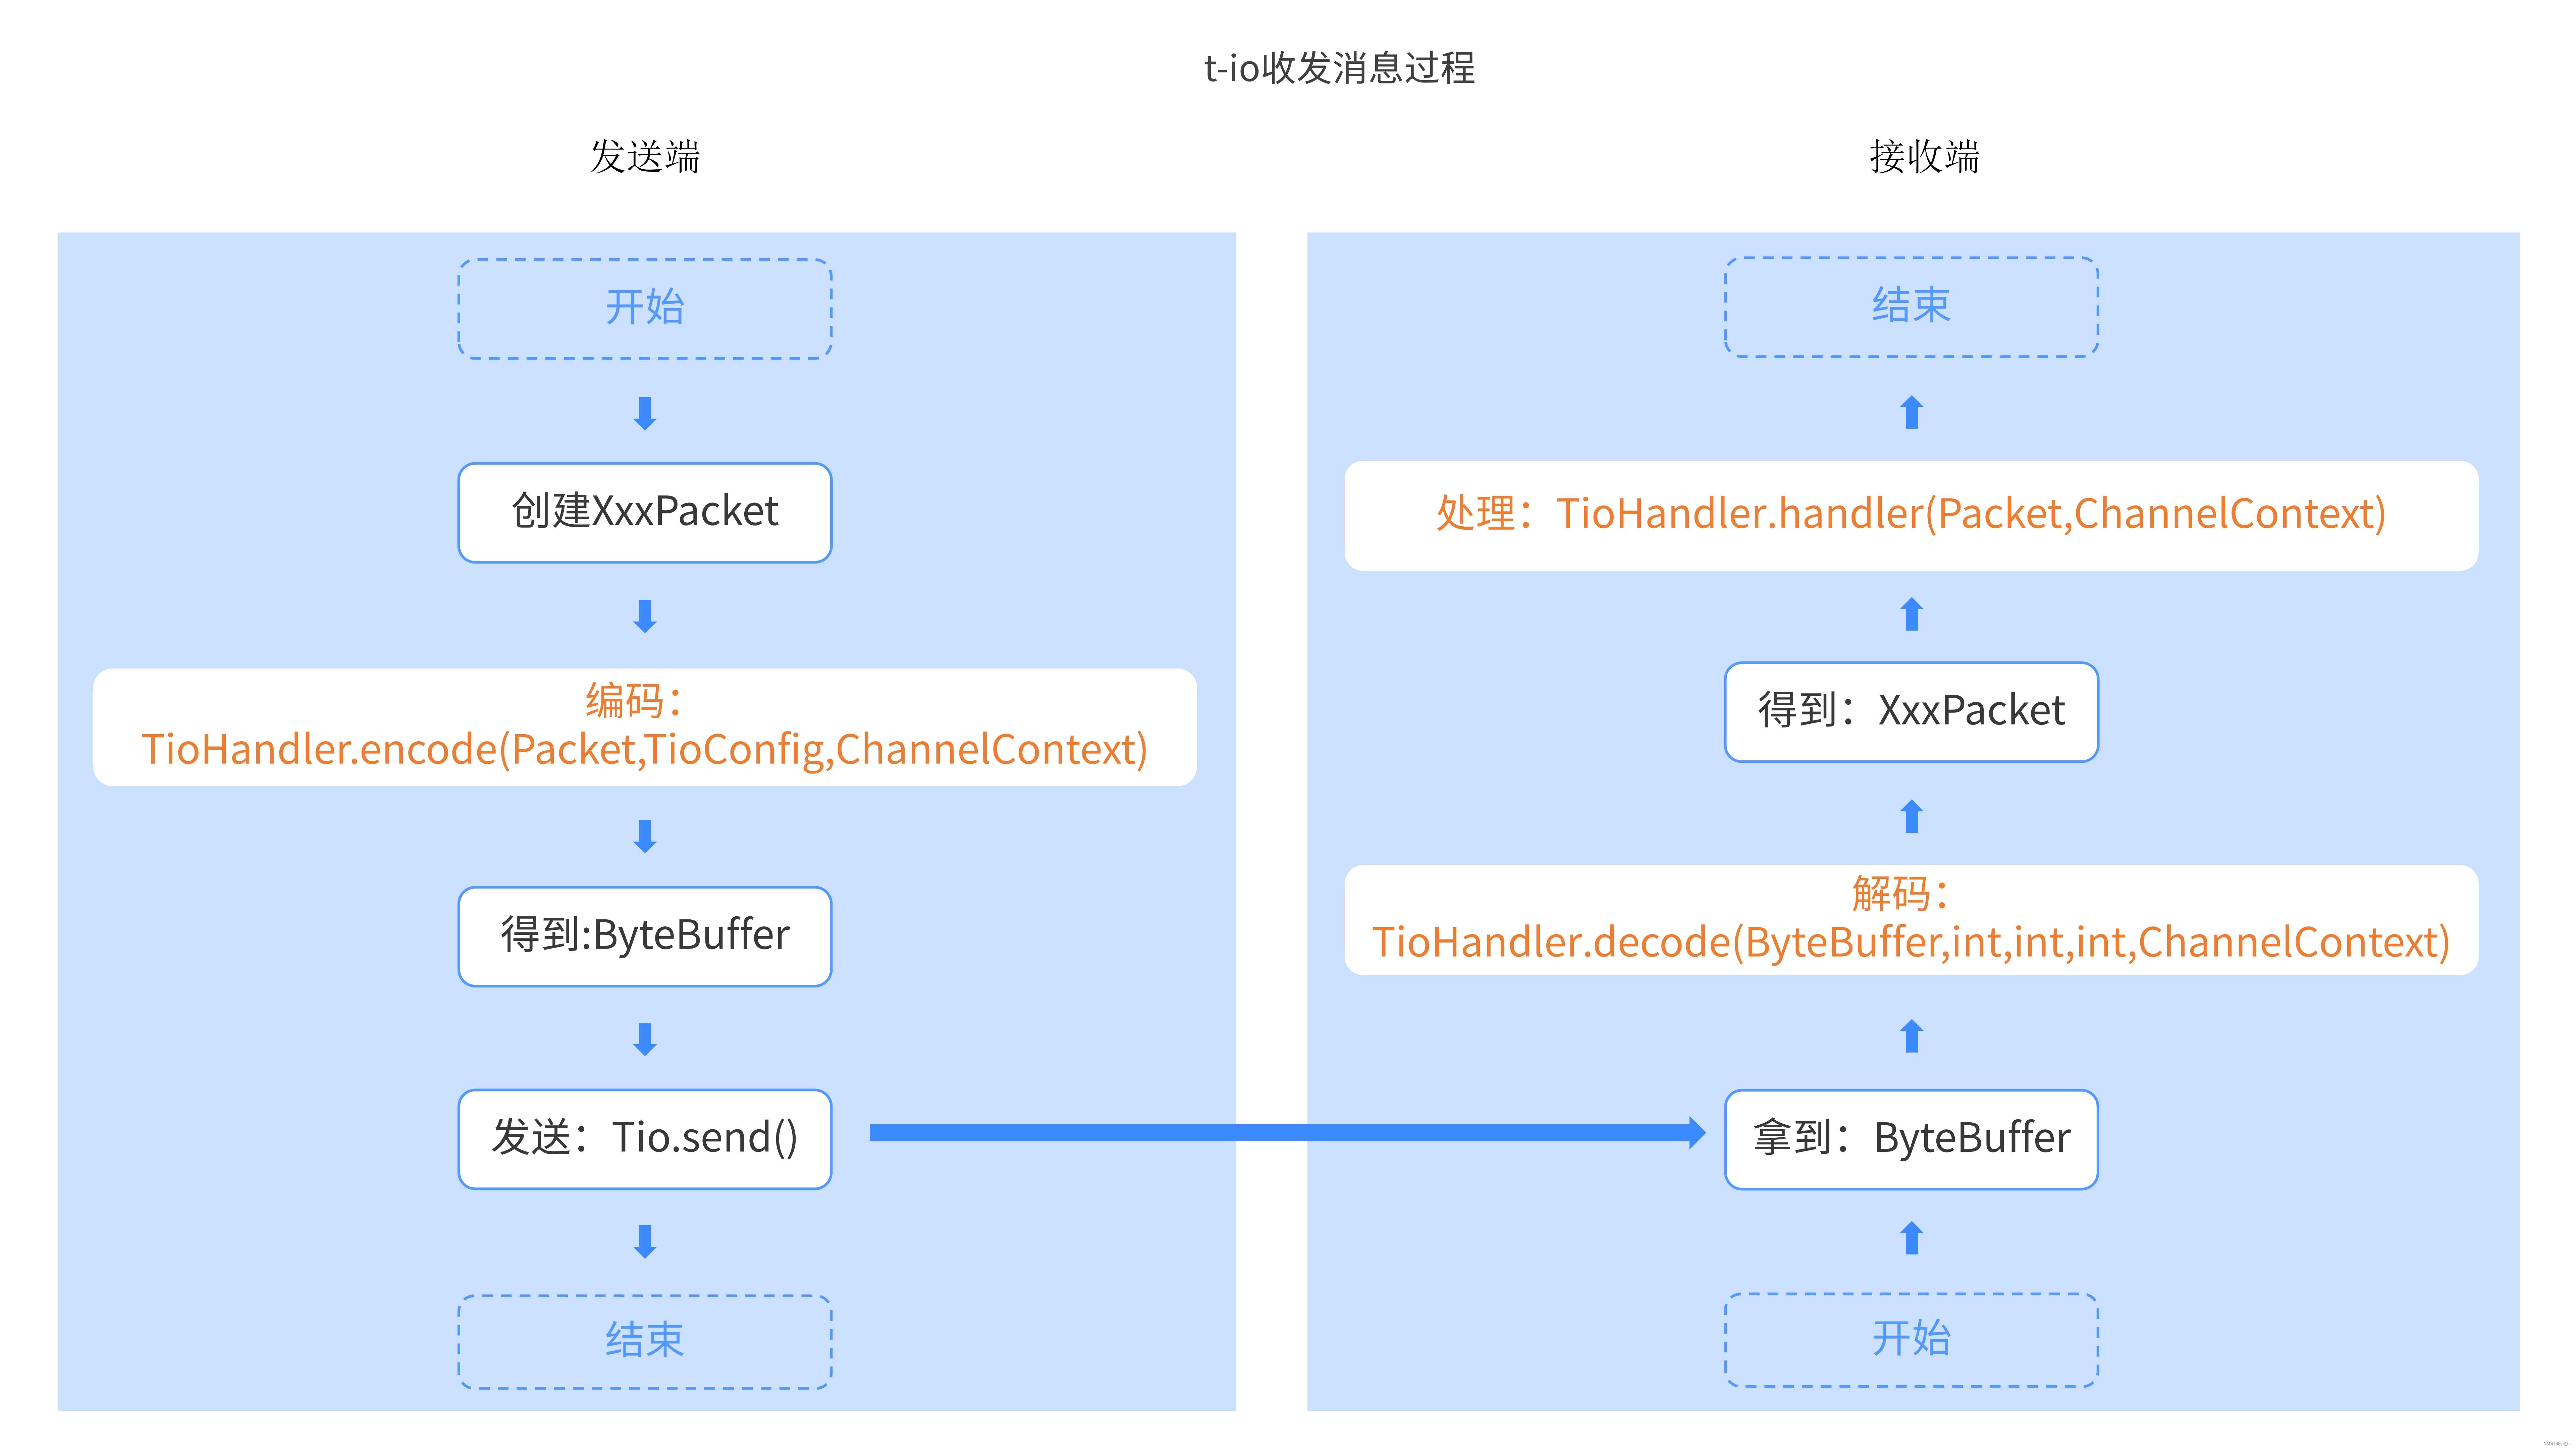
✨ T-io收发消息过程
Packet是用于表述业务数据结构的,我们通过继承Packet来实现自己的业务数据结构,对于各位而言,把Packet看作是一个普通的VO对象即可。
注意:不建议直接使用Packet对象,而是要继承Packet
🤣 TCP连接上下文
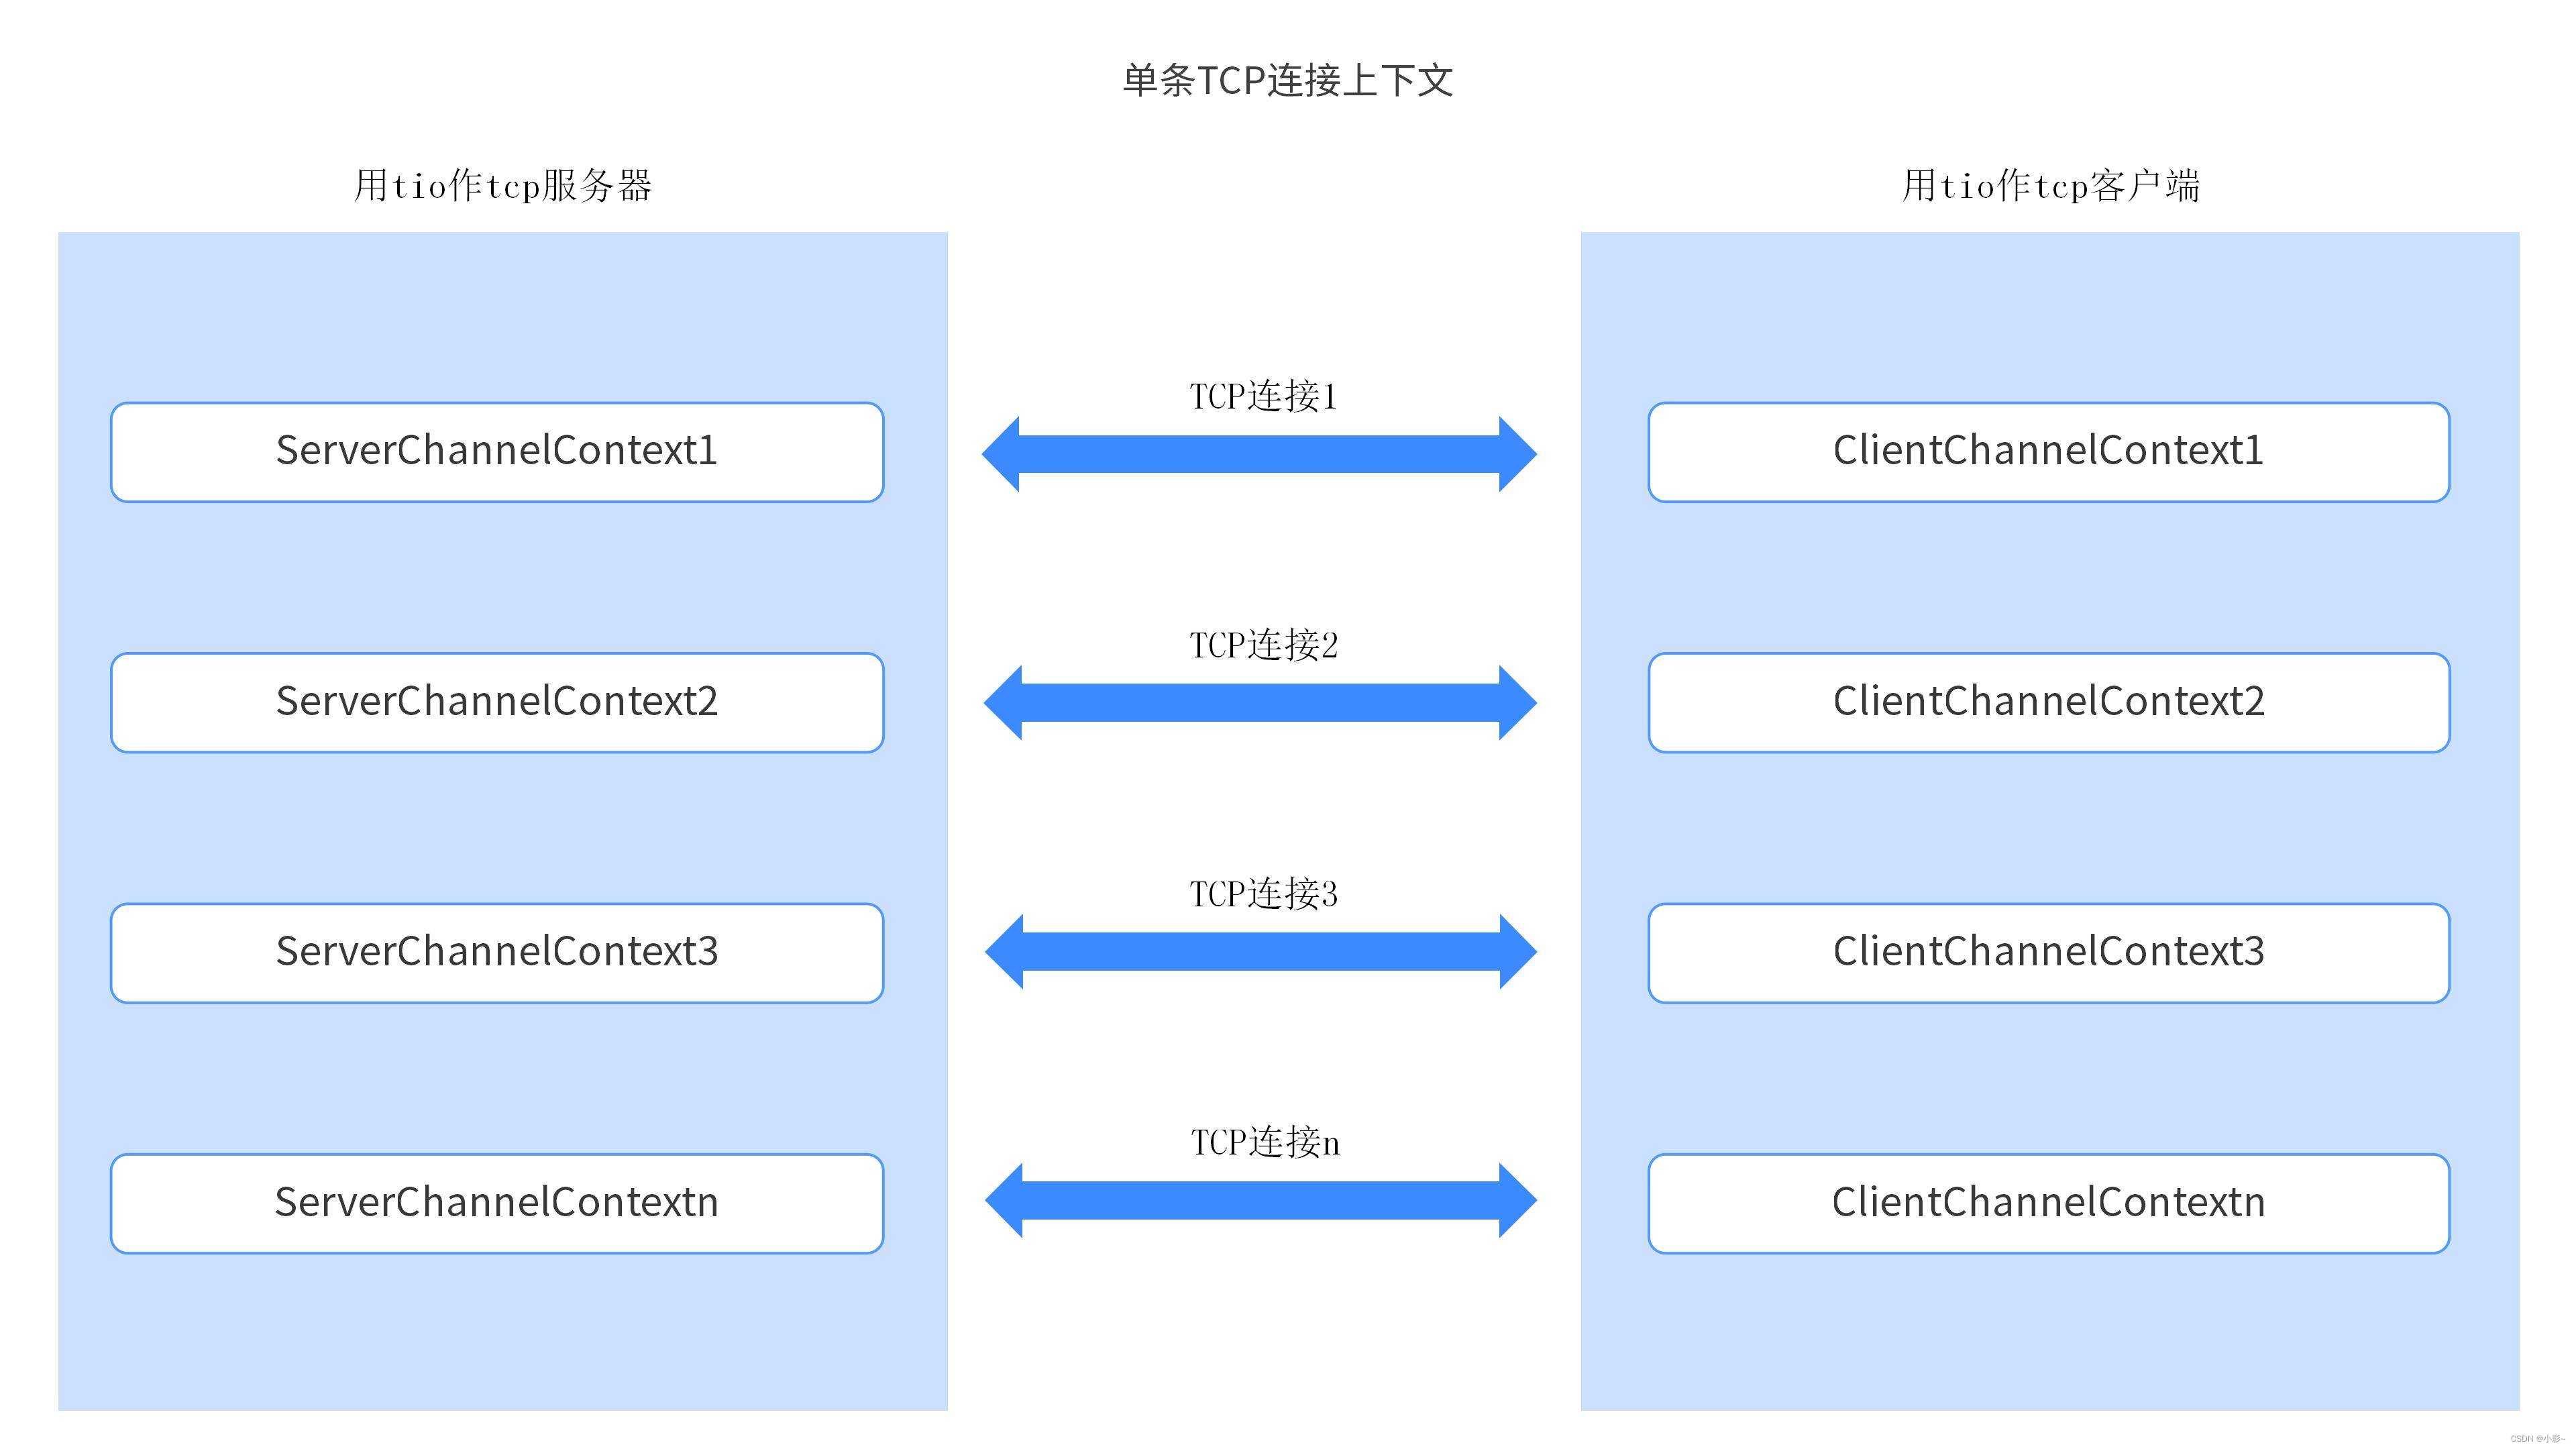
每一个tcp连接的建立都会产生一个ChannelContext对象,这是个抽象类,如果你是用t-io作tcp客户端,那么就是ClientChannelContext,如果你是用tio作tcp服务器,那么就是ServerChannelContext
用户可以把业务数据通过ChannelContext对象和TCP连接关联起来,像下面这样设置属性
ChannelContext.set(String key, Object value)然后用下面的方式获取属性
ChannelContext.get(String key)当然最最常用的还是用t-io提供的强到没对手的bind功能,譬如用下面的代码绑定userid
Tio.bindUser(ChannelContext channelContext, String userid)然后可以通过userid进行操作,示范代码如下
//获取某用户的ChannelContext集合
SetWithLock<ChannelContext> set = Tio.getChannelContextsByUserid(tioConfig, userid);
//给某用户发消息
Tio.sendToUser(TioConfig, userid, Packet)
除了可以绑定userid,t-io还内置了如下绑定API
- 绑定业务id
Tio.bindBsId(ChannelContext channelContext, String bsId)- 绑定token
Tio.bindToken(ChannelContext channelContext, String token)- 绑定群组
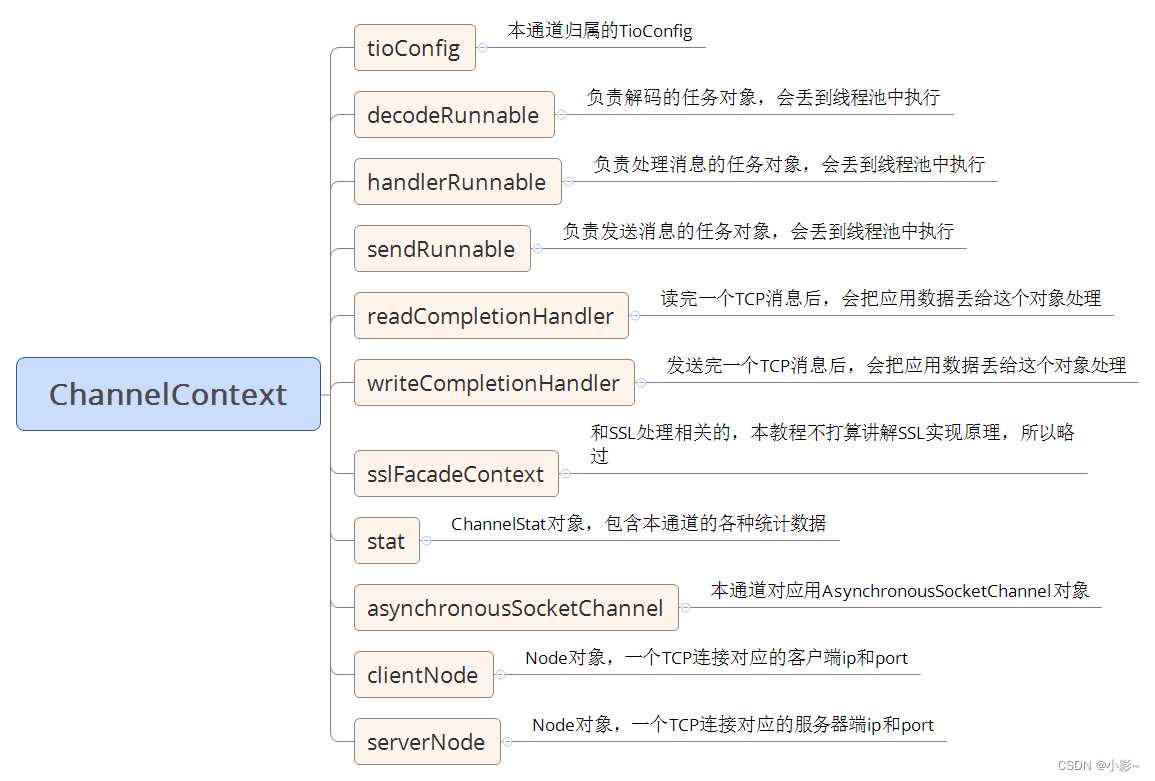
Tio.bindGroup(ChannelContext channelContext, String group)ChannelContext对象包含的信息非常多,主要对象见下图
ChannelContext是t-io中非常重要的类,他是业务和连接的沟通桥梁!
📕 TioConfig
- 场景:我们在写TCP Server时,都会先选好一个端口以监听客户端连接,再创建N组线程池来执行相关的任务,譬如发送消息、解码数据包、处理数据包等任务,还要维护客户端连接的各种数据,为了和业务互动,还要把这些客户端连接和各种业务数据绑定起来,譬如把某个客户端绑定到一个群组,绑定到一个userid,绑定到一个token等。
- TioConfig
就是解决以上场景的:配置线程池、监听端口,维护客户端各种数据等的。
- TioConfig是个抽象类
- 如果你是用tio作tcp客户端,那么你需要创建ClientTioConfig对象
- 服务器端对应一个ClientTioConfig对象
- 如果你是用tio作tcp服务器,那么你需要创建ServerTioConfig
- 一个监听端口对应一个ServerTioConfig ,一个jvm可以监听多个端口,所以一个jvm可以有多个ServerTioConfig对象
- 如果你是用tio作tcp客户端,那么你需要创建ClientTioConfig对象
😀 消息来往监听
TioListener是处理消息的核心接口,它有两个子接口:TioClientListener和TioServerListener
- 当用tio作tcp客户端时需要实现TioClientListener
- 当用tio作tcp服务器时需要实现TioServerListener
它主要定义了如下方法
public interface TioListener {
    /**
     * 建链后触发本方法,注:建链不一定成功,需要关注参数isConnected
     *
     * @param channelContext
     * @param isConnected    是否连接成功,true:表示连接成功,false:表示连接失败
     * @param isReconnect    是否是重连, true: 表示这是重新连接,false: 表示这是第一次连接
     * @throws Exception
     */
    public void onAfterConnected(ChannelContext channelContext, boolean isConnected, boolean isReconnect) throws Exception;
    /**
     * 原方法名:onAfterDecoded 解码成功后触发本方法
     *
     * @param channelContext
     * @param packet
     * @param packetSize
     * @throws Exception
     */
    public void onAfterDecoded(ChannelContext channelContext, Packet packet, int packetSize) throws Exception;
    /**
     * 处理一个消息包后
     *
     * @param channelContext
     * @param packet
     * @param cost           本次处理消息耗时,单位:毫秒
     * @throws Exception
     */
    public void onAfterHandled(ChannelContext channelContext, Packet packet, long cost) throws Exception;
    /**
     * 接收到TCP层传过来的数据后
     *
     * @param channelContext
     * @param receivedBytes  本次接收了多少字节
     * @throws Exception
     */
    public void onAfterReceivedBytes(ChannelContext channelContext, int receivedBytes) throws Exception;
    /**
     * 消息包发送之后触发本方法
     *
     * @param channelContext
     * @param packet
     * @param isSentSuccess  true:发送成功,false:发送失败
     * @throws Exception     */
    public void onAfterSent(ChannelContext channelContext, Packet packet, boolean isSentSuccess) throws Exception;
    /**
     * 连接关闭前触发本方法
     *
     * @param channelContext the channelcontext
     * @param throwable      the throwable 有可能为空
     * @param remark         the remark 有可能为空
     * @param isRemove
     * @throws Exception
     */
    public void onBeforeClose(ChannelContext channelContext, Throwable throwable, String remark, boolean isRemove) throws Exception;
    /**
     * 连接关闭前后触发本方法 警告:走到这个里面时,很多绑定的业务都已经解绑了,所以这个方法一般是空着不实现的
     *
     * @param channelContext the channelcontext
     * @param throwable      the throwable 有可能为空
     * @param remark         the remark 有可能为空
     * @param isRemove       是否是删除
     * @throws Exception
     */
    // public void onAfterClose(ChannelContext channelContext, Throwable throwable,
    // String remark, boolean isRemove) throws Exception;
}
🥰 整合JAVA
<!-- tio-websocket -->
<dependency>
    <groupId>org.t-io</groupId>
    <artifactId>tio-websocket-server</artifactId>
    <version>3.5.9.v20200214-RELEASE</version>
</dependency>
注意:每个版本之前存在差异请查看官方文档
🍔 websocket 配置类
import com.asurplus.tio.websocket.handle.MyWsMsgHandler;
import org.springframework.beans.factory.annotation.Autowired;
import org.springframework.context.annotation.Bean;
import org.springframework.context.annotation.Configuration;
import org.tio.server.ServerTioConfig;
import org.tio.websocket.server.WsServerStarter;

import java.io.IOException;

/**
 * websocket 配置类
 */
@Configuration
public class WebSocketConfig {

   /**
     * 注入消息处理器
     */
    @Autowired
    private MyWsMsgHandler myWsMsgHandler;

    /**
     * 启动类配置
     *
     * @return
     * @throws IOException
     */
    @Bean
    public WsServerStarter wsServerStarter() throws IOException {
        // 设置处理器
        WsServerStarter wsServerStarter = new WsServerStarter(6789, myWsMsgHandler);
        // 获取到ServerTioConfig
        ServerTioConfig serverTioConfig = wsServerStarter.getServerTioConfig();
        // 设置心跳超时时间,默认:1000 * 120
        serverTioConfig.setHeartbeatTimeout(1000 * 120);
        // 启动
        wsServerStarter.start();
        return wsServerStarter;
    }
}
这里我们注入了 WsServerStarter 的 bean,这样在 SpringBoot 启动的时候,就能启动咱们的 websocket 服务
- 注明了 websocket 的服务端口为:6789
- 消息处理类为:myWsMsgHandler,在下一步我们将会去实现这个类
- 设置了心跳的超时时间为:120秒,默认值,可以不设置
😄 消息处理类
package com.ying.tiiochat.config;

import com.alibaba.fastjson.JSONObject;
import org.springframework.stereotype.Component;
import org.tio.core.ChannelContext;
import org.tio.core.Tio;
import org.tio.http.common.HttpRequest;
import org.tio.http.common.HttpResponse;
import org.tio.websocket.common.WsRequest;
import org.tio.websocket.common.WsResponse;
import org.tio.websocket.server.handler.IWsMsgHandler;

/**
 * 消息处理类
 */
@Component
public class MyWsMsgHandler implements IWsMsgHandler {

   /**
    * <li>对httpResponse参数进行补充并返回,如果返回null表示不想和对方建立连接,框架会断开连接,如果返回非null,框架会把这个对象发送给对方</li>
    * <li>注:请不要在这个方法中向对方发送任何消息,因为这个时候握手还没完成,发消息会导致协议交互失败。</li>
    * <li>对于大部分业务,该方法只需要一行代码:return httpResponse;</li>
    *
    * @param httpRequest
    * @param httpResponse
    * @param channelContext
    * @return
    * @throws Exception
    */
   @Override
   public HttpResponse handshake(HttpRequest httpRequest, HttpResponse httpResponse, ChannelContext channelContext) throws Exception {
      // 可以在此做一些业务逻辑,返回null表示不想连接
      return httpResponse;
   }

   /**
    * 握手成功后触发该方法
    *
    * @param httpRequest
    * @param httpResponse
    * @param channelContext
    * @throws Exception
    */
   @Override
   public void onAfterHandshaked(HttpRequest httpRequest, HttpResponse httpResponse, ChannelContext channelContext) throws Exception {
      // 拿到用户id
      String id = httpRequest.getParam("userId");
      // 绑定用户
      Tio.bindUser(channelContext, id);
      // 给用户发送消息
      JSONObject message = new JSONObject();
      message.put("msg", "连接成功...");
      message.put("sendName", "系统提醒");
      WsResponse wsResponse = WsResponse.fromText(message.toString(), "UTF-8");
      Tio.sendToUser(channelContext.tioConfig, id, wsResponse);
   }

   /**
    * <li>当收到Opcode.BINARY消息时,执行该方法。也就是说如何你的ws是基于BINARY传输的,就会走到这个方法</li>
    *
    * @param wsRequest
    * @param bytes
    * @param channelContext
    * @return 可以是WsResponse、byte[]、ByteBuffer、String或null,如果是null,框架不会回消息
    * @throws Exception
    */
   @Override
   public Object onBytes(WsRequest wsRequest, byte[] bytes, ChannelContext channelContext) throws Exception {
      System.out.println("我走了onBytes");
      return null;
   }

   /**
    * 当收到Opcode.CLOSE时,执行该方法,业务层在该方法中一般不需要写什么逻辑,空着就好
    *
    * @param wsRequest
    * @param bytes
    * @param channelContext
    * @return 可以是WsResponse、byte[]、ByteBuffer、String或null,如果是null,框架不会回消息
    * @throws Exception
    */
   @Override
   public Object onClose(WsRequest wsRequest, byte[] bytes, ChannelContext channelContext) throws Exception {
      // 关闭连接
      Tio.remove(channelContext, "WebSocket Close");
      return null;
   }

   /**
    * <li>当收到Opcode.TEXT消息时,执行该方法。也就是说如何你的ws是基于TEXT传输的,就会走到这个方法</li>
    *
    * @param wsRequest
    * @param text
    * @param channelContext
    * @return 可以是WsResponse、byte[]、ByteBuffer、String或null,如果是null,框架不会回消息
    * @throws Exception
    */
   @Override
   public Object onText(WsRequest wsRequest, String text, ChannelContext channelContext) throws Exception {
      JSONObject message = JSONObject.parseObject(text);
      // 接收消息的用户ID
      String receiver = message.getString("receiver");
      // 发送消息者
      String sendName = message.getString("sendName");
      // 消息
      String msg = message.getString("msg");

      // 保存聊天记录到DB等业务逻辑...

      WsResponse wsResponse = WsResponse.fromText(message.toString(), "UTF-8");
      Tio.sendToUser(channelContext.tioConfig, receiver, wsResponse);

      JSONObject resp = new JSONObject();
      resp.put("sendName", "系统提醒");
      resp.put("msg", "发送成功");
      return resp.toString();
   }
}
我们实现了 IWsMsgHandler 接口,并重写了该接口的 5 个方法,这 5 个方法从 发送握手包,到消息收发,到断开连接等一系列过程
🚙 启动服务
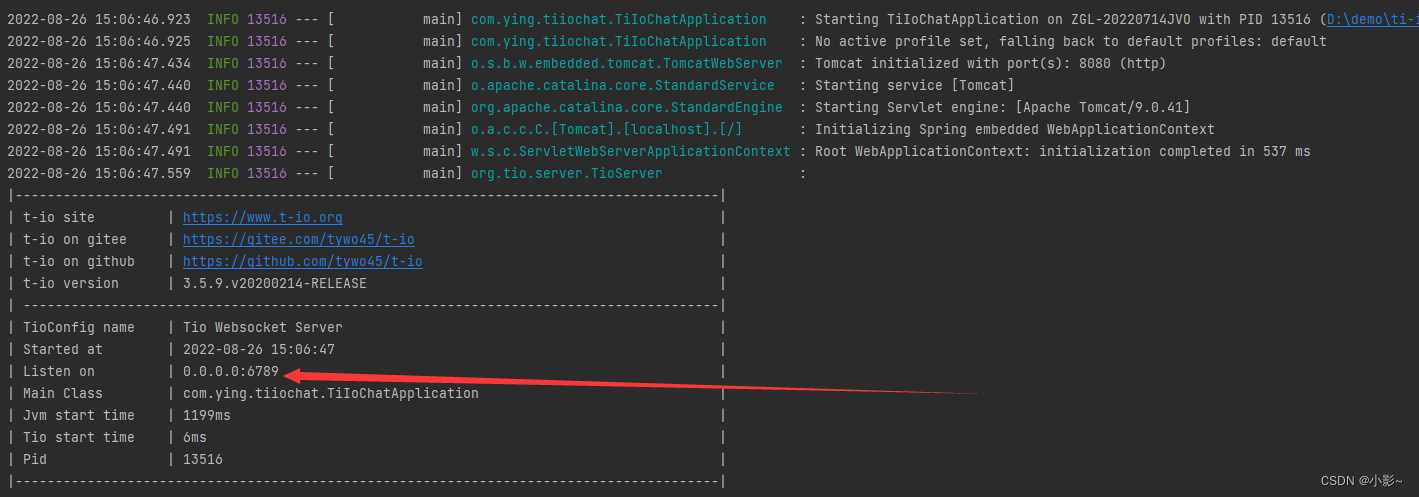
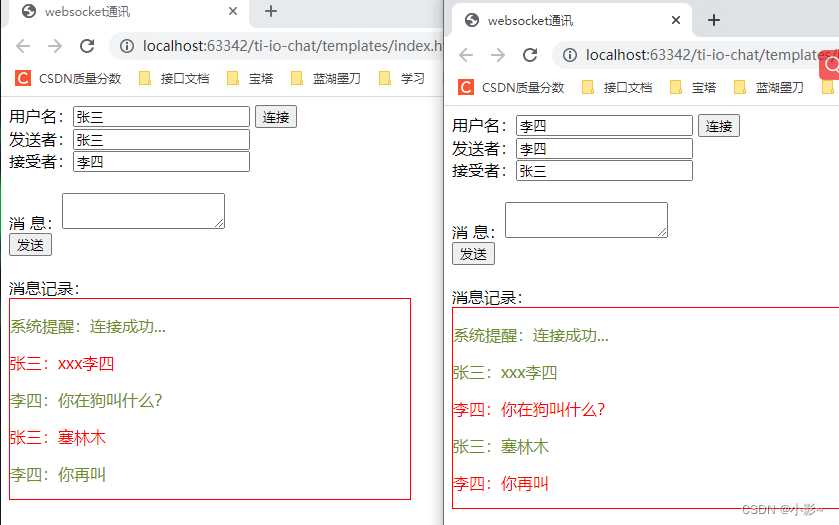
启动成功后,可以看出 tio 的打印结果,我们可以看出服务端口为我们设置的 6789,我们便可以连接测试了
前端代码(用脚写有点丑):
<!DOCTYPE html>
<html>
<head>
    <meta charset="utf-8">
    <title>websocket通讯</title>
</head>
<script src="https://cdn.bootcss.com/jquery/3.3.1/jquery.js"></script>
<script type="text/javascript">
    <!--  连接-->
    var socket;
    var userName;
    // 连接
    function connect() {
        var socketUrl = "ws://localhost:6789/?userId=" + $('#sendName').val();
        if (socket != null) {
            socket.close();
            socket = null;
        }
        socket = new WebSocket(socketUrl);
        //打开事件
        socket.onopen = function () {
            console.log("开始建立链接....")
        };
        //关闭事件
        socket.onclose = function () {
            console.log("websocket已关闭");
        };
        //发生了错误事件
        socket.onerror = function () {
            console.log("websocket发生了错误");
        };
        /**
         * 接收消息
         * @param msg
         */
        socket.onmessage = function (msg) {
            console.log(msg)
            var json = JSON.parse(msg.data);
            if (msg.msg != '连接成功') {
                $("#msgDiv").append('<p class="other" style="color:olivedrab;">' + json.sendName + ':'+json.msg+'</p>');
            }
        };
    }


    /**
     * 发送消息
     */
    function sendMessage() {
        var msg = $("#msg").val();
        if (msg == '' || msg == null) {
            alert("消息内容不能为空");
            return;
        }
        var receiver = $("#receiver").val();
        if (receiver == '' || receiver == null) {
            alert("接收人不能为空");
            return;
        }

        var sendName = $("#sendName").val();
        if (sendName == '' || sendName == null) {
            alert("发送人不能为空");
            return;
        }
        var msgObj = {
            "receiver": receiver,
            "sendName": sendName,
            "msg": msg
        };
         $("#msgDiv").append('<p class="user" style="color: red">' + sendName + ':'+msg+'</p>');
        try{
            socket.send(JSON.stringify(msgObj));
            $("#msg").val('');
        }catch (e) {
            alert("服务器内部错误");
        }
    }
</script>
<body>
用户名:<input type="text" id="sendName" value="李四">
<input type="button" value="连接" onclick="connect()" ><br>
发送者:<input type="text" id="sender" value="李四" ><br>
接受者:<input type="text" id="receiver" value="张三"><br><br>
消  息:<textarea id="msg"></textarea><br><input type="button" value="发送" onclick="sendMessage()"><br><br>

消息记录:<div id="msgDiv" style="border: 1px red solid;width: 400px;height: 200px"></div>
<br>

</body>
</html>
这是小编在开发学习使用和总结, 这中间或许也存在着不足,希望可以得到大家的理解和建议。如有侵权联系小编!
今天的文章Java实现在线聊天分享到此就结束了,感谢您的阅读,如果确实帮到您,您可以动动手指转发给其他人。
版权声明:本文内容由互联网用户自发贡献,该文观点仅代表作者本人。本站仅提供信息存储空间服务,不拥有所有权,不承担相关法律责任。如发现本站有涉嫌侵权/违法违规的内容, 请发送邮件至 举报,一经查实,本站将立刻删除。
如需转载请保留出处:https://bianchenghao.cn/27628.html

