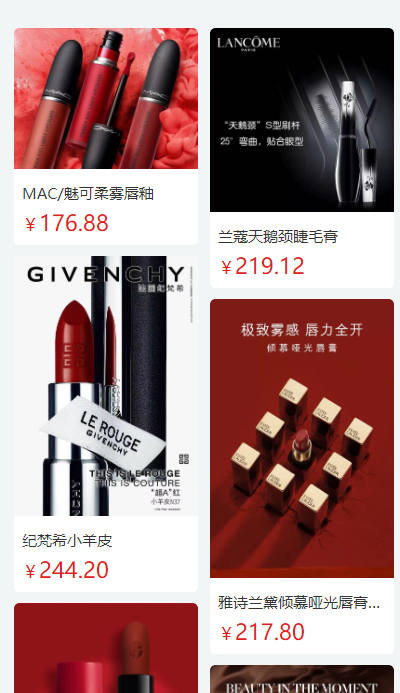
瀑布流实现效果
实现思路
同样采用常见的两栏瀑布流布局,分别用数组goodsLeftList和goodsRightList储存左右两栏要渲染对象, 初始化时,加载一张图片,然后依次把图片加到栏高更低的一栏中。 主要使用的是image的@load事件。每次通过计算放入左右列表 保存所有对象的数组将该对象删除 图片加载完毕触发下个模块实现懒加载的效果
代码理解
<view class="waterfall_left"  >
	<view class="waterfall_list" v-for="(item,index) in goodsLeftList" :key="index" ">
		<view class="waterfall_list_img">
			<image :src="item.goods_main_pic" mode="widthFix" @load="considerPush"></image>
		</view>
		<view class="msg-box">
			<view class="name single-omit">{
   {
   item.goods_name}}</view>
			<view class="price-box flex-align-center">
				<view class="unit"><text>¥</text>{
   {
   item.goods_sku.sku_sale_price}}</view>
			</view>
		</view>
	</view>
</view>
<view class="waterfall_right"  >
	<view class="waterfall_list" v-for="(item,index) in goodsRightList" :key="index">
		<view class="waterfall_list_img">
			<image :src="item.goods_main_pic" mode="widthFix" @load="considerPush"></image>
		</view>
		<view class="msg-box">
			<view class="name single-omit">{
   {
   item.goods_name}}</view>
			<view class="price-box flex-align-center">
				<view class="unit"><text>¥</text>{
   {
   item.goods_sku.sku_sale_price}}</view>
			</view>
		</view>
	</view>
</view>

<script>
export default {

	props: {

		list: {
    type: Array, required: true },
	},
	data() {

		return {

			// 左侧商品列表
			goodsLeftList:[],
			// 右侧商品列表
			goodsRightList:[],
			// 组件数据备份
			newList:[],
		}
	},
	created() {

		this.touchOff();// 触发排列
	},
	mounted(){
   },
	watch: {

		list(newValue, oldValue) {

			this.touchOff()
		},
	},
	computed:{
   },
	methods: {

		// 触发重新排列
		touchOff(){

			this.newList = [...this.list];
			this.goodsLeftList = [];
			this.goodsRightList = [];
			if(this.newList.length != 0){

				this.goodsLeftList.push(this.newList.shift());//触发排列
			}

		},
		// 计算排列
		considerPush(){

			if(this.newList.length == 0)return;//没有数据了
			let leftH = 0,rightH = 0;//左右高度
			var query = uni.createSelectorQuery().in(this);
			query.selectAll('.waterfall_left').boundingClientRect()
			query.selectAll('.waterfall_right').boundingClientRect()
			query.exec(res=>{

				leftH = res[0].length != 0 ? res[0][0].height : 0;//防止查询不到做个处理
				rightH = res[1].length != 0 ? res[1][0].height : 0;
				if(leftH == rightH || leftH < rightH){

					// 相等 || 左边小
					this.goodsLeftList.push(this.newList.shift());
				}else{

					// 右边小
					this.goodsRightList.push(this.newList.shift());
				}
			});
		},
	}
}
</script>
目前已封装为组件 传入参数list即可直接使用。因使用场景不同css自己因情况各自书写 这里就不罗列了 本文章主要分享实现思路 理解之后可以做到举一反三
今天的文章uni-app 实现瀑布流 最简洁方案分享到此就结束了,感谢您的阅读。
版权声明:本文内容由互联网用户自发贡献,该文观点仅代表作者本人。本站仅提供信息存储空间服务,不拥有所有权,不承担相关法律责任。如发现本站有涉嫌侵权/违法违规的内容, 请发送邮件至 举报,一经查实,本站将立刻删除。
如需转载请保留出处:https://bianchenghao.cn/59983.html

