📢📢📢📣📣📣
哈喽!大家好,我是【一心同学】,一位上进心十足的【Java领域博主】!😜😜😜
✨【一心同学】的写作风格:喜欢用【通俗易懂】的文笔去讲解每一个知识点,而不喜欢用【高大上】的官方陈述。
✨【一心同学】博客的领域是【面向后端技术】的学习,未来会持续更新更多的【后端技术】以及【学习心得】。
✨如果有对【后端技术】感兴趣的【小可爱】,欢迎关注【一心同学】💞💞💞
❤️❤️❤️感谢各位大可爱小可爱!❤️❤️❤️
目录
3.2.1.属性useGeneratedKeys和 keyProperty
一心同学将在本章讲解MyBatis的增删查改,在此之前,我们先来简单了解XML映射器。
1.XML 映射器
MyBatis 的真正强大在于它的语句映射,这是它的魔力所在。由于它的异常强大,映射器的 XML 文件就显得相对简单。如果拿它跟具有相同功能的 JDBC 代码进行对比,你会立即发现省掉了将近 95% 的代码。
SQL 映射文件的几个顶级元素:
cache – 该命名空间的缓存配置。
cache-ref – 引用其它命名空间的缓存配置。
resultMap – 描述如何从数据库结果集中加载对象,是最复杂也是最强大的元素。
sql – 可被其它语句引用的可重用语句块。
insert – 映射插入语句。
update – 映射更新语句。
delete – 映射删除语句。
select – 映射查询语句。
现在对XML映射器的基本组成有了解后,我们就开始本章的主题。
insert – 映射插入语句。
update – 映射更新语句。
delete – 映射删除语句。
select – 映射查询语句。
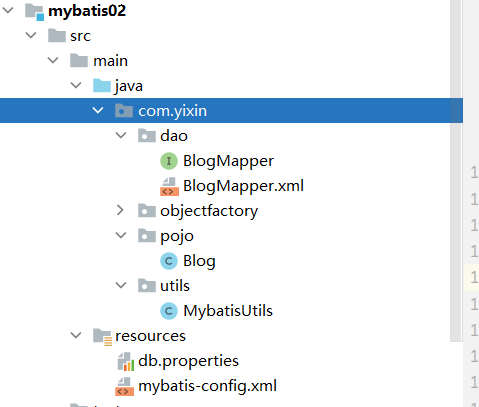
先看下我的目录:
这是我的MyBatis工具类:
package com.yixin.utils;

import org.apache.ibatis.io.Resources;
import org.apache.ibatis.session.SqlSession;
import org.apache.ibatis.session.SqlSessionFactory;
import org.apache.ibatis.session.SqlSessionFactoryBuilder;

import java.io.IOException;
import java.io.InputStream;

public class MybatisUtils {

    private static SqlSessionFactory sqlSessionFactory;

    static {
        try {
            String resource = "mybatis-config.xml";
            InputStream inputStream = Resources.getResourceAsStream(resource);
            sqlSessionFactory = new SqlSessionFactoryBuilder().build(inputStream);
        } catch (IOException e) {
            e.printStackTrace();
        }
    }

    //获取SqlSession连接
    public static SqlSession getSession(){
        return sqlSessionFactory.openSession();
    }


}
实体类:
package com.yixin.pojo;

public class Blog {
    private int id;
    private String name;
    private String pwd;
    //set,get,无参,有参
}
定义接口:
public interface BlogMapper {

}
定义映射文件BlogMapper.xml:
注意:接口类和映射文件BlogMapper.xml放在同一个目录下。
<?xml version="1.0" encoding="UTF-8" ?>
<!DOCTYPE mapper
        PUBLIC "-//mybatis.org//DTD Mapper 3.0//EN"
        "http://mybatis.org/dtd/mybatis-3-mapper.dtd">
<mapper namespace="com.yixin.dao.BlogMapper">


</mapper>
我的db.properties
driver=com.mysql.jdbc.Driver
url=jdbc:mysql://localhost:3306/mybatis_blog?useSSL=true&useUnicode=true&characterEncoding=UTF-8\
  &autoReconnect=true&failOverReadOnly=false&useUnicode=true&characterEncoding=UTF-8&serverTimezone=UTC
username=root
password=123456
我的mybatis-config.xml
<?xml version="1.0" encoding="UTF-8" ?>
<!DOCTYPE configuration
        PUBLIC "-//mybatis.org//DTD Config 3.0//EN"
        "http://mybatis.org/dtd/mybatis-3-config.dtd">
<configuration>
    <properties resource="db.properties">

    </properties>
    <!---编写setting的位置-->
    <typeAliases>
        <typeAlias type="com.yixin.pojo.Blog" alias="Blog"/>
    </typeAliases>
    <environments default="development">
        <environment id="development">
            <transactionManager type="JDBC"/>
            <dataSource type="POOLED">
                <property name="driver" value="${driver}"/>
                <property name="url" value="${url}"/>
                <property name="username" value="${username}"/>
                <property name="password" value="${password}"/>
            </dataSource>
        </environment>
    </environments>
    <mappers>
        <mapper resource="com/yixin/dao/BlogMapper.xml"/>
    </mappers>

</configuration>
如果不知道怎么配置的话,可以去看我之前的博客《MyBatis的搭建及入门》
2.select
2.1基本语法
<select id="selectPerson" parameterType="int" resultType="hashmap">
 SELECT * FROM PERSON WHERE ID = #{id}
</select>整个语句的含义:
语句名为 selectPerson,接受一个 int(或 Integer)类型的参数,并返回一个 HashMap 类型的对象,其中的键是列名,值便是结果行中的对应值。
属性解释:
id:语句名
parameterType:输入参数类型
resultType:返回结果类型
#{id}:代表输入的参数符号,相当于之前在JDBC中,SQL 中会由一个“?”来标识。
之前JDBC代码:
// 近似的 JDBC 代码,非 MyBatis 代码...
String selectPerson = "SELECT * FROM PERSON WHERE ID=?";
PreparedStatement ps = conn.prepareStatement(selectPerson);
ps.setInt(1,id);
2.2mybatis中select允许配置的属性
<select
        id="selectPerson"
        parameterType="int"
        resultType="hashmap"
        resultMap="personResultMap"
        flushCache="false"
        useCache="true"
        timeout="10"
        fetchSize="256"
        statementType="PREPARED"
        resultSetType="FORWARD_ONLY">
对各个属性的解释如下:
| 属性 | 描述 |
|---|---|
id |
在命名空间中唯一的标识符,可以被用来引用这条语句。 |
parameterType |
将会传入这条语句的参数的类全限定名或别名。这个属性是可选的,因为 MyBatis 可以通过类型处理器(TypeHandler)推断出具体传入语句的参数,默认值为未设置(unset)。 |
resultType |
期望从这条语句中返回结果的类全限定名或别名。 注意,如果返回的是集合,那应该设置为集合包含的类型,而不是集合本身的类型。 resultType 和 resultMap 之间只能同时使用一个。 |
resultMap |
对外部 resultMap 的命名引用。结果映射是 MyBatis 最强大的特性,如果你对其理解透彻,许多复杂的映射问题都能迎刃而解。 resultType 和 resultMap 之间只能同时使用一个。 |
flushCache |
将其设置为 true 后,只要语句被调用,都会导致本地缓存和二级缓存被清空,默认值:false。 |
useCache |
将其设置为 true 后,将会导致本条语句的结果被二级缓存缓存起来,默认值:对 select 元素为 true。 |
timeout |
这个设置是在抛出异常之前,驱动程序等待数据库返回请求结果的秒数。默认值为未设置(unset)(依赖数据库驱动)。 |
fetchSize |
这是一个给驱动的建议值,尝试让驱动程序每次批量返回的结果行数等于这个设置值。 默认值为未设置(unset)(依赖驱动)。 |
statementType |
可选 STATEMENT,PREPARED 或 CALLABLE。这会让 MyBatis 分别使用 Statement,PreparedStatement 或 CallableStatement,默认值:PREPARED。 |
resultSetType |
FORWARD_ONLY,SCROLL_SENSITIVE, SCROLL_INSENSITIVE 或 DEFAULT(等价于 unset) 中的一个,默认值为 unset (依赖数据库驱动)。 |
2.3思考
如果我们希望通过两个参数来查找一条数据,那么我们该怎么做呢?如:希望通过name和pwd来查询Blog这个实体
思路一
1、在接口方法的参数前加 @Param属性
2、Sql语句编写的时候,直接取@Param中设置的值即可,不需要单独设置参数类型
接口方法:
//通过id和name查询Blog
public Blog selectBlogByIdAndName(@Param("id")int id, @Param("name")String name);
xml配置文件:
<select id="selectBlogByIdAndName" resultType="Blog">
 select * from blog where id=#{id} and name=#{name}
</select>
测试方法:
@Test
public void testByIdAndName(){
 SqlSession sqlSession= MybatisUtils.getSession();
 BlogMapper mapper= sqlSession.getMapper(BlogMapper.class);

 Blog blog=mapper.selectBlogByIdAndName(1,"一心");
 System.out.println(blog);
 sqlSession.close();
}
思路二
使用万能Map
1、在接口方法中,参数直接传递Map;
public Blog selectBlogByIdAndNameMap(Map<String,Object> map);2、编写sql语句的时候,需要传递参数类型,参数类型为map
<select id="selectBlogByIdAndNameMap" parameterType="map" resultType="Blog">
 select * from blog where id=#{id} and name=#{name}
</select>
注意Map中的key的命名要与sql语句中的#{id},#{name}相符
测试方法:
@Test
public void testByIdAndNameMap(){
        SqlSession sqlSession= MybatisUtils.getSession();
        BlogMapper mapper= sqlSession.getMapper(BlogMapper.class);

        Map<String,Object> map=new HashMap<String, Object>();
        map.put("id",1);
        map.put("name","一心");
        Blog blog=mapper.selectBlogByIdAndNameMap(map);
        System.out.println(blog);
        sqlSession.close();
        }
在学insert,update,delete之前我们先对这张表的元素进行基本了解,以免一头雾水。
Insert, Update, Delete 元素的属性
| 属性 | 描述 |
|---|---|
id |
在命名空间中唯一的标识符,可以被用来引用这条语句。 |
parameterType |
将会传入这条语句的参数的类全限定名或别名。这个属性是可选的,因为 MyBatis 可以通过类型处理器(TypeHandler)推断出具体传入语句的参数,默认值为未设置(unset)。 |
flushCache |
将其设置为 true 后,只要语句被调用,都会导致本地缓存和二级缓存被清空,默认值:(对 insert、update 和 delete 语句)true。 |
timeout |
这个设置是在抛出异常之前,驱动程序等待数据库返回请求结果的秒数。默认值为未设置(unset)(依赖数据库驱动)。 |
statementType |
可选 STATEMENT,PREPARED 或 CALLABLE。这会让 MyBatis 分别使用 Statement,PreparedStatement 或 CallableStatement,默认值:PREPARED。 |
useGeneratedKeys |
(仅适用于 insert 和 update)这会令 MyBatis 使用 JDBC 的 getGeneratedKeys 方法来取出由数据库内部生成的主键(比如:像 MySQL 和 SQL Server 这样的关系型数据库管理系统的自动递增字段),默认值:false。 |
keyProperty |
(仅适用于 insert 和 update)指定能够唯一识别对象的属性,MyBatis 会使用 getGeneratedKeys 的返回值或 insert 语句的 selectKey 子元素设置它的值,默认值:未设置(unset)。如果生成列不止一个,可以用逗号分隔多个属性名称。 |
keyColumn |
(仅适用于 insert 和 update)设置生成键值在表中的列名,在某些数据库(像 PostgreSQL)中,当主键列不是表中的第一列的时候,是必须设置的。如果生成列不止一个,可以用逗号分隔多个属性名称。 |
databaseId |
如果配置了数据库厂商标识(databaseIdProvider),MyBatis 会加载所有不带 databaseId 或匹配当前 databaseId 的语句;如果带和不带的语句都有,则不带的会被忽略。 |
接下来就开始我们对这三个元素的学习了。
注意:增、删、改操作需要提交事务!
3.insert
<insert
        id="insertAuthor"
        parameterType="domain.blog.Author"
        flushCache="true"
        statementType="PREPARED"
        keyProperty=""
        keyColumn=""
        useGeneratedKeys=""
        timeout="20">
3.1基本使用
接口方法:
public int insertBlog(Blog blog);映射文件:
<insert id="insertBlog" parameterType="Blog" >
 insert into blog(id,name,pwd) values(#{id},#{name},#{pwd})
</insert>
测试代码:
@Test
public void testInsert0(){
        SqlSession sqlSession= MybatisUtils.getSession();
        BlogMapper mapper= sqlSession.getMapper(BlogMapper.class);

        Blog blog=new Blog(1,"一心","123456");
        int id=mapper.insertBlog(blog);
        sqlSession.commit();//切记要提交,不然不会更新数据库
        sqlSession.close();
        }
3.2进阶讲解
3.2.1.属性useGeneratedKeys和 keyProperty
- 两个属性有什么用
当我们设置表中的主键Id为自增时,希望插入元素没有Id时,而数据库的Id会自增,并且该Java的实体类对象的Id也会自动从数据库映射过来,而不是显示为空。
- 以往设置自增存在问题
回想一下之前的实现方式:
前提:已经将数据库中的主键ID设为自增。
alter table blog modify id int auto_increment;映射文件:
<insert id="insertBlog" parameterType="Blog" >
 insert into blog(name,pwd) values(#{name},#{pwd})
</insert>
测试代码:
@Test
public void testInsert(){
        SqlSession sqlSession= MybatisUtils.getSession();
        BlogMapper mapper= sqlSession.getMapper(BlogMapper.class);

        Blog blog=new Blog();//没有输入Id
        blog.setName("一心");
        blog.setPwd("123456");

        int i= mapper.insertBlog(blog);
        System.out.println("自动增长:"+blog.getId());

        sqlSession.commit();
        sqlSession.close();
        }
输出:
自动增长:0
问题所在:
通过之前的方式实现对Id的自增,虽然存入数据库的id实现了自增,但是并没有将数据库里的Id信息重新映射给我们这个对象。
- 怎么使用
映射文件:
<insert id="insertBlog" parameterType="Blog" useGeneratedKeys="true"
 keyProperty="id">
 insert into blog(name,pwd) values(#{name},#{pwd})
</insert>
测试代码:
@Test
public void testInsert(){
        SqlSession sqlSession= MybatisUtils.getSession();
        BlogMapper mapper= sqlSession.getMapper(BlogMapper.class);

        Blog blog=new Blog();//没有输入Id
        blog.setName("一心");
        blog.setPwd("123456");
        int i= mapper.insertBlog(blog);

        System.out.println("自动增长:"+blog.getId());
        sqlSession.commit();
        sqlSession.close();
        }
输出:
自动增长:1
如果没有useGeneratedKeys=”true”和keyProperty=”id”,下面 insert 之后的 blog.getId() 是无法获取 id 值的。
3.2.2批量插入
接口方法:
public int insertBlogList(List<Blog> blogs);映射文件:
<insert id="insertBlogList" parameterType="List" useGeneratedKeys="true"
        keyProperty="id">
    insert into blog(name,pwd) values
    <foreach item="item" collection="list" separator=",">
        (#{item.name}, #{item.pwd})
    </foreach>
</insert>
foreach:将集合中的每个元素传递给item,并通过item.name调用对象的属性值,每个属性值用“,”进行分割。
测试方法:
@Test
public void testInsertList(){
        SqlSession sqlSession= MybatisUtils.getSession();
        BlogMapper mapper= sqlSession.getMapper(BlogMapper.class);

        List<Blog> list=new ArrayList<Blog>();
        Blog blog=new Blog("张三","test1");
        Blog blog1=new Blog("李四","test2");
        Blog blog2=new Blog("王五","test3");

        list.add(blog);
        list.add(blog1);
        list.add(blog2);
        int i=mapper.insertBlogList(list);

        for(Blog b:list){
        System.out.println("自动增长:"+b.getId());
        }
        sqlSession.commit();
        sqlSession.close();
        }
4.update
<update
        id="updateAuthor"
        parameterType="domain.blog.Author"
        flushCache="true"
        statementType="PREPARED"
        timeout="20">
4.1使用方法
接口方法:
public int updateBlog(Blog blog);映射文件:
<update id="updateBlog" parameterType="Blog">
    update blog set name=#{name} ,pwd=#{pwd} where id=#{id}
</update>
测试方法:
@Test
public void testUpdate(){
        SqlSession sqlSession= MybatisUtils.getSession();
        BlogMapper mapper= sqlSession.getMapper(BlogMapper.class);

        Blog blog=new Blog(2,"一心同学","123456");
        int id=mapper.updateBlog(blog);
        System.out.println(id);
        sqlSession.commit();
        sqlSession.close();
        }
5.delete
<delete
        id="deleteAuthor"
        parameterType="domain.blog.Author"
        flushCache="true"
        statementType="PREPARED"
        timeout="20">
5.1使用方法
接口方法:
public int deleteBlog(int id);映射文件:
<delete id="deleteBlog" parameterType="int">
 delete from blog where id=#{ids}
</delete>
测试方法:
@Test
public void testDelete(){
        SqlSession sqlSession= MybatisUtils.getSession();
        BlogMapper mapper= sqlSession.getMapper(BlogMapper.class);

        int id=mapper.deleteBlog(2);
        System.out.println(id);
        sqlSession.commit();
        sqlSession.close();
        }
6.使用insert,update,delete的注意细节
1.接口返回值不能为实体类,因为没有意义,可以为void和int。
2.如果传入的是对象,映射文件中#{id}名字必须和实体类的参数名一致,如果传入的是int型则命名可以任意。
3.insert和update映射文件中的parameterType类型可以不指定(即不需要写)。
4.执行完语句后记得提交,不然不会更新数据库。
sqlSession.commit();5.映射文件中的id名不能重复。
6.批量插入映射文件也可以不指定parameterType,但需要传递集合。
结语
以上就是一心同学对MyBatis增删查改的使用总结,以及使用中需要注意的细节,下一个博客我将继续用通俗易懂的语言和例子讲解映射文件中的其它属性。
今天的文章MyBatis——增删查改分享到此就结束了,感谢您的阅读。
版权声明:本文内容由互联网用户自发贡献,该文观点仅代表作者本人。本站仅提供信息存储空间服务,不拥有所有权,不承担相关法律责任。如发现本站有涉嫌侵权/违法违规的内容, 请发送邮件至 举报,一经查实,本站将立刻删除。
如需转载请保留出处:https://bianchenghao.cn/60502.html

