
gpaw 是一款效率比较高的第一性原理计算软件,在接近vasp的计算精度情况下,只消耗20%的时间。官网为:
安装介绍:Installation - GPAW
这个可以安装在自己的电脑,用来作为测试使用。
yum install epel-release #有些程序包在这里面 yum install libxc-devel openblas-devel openmpi-devel fftw-devel yum install blacs-openmpi-devel scalapack-openmpi-devel
.bashrc 加入:
OPENMPI=/usr/lib64/openmpi
export PATH=$OPENMPI/bin/:$PATH
export LD_LIBRARY_PATH=$OPENMPI/lib:$LD_LIBRARY_PATH
export GPAW_SETUP PATH=/home/yourusername/gpaw_setups/gpaw-setups-0.9.20000.tar.gz
其中setups文件从官网下载:https://setups/setups.html#installation-of-paw-datasets。
2. 安装gpaw:
pip install gpaw
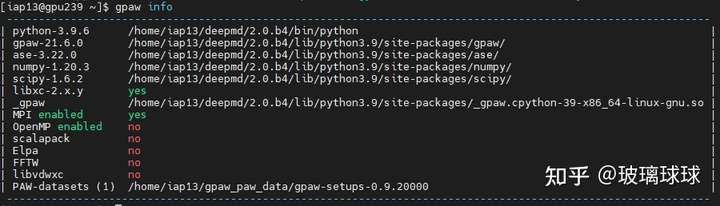
结果如上图所示,这种安装方式功能有限,并且因为为了方便,配置内容都放在了.bashrc,比较混乱。
yum install epel-release #有些程序包在这里面 yum install libxc-devel openblas-devel openmpi-devel fftw-devel yum install blacs-openmpi-devel scalapack-openmpi-devel
从gitlab下载gpaw.tar.gz,,解压并修改配置文件siteconfig.py。(若没有可创建,或者更改已存在的siteconfig_exapmle.py 为siteconfig.py):
tar -xf gpaw*.tar.gz cd pgaw vim siteconfig.py
写入:
# FFTW3:
fftw = True
if fftw:
libraries = ['fftw3']
# openblas
openblas = True
if openblas :
libraries +=['openblas']
# mpiblacs
mpiblacs = True
if mpiblacs :
libraries +=['mpiblacs']
# ScaLAPACK (version 2.0.1+ required):
scalapack = True
if scalapack:
libraries += ['scalapack']
# xc:
xc = True
if xc:
libraries += ['xc']
# openmp
openmp = False
if openmp:
extra_compile_args += ['-fopenmp']
extra_link_args += ['-fopenmp']
保存文件,其中 openmp 在并行安装时使用。
2. 安装gpaw:
python setup.py install
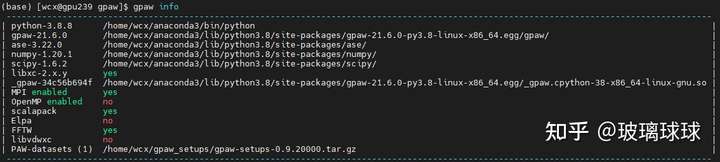
结果如下图所示,推荐,其他辅助功能可按照类似方式配置。
ubuntu
注:ubuntu同centos,第一步依赖程序换成:
sudo apt install libopenblas-dev libxc-dev libscalapack-mpi-dev libfftw3-dev
对于能够联网intel服务器来说这里,可以参考第二种方式。关闭其中的openmp,同时需要在.bashrc文件中加入:
export PATH=/opt/intel2020/compilers_and_libraries_2020.0.166/linux/mpi/:$PATH
export PATH=/opt/intel2020/compilers_and_libraries_2020.0.166/linux/mpi/intel64/bin/:$PATH
export PATH=/opt/intel2020/compilers_and_libraries_2020.0.166/linux/:$PATH
intel mpi下载请自行百度,一般使用过一段时间的服务器都已经安装好了,对应位置请自行设置。
对于不能联网服务器,比如某些使用intel cpu的超算,安装最为麻烦,其他种类的cpu请参考他们的文档。
Inter MPI:(不使用openmp)
intel mpi下载请自行百度,一般使用过一段时间的服务器都已经安装好了,对应位置请自行设置。在.bashrc文件中加入:
export PATH=/opt/intel2020/compilers_and_libraries_2020.0.166/linux/mpi/:$PATH
export PATH=/opt/intel2020/compilers_and_libraries_2020.0.166/linux/mpi/intel64/bin/:$PATH
export PATH=/opt/intel2020/compilers_and_libraries_2020.0.166/linux/:$PATH
libxc:
wget http://www. pus/down.php?file=libxc/4.2.3/libxc-4.2.3.tar.gz -O libxc-4.2.3.tar.gz
tar -xf libxc-4.2.3.tar.gz
cd libxc-4.2.3
https://blog.sciencenet.cn/configure --enable-shared --disable-fortran --prefix=$HOME/libxc-4.2.3
make -j 10
make install
添加文件.bashrc:
XC=~/libxc-4.2.3
export C_INCLUDE_PATH=$XC/include
export LIBRARY_PATH=$XC/lib
export LD_LIBRARY_PATH=$XC/lib
(这个过程中,可能会需要设置添加-std=c99, 或者直接更改xc-theshold.c文件第800+行,把i定义放在for循环外。不知道是不是bug? )
openblas (非必须):
tar -xf openblas.tar.gz
cd openblas
https://blog.sciencenet.cn/configure --prefix=$HOME/openblas
make -j 10
make install
libraries = ['openblas']
library_dirs = ['path_to_myblas']
添加文件.bashrc:
export C_INCLUDE_PATH=$HOME/openblas/include/:$C_INCLUDE_PATH
export LD_LIBRARY_PATH=$HOME/openblas/lib/:$LD_LIBRARY_PATH
export LIBRARY_PATH=/$HOME/openblas/lib/:$LIBRARY_PATH
export PATH=$HOME/openblas/bin/:$PATH
fftw:
没啥说的,和上面一样,编译安装,其中配置参数注意:
(并行版本)
https://blog.sciencenet.cn/configure MPICC=mpicc --prefix=$HOME/fftw --disable-fortran --enable-mpi --enable-shared
(非并行版本)
https://blog.sciencenet.cn/configure --prefix=$HOME/fftw --disable-fortran
添加文件.bashrc:
export LD_LIBRARY_PATH=/$HOME/fftw/lib/:$LD_LIBRARY_PATH
export C_INCLUDE_PATH=$HOME/fftw/include/:$C_INCLUDE_PATH
export LIBRARY_PATH=$HOME/fftw/lib/:$LIBRARY_PATH
其他的库请按照该方式自行安装。
2. gpaw:
tar -xf gpaw*.tar.gz cd gpaw vim siteconfig.py
siteconfig.py 写入:
libraries += ['openblas']
library_dirs += ['/data/home/wa/openblas/lib/']
include_dirs +=["/data/home/wa/anaconda3/include/python3.8"]
include_dirs +=["/data/home/wa/anaconda3/lib/python3.8/site-packages/numpy/core/include"]
# FFTW3:
fftw=True
libraries += ['fftw3']
ff = '/data/home/wa/gpaw/fftw/'
include_dirs += [ff + 'include']
library_dirs += [ff + 'lib']
extra_link_args += ['-Wl,-rpath={ff}lib'.format(ff=ff)]
# LibXC:
xc = '/data/home/wa/gpaw/libxc/'
include_dirs += [xc + 'include']
library_dirs += [xc + 'lib']
# You can use rpath to avoid changing LD_LIBRARY_PATH:
extra_link_args += ['-Wl,-rpath={xc}lib'.format(xc=xc)]
if 'xc' not in libraries:
libraries.append('xc')
setup.py 文件写入:
extra_compile_args = ['-Wall', '-Wno-unknown-pragmas', '-std=c99',"-Xlinker",]
运行:
python setup.py build_ext install
这样装完,基本都是动态链接。所以谨慎删除文件。

编辑于 2021-09-18 18:02
https://blog.sciencenet.cn/blog-3471958-1328574.html
上一篇:已知拉曼张量,计算拉曼振动模强度随旋转角度变化关系(偏振拉曼)
下一篇:openmpi+gfortran编译ShengBTE
今天的文章 2026年linux怎么自学(linux怎么学 知乎)分享到此就结束了,感谢您的阅读。
版权声明:本文内容由互联网用户自发贡献,该文观点仅代表作者本人。本站仅提供信息存储空间服务,不拥有所有权,不承担相关法律责任。如发现本站有涉嫌侵权/违法违规的内容, 请发送邮件至 举报,一经查实,本站将立刻删除。
如需转载请保留出处:https://bianchenghao.cn/bian-cheng-ri-ji/45713.html