

yum -y install rsyncd
uid = rsync
gid = rsync
port = 873
fake super = yes
use chroot = no
max connections = 200
timeout = 300
pid file = /var/run/rsyncd.pid
lock file = /var/run/rsync.lock
log file = /var/log/rsyncd.log
ignore errors
read only = false
list = false
hosts allow = 172.16.1.0/24
hosts deny = 0.0.0.0/32
auth users = rsync_backup
secrets file = /etc/rsync.password
[backup]
comment = "backup dir by oldboy"
path = /backup
[root@backup ~] # useradd -s /sbin/nologin -M rsync
echo "rsync_backup:oldboy123" > /etc/rsync.password && chmod 600 /etc/rsync.password
mkdir -p /backup && chown -R rsync. /backup
systemctl restart rsyncd && systemctl enable rsyncd
yum -y install nfs-utils
[root@nfs01 ~] # vim /etc/exports
/data 172.16.1.0/24(rw,sync)
mkdir -p /data &&chown -R nfsnobody. /data
[root@nfs01 ~] # systemctl restart rpcbind.socket && systemctl enable rpcbind.socket
[root@nfs01 ~] # systemctl restart nfs && systemctl enable nfs
yum -y install rsync
echo " oldboy123" > /etc/rsync.password && chmod 600 /etc/rsync.password
yum -y install inotify-tools
[root@nfs01 ~] # cd /usr/local/
[root@nfs01 local] # unzip sersync_installdir_64bit.zip
[root@nfs01 local] # mv sersync_installdir_64bit/* https://www.cnblogs.com/liangyuxing/p/
[root@nfs01 ~] # cd /usr/local/
[root@nfs01 local] # cd sersync/conf
[root@nfs01 conf] # vim confxml.xml
………………………………………………
<sersync>
<localpath watch="/data">
<remote ip="172.16.1.41" name="/backup"/>
<!--<remote ip="192.168.8.39" name="tongbu"/>-->
<!--<remote ip="192.168.8.40" name="tongbu"/>-->
</localpath>
<rsync>
<commonParams params="-az"/>
<auth start="true" users="rsync_backup" passwordfile="/etc/rsync.password"/>
[root@nfs01 bin] # chmod +x sersync && sersync -dro /usr/local/sersync/conf/confxml.xml
export PATH=/usr/local/sbin:/usr/local/bin:/usr/sbin:/usr/bin:/root/bin:/usr/local/sersync/bin/:/usr/local/sersync/bin/
5.2.5.1 ERROR: The remote path must start with a module name not a /
<sersync>
<localpath watch="/data">
<remote ip="172.16.1.41" name="backup"/> 这里是模块不是备份目录
5.2.5.2 测试成功
添加
cd /data && rsync -az -R "https://www.cnblogs.com/liangyuxing/p/11.txt" rsync_backup@172.16.1.41::backup --password-file=/etc/rsync.password
删除
cd /data && rsync -az -R --delete https://www.cnblogs.com/liangyuxing/p/ --include="11.txt" --exclude=* rsync_backup@172.16.1.41::backup --password-file=/etc/rsync.password
服务器172.16.1.41
备份目录:/backup
服务器 172.16.1.31
本地存储目录:/backup/172.16.1.31
/etc/password
/etc/shadow
/etc/rc.d/rc.local
/usr/local
/var/log/messages
#!/bin/bash
DIR_INFO="/backup"
IP_INFO=$(hostname -i)
mkdir -p $DIR_INFO/$IP_INFO
#开始压缩备份目录
tar -zcPhf $DIR_INFO/$IP_INFO/backup_nfs01_$(date +%F_'week'%w)_data.tar.gz /etc/passwd /etc/shadow /etc/rc.d/rc.local /usr/local /var/log/messages
#开始创建指纹文件
find $DIR_INFO -name "*.tar.gz" -type f -mmin -20 | xargs md5sum > $DIR_INFO/$IP_INFO/finger.txt
#开始发送数据
rsync -azL $DIR_INFO/$IP_INFO/ rsync_backup@172.16.1.41::backup/$IP_INFO --password-file=/etc/rsync.password
#查找出大于7天的数据包删除
find $DIR_INFO -type f -name "*.tar.gz" -mtime +7 -delete
6.3.2.1 编写脚本
[root@backup scripts] # vim backup_server.sh
#!/bin/bash
DIR_INFO="/backup"
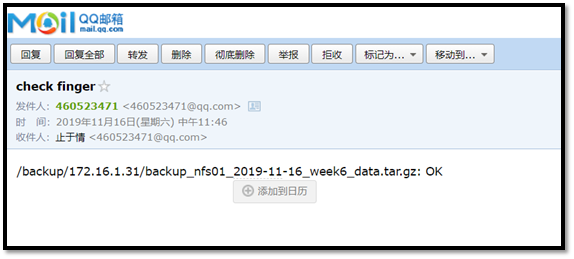
.纹验证
find $DIR_INFO -name "*finger*.txt" -type f | xargs md5sum -c > /tmp/finger.txt
#给管理发送
mail -s "check finger" @.com < /tmp/finger.txt
6.3.2.2 编写邮件信息
set from=@.com
set smtp=smtp..com
set smtp-auth-user=@.com
set smtp-auth-password=enoncgdkvjhlbjbd
set smtp-auth=login
(http://nginx.org/en/linux_packages.html)
vim /etc/yum.repos.d/nginx.repo
[nginx-stable]
name=nginx stable repo
baseurl=http://nginx.org/packages/centos/$releasever/$basearch/
gpgcheck=1
enabled=1
gpgkey=https://nginx.org/keys/nginx_signing.key
module_hotfixes=true
yum -y install nginx
useradd -M -s /sbin/nologin www
user www; 修改www
worker_processes 1;
error_log /var/log/nginx/error.log warn;
pid /var/run/nginx.pid;
events {
worker_connections 1024;
}
http {
include /etc/nginx/mime.types;
default_type application/octet-stream;
log_format main '$remote_addr - $remote_user [$time_local] "$request" '
'$status $body_bytes_sent "$http_referer" '
'"$http_user_agent" "$http_x_forwarded_for"';
access_log /var/log/nginx/access.log main;
sendfile on;
#tcp_nopush on;
keepalive_timeout 65;
#gzip on;
include /etc/nginx/conf.d/*.conf;
}
systemctl restart nginx && systemctl enable nginx
yum remove php-mysql php php-fpm php-common
rpm -Uvh https://dl.fedoraproject.org/pub/epel/epel-release-latest-7.noarch.rpm
rpm -Uvh https://mirror.webtatic.com/yum/el7/webtatic-release.rpm
yum install -y php71w php71w-cli php71w-common php71w-devel php71w-embedded php71w-gd php71w-mcrypt php71w-mbstring php71w-pdo php71w-xml php71w-fpm php71w-mysqlnd php71w-opcache php71w-pecl-memcached php71w-pecl-redis php71w-pecl-mongodb
[root@web01 yum.repos.d] # vim /etc/php-fpm.d/www.conf
; Start a new pool named 'www'.
[www]
; Unix user/group of processes
; Note: The user is mandatory. If the group is not set, the default user's group
; will be used.
; RPM: apache Choosed to be able to access some dir as httpd
user = www 修改属主
; RPM: Keep a group allowed to write in log dir.
group = www 修改属组
vim /etc/php.ini
779 upload_max_filesize = 10M 指定最大上传文件大小限制
656 post_max_size = 10M 请求主体最大尺寸
802 max_execution_time = 300 执行上传数据操作最大执行时间
[root@web02 yum.repos.d] # systemctl restart php-fpm.service
[root@web02 yum.repos.d] #
yum install mariadb-server mariadb -y
[root@db ~] # systemctl start mariadb.service && systemctl enable mariadb.service
Created symlink from /etc/systemd/system/multi-user.target.wants/mariadb.service to /usr/lib/systemd/system/mariadb.service.
[root@db ~] #
MariaDB [(none)]> create database wordpress_7;
Query OK, 1 row affected (0.01 sec)
MariaDB [(none)]> grant all on dwordpress_7.* to 'wordpress_7'@'172.16.1.%' identified by 'oldboy123';
Query OK, 0 rows affected (0.00 sec)
MariaDB [(none)]> create database discuz_7;
Query OK, 1 row affected (0.01 sec)
MariaDB [(none)]> grant all on discuz_7.* to 'discuz_7'@'172.16.1.%' identified by 'oldboy123';
Query OK, 0 rows affected (0.00 sec)
MariaDB [(none)]> create database wecenter_7;
Query OK, 1 row affected (0.01 sec)
MariaDB [(none)]> grant all on wecenter_7.* to 'wecenter_7'@'172.16.1.%' identified by 'oldboy123';
Query OK, 0 rows affected (0.00 sec)
MariaDB [(none)]> create database wordpress_8;
Query OK, 1 row affected (0.01 sec)
MariaDB [(none)]> grant all on dwordpress_8.* to 'wordpress_8'@'172.16.1.%' identified by 'oldboy123';
Query OK, 0 rows affected (0.00 sec)
MariaDB [(none)]> create database discuz_8;
Query OK, 1 row affected (0.01 sec)
MariaDB [(none)]> grant all on discuz_8.* to 'discuz_8'@'172.16.1.%' identified by 'oldboy123';
Query OK, 0 rows affected (0.00 sec)
MariaDB [(none)]> create database wecenter_8;
Query OK, 1 row affected (0.01 sec)
MariaDB [(none)]> grant all on wecenter_8.* to 'wecenter_8'@'172.16.1.%' identified by 'oldboy123';
Query OK, 0 rows affected (0.00 sec)
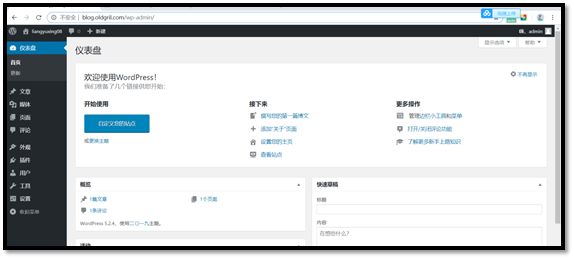
[root@web01 conf.d] # vim blog.conf
server {
listen 80;
server_name blog.oldboy.com;
client_max_body_size 10m;
location / {
root /html/blog;
index index.php index.html index.htm;
}
location ~ .php$ {
root /html/blog;
fastcgi_pass 127.0.0.1:9000;
fastcgi_index index.php;
fastcgi_param SCRIPT_FILENAME $document_root$fastcgi_script_name;
include fastcgi_params;
}
}
mkdir -p /html/blog && chown -R www. /html/*

server {
listen 80;
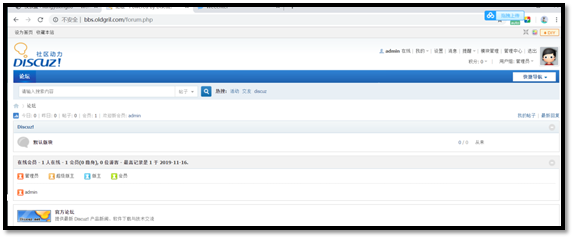
server_name bbs.oldboy.com;
client_max_body_size 10m;
location / {
root /html/bbs;
index index.php index.html index.htm;
}
location ~ .php$ {
root /html/bbs;
fastcgi_pass 127.0.0.1:9000;
fastcgi_index index.php;
fastcgi_param SCRIPT_FILENAME $document_root$fastcgi_script_name;
include fastcgi_params;
}
}
mkdir -p /html/bbs && chown -R www. /html/*
server {
listen 80;
server_name zhihu.oldboy.com;
client_max_body_size 10m;
location / {
root /html/zhihu;
index index.php index.html index.htm;
}
location ~ .php$ {
root /html/zhihu;
fastcgi_pass 127.0.0.1:9000;
fastcgi_index index.php;
fastcgi_param SCRIPT_FILENAME $document_root$fastcgi_script_name;
include fastcgi_params;
}
}
mkdir -p /html/zhihu && chown -R www. /html/*


yum -y install nginx
[root@lb01 conf.d] # pwd
/etc/nginx/conf.d
[root@lb01 conf.d] # cat www.conf
upstream oldboy {
server 10.0.0.7:80;
server 10.0.0.8:80;
}
server {
listen 80;
server_name localhost;
location / {
proxy_pass http://oldboy;
proxy_set_header X-Forwarded-For $remote_addr;
}
}
[root@lb01 conf.d] #
成功
yum -y install keepalived
[root@lb01 ~] # vim /etc/keepalived/keepalived.conf
! Configuration File for keepalived
global_defs {
notification_email {
}
notification_email_from
smtp_server 192.168.200.1
smtp_connect_timeout 30
router_id lb01
}
vrrp_instance oldboy {
state MASTER
interface eth0
virtual_router_id 66
priority 150
advert_int 1
authentication {
auth_type PASS
auth_pass 1234
}
virtual_ipaddress {
10.0.0.3
}
}
[root@lb02 ~] #
[root@lb02 ~] # vim /etc/keepalived/keepalived.conf
! Configuration File for keepalived
global_defs {
notification_email {
}
notification_email_from
smtp_server 192.168.200.1
smtp_connect_timeout 30
router_id lb02
}
vrrp_instance oldboy {
state BACKUP
interface eth0
virtual_router_id 66
priority 100
advert_int 1
authentication {
auth_type PASS
auth_pass 1234
}
virtual_ipaddress {
10.0.0.3
}
}
systemctl restart keepalived.service && systemctl enable keepalived.service
[root@lb01 conf.d] # vim /etc/keepalived/keepalived.conf
! Configuration File for keepalived
global_defs {
notification_email {
router_id lb01
}
}
vrrp_instance oldboy {
state MASTER
interface eth0
virtual_router_id 66
priority 150
advert_int 1
authentication {
auth_type PASS
auth_pass 1234
}
virtual_ipaddress {
10.0.0.3
}
}
vrrp_instance girl {
state BACKUP
interface eth0
virtual_router_id 67
priority 100
advert_int 1
authentication {
auth_type PASS
auth_pass 1234
}
virtual_ipaddress {
10.0.0.4
}
}
[root@lb02 conf.d] # vim /etc/keepalived/keepalived.conf
! Configuration File for keepalived
global_defs {
notification_email {
router_id lb02
}
}
vrrp_instance oldboy {
state BACKUP
interface eth0
virtual_router_id 66
priority 100
advert_int 1
authentication {
auth_type PASS
auth_pass 1234
}
virtual_ipaddress {
10.0.0.3
}
}
vrrp_instance oldgirl {
state MASTER
interface eth0
virtual_router_id 67
priority 150
advert_int 1
authentication {
auth_type PASS
auth_pass 1234
}
virtual_ipaddress {
10.0.0.4
}
}
[root@lb02 conf.d] # vim www.conf
upstream oldboy {
ip_hash;
server 172.16.1.7:80;
server 172.16.1.8:80;
}
server {
listen 80;
server_name localhost;
location / {
proxy_pass http://oldboy;
proxy_set_header Host $host;
proxy_set_header X-Forwarded-For $remote_addr;
}
}
服务器
外网
内网
web01
10.0.0.7
172.16.1.7


[root@web01 yum.repos.d] # yum -y install nginx
[root@web01 yum.repos.d] # openssl genrsa -idea -out /etc/nginx/server.key 2048
Generating RSA private key, 2048 bit long modulus
..................................................................................+++
....................................................+++
e is 65537 (0x10001)
Enter pass phrase for /etc/nginx/server.key:
Verifying - Enter pass phrase for /etc/nginx/server.key:
[root@web01 yum.repos.d] #
[root@web01 yum.repos.d] # cd /etc/nginx/
[root@web01 nginx] # openssl req -days 36500 -x509 -sha256 -nodes -newkey rsa:2048 -keyout server.key -out server.crt
Generating a 2048 bit RSA private key
.....................+++
You have new mail in /var/spool/mail/root
[root@web01 yum.repos.d] #
13.3.3.1 http
的实现13.3.3.1.1 环境的准备
[root@web01 html] # vim /etc/nginx/conf.d/www.conf
1 server{
2 listen 80;
3 server_name www.oldboy.com;
4 root /html/www/;
5 autoindex on;
6 }
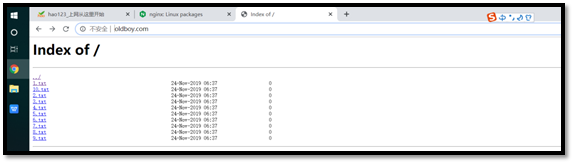
[root@web01 ~] # tree /html/www/
/html/www/
├── 10.txt
├── 1.txt
├── 2.txt
├── 3.txt
├── 4.txt
├── 5.txt
├── 6.txt
├── 7.txt
├── 8.txt
└── 9.txt
0 directories, 10 files
[root@web01 ~] #
13.3.3.1.2 查看是否正常
13.3.3.2 https
实现13.3.3.2.1 环境的准备
[root@web01 conf.d] # vim www.conf
server{
listen 80;
server_name www.oldboy.com;
rewrite /(.*)$ https://$host/$1;
}
server{
listen 443 ssl;
server_name www.oldboy.com;
ssl_certificate server.crt;
ssl_certificate_key server.key;
root /html/www/;
autoindex on;
}
13.3.3.2.2 查看是否正常

服务器
外网
内网
m01
10.0.0.61
172.16.1.61
nfs01
10.0.0.31
172.16.1.31
br>
br>
img src="https://img2018.cnblogs.com/blog///--.png" alt="">
允许内网其他机器同步时间
img src="https://img2018.cnblogs.com/blog///--.png" alt="">
允许上层时间服务器修改本机时间
外部时间服务器不可用的时候,以本地的时间作为同步时间
img src="https://img2018.cnblogs.com/blog///--.png" alt="">
[root@m01 ~] # date -s "" 修改时间为
ping: baidu.com: Name or service not known 域名解析失败
connect: Network is unreachable 外网不通畅
root@nfs01 ~] # ntpdate 172.16.1.61 内网同步服务端时间
Tue Oct 1 00:02:56 CST 2019 查看时间
Tue Oct 1 00:07:48 CST 2019 服务端现在的时间
Tue Oct 1 00:07:53 CST 2019 客户端现在的时间
tbody valign="top">
服务器
外网
内网
m01
10.0.0.61
172.16.1.61
可以出现这个证明支持vpn
查看转发是否开启
设置内核转发
添加本级公网IP
分配给vpn的内网网段
col style="width: 237px">
col style="width: 237px">
col style="width: 237px">
服务器
外网
内网
jumpserver
10.0.0.91
172.16.1.91
关闭
关闭
10.0.0.81
y
smtp..com
@.com
enoncgdkvjhlbjbd
y
admin
admin
admin
SUCCESS
服务器
外网
内网
m01
10.0.0.5
172.16.1.5
web01
10.0.0.7
172.16.1.7
y
y
y
y
hostname
服务器
内网
外网
nfs (主)
172.16.1.31
10.0.031
mysql(副)
172.16.1.51
10.0.0.51
web
172.16.1.7
10.0.0.7
mysql( 主 )
mysql( 副 )
- 读写分离,支持更大的并发,提高用户的体验度
- 拥有数据库的冗余机制,提高数据的安全性
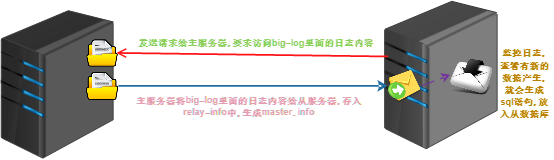
- 主服务器开启big-log日志(记录数据的增删改查)
- 从服务器开启I/O线程响应请求想将big-log的日志内容给我
- 从服务器会将数据放到relay-info中,生成master.info,(记录master的一些信息)
- 从服务器会一直监控relay日志的更新,一旦有更新,将信息解析成sql内容.添加数据库中
- 保持2个服务器的数据库内容一致
- 并发量大的时候
- 数据需要备份
- 大型公司或者一些国家级的单位需要使用
22.4.1.1 数据库开始安装
[root@db ~] # yum install mariadb mariadb-server -y
22.4.1.2 数据库启动
[root@db ~] # systemctl start mariadb.service
22.4.1.3 安装数据库
[root@db ~] # mysql_secure_installation
Enter current password for root (enter for none):
OK, successfully used password, moving on...
Set root password? [Y/n] y
New password:
Re-enter new password:
Password updated successfully!
Reloading privilege tables..
... Success!
Remove anonymous users? [Y/n] y
... Success!
Disallow root login remotely? [Y/n] n
Remove test database and access to it? [Y/n] y
- Dropping test database...
... Success!
- Removing privileges on test database...
... Success!
Reload privilege tables now? [Y/n] y
... Success!
Thanks for using MariaDB!
22.4.1.4 登录数据库创建数据库并且添加测试数据
[root@db ~] # mysql -uroot -p
MariaDB [(none)]> create database DB1; 创建数据库DB1
Query OK, 1 row affected (0.00 sec)
MariaDB [(none)]> show databases; 显示数据库
+--------------------+
| Database |
+--------------------+
| information_schema |
| DB1 |
| mysql |
| performance_schema |
+--------------------+
4 rows in set (0.00 sec)
MariaDB [(none)]> grant all privileges on *.* to root@'%' identified by '' with grant option; 进行数据库授权和密码的修改
Query OK, 0 rows affected (0.00 sec)
MariaDB [(none)]> use DB1; 使用数据库
Database changed
MariaDB [DB1]> create table test (name VARCHAR(20), sex CHAR(1), birth DATE, birthaddr VARCHAR(20)); 创建表
Query OK, 0 rows affected (0.02 sec)
MariaDB [DB1]> insert into test values ('abccs','f','1995-10-22','china'); 插入数据
Query OK, 1 row affected (0.00 sec)
MariaDB [DB1]> select * from test; 查看数据
+-------+------+------------+-----------+
| name | sex | birth | birthaddr |
+-------+------+------------+-----------+
| abccs | f | 1995-10-22 | china |
+-------+------+------------+-----------+
1 row in set (0.00 sec)
MariaDB [DB1]>
22.4.1.5 将数据进行备份,并且发送到从服务器上
[root@db ~] # mysqldump -h localhost -u root -p DB1 > /tmp/1.sql
Enter password:
[root@db ~] #
[root@db ~] # scp -r /tmp/1.sql 172.16.1.31:/tmp/
root@172.16.1.31's password:
1.sql 100% 1926 1.2MB/s 00:00
[root@db ~] #
22.4.1.6 主服务器配置文件进行配置
#设置服务器ID,为1的表示为主服务器;如果服务器没有以下配置,添加,如果有就跳过。
server-id=1
启动MySQ二进制日志系统,注意:如果原来的配置文件中已经有这一行,就不用再添加了。
log_bin=mysql-bin?
需要同步的数据库名,如果有多个数据库,可重复此参数,每个数据库一行
binlog-do-db=DB1
不同步mysql系统数据库
binlog-ignore-db=mysql
22.4.1.7 重启服务
[root@db ~] # systemctl restart mariadb.service
[root@db ~] #
[root@db ~] # mysql -uroot -p
MariaDB [(none)]> show master status;
+-------------------+----------+--------------+------------------+
| File | Position | Binlog_Do_DB | Binlog_Ignore_DB |
+-------------------+----------+--------------+------------------+
| mysql-bin?.000001 | 245 | DB1 | mysql |
+-------------------+----------+--------------+------------------+
1 row in set (0.00 sec)
MariaDB [(none)]>
-
查看主服务器,出现以上类似信息;如果看不见以下结果或者为空的话,说明my.cnf配置文件配置的有问题,请检查即可。
-
这里记住File的值:mysql-bin.000001和Position的值:245,后面会用到。
22.4.2.1 数据库开始安装
[root@db ~] # yum install mariadb mariadb-server -y
22.4.2.2 数据库启动
[root@db ~] # systemctl start mariadb.service
22.4.2.3 安装数据库
[root@db ~] # mysql_secure_installation
Enter current password for root (enter for none):
OK, successfully used password, moving on...
Set root password? [Y/n] y
New password:
Re-enter new password:
Password updated successfully!
Reloading privilege tables..
... Success!
Remove anonymous users? [Y/n] y
... Success!
Disallow root login remotely? [Y/n] n
Remove test database and access to it? [Y/n] y
- Dropping test database...
... Success!
- Removing privileges on test database...
... Success!
Reload privilege tables now? [Y/n] y
... Success!
Thanks for using MariaDB!
22.4.2.4 登录数据库创建数据库并且添加测试数据
[root@db ~] # mysql -uroot -p
MariaDB [(none)]> create database DB1; 创建数据库DB1
Query OK, 1 row affected (0.00 sec)
MariaDB [(none)]> show databases; 显示数据库
+--------------------+
| Database |
+--------------------+
| information_schema |
| DB1 |
| mysql |
| performance_schema |
+--------------------+
4 rows in set (0.00 sec)
22.4.2.5 导入数据库
[root@nfs01 ~] # mysql -h localhost -u root -p DB1 < /tmp/1.sql
Enter password:
[root@nfs01 ~] #
22.4.2.6 更新master信息
[root@nfs01 ~] # mysql -uroot -p
Enter password:
MariaDB [(none)]> slave stop;
Query OK, 0 rows affected, 1 warning (0.00 sec)
MariaDB [(none)]> use DB1;
Database changed
MariaDB [DB1]> change master to master_host='172.16.1.51',master_user='root',master_password='',master_log_file='mysql-bin?.000001',master_log_pos=245;
MariaDB [DB1]>
- change master to master_host='主服务器',master_user='mysql用户名',master_password='mysql服务密码',master_log_file='File值',master_log_pos=Postion值;
22.4.2.7 添加配置文件(/etc/my.cnf)
[mysqld]
datadir=/var/lib/mysql
socket=/var/lib/mysql/mysql.sock
#设置服务器ID,为1的表示为主服务器;如果服务器没有以下配置,添加,如果有就跳过。
server-id=2
启动MySQ二进制日志系统,注意:如果原来的配置文件中已经有这一行,就不用再添加了。
log_bin=mysql-bin?
需要同步的数据库名,如果有多个数据库,可重复此参数,每个数据库一行
binlog-do-db=DB1
不同步mysql系统数据库
binlog-ignore-db=mysql
22.4.2.8 重启数据库
[root@nfs01 ~] # systemctl restart mariadb
[root@nfs01 ~] #
22.4.2.8 查看主从同步是否正常
[root@nfs01 ~] # mysql -uroot -p
Enter password:
Welcome to the MariaDB monitor. Commands end with ; or g.
Your MariaDB connection id is 4
Server version: 5.5.64-MariaDB MariaDB Server
Copyright (c) 2000, 2018, Oracle, MariaDB Corporation Ab and others.
Type 'help;' or 'h' for help. Type 'c' to clear the current input statement.
MariaDB [(none)]> show master status; 查看状态
+-------------------+----------+--------------+------------------+
| File | Position | Binlog_Do_DB | Binlog_Ignore_DB |
+-------------------+----------+--------------+------------------+
| mysql-bin?.000001 | 245 | DB1 | mysql |
+-------------------+----------+--------------+------------------+
1 row in set (0.00 sec)
MariaDB [(none)]> slave start; 启动slave
Query OK, 0 rows affected, 1 warning (0.00 sec)
MariaDB [(none)]> show master statusG; 查看主从同步是否正常
* 1. row *
File: mysql-bin?.000001
Position: 245
Binlog_Do_DB: DB1
Binlog_Ignore_DB: mysql
1 row in set (0.00 sec)
ERROR: No query specified
MariaDB [(none)]> show slave statusG;
* 1. row *
Slave_IO_State: Waiting for master to send event
Master_Host: 172.16.1.51
Master_User: root
Master_Port: 3306
Connect_Retry: 60
Master_Log_File: mysql-bin?.000001
Read_Master_Log_Pos: 245
Relay_Log_File: mariadb-relay-bin.000005
Relay_Log_Pos: 530
Relay_Master_Log_File: mysql-bin?.000001
Slave_IO_Running: Yes
Slave_SQL_Running: Yes
Replicate_Do_DB:
Replicate_Ignore_DB:
Replicate_Do_Table:
Replicate_Ignore_Table:
Replicate_Wild_Do_Table:
Replicate_Wild_Ignore_Table:
Last_Errno: 0
Last_Error:
Skip_Counter: 0
Exec_Master_Log_Pos: 245
Relay_Log_Space: 826
Until_Condition: None
Until_Log_File:
Until_Log_Pos: 0
Master_SSL_Allowed: No
Master_SSL_CA_File:
Master_SSL_CA_Path:
Master_SSL_Cert:
Master_SSL_Cipher:
Master_SSL_Key:
Seconds_Behind_Master: 0
Master_SSL_Verify_Server_Cert: No
Last_IO_Errno: 0
Last_IO_Error:
Last_SQL_Errno: 0
Last_SQL_Error:
Replicate_Ignore_Server_Ids:
Master_Server_Id: 1
1 row in set (0.00 sec)
ERROR: No query specified
MariaDB [(none)]>
今天的文章 2026年查看本机本级信息(我查看本机信息)分享到此就结束了,感谢您的阅读。
版权声明:本文内容由互联网用户自发贡献,该文观点仅代表作者本人。本站仅提供信息存储空间服务,不拥有所有权,不承担相关法律责任。如发现本站有涉嫌侵权/违法违规的内容, 请发送邮件至 举报,一经查实,本站将立刻删除。
如需转载请保留出处:https://bianchenghao.cn/bian-cheng-ri-ji/50429.html