前言
本文所讲的组件化案例是基于自己开源的组件化框架项目
github上地址github.com/HelloChenJi…
其中即时通讯(Chat)模块是单独的项目
github上地址github.com/HelloChenJi…
1.什么是组件化?
项目发展到一定阶段时,随着需求的增加以及频繁地变更,项目会越来越大,代码变得越来越臃肿,耦合会越来越多,开发效率也会降低,这个时候我们就需要对旧项目进行重构即模块的拆分,官方的说法就是组件化。
2.为什么需要组件化和组件化带来的好处?
1、 现在Android项目中代码量达到一定程度,编译将是一件非常痛苦的事情,一般都需要变异5到6分钟。Android studio推出instant run由于各种缺陷和限制条件(比如采用热修复tinker)一般情况下是被关闭的。而组件化框架可以使模块单独编译调试,可以有效地减少编译的时间。
2、通过组件化可以更好的进行并行开发,因为我们可以为每一个模块进行单独的版本控制,甚至每一个模块的负责人可以选择自己的设计架构而不影响其他模块的开发,与此同时组件化还可以避免模块之间的交叉依赖,每一个模块的开发人员可以对自己的模块进行独立测试,独立编译和运行,甚至可以实现单独的部署。从而极大的提高了并行开发效率。
3.组件化的基本框架
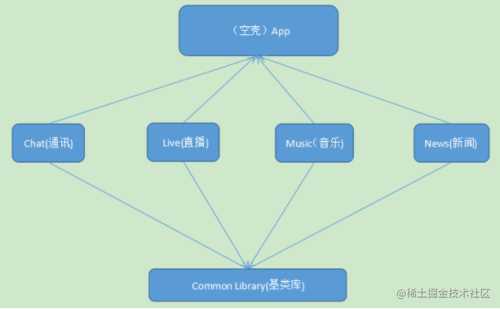
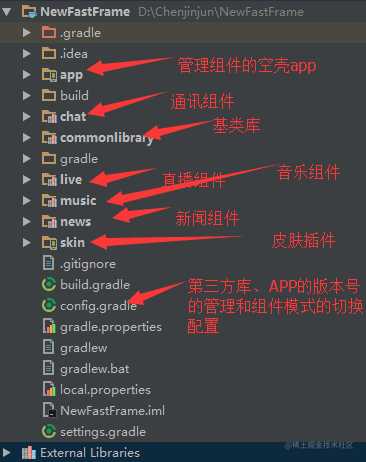
4.组件化框架的具体实现
4.1、基类库的封装
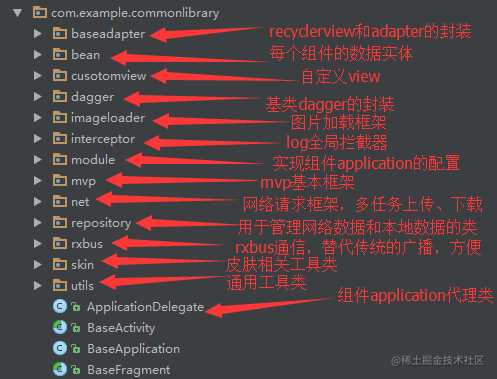
基类库中主要包括开发常用的一些框架。
1、网络请求(多任务下载和上传,采用Retrofit+RxJava框架)
2、图片加载(策略模式,Glide与Picasso之间可以切换)
3、通信机制(RxBus)
4、基类adapter的封装(支持item动画、多布局item、下拉和加载更多、item点击事件)
5、基类RecyclerView的封装(支持原生风格的下拉加载,item侧滑等)
6、mvp框架
7、各组件的数据库实体类
8、通用的工具类
9、自定义view(包括对话框,ToolBar布局,圆形图片等view的自定义)
10、dagger的封装(用于初始化全局的变量和网络请求等配置)
等等
4.2组件模式和集成模式切换的实现
music组件下的build.gradle文件,其他组件类似。
//控制组件模式和集成模式
if (rootProject.ext.isAlone) {
    apply plugin: 'com.android.application'
} else {
    apply plugin: 'com.android.library'
}
apply plugin: 'com.neenbedankt.android-apt'
android {
    compileSdkVersion rootProject.ext.android.compileSdkVersion
    buildToolsVersion rootProject.ext.android.buildToolsVersion
    defaultConfig {
        if (rootProject.ext.isAlone) {
     // 组件模式下设置applicationId
            applicationId "com.example.cootek.music"
        }
        minSdkVersion rootProject.ext.android.minSdkVersion
        targetSdkVersion rootProject.ext.android.targetSdkVersion
        versionCode rootProject.ext.android.versionCode
        versionName rootProject.ext.android.versionName
        testInstrumentationRunner "android.support.test.runner.AndroidJUnitRunner"
        if (!rootProject.ext.isAlone) {
// 集成模式下Arouter的配置,用于组件间通信的实现
            javaCompileOptions {
                annotationProcessorOptions {
                    arguments = [moduleName: project.getName()]
                }
            }
        }
    }
    buildTypes {
        release {
            minifyEnabled false
            proguardFiles getDefaultProguardFile('proguard-android.txt'), 'proguard-rules.pro'
        }
    }
    compileOptions {
        sourceCompatibility JavaVersion.VERSION_1_7
        targetCompatibility JavaVersion.VERSION_1_7
    }
    sourceSets {
        main {
    //控制两种模式下的资源和代码配置情况
            if (rootProject.ext.isAlone) {
                manifest.srcFile 'src/main/module/AndroidManifest.xml'
                java.srcDirs = ['src/main/java', 'src/main/module/java']
                res.srcDirs = ['src/main/res', 'src/main/module/res']
            } else {
                manifest.srcFile 'src/main/AndroidManifest.xml'
            }
        }
    }
}
dependencies {
    compile fileTree(dir: 'libs', include: ['*.jar'])
    androidTestCompile('com.android.support.test.espresso:espresso-core:2.2.2', {
        exclude group: 'com.android.support', module: 'support-annotations'
    })
// 依赖基类库
    compile project(':commonlibrary')
//用作颜色选择器
    compile 'com.afollestad.material-dialogs:commons:0.9.1.0'
    apt rootProject.ext.dependencies.dagger2_compiler
    if (!rootProject.ext.isAlone) {
// 集成模式下需要编译器生成路由通信的代码
        apt rootProject.ext.dependencies.arouter_compiler
    }
    testCompile 'junit:junit:4.12'
}
集成模式
1、首先需要在config,gradle文件中设置isAlone=false
ext {
    isAlone = false;//false:作为Lib组件存在, true:作为application存在
2、然后Sync 下。
3、最后选择app运行即可。

组件模式
1、首先需要在config,gradle文件中设置isAlone=true
ext {
    isAlone = true;//false:作为Lib组件存在, true:作为application存在
2、然后Sync 下。
3、最后相应的模块(new、chat、live、music、app)进行运行即可。
4.3第三方开源库和组件版本号的管理
config.gradle文件的配置情况
ext {
    isAlone = false;//false:作为集成模式存在, true:作为组件模式存在

// 各个组件版本号的统一管理
    android = [
            compileSdkVersion: 24,
            buildToolsVersion: "25.0.2",
            minSdkVersion    : 16,
            targetSdkVersion : 22,
            versionCode      : 1,
            versionName      : '1.0.0',
    ]


    libsVersion = [
            // 第三方库版本号的管理
            supportLibraryVersion = "25.3.0",
            retrofitVersion = "2.1.0",
            glideVersion = "3.7.0",
            loggerVersion = "1.15",
// eventbusVersion = "3.0.0",
            gsonVersion = "2.8.0",
            butterknife = "8.8.0",
            retrofit = "2.3.0",
            rxjava = "2.1.1",
            rxjava_android = "2.0.1",
            rxlifecycle = "2.1.0",
            rxlifecycle_components = "2.1.0",
            dagger_compiler = "2.11",
            dagger = "2.11",
            greenDao = "3.2.2",
            arouter_api = "1.2.2",
            arouter_compiler = "1.1.3",
            transformations = "2.0.2",
            rxjava_adapter = "2.3.0",
            gson_converter = "2.3.0",
            scalars_converter = "2.3.0",
            rxpermission = "0.9.4",
            eventbus="3.0.0",
            support_v4="25.4.0",
            okhttp3="3.8.1"
    ]

// 依赖库管理
    dependencies = [
            appcompatV7               : "com.android.support:appcompat-v7:$rootProject.supportLibraryVersion",
            design                    : "com.android.support:design:$rootProject.supportLibraryVersion",
            cardview                  : "com.android.support:cardview-v7:$rootProject.supportLibraryVersion",
            palette                   : "com.android.support:palette-v7:$rootProject.supportLibraryVersion",
            recycleview               : "com.android.support:recyclerview-v7:$rootProject.supportLibraryVersion",
            support_v4                : "com.android.support:support-v4:$rootProject.support_v4",
            annotations               : "com.android.support:support-annotations:$rootProject.supportLibraryVersion",
            eventBus                  : "org.greenrobot:eventbus:$rootProject.eventbus",
            glide                     : "com.github.bumptech.glide:glide:$rootProject.glideVersion",
            gson                      : "com.google.code.gson:gson:$rootProject.gsonVersion",
            logger                    : "com.orhanobut:logger:$rootProject.loggerVersion",
            butterknife               : "com.jakewharton:butterknife:$rootProject.butterknife",
            butterknife_compiler      : "com.jakewharton:butterknife-compiler:$rootProject.butterknife",
            retrofit                  : "com.squareup.retrofit2:retrofit:$rootProject.retrofit",
            okhttp3                   : "com.squareup.okhttp3:okhttp:$rootProject.retrofit",
            retrofit_adapter_rxjava2  : "com.squareup.retrofit2:adapter-rxjava2:$rootProject.rxjava_adapter",
            retrofit_converter_gson   : "com.squareup.retrofit2:converter-gson:$rootProject.gson_converter",
            retrofit_converter_scalars: "com.squareup.retrofit2:converter-scalars:$rootProject.scalars_converter",
            rxpermission              : "com.tbruyelle.rxpermissions2:rxpermissions:$rootProject.rxpermission@aar",
            rxjava2                   : "io.reactivex.rxjava2:rxjava:$rootProject.rxjava",
            rxjava2_android           : "io.reactivex.rxjava2:rxandroid:$rootProject.rxjava_android",
            rxlifecycle2              : "com.trello.rxlifecycle2:rxlifecycle:$rootProject.rxlifecycle",
            rxlifecycle2_components   : "com.trello.rxlifecycle2:rxlifecycle-components:$rootProject.rxlifecycle_components",
            dagger2_compiler          : "com.google.dagger:dagger-compiler:$rootProject.dagger_compiler",
            dagger2                   : "com.google.dagger:dagger:$rootProject.dagger",
            greenDao                  : "org.greenrobot:greendao:$rootProject.greenDao",
            transformations           : "jp.wasabeef:glide-transformations:$rootProject.transformations",
//路由通讯
            arouter_api               : "com.alibaba:arouter-api:$rootProject.arouter_api",
            arouter_compiler          : "com.alibaba:arouter-compiler:$rootProject.arouter_compiler"
    ]
}
4.4、组件间通信实现
组件间通信的实现是采用阿里开源的Arouter路由通信。
github地址:github.com/alibaba/ARo…
在App工程中,初始化组件通信数据
private List<MainItemBean> getDefaultData() {
        List<MainItemBean> result=new ArrayList<>();
        MainItemBean mainItemBean=new MainItemBean();
        mainItemBean.setName("校园");
        mainItemBean.setPath("/news/main");
        mainItemBean.setResId(R.mipmap.ic_launcher);
        MainItemBean music=new MainItemBean();
        music.setName("音乐");
        music.setResId(R.mipmap.ic_launcher);
        music.setPath("/music/main");
        MainItemBean live=new MainItemBean();
        live.setName("直播");
        live.setResId(R.mipmap.ic_launcher);
        live.setPath("/live/main");
        MainItemBean chat=new MainItemBean();
        chat.setName("聊天");
        chat.setPath("/chat/splash");
        chat.setResId(R.mipmap.ic_launcher);
        result.add(mainItemBean);
        result.add(music);
        result.add(live);
        result.add(chat);
        return result;
    }
然后在设置每个item的点击事件时,启动组件界面跳转。
@Override public void onItemClick(int position, View view) {
                MainItemBean item=mainAdapter.getData(position);
                ARouter.getInstance().build(item.getPath()).navigation();
            }
每个组件入口界面的设置(比如直播Live组件,其它组件类似)
@Route(path = "/live/main")
public class MainActivity extends BaseActivity<List<CategoryLiveBean>, MainPresenter> implements View.OnClickListener {
5.组件合并时res资源和AndroidManifest配置的问题
我们通过判断组件处于哪种模式来动态设置项目res资源和Manifest、以及代码的位置。以直播组件为例,其它组件类似。
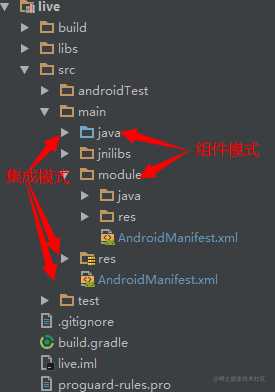
直播组件的build.gradle文件对代码资源等位置的配置
sourceSets {
        main {
            if (rootProject.ext.isAlone) {
                manifest.srcFile 'src/main/module/AndroidManifest.xml'
                java.srcDirs = ['src/main/java', 'src/main/module/java']
                res.srcDirs = ['src/main/res', 'src/main/module/res']
            } else {
                manifest.srcFile 'src/main/AndroidManifest.xml'
            }
        }
    }
6.组件全局application的实现和数据的初始化
采用类似于Glide在Manifest初始化配置的方式来初始化各个组件的Application,以直播组件为例,其它类似。
在BaseApplication中,初始化ApplicationDelegate代理类
 @Override
    protected void attachBaseContext(Context base) {
        super.attachBaseContext(base);
        applicationDelegate = new ApplicationDelegate();
        applicationDelegate.attachBaseContext(base);
        MultiDex.install(this);
    }
ApplicationDelegate内部是怎样的呢?继续看下去
public class ApplicationDelegate implements IAppLife {
    private List<IModuleConfig> list;
    private List<IAppLife> appLifes;
    private List<Application.ActivityLifecycleCallbacks> liferecycleCallbacks;


    public ApplicationDelegate() {
        appLifes = new ArrayList<>();
        liferecycleCallbacks = new ArrayList<>();
    }

    @Override
    public void attachBaseContext(Context base) {
// 初始化Manifest文件解析器,用于解析组件在自己的Manifest文件配置的Application
        ManifestParser manifestParser = new ManifestParser(base);
        list = manifestParser.parse();
//解析得到的组件Application列表之后,给每个组件Application注入
context,和Application的生命周期的回调,用于实现application的同步
        if (list != null && list.size() > 0) {
            for (IModuleConfig configModule :
                    list) {
                configModule.injectAppLifecycle(base, appLifes);
                configModule.injectActivityLifecycle(base, liferecycleCallbacks);
            }
        }
        if (appLifes != null && appLifes.size() > 0) {
            for (IAppLife life :
                    appLifes) {
                life.attachBaseContext(base);
            }
        }
    }

    @Override
    public void onCreate(Application application) {
// 相应调用组件Application代理类的onCreate方法
        if (appLifes != null && appLifes.size() > 0) {
            for (IAppLife life :
                    appLifes) {
                life.onCreate(application);
            }
        }
        if (liferecycleCallbacks != null && liferecycleCallbacks.size() > 0) {
            for (Application.ActivityLifecycleCallbacks life :
                    liferecycleCallbacks) {
                application.registerActivityLifecycleCallbacks(life);
            }
        }
    }

    @Override
    public void onTerminate(Application application) {
// 相应调用组件Application代理类的onTerminate方法
        if (appLifes != null && appLifes.size() > 0) {
            for (IAppLife life :
                    appLifes) {
                life.onTerminate(application);
            }
        }
        if (liferecycleCallbacks != null && liferecycleCallbacks.size() > 0) {
            for (Application.ActivityLifecycleCallbacks life :
                    liferecycleCallbacks) {
                application.unregisterActivityLifecycleCallbacks(life);
            }
        }
    }
}
组件Manifest中application的全局配置
<meta-data
            android:name="com.example.live.LiveApplication"
            android:value="IModuleConfig" />
ManifestParser会对其中value为IModuleConfig的meta-data进行解析,并通过反射生成实例。
public final class ManifestParser {
    private static final String MODULE_VALUE = "IModuleConfig";
    private final Context context;
    public ManifestParser(Context context) {
        this.context = context;
    }
    public List<IModuleConfig> parse() {
        List<IModuleConfig> modules = new ArrayList<>();
        try {
            ApplicationInfo appInfo = context.getPackageManager().getApplicationInfo(
                    context.getPackageName(), PackageManager.GET_META_DATA);
            if (appInfo.metaData != null) {
                for (String key : appInfo.metaData.keySet()) {
//会对其中value为IModuleConfig的meta-data进行解析,并通过反射生成实例
                    if (MODULE_VALUE.equals(appInfo.metaData.get(key))) {
                        modules.add(parseModule(key));
                    }
                }
            }
        } catch (PackageManager.NameNotFoundException e) {
            throw new RuntimeException("Unable to find metadata to parse IModuleConfig", e);
        }
        return modules;
    }

//通过类名生成实例
    private static IModuleConfig parseModule(String className) {
        Class<?> clazz;
        try {
            clazz = Class.forName(className);
        } catch (ClassNotFoundException e) {
            throw new IllegalArgumentException("Unable to find IModuleConfig implementation", e);
        }

        Object module;
        try {
            module = clazz.newInstance();
        } catch (InstantiationException e) {
            throw new RuntimeException("Unable to instantiate IModuleConfig implementation for " + clazz, e);
        } catch (IllegalAccessException e) {
            throw new RuntimeException("Unable to instantiate IModuleConfig implementation for " + clazz, e);
        }

        if (!(module instanceof IModuleConfig)) {
            throw new RuntimeException("Expected instanceof IModuleConfig, but found: " + module);
        }
        return (IModuleConfig) module;
    }
这样通过以上步骤就可以在Manifest文件中配置自己组件的Application,用于初始化组件内的数据,比如在直播组件中初始化Dagger的全局配置
public class LiveApplication implements IModuleConfig,IAppLife {
    private static MainComponent mainComponent;
    @Override
    public void injectAppLifecycle(Context context, List<IAppLife> iAppLifes) {
// 这里需要把本引用添加到Application的生命周期的回调中,以便实现回调
        iAppLifes.add(this);
    }

    @Override
    public void injectActivityLifecycle(Context context, List<Application.ActivityLifecycleCallbacks> lifecycleCallbackses) {
    }

    @Override
    public void attachBaseContext(Context base) {
    }

    @Override
    public void onCreate(Application application) {
// 在onCreate方法中对Dagger进行初始化
            mainComponent= DaggerMainComponent.builder().mainModule(new MainModule()).appComponent(BaseApplication.getAppComponent()).build();
    }

    @Override
    public void onTerminate(Application application) {
        if (mainComponent != null) {
            mainComponent = null;
        }
    }

    public static MainComponent getMainComponent() {
        return mainComponent;
    }
}
7.组件内网络请求和拦截器的实现
由于每个组件的BaseUrl和网络配置等可能不一样,所以每个组件可以在自己配置的dagger中的 MainConponent实现自己的网络请求和拦截器。
以直播组件为例,其它类似。
MainComponent
@PerApplication
@Component(dependencies = AppComponent.class, modules = MainModule.class)
public interface MainComponent {
    public DaoSession getDaoSession();

    public MainRepositoryManager getMainRepositoryManager();
}
MainModule代码
@Module
public class MainModule {
    @Provides
    @PerApplication
    public MainRepositoryManager provideRepositoryManager(@Named("live") Retrofit retrofit, DaoSession daoSession) {
        return new MainRepositoryManager(retrofit, daoSession);
    }
    @Provides
    @Named("live")
    @PerApplication
    public Retrofit provideRetrofit(@Named("live") OkHttpClient okHttpClient,@Nullable Gson gson){
        Retrofit.Builder builder=new Retrofit.Builder().baseUrl(LiveUtil.BASE_URL).addCallAdapterFactory(RxJava2CallAdapterFactory.create())
                .addConverterFactory(GsonConverterFactory.create(gson)).client(okHttpClient);
        return builder.build();
    }
    @Provides
    @Named("live")
    @PerApplication
    public OkHttpClient provideOkHttpClient(@Named("live")LiveInterceptor interceptor){
        OkHttpClient.Builder builder=new OkHttpClient.Builder();
        builder.connectTimeout(10, TimeUnit.SECONDS).readTimeout(10,TimeUnit.SECONDS);
        builder.addInterceptor(interceptor);
        return builder.build();
    }
    @Provides
    @Named("live")
    @PerApplication
    public LiveInterceptor provideNewsInterceptor(){
        return new LiveInterceptor();
    }
}
8.组件化实现的技术难点
8.1.greendao数据库的实现
greendao数据库初始化代码,在基类库的NetClientModule.java中
public DaoSession provideDaoSession(Application application) {
        DaoMaster.DevOpenHelper devOpenHelper = new DaoMaster.DevOpenHelper(application, "common_library_db", null);
        Database database = devOpenHelper.getWritableDb();
        DaoMaster master = new DaoMaster(database);
        return master.newSession();
    }
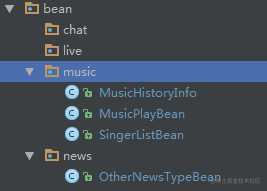
其中的DaoMaster是通过APT生成的,由于DaoMaster给全局的组件使用,所以只能将greendao 数据库放在基类库中,并且各个组件的实体类bean的创建也只能在基类库中进行,以分包命名进行区分,如下图。因为如果在组件内创建bean 会重新生成另一个副本DaoMaster并且不能操控其他组件的数据库实体,有很大的局限性。
8.2.资源命名冲突
官方说法是在每个module的build.gradle文件中配置资源文件名前缀
这种方法缺点就是,所有的资源名必须要以指定的字符串(moudle_prefix)做前缀,否则会异常报错,而且这方法只限定xml里面的资源,对图片资源并不起作用,所以图片资源仍然需要手动去修改资源名。
所以不是很推荐使用这种方法来解决资源名冲突。所以只能自己注意点,在创建资源的时候,尽量不让其重复。
resourcePrefix "moudle_prefix"8.3.butterKnife不能使用的原因
虽然Butterknife支持在lib中使用,但是条件是用 R2 代替 R ,在组件模式和集成模式的切换中,R2<->R之间的切换是无法完成转换的,切换一次要改动全身,是非常麻烦的!所以不推荐在组件化中使用Butterknife。
8.4.library重复依赖问题
1、可能大家会认为,每个组件都依赖基类库,基类库library次不是重复依赖了?其实并不会存在这样的问题,因为在构建APP的过程中Gradle会自动将重复的arr包排除,也就不会存在重复依赖基类库的情况。
2、但是第三方开源库依赖的包可能会与我们自己引用的包重复,所以我们需要将多余的包给排除出去。
基类库(CommonLibrary)中build.gradle
dependencies {
    compile fileTree(dir: 'libs', include: ['*.jar'])
    testCompile 'junit:junit:4.12'
    androidTestCompile('com.android.support.test.espresso:espresso-core:2.2.2', {
        exclude group: 'com.android.support', module: 'support-annotations'
    })
    compile(rootProject.ext.dependencies.appcompatV7) {
        exclude module: "support-v4"
        exclude module: "support-annotations"
    }
    compile rootProject.ext.dependencies.recycleview
    compile rootProject.ext.dependencies.design

    compile(rootProject.ext.dependencies.support_v4) {
       exclude module: "support-annotations"
    }
    compile rootProject.ext.dependencies.annotations
    compile(rootProject.ext.dependencies.butterknife) {
        exclude module: 'support-annotations'
    }
    compile rootProject.ext.dependencies.rxjava2
    compile(rootProject.ext.dependencies.rxjava2_android) {
        exclude module: "rxjava"
    }
    compile(rootProject.ext.dependencies.rxlifecycle2) {
        exclude module: 'rxjava'
        exclude module: 'jsr305'
    }
    compile(rootProject.ext.dependencies.rxlifecycle2_components) {
        exclude module: 'support-v4'
        exclude module: 'appcompat-v7'
        exclude module: 'support-annotations'
        exclude module: 'rxjava'
        exclude module: 'rxandroid'
        exclude module: 'rxlifecycle'
    }
    compile(rootProject.ext.dependencies.retrofit) {
        exclude module: 'okhttp'
        exclude module: 'okio'
    }
    compile(rootProject.ext.dependencies.retrofit_converter_gson) {
        exclude module: 'gson'
        exclude module: 'okhttp'
        exclude module: 'okio'
        exclude module: 'retrofit'
    }
    compile(rootProject.ext.dependencies.retrofit_adapter_rxjava2) {
        exclude module: 'rxjava'
        exclude module: 'okhttp'
        exclude module: 'retrofit'
        exclude module: 'okio'
    }
    compile rootProject.ext.dependencies.greenDao
    compile rootProject.ext.dependencies.okhttp3
    compile rootProject.ext.dependencies.gson
    compile rootProject.ext.dependencies.glide
    compile rootProject.ext.dependencies.eventBus
    compile rootProject.ext.dependencies.dagger2
    compile(rootProject.ext.dependencies.rxpermission) {
        exclude module: 'rxjava'
    }
    compile rootProject.ext.dependencies.retrofit_converter_scalars
    annotationProcessor rootProject.ext.dependencies.dagger2_compiler
    annotationProcessor rootProject.ext.dependencies.butterknife_compiler
    compile rootProject.ext.dependencies.butterknife
    compile rootProject.ext.dependencies.transformations
    compile rootProject.ext.dependencies.arouter_api
}
9.组件化与热修复的无缝连接
本开源项目是基于腾讯的bugly平台,用于监控异常信息、热修复和应用升级。
具体实现:
1、在工程的根目录build.gradle配置
buildscript {
    repositories {
        jcenter()
    }
    dependencies {
        classpath "com.tencent.bugly:tinker-support:1.0.8" } }
然后在App 的build.gradle进行以下配置
dependencies {
    compile fileTree(include: ['*.jar'], dir: 'libs')
    androidTestCompile('com.android.support.test.espresso:espresso-core:2.2.2', {
        exclude group: 'com.android.support', module: 'support-annotations'
    })
    if (!rootProject.ext.isAlone) {
        compile project(':chat')
        compile project(':music')
        compile project(':news')
        compile project(':live')
        apt rootProject.ext.dependencies.arouter_compiler
    } else {
        compile project(':commonlibrary')
    }
    testCompile 'junit:junit:4.12'
//  依赖bugly相关SDK
    compile 'com.tencent.bugly:crashreport_upgrade:1.3.1'
    compile 'com.tencent.bugly:nativecrashreport:latest.release'
}
apply from: 'tinker-support.gradle'
然后依赖其中的插件脚本
apply from: 'tinker-support.gradle'其中的tinker-support.gradle文件如下:
apply plugin: 'com.tencent.bugly.tinker-support'
def bakPath = file("${buildDir}/bakApk/")
/**
 * 此处填写每次构建生成的基准包目录
 */
def baseApkDir = "app-0831-17-50-44"
/**
 * 对于插件各参数的详细解析请参考
 */
tinkerSupport {
    // 开启tinker-support插件,默认值true
    enable = true
    // 自动生成tinkerId, 你无须关注tinkerId,默认为false
    autoGenerateTinkerId = true
    // 指定归档目录,默认值当前module的子目录tinker
    autoBackupApkDir = "${bakPath}"
    // 是否启用覆盖tinkerPatch配置功能,默认值false
    // 开启后tinkerPatch配置不生效,即无需添加tinkerPatch
    overrideTinkerPatchConfiguration = true
    // 编译补丁包时,必需指定基线版本的apk,默认值为空
    // 如果为空,则表示不是进行补丁包的编译
    // @{link tinkerPatch.oldApk }
    baseApk =  "${bakPath}/${baseApkDir}/app-release.apk"
    // 对应tinker插件applyMapping
    baseApkProguardMapping = "${bakPath}/${baseApkDir}/app-release-mapping.txt"
    // 对应tinker插件applyResourceMapping
    baseApkResourceMapping = "${bakPath}/${baseApkDir}/app-release-R.txt"
    // 构建基准包跟补丁包都要修改tinkerId,主要用于区分
      tinkerId = "1.0.5-base_patch"
    // 打多渠道补丁时指定目录
    // buildAllFlavorsDir = "${bakPath}/${baseApkDir}"
    // 是否使用加固模式,默认为false
    // isProtectedApp = true
    // 是否采用反射Application的方式集成,无须改造Application
    enableProxyApplication = true
}
/**
 * 一般来说,我们无需对下面的参数做任何的修改
 * 对于各参数的详细介绍请参考:
 * https://github.com/Tencent/tinker/wiki/Tinker-%E6%8E%A5%E5%85%A5%E6%8C%87%E5%8D%97
 */
tinkerPatch {
    tinkerEnable = true
    ignoreWarning = false
    useSign = true
    dex {
        dexMode = "jar"
        pattern = ["classes*.dex"]
        loader = []
    }
    lib {
        pattern = ["lib/*/*.so"]
    }
    res {
        pattern = ["res/*", "r/*", "assets/*", "resources.arsc", "AndroidManifest.xml"]
        ignoreChange = []
        largeModSize = 100
    }
    packageConfig {
    }
    sevenZip {
        zipArtifact = "com.tencent.mm:SevenZip:1.1.10"
//        path = "/usr/local/bin/7za"
    }
    buildConfig {
        keepDexApply = false
//      tinkerId = "base-2.0.1"
    }
}
然后需要在Manifest配置文件配置如下
<activity
            android:name="com.tencent.bugly.beta.ui.BetaActivity"
      android:configChanges="keyboardHidden|orientation|screenSize|locale"
            android:theme="@android:style/Theme.Translucent" />
        <provider
            android:name="android.support.v4.content.FileProvider"
            android:authorities="${applicationId}.fileProvider"
            android:exported="false"
            android:grantUriPermissions="true">
            <meta-data
                android:name="android.support.FILE_PROVIDER_PATHS"
                android:resource="@xml/provider_paths"/>
        </provider>
最后在Application中初始化bugly
public class App extends BaseApplication {
    @Override
    public void onCreate() {
        super.onCreate();
        setStrictMode();
        // 设置是否开启热更新能力,默认为true
        Beta.enableHotfix = true;
        // 设置是否自动下载补丁
        Beta.canAutoDownloadPatch = true;
        // 设置是否提示用户重启
        Beta.canNotifyUserRestart = true;
        // 设置是否自动合成补丁
        Beta.canAutoPatch = true;

        /** * 全量升级状态回调 */
        Beta.upgradeStateListener = new UpgradeStateListener() {
            @Override
            public void onUpgradeFailed(boolean b) {
            }

            @Override
            public void onUpgradeSuccess(boolean b) {
            }

            @Override
            public void onUpgradeNoVersion(boolean b) {
                Toast.makeText(getApplicationContext(), "最新版本", Toast.LENGTH_SHORT).show();
            }

            @Override
            public void onUpgrading(boolean b) {
                Toast.makeText(getApplicationContext(), "onUpgrading", Toast.LENGTH_SHORT).show();
            }

            @Override
            public void onDownloadCompleted(boolean b) {

            }
        };
        /** * 补丁回调接口,可以监听补丁接收、下载、合成的回调 */
        Beta.betaPatchListener = new BetaPatchListener() {
            @Override
            public void onPatchReceived(String patchFileUrl) {
                Toast.makeText(getApplicationContext(), patchFileUrl, Toast.LENGTH_SHORT).show();
            }
            @Override
            public void onDownloadReceived(long savedLength, long totalLength) {
                Toast.makeText(getApplicationContext(), String.format(Locale.getDefault(),
                        "%s %d%%",
                        Beta.strNotificationDownloading,
                        (int) (totalLength == 0 ? 0 : savedLength * 100 / totalLength)), Toast.LENGTH_SHORT).show();
            }
            @Override
            public void onDownloadSuccess(String patchFilePath) {
                Toast.makeText(getApplicationContext(), patchFilePath, Toast.LENGTH_SHORT).show();
// Beta.applyDownloadedPatch();
            }
            @Override
            public void onDownloadFailure(String msg) {
                Toast.makeText(getApplicationContext(), msg, Toast.LENGTH_SHORT).show();
            }
            @Override
            public void onApplySuccess(String msg) {
                Toast.makeText(getApplicationContext(), msg, Toast.LENGTH_SHORT).show();
            }
            @Override
            public void onApplyFailure(String msg) {
                Toast.makeText(getApplicationContext(), msg, Toast.LENGTH_SHORT).show();
            }

            @Override
            public void onPatchRollback() {
                Toast.makeText(getApplicationContext(), "onPatchRollback", Toast.LENGTH_SHORT).show();
            }
        };
        long start = System.currentTimeMillis();
        // 这里实现SDK初始化,appId替换成你的在Bugly平台申请的appId,调试时将第三个参数设置为true
        Bugly.init(this, "2e5309db50", true);
        long end = System.currentTimeMillis();
    }
    @Override
    protected void attachBaseContext(Context base) {
        super.attachBaseContext(base);
        // you must install multiDex whatever tinker is installed!
        MultiDex.install(base);
        // 安装tinker
        Beta.installTinker();
    }
    @TargetApi(9)
    protected void setStrictMode() {
        StrictMode.setThreadPolicy(new StrictMode.ThreadPolicy.Builder().permitAll().build());
        StrictMode.setVmPolicy(new StrictMode.VmPolicy.Builder().detectAll().penaltyLog().build());
    }
}
10.参考的项目
MVPArms
github.com/JessYanCodi…
全民直播
github.com/jenly1314/K…
音乐项目
github.com/hefuyicoder…
github.com/aa112901/re…
大象:PHPHub客户端
github.com/Freelander/…
MvpApp
github.com/Rukey7/MvpA…
CloudReader
github.com/youlookwhat…
非常感谢以上开源项目的作者!谢谢!
11.结束语
该组件框架是自己在暑假实习期间做的,由于实习公司的项目过于庞大和复杂,每次编译都需要花费10几分钟,心都碎了,所以才想尝试下组件化框架,摸索了很长时间,最后还是做出来了,大概花费2个多月的时间,由于最近项目上比较忙,所以没什么时间来完善,界面有点简陋,但逻辑基本实现了。欢迎fork and star。
有对组件化框架兴趣的同学可以加本人QQ1981367757,一起探讨技术。
github上地址: github.com/HelloChenJi…
今天的文章终极组件化框架项目方案详解分享到此就结束了,感谢您的阅读。
版权声明:本文内容由互联网用户自发贡献,该文观点仅代表作者本人。本站仅提供信息存储空间服务,不拥有所有权,不承担相关法律责任。如发现本站有涉嫌侵权/违法违规的内容, 请发送邮件至 举报,一经查实,本站将立刻删除。
如需转载请保留出处:https://bianchenghao.cn/19761.html
