我们研发开源了一款基于 Git 进行技术实战教程写作的工具,我们图雀社区的所有教程都是用这款工具写作而成,欢迎 Star 哦
如果你想快速了解如何使用,欢迎阅读我们的 教程文档哦

本文由图雀社区认证作者 测不准 使用 Tuture 写作工具写作而成,图雀社区将连载其 uni-app 结合云函数开发小程序博客系列,感谢作者的优质输出,让我们的技术世界变得更加美好😆
不好意思大家,个人原因拖了一周时间才发表第二篇,没想到还有朋友在支持,非常感谢和抱歉。第一篇中已经引入了第三方样式,实现了主题和语言的切换;本篇主要开始页面的搭建和云函数创建,前端代码通过uniCloud.callFunction()方法调用云函数,云函数中可执行js运算、读写云数据库(NoSQL),直接返回json数据,也可以使用npm安装第三方依赖。服务端环境安装配置和安全等方面完全不需要去考虑。
登录界面
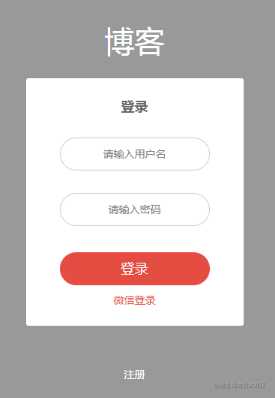
- 我们开发uni-app的工具是HbuilderX,在 pages 文件夹右键新建页面 ,取名login,这时会生成
/pages/login/login.vue, 会自动在 pages.json 文件中添加 如下: (新增的文件会放在 pages 数组最后)
// 以下代码在 pages.json 中
{
       "path" : "pages/login/login",
       "style" : {}
}
- 定义 page 背景
// 以下代码在 login.vue 中
// 我只在登录和注册界面填充了背景色,其他页面使用默认白色,如果想定义全局的page背景,在全局css文件中定义,再在app.vue文件中引入样式

page {
      background: #999;
}
- 字体大小和边距直接使用 colorui 自带样式,自己的样式可以在 style 中书写
// 以下 字体大小 文件在 colorui main.css 的 3748 行
// 统一一个类名,不需每个vue界面单独定义,解析重复的东西
.text-xs {
	font-size: 20upx;
}
.text-sm {
	font-size: 24upx;
}
.text-df {
	font-size: 28upx;
}
.text-lg {
	font-size: 32upx;
}
.text-xl {
	font-size: 36upx;
}
// 以下代码在 colorui/main.css 的 2999行 (padding同理)

.margin-0 {
	margin: 0;
}
.margin-xs {
	margin: 10upx;
}
.margin-sm {
	margin: 20upx;
}
.margin {
	margin: 30upx;
}

// 由于 使用 flex 布局,可能会使用到 auto 的场景, 自己加了几个样式

.margin-top-auto {
	margin-top: auto;
}
.margin-bottom-auto {
	margin-bottom: auto;
}
.margin-left-auto {
	margin-left: auto;
}
.margin-right-auto {
	margin-right: auto;
}
- 页面代码如下 (事件绑定 @tap,移动端点击,后面使用)
<view class="login">
        // lang. 第一节中做的全局混入,国际化
	<view class="login-title text-white text-sl text-center">{{lang.login_title}}</view>
	<view class="form-wrapper flex flex-direction margin-0-auto">
		<view class="bg-white radius flex flex-direction align-center">
			<view class="login-form-title text-bold text-xl margin-top-xl margin-bottom-xl">{{lang.login_form_title}}</view>
			<view class="login-form-username border-3-ccc margin-top-xs margin-bottom-xl">
				<input v-model='form.username' class="w-100 h-100 text-center text-df" type="text" value="" :placeholder="lang.login_form_username_placeholder" />
			</view>
			<view class="login-form-password border-3-ccc margin-top-xs margin-bottom-xl">
				<input v-model="form.password" class="w-100 h-100 text-center text-df" type="password" value="" :placeholder="lang.login_form_password_placeholder" />
			</view>

			<button type="primary" @tap='login' class="cu-btn login-btn text-xl margin-top-sm" :class="['bg-' + themeColor.name]">{{lang.login_submit_btn}}</button>
			<view @tap='loginWithWechat' class="login-with-wechat text-df margin-top-sm text-center text-btn" :class="['text-'+themeColor.name]">
				{{lang.login_with_wechat}}
			</view>
		</view>

		<view @tap='register' class="login-with-wechat text-df margin-top-auto text-white text-center text-btn">
			{{lang.login_register}}
		</view>
	</view>
	<open-data type="userAvatarUrl"></open-data>
	<open-data type="userNickName"></open-data>
	<button type="default" @getuserinfo="getuserinfo" open-type="getUserInfo">getUserInfo</button>
</view>

// 如果没安装 scss 插件, 点击菜单中的设置 安装插件
// (小编自己小改了下样式, 官方推荐使用 rpx 单位,设计稿为 750px,单位长度自适应。手机端,或者平板直接兼容)
.login {
	.login-title {
		padding: 212rpx 0 50rpx 0;
	}

	.form-wrapper {
		width: 580rpx;
		height: 808rpx;

		.bg-white {
			height: 660rpx;

			.login-form-username {
				width: 400rpx;
				height: 88rpx;
				border-radius: 44rpx;
				overflow: hidden;
			}

			.login-form-password {
				@extend .login-form-username;
			}

			.login-btn {
				width: 400rpx;
				height: 88rpx;
				border-radius: 44rpx;
			}
		}
	}
}
简单封装操作
- 根目录下新建
/utils/plugins.js, 在main.js中引入require('./utils/plugins.js') - 放入 vuex
// 以下内容在 /utils/plugins.js 中
import Vue from 'vue'
import store from '../store';
// uni中的store不需要注册到main.js的 new Vue 中
Vue.prototype.$store = store;
- 封装 toast 提示框
// 以下内容在 /utils/plugins.js 中
Vue.prototype.$toast = (title, duration = 1500) => uni.showToast({
	icon: 'none',
	title,
	duration
})
- 封装路由跳转 navigateTo, switchTab,reLaunch
Vue.prototype.$router = (url) => uni.navigateTo({
	url: '/pages' + url,
	animationType:"slide-in-left", // 跳转动画
	animationDuration: 800
})
// 跳转底部 tabbar 对应的页面
Vue.prototype.$switchTab = (url) => uni.switchTab({
	url: '/pages' + url
})
// 关闭其它页面,跳转
Vue.prototype.$relaunch = (url) => uni.reLaunch({
	url: '/pages' + url
})
- 封装 云函数请求 文档
Vue.prototype.$uniCloud = async (name, data) => {
	uni.showLoading()
	try{
		let res = await uniCloud.callFunction({
			name, // 云函数名字
			data // 传输数据
		})
		return res
	} catch(e) {
		return e
	} finally{
		uni.hideLoading()
	}
}
请求云函数
我们的根目录下有个 cloudfunctions-aliyun 文件夹,右键创建云函数,取名为 user, 目录下会生成 user/index.js ,这个user 就是 上文封装的云函数的名字。index.js 内容如下:
'use strict';
// 对云数据库的操作一定要是等待读取的, async await
exports.main = async (event, context) => {
  //event为客户端上传的参数 对应上传的 data 数据 {}
  console.log('event : ' + event)
  //返回数据给客户端
  return event
};
我们有了去操作云数据库的函数,也得有云数据库,初始化我们的云数据库, 在 cloudfunctions-aliyun 文件夹下创建 db_init.json 文件 (参考),json格式,因为我们做的是登录注册,所以创建 user 表(集合)
// user表
"user": {
	    "data": [ // 数据, 有两个字段,
			{
				"username": "admin",
				"password": "admin"
			}
	    ],
	    "index": [{ // 索引
	        "IndexName": "username", // 索引名称
	        "MgoKeySchema": { // 索引规则
	            "MgoIndexKeys": [{
	                "Name": "username", // 索引字段
	                "Direction": "1" // 索引方向,1:ASC-升序,-1:DESC-降序
	            }],
	            "MgoIsUnique": true// 索引是否唯一
	        }
	    }]
	}
}
我们云数据库有了,操作函数也有了,需要有个地方存储 —- 服务空间 (请参考官网基本概念理解)
- 右键cloudfunctions-aliyun 文件夹,创建云服务空间,浏览器会自动打开web控制台,服务空间有个唯一标识id,修改好识别的服务空间名字。

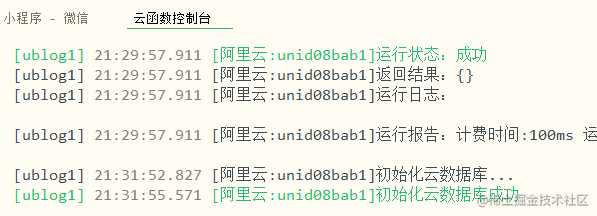
- 右键cloudfunctions-aliyun 文件夹选择你创建的云服务空间,在user云函数上右键上传并运行;一方面可以上传,一方面可以检测 函数中是否有错误。刷新web控制台,可以发现上传成功:

// 检验云函数是否正确 以下代码在 login.vue中
async onLoad() {
  await this.$uniCloud('user', {name: 'uncertainty'})
}
// 还记得我们的云函数吧,发送什么返回什么

- 右键db_init.json 文件,初始化云数据库,同样刷新web控制台,发现初始化成功,当然在编译器的控制台也有相关输出(云数据库的操作都可以web 端操作,创建,删除,新增等)
前端请求
// 以下代码在 login.vue 中
async login() {
	if (!this.form.openid) {
     // 不是微信登录,判断输入是否正确
		if (!this.form.username || !this.form.password) {
			this.$toast('请填写正确信息')
			return
		}
	} else {
		this.form.username = ''
		this.form.password = ''
	}


  let res = await this.$uniCloud('user', this.form)
	if (res.result.code === 0) {
		this.$toast('登陆成功')
	} else {
		this.$toast(res.result.msg)
	}
}
- 输入用户名密码(有需要自己可以写限制),点击登录按钮,查看:(没有弹出登陆成功因为没有code)

登录云函数
- 集合的常用方法
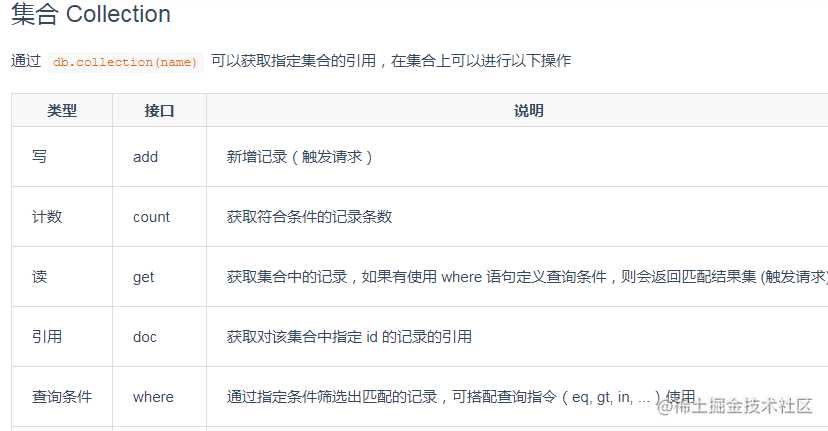
const db = uniCloud.database()
exports.main = async (event, context) => {
  // 获取 user 表的集合对象
  const collection = db.collection('user')
  let user
  // 操作云数据库必须 等待,查找user表中 username 为 event.username同时password为event.password的对象
  user = await collection.where({
  	username: event.username,
  	password: event.password
  }).get()

  // affectedDocs 当做找到的个数
  if (user.affectedDocs < 1) {
    // 没有找到
  	return {
  		code: -1,
  		msg: '用户名或密码错误'
  	}
  } else {
  	return {
  		code: 0,
  		msg: 'success'
  	}
  }
}
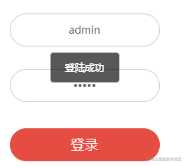
输入初始化的admin,admin,成功
微信openid登录
- 小程序请求
// 以下代码在 login.vue 中
loginWithWechat() {
    let _this = this
    uni.login({
      async success(res) {
        let result = await _this.$uniCloud('loginWithWechat', {
            js_code: res.code
          })

        _this.form.openid = result.result.data.openid
        _this.login()
      }
    })
},
- 创建云函数 loginWithWechat
// 以下代码在云函数 loginWithWechat/index.js 中
exports.main = async (event, context) => {
   // 获取openid 请求地址
	const apiUrl = 'https://api.weixin.qq.com/sns/jscode2session';
  // uniCloud.httpclient 发起请求
	const res = await uniCloud.httpclient.request(apiUrl,
	{
		method: 'GET',
		dataType:"json",
		data: {
			'grant_type' : 'authorization_code',
			'appid'	  : '', //你自己小程序的appid
			'secret'  : '', // 在小程序管理平台 -> 开发 -> 开发设置中
			'js_code' : event.js_code // wx.login 拿到的code
		}
	});
	//返回数据给客户端
	return res
};
- 我们拿到了openid

点击微信登录按钮会显示用户名或密码错误,因为我们没有在user 云函数中做判断。修改user云函数 (点击微信登录,发现登录成功)
// 以下代码在 user云函数index.js 中
const db = uniCloud.database()

exports.main = async (event, context) => {
  	const collection = db.collection('user')
  	let user if (event.openid) {
  		user = await collection.where({
  			openid: event.openid
  		}).get()

  		if (user.affectedDocs < 1) {
  			// 没有就新增
  			await collection.add({
  				openid: event.openid
  			})
  		}

  		return {
  			code: 0,
  			msg: 'success'
  		}
  	} else {
  		user = await collection.where({
  			username: event.username,
  			password: event.password
  		}).get()

  		if (user.affectedDocs < 1) {
  			return {
  				code: -1,
  				msg: '用户名或密码错误'
  			}
  		} else {
  			return {
  				code: 0,
  				msg: 'success'
  			}
  		}
  	}
};
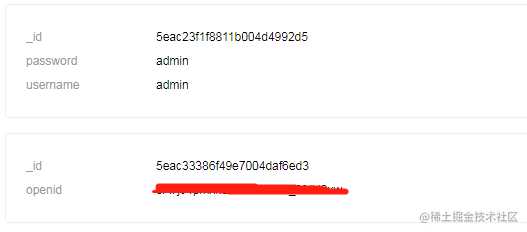
- 查看我们的user表,(nosql不像mysql key value 值必须对应,可以看到两组数据字段不同)
注册界面
- 页面布局这里就不多说了,直接梭哈
// 以下代码在 register.vue中
<template>
	<view class="register">
		<cu-custom :bgColor="'bg-'+themeColor.name" :isBack="true">
			<block slot="backText">返回</block>
			<block slot="content">注册</block>
		</cu-custom>
		<view class="register-title text-white text-sl text-center">{{lang.login_title}}</view>
		<view class="text-white text-sm text-center">{{lang.create_new_account}}</view>
		<view class="form-wrapper flex flex-direction margin-0-auto">
			<view class="flex flex-direction align-center">
				<view class="register-form-username border-3-white margin-top-xl margin-bottom-xl">
					<input v-model='form.username' class="w-100 h-100 text-center text-df text-white" type="text" value="" placeholder-class="register-placeholder-class text-white" :placeholder="lang.login_form_username_placeholder" />
				</view>
				<view class="register-form-password border-3-white margin-top-xs margin-bottom-xl padding-left-sm padding-right-sm">
					<input v-model="form.password" class="w-100 h-100 text-center text-df text-white" type="password" value="" placeholder-class="register-placeholder-class text-white" :placeholder="lang.login_form_password_placeholder" />
				</view>
				<view class="register-form-password border-3-white margin-top-xs margin-bottom-xl padding-left-sm padding-right-sm">
					<input v-model="form.confirm_password" class="w-100 h-100 text-center text-df text-white" type="password" value="" placeholder-class="register-placeholder-class text-white" :placeholder="lang.register_form_confirm_password_placeholder" />
					<text v-if='isConfirm' class="text-red wrong-confirm-password animation-fade">{{lang.register_wrong_confirm_password_tips}}</text>
				</view>

				<button type="primary" @tap='register' class="cu-btn register-btn text-xl margin-top-sm" :class="['bg-' + themeColor.name, 'light']">{{lang.register_submit_btn}}</button>
			</view>
			<view class="register-with-wechat text-df margin-top-auto text-white text-center text-btn">
				{{lang.register_policy}}
			</view>
		</view>
	</view>
</template>

<script> export default { data() { return { form: { username: '', password: '', confirm_password: '' }, isConfirm: false } }, onLoad() { }, watch:{ 'form.confirm_password'(val) { if (val && val !== this.form.password) { this.isConfirm = true } else if (val && val === this.form.password) { this.isConfirm = false } } }, methods: { async register() { if (!this.form.username || !this.form.password || !this.form.confirm_password) { this.$toast('请填写正确信息') return } if (this.form.password !== this.form.confirm_password) { this.$toast(this.lang.register_wrong_confirm_password_tips) return } // 这里我们使用原始写法 let res = await uniCloud.callFunction({ name: 'user', // 因为登录注册都属于 use表,感觉index文件可能代码混杂,加个type加以区分,登录的type是get data: Object.assign({}, this.form, { type: 'add' }) }) if (res.result.code === 0) { this.$toast('注册成功') // 跳转 setTimeout(() =>{ uni.navigateBack() }, 1500) } else { this.$toast(res.result.msg) } } } } </script>

<style lang="scss"> page{ background: #999; } .register { .register-title { padding: 212rpx 0 20rpx 0; } .form-wrapper { .flex-direction { height: 660rpx; .register-form-username { width: 400rpx; height: 88rpx; border-radius: 44rpx; } .register-form-password { @extend .register-form-username; position: relative; .wrong-confirm-password{ position:absolute; top: 100%; left: 20rpx; } } .register-btn { width: 400rpx; height: 88rpx; border-radius: 44rpx; } } } } </style>
- 改造 user 云函数
// 以下代码在 user/index.js
'use strict';
const { add } = require('./add/index.js')
const { get } = require('./get/index.js')
// 这里感觉应该 引个文件 用枚举
// 因为是node 就直接用global全局对象
global.successMsg = 'success'
global.successCode = 0
global.wrongCode = -1

exports.main = async (event, context) => {
	switch (event.type) {
		case 'add':
			return add(event)
		case 'get':
        // 上文的index代码都移动到 get/index.js中
			return get(event)
	}
};
注册云函数(add)
//以下代码在 user/add/index.js

const db = uniCloud.database()

exports.add = async (data) => {
	const collection = db.collection('user')

	let user = await collection.where({
		username: data.username
	}).get() // 切记获取最后一定要 get()

        // 一目了然,感觉不用解释
	if (user.affectedDocs < 1) {
		const res = await collection.add({
			username: data.username,
			password: data.password
		})
		return {
			code: global.successCode,
			msg: global.successMsg
		}
	} else {
		return {
			code: global.wrongCode,
			msg: '用户名重复,请重新录入'
		}
	}

}
- 修改完云函数记得要上传并运行哦,注册成功
加密密码
- 查看web端,我们发现数据都是明文存在,这时我们需要把密码加密,同样是user云函数,我们下user云函数下新建
utils/index.js,我们使用sha1加密
// 以下代码在 utils/index.js
// 密码加密
function encodeUTF8(s) {
  var i, r = [], c, x;
  for (i = 0; i < s.length; i++)
    if ((c = s.charCodeAt(i)) < 0x80) r.push(c);
    else if (c < 0x800) r.push(0xC0 + (c >> 6 & 0x1F), 0x80 + (c & 0x3F));
    else {
      if ((x = c ^ 0xD800) >> 10 == 0) //对四字节UTF-16转换为Unicode
        c = (x << 10) + (s.charCodeAt(++i) ^ 0xDC00) + 0x10000,
          r.push(0xF0 + (c >> 18 & 0x7), 0x80 + (c >> 12 & 0x3F));
      else r.push(0xE0 + (c >> 12 & 0xF));
      r.push(0x80 + (c >> 6 & 0x3F), 0x80 + (c & 0x3F));
    };
  return r;
};

// 字符串加密成 hex 字符串
function sha1(s) {
  var data = new Uint8Array(encodeUTF8(s))
  var i, j, t;
  var l = ((data.length + 8) >>> 6 << 4) + 16, s = new Uint8Array(l << 2);
  s.set(new Uint8Array(data.buffer)), s = new Uint32Array(s.buffer);
  for (t = new DataView(s.buffer), i = 0; i < l; i++)s[i] = t.getUint32(i << 2);
  s[data.length >> 2] |= 0x80 << (24 - (data.length & 3) * 8);
  s[l - 1] = data.length << 3;
  var w = [], f = [
    function () { return m[1] & m[2] | ~m[1] & m[3]; },
    function () { return m[1] ^ m[2] ^ m[3]; },
    function () { return m[1] & m[2] | m[1] & m[3] | m[2] & m[3]; },
    function () { return m[1] ^ m[2] ^ m[3]; }
  ], rol = function (n, c) { return n << c | n >>> (32 - c); },
    k = [1518500249, 1859775393, -1894007588, -899497514],
    m = [1732584193, -271733879, null, null, -1009589776];
  m[2] = ~m[0], m[3] = ~m[1];
  for (i = 0; i < s.length; i += 16) {
    var o = m.slice(0);
    for (j = 0; j < 80; j++)
      w[j] = j < 16 ? s[i + j] : rol(w[j - 3] ^ w[j - 8] ^ w[j - 14] ^ w[j - 16], 1),
        t = rol(m[0], 5) + f[j / 20 | 0]() + m[4] + w[j] + k[j / 20 | 0] | 0,
        m[1] = rol(m[1], 30), m.pop(), m.unshift(t);
    for (j = 0; j < 5; j++)m[j] = m[j] + o[j] | 0;
  };
  t = new DataView(new Uint32Array(m).buffer);
  for (var i = 0; i < 5; i++)m[i] = t.getUint32(i << 2);

  var hex = Array.prototype.map.call(new Uint8Array(new Uint32Array(m).buffer), function (e) {
    return (e < 16 ? "0" : "") + e.toString(16);
  }).join("");

  return hex;
};

module.exports = {
  sha1
}
- 注册时加密密码
// 以下代码在 user/add/index.js中 ,部分修改
const util = require('../utils/index.js')
...
const res = await collection.add({
	username: data.username,
	password: util.sha1(data.password) // 加密
})
- 登录时解密
// 以下代码在 user/get/index.js 中
const util = require('../utils/index.js')
...
user = await collection.where({
	username: data.username,
	password: util.sha1(data.password)
}).get()
- 加密成功

- 使用腾讯云开发的朋友,感兴趣可以去尝试使用token 认证 云token
到这里,登录和注册的逻辑基本完成,云函数碰到问题就去查看文档,操作云数据库使用 await,可以打印看看返回数据格式,进行逻辑判断。我习惯用code 判断,但其实自己开发的话,可以不需要使用code,请求逻辑可以使用try catch 进行捕获。云数据库操作可以不使用json文件,直接在web 端进行配置,感觉可能更方便,web端创建数据时候一定要是json格式的,自动添加_id, 如果你创建时自己添加了_id,就会使用你提供的值。获取openid时,secret 要保存好,不要泄露,注意安全使用。
进入页面
我上文做的是注册成功后,再返回登录页登录,小伙伴们也可以直接注册成功后直接进入内容页。需要的话可以把登录信息存放在本地,这样就可以记住密码,第二次直接登录。本人习惯页面中使用vuex 读取状态,修改缓存也是用 vuex 操作,第一次初始化直接从缓存读取值赋值到 store 对象中。小伙伴们可自行选择。
创建底部导航
- 首先在pages.json 下添加 tabBar 字段,配置底部导航最少需要两个跳转。点击底部跳转的页面也需要在pages目录下创建, 对应的按钮图标,我在阿里的字体图标库中选取的 链接
// 以下代码在 pages.json中
"tabBar": {
	"color": "#666666", //文字默认颜色
	"selectedColor": "#1296DB", //文字选中的颜色
	"backgroundColor": "#FFFFFF", //背景色
	"list": [{
			"pagePath": "pages/home/home", // 点击跳转的路径
			"text": "故事", // 底部文字
			"iconPath": "static/images/tabbar/story.png", // 默认的图标
			"selectedIconPath": "static/images/tabbar/story_active.png" // 选中后的图标
		},
		{
			"pagePath": "pages/gallery/gallery",
			"text": "画廊",
			"iconPath": "static/images/tabbar/gallery.png",
			"selectedIconPath": "static/images/tabbar/gallery_active.png"
		},
		{
			"pagePath": "pages/activities/activities",
			"text": "活动",
			"iconPath": "static/images/tabbar/activities.png",
			"selectedIconPath": "static/images/tabbar/activities_active.png"
		},
		{
			"pagePath": "pages/my/my",
			"text": "我的",
			"iconPath": "static/images/tabbar/my.png",
			"selectedIconPath": "static/images/tabbar/my_active.png"
		}
	]
}
在登录页面的登陆成功后,使用 this.$relaunch('/home/home')或this.$switchTab('/home/home'),跳转到 home 页面。
由于默认打开的是 pages.json 中 pages的第一项对应的页面,如果只想开发首页布局,可以把home位置移动到第一个,或者把上面的注释掉
- 由于底部导航属于原生的配置,所以层级是最高的,这是如果想在页面中使用遮罩层,会出现如下现象:
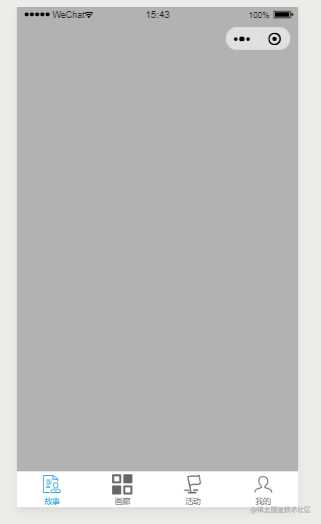
可以看到遮罩层无法覆盖底部导航,我们可以隐藏底部导航
// 点击弹出遮罩时触发
uni.hideTabBar()
// 隐藏遮罩层是触发
uni.showTabBar()
- 如果感觉自带的底部导航样式无法满足UI设计,可以自定义底部导航,colorui 为我们提供了几种选择:
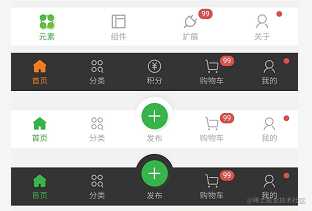
- 简单使用 colorui 中的底部导航 (布局在 colorui 原项目的
pages/component/bar.vue中)
// 直接复制到 home.vue 中即可查看 根据自己的需求该样式
// 可以封装成组件,在需要的地方调用
<view class="cu-bar tabbar bg-black" style="position: fixed;bottom: 0;left: 0;width:100%;">
	<view class="action text-green"> <view class="cuIcon-homefill"></view> 首页 </view>
	<view class="action text-gray"> <view class="cuIcon-similar"></view> 分类 </view>
	<view class="action text-gray add-action"> <button class="cu-btn cuIcon-add bg-green shadow"></button> 发布 </view>
	<view class="action text-gray"> <view class="cuIcon-cart"> <view class="cu-tag badge">99</view> </view> 购物车 </view>
	<view class="action text-gray"> <view class="cuIcon-my"> <view class="cu-tag badge"></view> </view> 我的 </view>
</view>

底部导航国际化
还记得我们上一小节留的小问题,底部导航的中英文切换。回到 vuex 中切换语言的操作
// 以下代码在 store/index.js 中
changeLang: function(state){
	uni.showActionSheet({
		itemList:['简体中文', 'English'],
		success (e) {
			if(e.tapIndex === 0){
				lang = require('../language/zh.js')
			}else{
				lang = require('../language/en.js')
			}
                        // 操作vuex 直接修改缓存
			uni.setStorageSync("userLang", lang.langType)
			state.lang = lang;
			// 改tabbar,添加如下代码即可
			uni.setTabBarItem({
				index:0,
				text: lang.home_stories
			})
			uni.setTabBarItem({
				index:3,
				text: lang.my
			})
		}
	})
}

uni.setTabBarItem() 修改底部导航样式,如显示聊天信息数,右上角显示红点,显示数字
导航条
还记得我们要使用更换主题,所以导航条设置为自定义,这里我们也是用 colorui 提供的写法,实现自定义顶部导航栏。
- 首先我们在main.js中全局注册
// 以下代码在 main.js中
import cuCustom from './colorui/components/cu-custom/cu-custom.vue'
Vue.component('cu-custom', cuCustom)
- 页面中引入 自定义组件
// 以下代码再home.vue 中
// 动态 属性 实现主题更换
<cu-custom :bgColor="'bg-'+themeColor.name" :isBack="true">
    <block slot="content">{{lang.home_stories}}</block>
</cu-custom>
界面样式如下:

这是因为我们没有获取到导航条的高度,在 app.vue 中引入
// 以下代码在 app.vue 中
import Vue from 'vue'
// onLaunch 应用启动只会执行一次,有推送也放在这里
onLaunch: function() {
	console.log('App Launch')
        // 获取系统信息
	uni.getSystemInfo({
		success: function(e) {
			// #ifndef MP
			Vue.prototype.StatusBar = e.statusBarHeight;

			// #ifdef MP-WEIXIN || MP-QQ
			Vue.prototype.StatusBar = e.statusBarHeight;
			let capsule = wx.getMenuButtonBoundingClientRect();
			if (capsule) {
				Vue.prototype.Custom = capsule;
				// Vue.prototype.capsuleSafe = uni.upx2px(750) - capsule.left + uni.upx2px(750) - capsule.right;
				Vue.prototype.CustomBar = capsule.bottom + capsule.top - e.statusBarHeight;
			} else {
				Vue.prototype.CustomBar = e.statusBarHeight + 50;
			}
                        // #endif
		}
	})
}
- 可以看到导航栏正常了 (大家可以在小程序上切换手机类型,包括刘海屏测试效果),组件的代码在
colorui/components/cu-custom.vue中,就是进入应用时获取系统状态栏的高度,赋值给自定义的view高度,title 使用 slot 赋值。


- 把上一节的代码放入 my 页面里,自定义导航条也引入
// 由于上一节课介绍了主题更换,这里直接上代码,在 /pages/my/my.vue中
<template>
	<view>
		<cu-custom :bgColor="'bg-'+themeColor.name" :isBack="true" :icon="'sort'">
			<block slot="content">{{lang.my}}</block>
		</cu-custom>

		<view class="cu-modal" :class="modalName=='RadioModal'?'show':''" @tap="modalName =''">
			<view class="cu-dialog" @tap.stop="">
				<radio-group class="block" @change="RadioChange">
					<view class="cu-list menu text-left">
						<view class="cu-item" v-for="(item,index) in themeList" :key="index">
							<label class="flex justify-between align-center flex-sub">
								<view class="flex-sub flex">
									<view>{{item.title}}</view>
									<view :style="{backgroundColor: item.color}" style='height: 50rpx;width: 100rpx;margin-left: 30rpx;'></view>
								</view>
								<radio class="round" :class="radio=='radio' + index?'checked':''" :checked="radio=='radio' + index?true:false" :value="item.name"></radio>
							</label>
						</view>
					</view>
				</radio-group>
			</view>
		</view>

		<button class="btn" hover-class="navigator-hover" :class="['bg-' + themeColor.name]" @click='changeLang'>切换语言</button>
		<button class="btn" hover-class="navigator-hover" :class="['bg-' + themeColor.name]" @click='changeTheme' data-target="RadioModal">更改主题</button>
	</view>
</template>

<script> import {ColorList} from './theme.js' export default { data() { return { radio: '', modalName: '', themeList: [] } }, methods: { changeLang(){ this.$store.commit('changeLang') }, changeTheme(e){ this.themeList = [] for (let i = 0;i<ColorList.length;i++) { let random = Math.floor(Math.random() * ColorList.length) let item = ColorList[random] this.themeList.indexOf(item) === -1 && this.themeList.push(item) if (this.themeList.length > 5) break } this.modalName = e.currentTarget.dataset.target }, RadioChange(e) { let name = e.detail.value let obj = this.themeList.filter(item => { return item.name === name }) this.$store.commit('setThemeColor', obj[0]) this.modalName = '' } } } </script>

<style> button{ margin-top: 20rpx; } </style>

- 如果大家不想使用自定义的导航条,使用自带的导航条也可以 api 如下
// 修改title文字
uni.setNavigationBarTitle({
    title: this.lang.title
});
// 修改背景色
uni.setNavigationBarColor({
    frontColor: '#ffffff',
    backgroundColor: '#ff0000',
    animation: {
	duration: 400,
	timingFunc: 'easeIn'
    }
})
// 使用原生导航条比较方便,不用担心不同机型兼容问题,下拉刷新也比较容易
// 更多导航条的操作大家可以查看官网
// 想要更多自定义导航栏样式,如搜索,下拉选择城市等,可查看插件市场
- 页面中语言对应如下
// 以下代码在 language/en.js
module.exports = {
	// langType 属性为语言包标识,请勿删除
	langType : 'en',
	// login_page
	login_title: 'UBLOG',
	login_form_title: 'LOGIN',
	login_form_username_placeholder: 'please write your username',
	login_form_password_placeholder: 'please write your password',
	login_submit_btn: 'LOGIN',
	login_with_wechat: 'LOGIN WITH WECHAT',
	login_register: 'REGISTER',
	// 注册页
	create_new_account: 'CREATE NEW ACCOUNT',
	register_submit_btn: 'SIGN UP',
	register_form_confirm_password_placeholder: 'please confirm your password',
	register_policy: 'Terms of Service and Privacy Policy',
	register_wrong_confirm_password_tips: 'Password and Confirm Password inconsistent!',
	// 首页
	home_stories: 'STORIES',
	// 我的
	my: 'MY'
}

// 以下代码在language/zh.js 中
module.exports = {
	// langType 属性为语言包标识,请勿删除
	langType : 'zh-CN',
	// 登陆页
	login_title: '博客',
	login_form_title: '登录',
	login_form_username_placeholder: '请输入用户名',
	login_form_password_placeholder: '请输入密码',
	login_submit_btn: '登录',
	login_with_wechat: '微信登录',
	login_register: '注册',
	// 注册页
	create_new_account: '创建新账户',
	register_submit_btn: '注册',
	register_form_confirm_password_placeholder: '确认密码',
	register_policy: '服务条款及隐私',
	register_wrong_confirm_password_tips: '两次密码不一致',
	// 首页
	home_stories: '你的故事',
	// 我的
	my: '我的'
}
下一小节咱们进入首页的制作,与其它插件的结合使用。如果文中有写的不对的地方,希望大家指正,有好的建议也希望大家提出。能力一般,水平有限,如果文章对你有帮助的话,深感欣慰。我是测不准,谢谢您的阅读!
想要学习更多精彩的实战技术教程?来图雀社区逛逛吧。
如果您觉得我们写得还不错,希望您能给❤️这篇文章点赞❤️哦

今天的文章uni-app 结合云函数开发小程序博客(二):云函数实现登录注册分享到此就结束了,感谢您的阅读。
版权声明:本文内容由互联网用户自发贡献,该文观点仅代表作者本人。本站仅提供信息存储空间服务,不拥有所有权,不承担相关法律责任。如发现本站有涉嫌侵权/违法违规的内容, 请发送邮件至 举报,一经查实,本站将立刻删除。
如需转载请保留出处:https://bianchenghao.cn/20486.html
