前言
在上一篇文章中,我们对 ConstraintLayout 1.0.2 版进行了详细的了解。而当时说好的 1.1.0 版本的文章却直到现在才出来,相隔了好久。其实关于 1.1.0 beta 版的文章早已写完,但却一直没有发布,这是因为当时担心后面的稳定版会和现有的冲突(事实上的确有),所以一直等到上周四,Google 宣布 ConstraintLayout 1.1.0 稳定版发布,于是在周末休息时重新整理发布了这篇文章。
如果对 ConstraintLayout 不了解,并且还没有观看上篇文章的,强烈建议先观看完上篇文章,因为本篇只是对上篇的补充。如果有遗漏或错误,欢迎各位补充和指正。
准备
implementation 'com.android.support.constraint:constraint-layout:1.1.0'
Circular Positioning
圆形定位(Circular Positioning)可以让一个控件以另一个控件的中心为中心点,来设置其相对与该中心点的距离和角度。 可以设置的属性有:
- layout_constraintCircle:引用另一个控件的 id。
- layout_constraintCircleRadius:到另一个控件中心的距离。
- layout_constraintCircleAngle:控件的角度(顺时针,0 – 360 度)。
下面以给头像设置 badge 为例,演示下其用法:
<?xml version="1.0" encoding="utf-8"?>
<android.support.constraint.ConstraintLayout xmlns:android="http://schemas.android.com/apk/res/android"
    xmlns:app="http://schemas.android.com/apk/res-auto"
    xmlns:tools="http://schemas.android.com/tools"
    android:layout_width="match_parent"
    android:layout_height="match_parent"
    tools:context="com.github.airsaid.constraintlayoutdemo.MainActivity">

    <ImageView
        android:id="@+id/img_avatar"
        android:layout_width="60dp"
        android:layout_height="60dp"
        android:src="@mipmap/ic_avatar"
        app:layout_constraintBottom_toBottomOf="parent"
        app:layout_constraintLeft_toLeftOf="parent"
        app:layout_constraintRight_toRightOf="parent"
        app:layout_constraintTop_toTopOf="parent" />

    <TextView
        android:id="@+id/txt_label"
        android:layout_width="wrap_content"
        android:layout_height="wrap_content"
        android:text="VIP"
        android:textColor="#FFFF00"
        android:textStyle="bold"
        app:layout_constraintCircle="@id/img_avatar"
        app:layout_constraintCircleAngle="45"
        app:layout_constraintCircleRadius="30dp" />

</android.support.constraint.ConstraintLayout>
运行结果:

Enforcing constraints
在 1.1 版本之前,如果将控件的尺寸设置为了 WRAP_CONTENT,那么对控件设置约束(如:minWidth 等)是不起作用的。那么强制约束(Enforcing constraints)的作用就是,在控件被设置 WRAP_CONTENT 的情况下,使约束依然生效。
需要使用到的属性有:
- app:constrainedWidth=”true|false”
- app:constrainedHeight=”true|false”
下面的例子演示了没有设置强制约束和设置了强制约束的对比:
<ImageView
        android:id="@+id/img_avatar"
        android:layout_width="wrap_content"
        android:layout_height="wrap_content"
        android:src="@mipmap/ic_avatar"
        app:layout_constrainedWidth="false"
        app:layout_constraintBottom_toBottomOf="parent"
        app:layout_constraintLeft_toLeftOf="parent"
        app:layout_constraintRight_toRightOf="parent"
        app:layout_constraintTop_toTopOf="parent"
        app:layout_constraintWidth_max="100dp" />

<ImageView
        android:layout_width="wrap_content"
        android:layout_height="wrap_content"
        android:src="@mipmap/ic_avatar"
        app:layout_constrainedWidth="true"
        app:layout_constraintBottom_toBottomOf="parent"
        app:layout_constraintLeft_toLeftOf="parent"
        app:layout_constraintRight_toRightOf="parent"
        app:layout_constraintTop_toBottomOf="@id/img_avatar"
        app:layout_constraintWidth_max="100dp" />
运行结果:

Dimensions
1.1 版本中,当控件的尺寸设置为了 MATCH_CONSTRAINT 时( 0dp),在设置尺寸上又多了二个新的修饰属性:
- layout_constrainWidth_percent。
- layout_constrainHeight_percent。
这两个属性的作用就是指定当前控件的宽度或高度是父控件的百分之多少。可设置的值在 0 – 1 之间,1 就是 100%。
设置头像的宽度占父控件宽度的 80%(父控件占满全屏)例子:
<ImageView
    android:id="@+id/img_avatar"
    android:layout_width="0dp"
    android:layout_height="wrap_content"
    android:scaleType="centerCrop"
    android:src="@mipmap/ic_avatar"
    app:layout_constraintBottom_toBottomOf="parent"
    app:layout_constraintLeft_toLeftOf="parent"
    app:layout_constraintRight_toRightOf="parent"
    app:layout_constraintTop_toTopOf="parent"
    app:layout_constraintWidth_percent="0.8" />
运行结果:

Margins and chains
在 1.1.0-beta4 版本中(已知),为链中的控件设置 marginRight/End 是无效的(个人感觉这应该是个 Bug)。而在 1.1 稳定版中,无论设置右边距还是左边距都是有效果的,会累计计算。并且在计算剩余空间时,会将边距一起考虑。
Optimizer
需要知道的是,当我们使用 MATCH_CONSTRAINT 时,ConstraintLayout 将不得不对控件进行 2 次测量,而测量的操作是昂贵的。
而优化器(Optimizer)的作用就是对 ConstraintLayout 进行优化,对应设置给 ConstraintLauyout 的属性是:
- layout_optimizationLevel。
可设置的值有:
- none:不应用优化。
- standard:仅优化直接约束和屏障约束(默认的)。
- direct:优化直接约束。
- barrier:优化屏障约束。
- chain:优化链约束(实验)。
- dimensions:优化尺寸测量(实验)。
在设置值时,可以设置多个,如:
app:layout_optimizationLevel="direct|barrier|dimensions"
Barrier
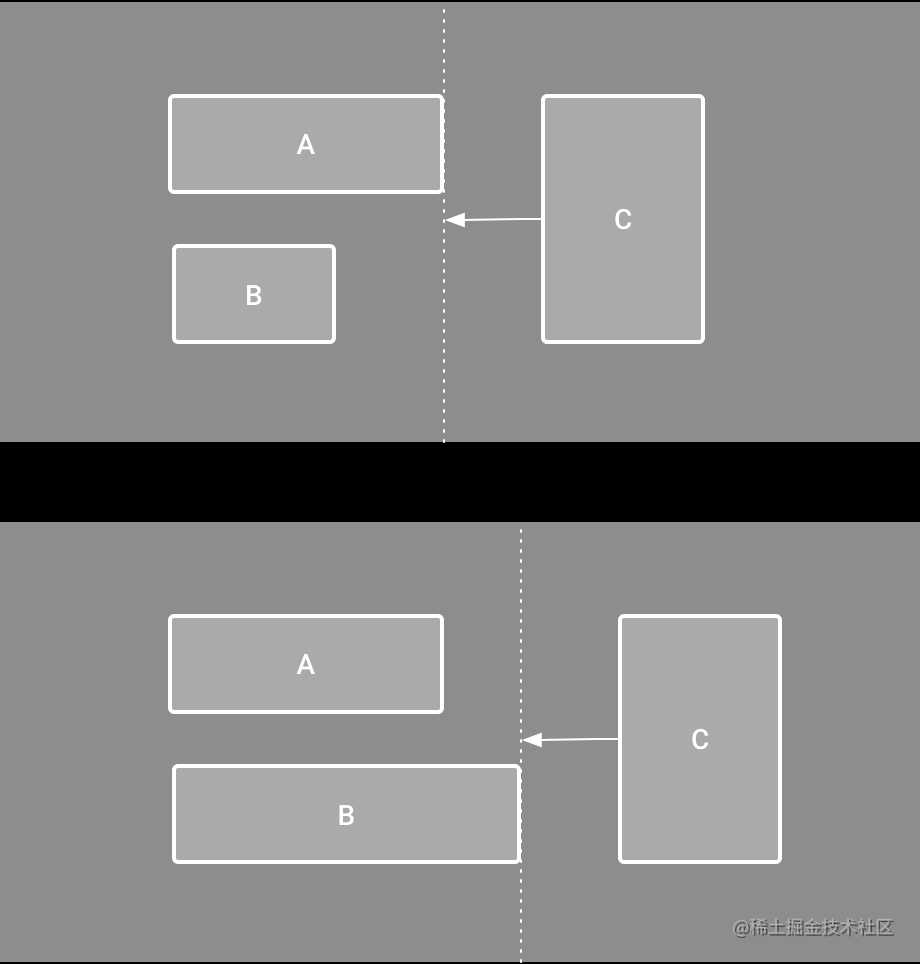
当我们在布局时,有时候就会遇到布局会随着数据的多少而改变大小的情况。以下图为例:

(图片来自官方)
通过上图就可以发现,当在 A、B 控件的大小都不确定的情况下, View3 以谁作为约束对象都不对。如果以 A 作为约束对象,那么当 B 的宽度过宽时就会被遮挡,同理以 B 作为约束也是如此。
那么此时,Barrier(屏障)就派上用场了。这是个非常好用的东东,和 GuideLine 一样,它是一个虚拟的 View,对界面是不可见的。目的就是辅助布局。
对 Barrier 可以使用的属性有:
- barrierDirection:设置 Barrier 所创建的位置。可设置的有:bottom、end、left、right、start、top。
- constraint_referenced_ids:设置 Barrier 引用的控件。可设置多个,设置的方式是:id, id。(无需加 @id/)
- barrierAllowsGoneWidgets:默认为 true,即当 Barrier 引用的控件被 GONE 掉时,则 Barrier 默认的创建行为是在已 GONE 掉控件的已解析位置上进行创建。如果设置为 false,则不会将 GONE 掉的控件考虑在内。
说再多不如看代码,还是以上图为例,来看看 Barrier 是如何解决的:
<?xml version="1.0" encoding="utf-8"?>
<android.support.constraint.ConstraintLayout xmlns:android="http://schemas.android.com/apk/res/android"
    xmlns:app="http://schemas.android.com/apk/res-auto"
    xmlns:tools="http://schemas.android.com/tools"
    android:layout_width="match_parent"
    android:layout_height="match_parent"
    android:padding="16dp"
    tools:context="com.github.airsaid.constraintlayoutdemo.MainActivity">

    <TextView
        android:id="@+id/title"
        android:layout_width="wrap_content"
        android:layout_height="wrap_content"
        android:text="Title"
        android:textSize="16sp"
        app:layout_constraintStart_toStartOf="parent"
        app:layout_constraintTop_toTopOf="parent" />

    <TextView
        android:id="@+id/desc"
        android:layout_width="wrap_content"
        android:layout_height="wrap_content"
        android:layout_marginTop="10dp"
        android:text="This is a descriptive text."
        app:layout_constraintStart_toStartOf="parent"
        app:layout_constraintTop_toBottomOf="@id/title" />

    <android.support.constraint.Barrier
        android:id="@+id/barrier"
        android:layout_width="match_parent"
        android:layout_height="match_parent"
        app:barrierDirection="end"
        app:constraint_referenced_ids="title, desc" />

    <TextView
        android:id="@+id/content"
        android:layout_width="0dp"
        android:layout_height="wrap_content"
        android:layout_marginStart="10dp"
        android:text="This is a piece of content that is very long and long very long and long ..."
        app:layout_constraintEnd_toEndOf="parent"
        app:layout_constraintStart_toEndOf="@id/barrier"
        app:layout_constraintTop_toTopOf="parent" />


</android.support.constraint.ConstraintLayout>
运行结果:

另一种情况:

完美解决。
Group
Group 的作用就是控制一组控件的可见性。其可使用到的属性为:
- constraint_referenced_ids:指定所引用控件的 id。
例:
<android.support.constraint.Group
    android:layout_width="wrap_content"
    android:layout_height="wrap_content"
    android:visibility="gone"
    app:constraint_referenced_ids="title, desc" />
如果有多个 Group,是可以同时指定相同的控件的,最终是以 XML 中最后声明的 Group 为准。
Placeholder
Placeholder(占位符)是一个虚拟对象,作用和它的名字一样,就是占位。
当放置好 Placeholder 后,可以通过 setContentId() 方法将占位符变为有效的视图。如果视图已经存在于屏幕上,那么视图将会从原有位置消失。
除此之外,还可以通过 setEmptyVisibility() 方法设置当视图不存在时占位符的可见性。
下面的例子演示了占位符的使用,当点击顶部头像时,顶部头像会消失并在占位符处显示:
<?xml version="1.0" encoding="utf-8"?>
<android.support.constraint.ConstraintLayout xmlns:android="http://schemas.android.com/apk/res/android"
    xmlns:app="http://schemas.android.com/apk/res-auto"
    xmlns:tools="http://schemas.android.com/tools"
    android:layout_width="match_parent"
    android:layout_height="match_parent"
    android:padding="16dp"
    tools:context="com.github.airsaid.constraintlayoutdemo.MainActivity">

    <ImageView
        android:id="@+id/avatar"
        android:layout_width="wrap_content"
        android:layout_height="wrap_content"
        android:src="@mipmap/ic_avatar"
        app:layout_constraintStart_toStartOf="parent"
        app:layout_constraintTop_toTopOf="parent" />

    <android.support.constraint.Placeholder
        android:id="@+id/placeholder"
        android:layout_width="wrap_content"
        android:layout_height="wrap_content"
        app:layout_constraintBottom_toBottomOf="parent"
        app:layout_constraintEnd_toEndOf="parent"
        app:layout_constraintStart_toStartOf="parent"
        app:layout_constraintTop_toTopOf="parent" />

</android.support.constraint.ConstraintLayout>
运行结果:

总结
通过本篇文章可以看到, ConstraintLayout 正在不断的强大、优化中,并且更是推出了优化器来让性能更出色。那么,还有什么理由不用 ConstraintLayout 呢?!
今天的文章Android 约束布局(ConstraintLayout)1.1.0 版详解分享到此就结束了,感谢您的阅读。
版权声明:本文内容由互联网用户自发贡献,该文观点仅代表作者本人。本站仅提供信息存储空间服务,不拥有所有权,不承担相关法律责任。如发现本站有涉嫌侵权/违法违规的内容, 请发送邮件至 举报,一经查实,本站将立刻删除。
如需转载请保留出处:https://bianchenghao.cn/21529.html
