Fluro作为 一个Flutter的 企业级的路由框架 ,确实不错,可以解决多变的需求情况 ,是时候搞一波了。 我看了官方的demo,写的有点乱(反正我是这样感觉的,老外的代码总是有点抽象),顺便扩展一下传参的问题和使用 Flutter 的 cupertino 转场动画。写了一个demo, 地址在:在这里在这里,快点我,快快快
本文基于 Fluro 目前版本 1.4.0 pub.dev/packages/fl…
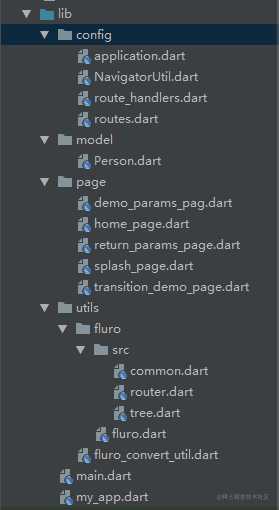
1. 先看下Demo代码结构
2. 基础使用
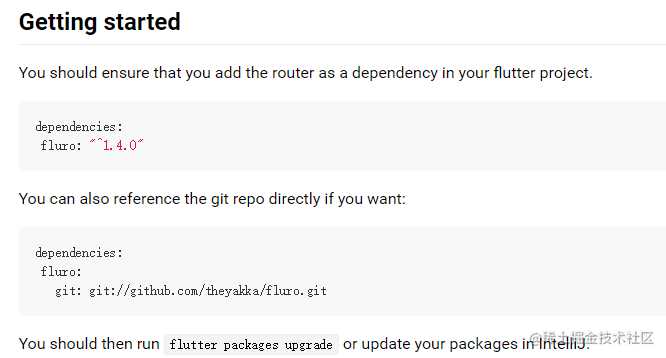
1. 导包
2. 基础配置
1. application.dart
class Application {
  static Router router;
}
2. routes.dart
在routes.dart文件中配置路由,这里需要注意的事首页一定要用“/”配置

class Routes {
  static String root = "/";
  static String home = "/home";
  static String demoParams = "/deme_params";
  static String returnParams = "/return_params";
  static String transitionDemo = "/transitionDemo";
  static String transitionCustomDemo = "/transitionCustomDemo";
  static String transitionCupertinoDemo = "/transitionCupertinoDemo";

  static void configureRoutes(Router router) {

    router.notFoundHandler = new Handler(
        handlerFunc: (BuildContext context, Map<String, List<String>> params) {
      print("ROUTE WAS NOT FOUND !!!");
    });
    /// 第一个参数是路由地址,第二个参数是页面跳转和传参,第三个参数是默认的转场动画,可以看上图
    /// 我这边先不设置默认的转场动画,转场动画在下面会讲,可以在另外一个地方设置(可以看NavigatorUtil类)
    router.define(root, handler: splashHandler);
    router.define(home, handler: homeHandler);
    router.define(demoParams, handler: demoParamHandler);
    router.define(returnParams, handler: returnParamHandler);
    router.define(transitionDemo, handler: transitionDemoHandler);
    router.define(transitionCustomDemo, handler: transitionDemoHandler);
    router.define(transitionCupertinoDemo, handler: transitionDemoHandler);

  }
}
3. main.dart
void main() {
  // 注册 fluro routes
  Router router = Router();
  Routes.configureRoutes(router);
  Application.router = router;


  runApp(MyApp());
}
4. my_app.dart
class MyApp extends StatelessWidget {
  @override
  Widget build(BuildContext context) {
    return MaterialApp(
      title: 'Weather App',
      /// 生成路由
      onGenerateRoute: Application.router.generator,
    );
  }
}
3. 场景一:设置启动页 Splash 跳转到 Home页面,并且移除 Splash 页面
只摘取相关代码,完整代码去 github查看,在文章最顶部
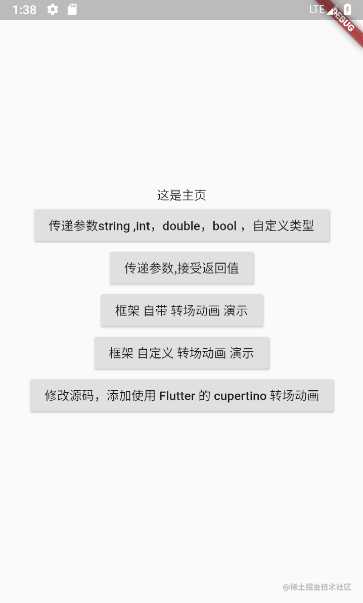
首先App启动,先进入 首页Splash 页面,然后 倒计时2秒,再进入home页面
1. 效果图
1. 首先先打开 Splash 页面

2. 两秒后跳转到 home 页面
2. 代码
1. routes.dart
/// 这边设置了首页,固定写法 /
static String root = "/";
/// home 页面的 路由地址
static String home = "/home";

/// splashHandler 就是页面跳转,在route_handlers.dart
router.define(root, handler: splashHandler);
/// homeHandler home页面
router.define(home, handler: homeHandler);
2. route_handlers.dart
/// 跳转到首页Splash
var splashHandler = new Handler(
    handlerFunc: (BuildContext context, Map<String, List<String>> params) {
  return new SplashPag();
});

/// 跳转到主页
var homeHandler = new Handler(
    handlerFunc: (BuildContext context, Map<String, List<String>> params) {
  return HomePage();
});
3. splash_page.dart
class SplashPag extends StatefulWidget {
  @override
  _SplashPagState createState() => _SplashPagState();
}

class _SplashPagState extends State<SplashPag> {

  @override
  void initState() {
// Future.delayed(Duration(seconds: 5),(){
// NavigatorUtil.goHomePage(context);
// });
	/// 2秒后跳转到主页面,上面注释的代码也可以做到倒计时
    Observable.timer(0, Duration(seconds: 2)).listen((_){
      /// 然后看 NavigatorUtil.dart
      NavigatorUtil.goHomePage(context);
    });
    super.initState();
  }

  @override
  Widget build(BuildContext context) {

    return Scaffold(
      body: Center(
        child: Container(
          child: Text('我是欢迎页面'),
        ),
      ),
    );
  }
}
4. NavigatorUtil.dart
  /// 跳转到主页面
  static void goHomePage(BuildContext context) {
    /// Routes.home 路由地址
	/// replace:true 就是将 splash 页面给移除掉了,这点后退键的时候就不会再出现Splash页面
    Application.router.navigateTo(context, Routes.home, replace: true);
  }
5. home_page.dart
class HomePage extends StatefulWidget {
  @override
  _HomePageState createState() => _HomePageState();
}

class _HomePageState extends State<HomePage> {
  @override
  Widget build(BuildContext context) {
    String name = "来自第一个界面测试一下";
    int age = 14;
    double score = 6.4;
    bool sex = true;
    Person person = new Person(name: 'Zeking', age: 18, sex: true);

    return Scaffold(
      body: Column(
        mainAxisAlignment: MainAxisAlignment.center,
        children: <Widget>[
          Center(child: Text('这是主页')),
          RaisedButton(
            child: Text('传递参数string ,int,double,bool ,自定义类型'),
            onPressed: () {
              NavigatorUtil.goDemoParamsPage(
                  context, name, age, score, sex, person);
            },
          ),
          RaisedButton(
            child: Text('传递参数,接受返回值'),
            onPressed: () {
              NavigatorUtil.goReturnParamsPage(context).then((result) {
                debugPrint('${result.runtimeType}');
                String message  ;
                /// 如果是 自定义的 Person 类
                if (result.runtimeType == Person) {
                  message = result.toJson().toString();
                  debugPrint('${result.toJson().toString()}');
                } else {
                  message = '$result';
                  debugPrint('$result');
                }
                showResultDialog(context, message);
              });
            },
          ),
          RaisedButton(
            child: Text('框架 自带 转场动画 演示'),
            onPressed: () {
              NavigatorUtil.gotransitionDemoPage(context,
                  /// 这边进行了 String 编码
                  FluroConvertUtils.fluroCnParamsEncode("框架 自带 转场动画 演示 \n\n\n "
                      "这边只展示 inFromLeft ,剩下的自己去尝试下,\n\n\n "
                      "架自带的有 native,nativeModal,inFromLeft,inFromRight,inFromBottom,fadeIn,custom"));
            },
          ),
          RaisedButton(
            child: Text('框架 自定义 转场动画 演示'),
            onPressed: () {
              NavigatorUtil.gotransitionCustomDemoPage(context,
                  FluroConvertUtils.fluroCnParamsEncode('框架 自定义 转场动画 演示'));
            },
          ),
          RaisedButton(
            child: Text('修改源码,添加使用 Flutter 的 cupertino 转场动画'),
            onPressed: () {
              NavigatorUtil.gotransitionCupertinoDemoPage(
                  context,
                  FluroConvertUtils.fluroCnParamsEncode(
                      "修改源码,添加使用 Flutter 的 cupertino 转场动画"));
            },
          ),
        ],
      ),
    );
  }

  /// 显示一个Dialgo
  void showResultDialog(BuildContext context,String message){
    showDialog(
      context: context,
      builder: (context) {
        return new AlertDialog(
          title: new Text(
            "Hey Hey!",
            style: new TextStyle(
              color: const Color(0xFF00D6F7),
              fontFamily: "Lazer84",
              fontSize: 22.0,
            ),
          ),
          content: new Text("$message"),
          actions: <Widget>[
            new Padding(
              padding: new EdgeInsets.only(bottom: 8.0, right: 8.0),
              child: new FlatButton(
                onPressed: () {
                  Navigator.of(context).pop(true);
                },
                child: new Text("OK"),
              ),
            ),
          ],
        );
      },
    );
  }
}
4. 场景二:传参 String,int,double,bool,自定义类型
1. 效果图

2. 代码
1. 注意点(类型转换 fluro_convert_util.dart)
Fluro路由地址,只能传递String类型(并且不支持中文),所以需要对 中文,int,double,bool,自定义类型进行一个转换 , 写了一个 转换类 fluro_convert_util.dart
import 'dart:convert';

/// fluro 参数编码解码工具类
class FluroConvertUtils {
  /// fluro 传递中文参数前,先转换,fluro 不支持中文传递
  static String fluroCnParamsEncode(String originalCn) {
    return jsonEncode(Utf8Encoder().convert(originalCn));
  }

  /// fluro 传递后取出参数,解析
  static String fluroCnParamsDecode(String encodeCn) {
    var list = List<int>();

    ///字符串解码
    jsonDecode(encodeCn).forEach(list.add);
    String value = Utf8Decoder().convert(list);
    return value;
  }

  /// string 转为 int
  static int string2int(String str) {
    return int.parse(str);
  }

  /// string 转为 double
  static double string2double(String str) {
    return double.parse(str);
  }

  /// string 转为 bool
  static bool string2bool(String str) {
    if (str == 'true') {
      return true;
    } else {
      return false;
    }
  }

  /// object 转为 string json
  static String object2string<T>(T t) {
    return fluroCnParamsEncode(jsonEncode(t));
  }

  /// string json 转为 map
  static Map<String, dynamic> string2map(String str) {
    return json.decode(fluroCnParamsDecode(str));
  }
}
2. Person.dart 等下用到的自定义类型
class Person{
  String name;
  int age;
  bool sex;

  Person({this.name, this.age,this.sex});

  Person.fromJson(Map<String, dynamic> json) {
    name = json['name'];
    age = json['age'];
    sex = json['sex'];
  }

  Map<String, dynamic> toJson() {
    final Map<String, dynamic> data = new Map<String, dynamic>();
    data['name'] = this.name;
    data['age'] = this.age;
    data['sex'] = this.sex;
    return data;
  }
}
3. routes.dart
/// 配置路由地址 和 跳转类和参数handler
static String demoParams = "/deme_params";

router.define(demoParams, handler: demoParamHandler);
4. route_handlers.dart
/// 参数传递 int ,double,bool,自定义类型
var demoParamHandler = new Handler(
    handlerFunc: (BuildContext context, Map<String, List<Object>> params) {
  /// params["name"]?.first 相当于 params["name"][0] ,打个debug 你就知道为什么了是个list
  String name = params["name"]?.first;
  String age = params["age"]?.first;
  String sex = params["sex"]?.first;
  String score = params["score"]?.first;
  String personjson = params['personjson']?.first;
  /// 下面转换为真实想要的类型
  return DemoParamsPage(
    name: name,
    age: FluroConvertUtils.string2int(age),
    score: FluroConvertUtils.string2double(score),
    sex: FluroConvertUtils.string2bool(sex),
    personJson: personjson,
  );
});
5. NavigatorUtil.dart
  /// 跳转到 传参demo 页面
  static void goDemoParamsPage(BuildContext context, String name, int age,
      double score, bool sex, Person person) {
    /// 对中文进行编码
    String mName = FluroConvertUtils.fluroCnParamsEncode(name);
    /// 对自定义类型 转为 json string
    String personJson = FluroConvertUtils.object2string(person);
    Application.router.navigateTo(
        context,
        Routes.demoParams +
            "?name=$name&age=$age&score=$score&sex=$sex&personjson=$personJson");
  }
6. home_page.dart 跳转按钮
String name = "来自第一个界面测试一下";
int age = 14;
double score = 6.4;
bool sex = true;
Person person = new Person(name: 'Zeking', age: 18, sex: true);

RaisedButton(
	child: Text('传递参数string ,int,double,bool ,自定义类型'),
	      onPressed: () {
	        NavigatorUtil.goDemoParamsPage(
	            context, name, age, score, sex, person);
	      },
	    ),
7. demo_params_pag.dart
class DemoParamsPage extends StatefulWidget {
  final String name;
  final int age;
  final double score;
  final bool sex;
  final String personJson;

  DemoParamsPage({this.name, this.age, this.score, this.sex, this.personJson});

  @override
  _DemoParamsPageState createState() => _DemoParamsPageState();
}

class _DemoParamsPageState extends State<DemoParamsPage> {
  @override
  Widget build(BuildContext context) {
    /// 对 中文 进行解码
    String mName = FluroConvertUtils.fluroCnParamsDecode(widget.name);
    /// 对自定义类 进行解析
    Person person =
        Person.fromJson(FluroConvertUtils.string2map(widget.personJson));
    print(person.name);
    print(person.age);
    print(person.sex);
    /// 下面的写法也可以
    Map<String, dynamic> data = FluroConvertUtils.string2map(widget.personJson);
    print(data["name"]);
    print(data["age"]);
    print(data["sex"]);

    return Scaffold(
      body: Center(
        child: Column(
          mainAxisAlignment: MainAxisAlignment.center,
          children: <Widget>[
            Text('name:$mName'),
            Text('age:${widget.age}'),
            Text('score:${widget.score}'),
            Text('sex:${widget.sex}'),
            Text('Person:${person.toJson().toString()}'),
            RaisedButton(
              child: Text('返回'),
              onPressed: () {
                NavigatorUtil.goBack(context);
              },
            )
          ],
        ),
      ),
    );
  }
}
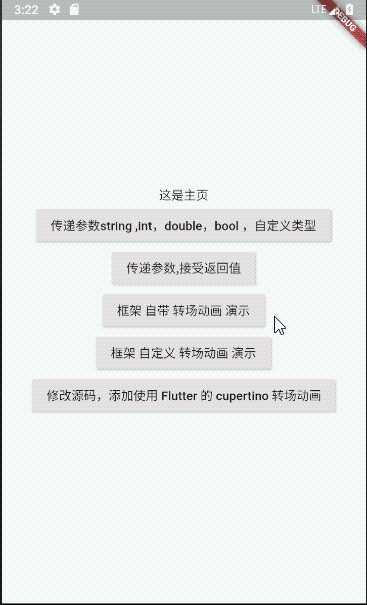
5. 场景三:接收返回值 String,int,double,自定义类型
1. 效果图
2. routes.dart
static String returnParams = "/return_params";

router.define(returnParams, handler: returnParamHandler);
3. route_handlers.dart
/// 关闭页面,返回参数
var returnParamHandler = new Handler(
    handlerFunc: (BuildContext context, Map<String, List<Object>> params) {
  return ReturnParamsPage();
});
4. NavigatorUtil.dart
  /// 跳转到 会返回参数的 页面
  static Future goReturnParamsPage(BuildContext context) {
    return Application.router.navigateTo(context, Routes.returnParams);
  }
5. home_page.dart
RaisedButton(
    child: Text('传递参数,接受返回值'),
     onPressed: () {
       NavigatorUtil.goReturnParamsPage(context).then((result) {
         debugPrint('${result.runtimeType}');
         String message  ;
         /// 如果是 自定义的 Person 类
         if (result.runtimeType == Person) {
           message = result.toJson().toString();
           debugPrint('${result.toJson().toString()}');
         } else {
           message = '$result';
           debugPrint('$result');
         }
         showResultDialog(context, message);
       });
     },
   )

  /// 显示一个Dialgo
  void showResultDialog(BuildContext context,String message){
    showDialog(
      context: context,
      builder: (context) {
        return new AlertDialog(
          title: new Text(
            "Hey Hey!",
            style: new TextStyle(
              color: const Color(0xFF00D6F7),
              fontFamily: "Lazer84",
              fontSize: 22.0,
            ),
          ),
          content: new Text("$message"),
          actions: <Widget>[
            new Padding(
              padding: new EdgeInsets.only(bottom: 8.0, right: 8.0),
              child: new FlatButton(
                onPressed: () {
                  Navigator.of(context).pop(true);
                },
                child: new Text("OK"),
              ),
            ),
          ],
        );
      },
    );
  }
6. return_params_page.dart
class ReturnParamsPage extends StatefulWidget {
  @override
  _ReturnParamsPageState createState() => _ReturnParamsPageState();
}

class _ReturnParamsPageState extends State<ReturnParamsPage> {
  @override
  Widget build(BuildContext context) {
    Person person = new Person(name: "returnName", age: 23, sex: false);
    return Scaffold(
      body: Column(
        mainAxisAlignment: MainAxisAlignment.center,
        children: <Widget>[
          Center(
            child: RaisedButton(
              child: Text('返回,并且返回string'),
              onPressed: () {
                NavigatorUtil.goBackWithParams(context, "我是返回值哦");
              },
            ),
          ),
          RaisedButton(
            child: Text('返回,并且返回int'),
            onPressed: () {
              NavigatorUtil.goBackWithParams(context, 12);
            },
          ),
          RaisedButton(
            child: Text('返回,并且返回double'),
            onPressed: () {
              NavigatorUtil.goBackWithParams(context, 3.1415926);
            },
          ),
          RaisedButton(
            child: Text('返回,并且返回bool'),
            onPressed: () {
              NavigatorUtil.goBackWithParams(context, true);
            },
          ),
          RaisedButton(
            child: Text('返回,并且返回自定义类型'),
            onPressed: () {
              NavigatorUtil.goBackWithParams(context, person);
            },
          )
        ],
      ),
    );
  }
}
6. 场景四:使用 框架 自带 的 转场动画
1. 效果图

2. routes.dart
static String transitionDemo = "/transitionDemo";

router.define(transitionDemo, handler: transitionDemoHandler);
3. route_handlers.dart
/// 转场动画 页面
var transitionDemoHandler = new Handler(
    handlerFunc: (BuildContext context, Map<String, List<Object>> params) {
  String title = params["title"]?.first;
  return TransitionDemoPage(title);
});
4. NavigatorUtil.dart
  /// 跳转到 转场动画 页面 , 这边只展示 inFromLeft ,剩下的自己去尝试下,
  /// 框架自带的有 native,nativeModal,inFromLeft,inFromRight,inFromBottom,fadeIn,custom
  static Future gotransitionDemoPage(BuildContext context, String title) {
    return Application.router.navigateTo(
        context, Routes.transitionDemo + "?title=$title",
        /// 指定了 转场动画 inFromLeft
        transition: TransitionType.inFromLeft);
  }
5. home_page.dart
RaisedButton(
  child: Text('框架 自带 转场动画 演示'),
  onPressed: () {
    NavigatorUtil.gotransitionDemoPage(context,
		/// 这边进行了 String 编码
        FluroConvertUtils.fluroCnParamsEncode("框架 自带 转场动画 演示 \n\n\n "
            "这边只展示 inFromLeft ,剩下的自己去尝试下,\n\n\n "
            "架自带的有 native,nativeModal,inFromLeft,inFromRight,inFromBottom,fadeIn,custom"));
  },
),
6. transition_demo_page.dart
场景五 ,场景六 ,用到一样的 transition_demo_page 后面就不展示了
class TransitionDemoPage extends StatefulWidget {
  final String title;

  TransitionDemoPage(this.title);

  @override
  _TransitionDemoPageState createState() => _TransitionDemoPageState();
}

class _TransitionDemoPageState extends State<TransitionDemoPage> {
  @override
  Widget build(BuildContext context) {
    return Scaffold(
      body: Column(
        mainAxisAlignment: MainAxisAlignment.center,
        children: <Widget>[
          Center(
              child: Text(
            /// string 解码
            FluroConvertUtils.fluroCnParamsDecode(widget.title),
            textAlign: TextAlign.center,
          )),
          RaisedButton(
            child: Text('返回'),
            onPressed: () {
              NavigatorUtil.goBack(context);
            },
          )
        ],
      ),
    );
  }
}
7. 场景五:自定义转场动画
1. 效果图

2. routes.dart
static String transitionCustomDemo = "/transitionCustomDemo";

router.define(transitionCustomDemo, handler: transitionDemoHandler);
3. route_handlers.dart
/// 转场动画 页面
var transitionDemoHandler = new Handler(
    handlerFunc: (BuildContext context, Map<String, List<Object>> params) {
  String title = params["title"]?.first;
  return TransitionDemoPage(title);
});
4. NavigatorUtil.dart
  /// 自定义 转场动画
  static Future gotransitionCustomDemoPage(BuildContext context, String title) {
    var transition = (BuildContext context, Animation<double> animation,
        Animation<double> secondaryAnimation, Widget child) {
      return new ScaleTransition(
        scale: animation,
        child: new RotationTransition(
          turns: animation,
          child: child,
        ),
      );
    };
    return Application.router.navigateTo(
        context, Routes.transitionCustomDemo + "?title=$title",
        transition: TransitionType.custom, /// 指定是自定义动画
        transitionBuilder: transition, /// 自定义的动画
        transitionDuration: const Duration(milliseconds: 600)); /// 时间
  }
5. home_page.dart
 RaisedButton(
   child: Text('框架 自定义 转场动画 演示'),
   onPressed: () {
     NavigatorUtil.gotransitionCustomDemoPage(context,
         FluroConvertUtils.fluroCnParamsEncode('框架 自定义 转场动画 演示'));
   },
 ),
8. 场景六:修改源码,添加使用 Flutter 的 cupertino 转场动画
1. 查看源码,为什么没有 Flutter 的 cupertino
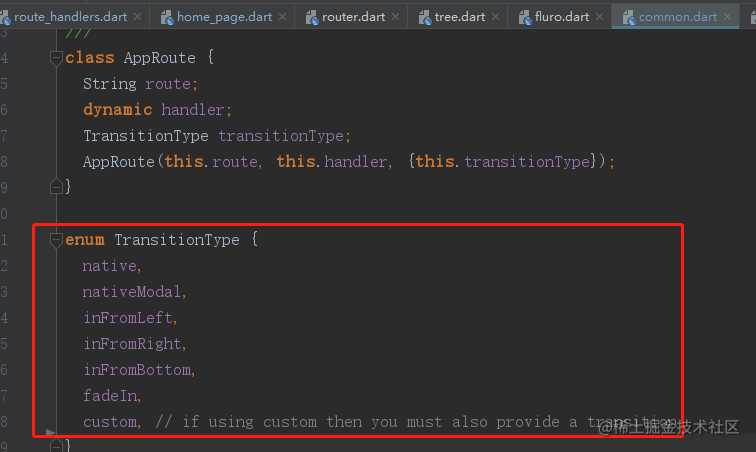
看下图,发现它自带的 转场动画 只有 这几个,没有我喜欢的Flutter 的cupertino转场动画,侧滑关闭页面,
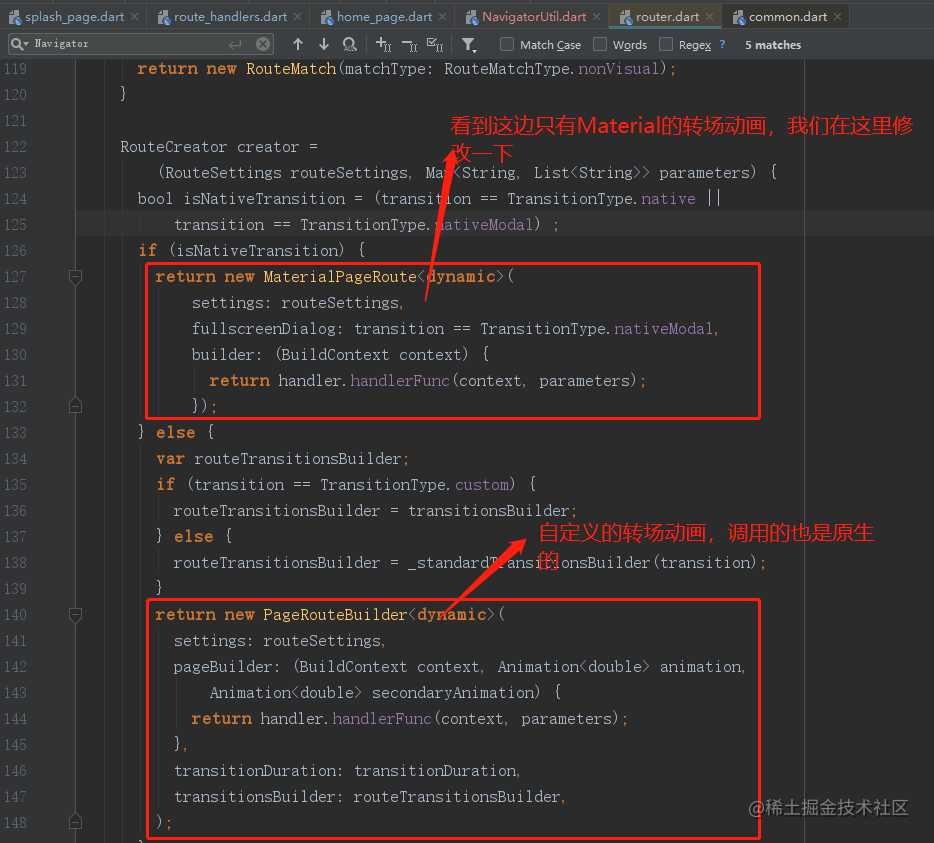
继续看源码 ,看下图,最后也是调用了系统的MaterialPageRoute 和 PageRouteBuilder
2. 修改源码
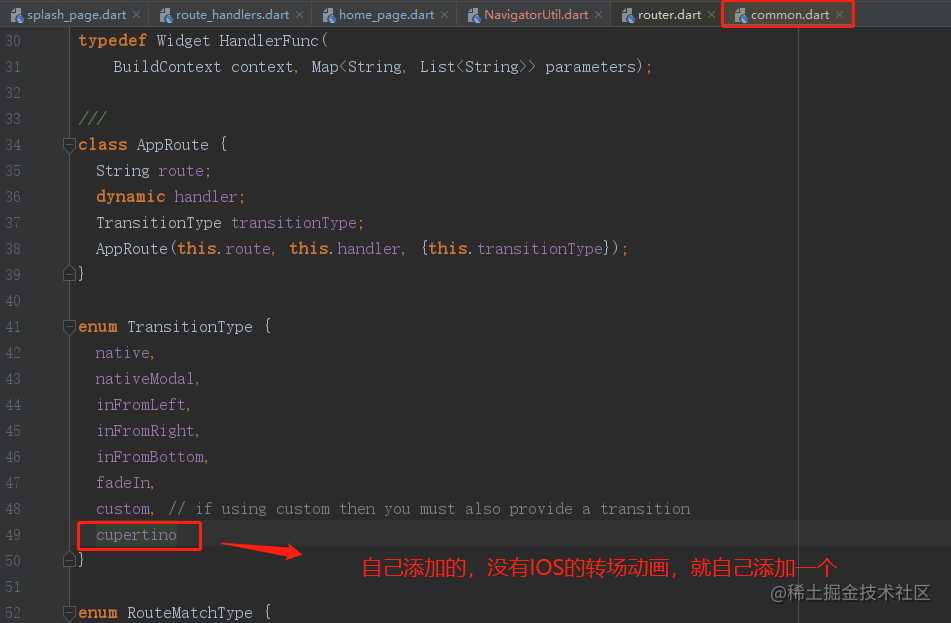
看下图,自己添加 cupertino 类型
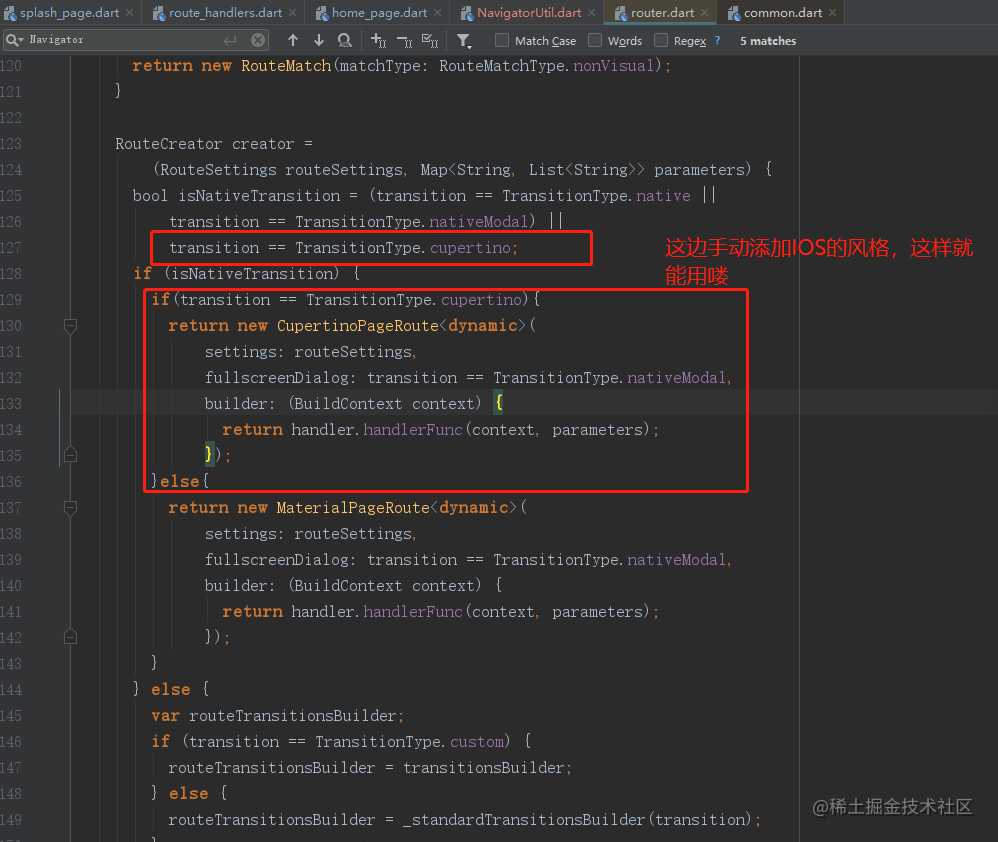
看下图,添加
CupertinoPageRoute
3. 效果图

4. routes.dart
static String transitionCupertinoDemo = "/transitionCupertinoDemo";

router.define(transitionCupertinoDemo, handler: transitionDemoHandler);
5. route_handlers.dart
/// 转场动画 页面
var transitionDemoHandler = new Handler(
    handlerFunc: (BuildContext context, Map<String, List<Object>> params) {
  String title = params["title"]?.first;
  return TransitionDemoPage(title);
})
6. NavigatorUtil.dart
  /// 使用 IOS 的 Cupertino 的转场动画,这个是修改了源码的 转场动画
  /// Fluro本身不带,但是 Flutter自带
  static Future gotransitionCupertinoDemoPage(
      BuildContext context, String title) {
    return Application.router.navigateTo(
        context, Routes.transitionCupertinoDemo + "?title=$title",
        transition: TransitionType.cupertino);
  }
7. home_page.dart
 RaisedButton(
   child: Text('修改源码,添加使用 Flutter 的 cupertino 转场动画'),
   onPressed: () {
     NavigatorUtil.gotransitionCupertinoDemoPage(
         context,
         FluroConvertUtils.fluroCnParamsEncode(
             "修改源码,添加使用 Flutter 的 cupertino 转场动画"));
   },

今天的文章Flutter – 路由管理 – 02 – Fluro分享到此就结束了,感谢您的阅读。
版权声明:本文内容由互联网用户自发贡献,该文观点仅代表作者本人。本站仅提供信息存储空间服务,不拥有所有权,不承担相关法律责任。如发现本站有涉嫌侵权/违法违规的内容, 请发送邮件至 举报,一经查实,本站将立刻删除。
如需转载请保留出处:https://bianchenghao.cn/22328.html
