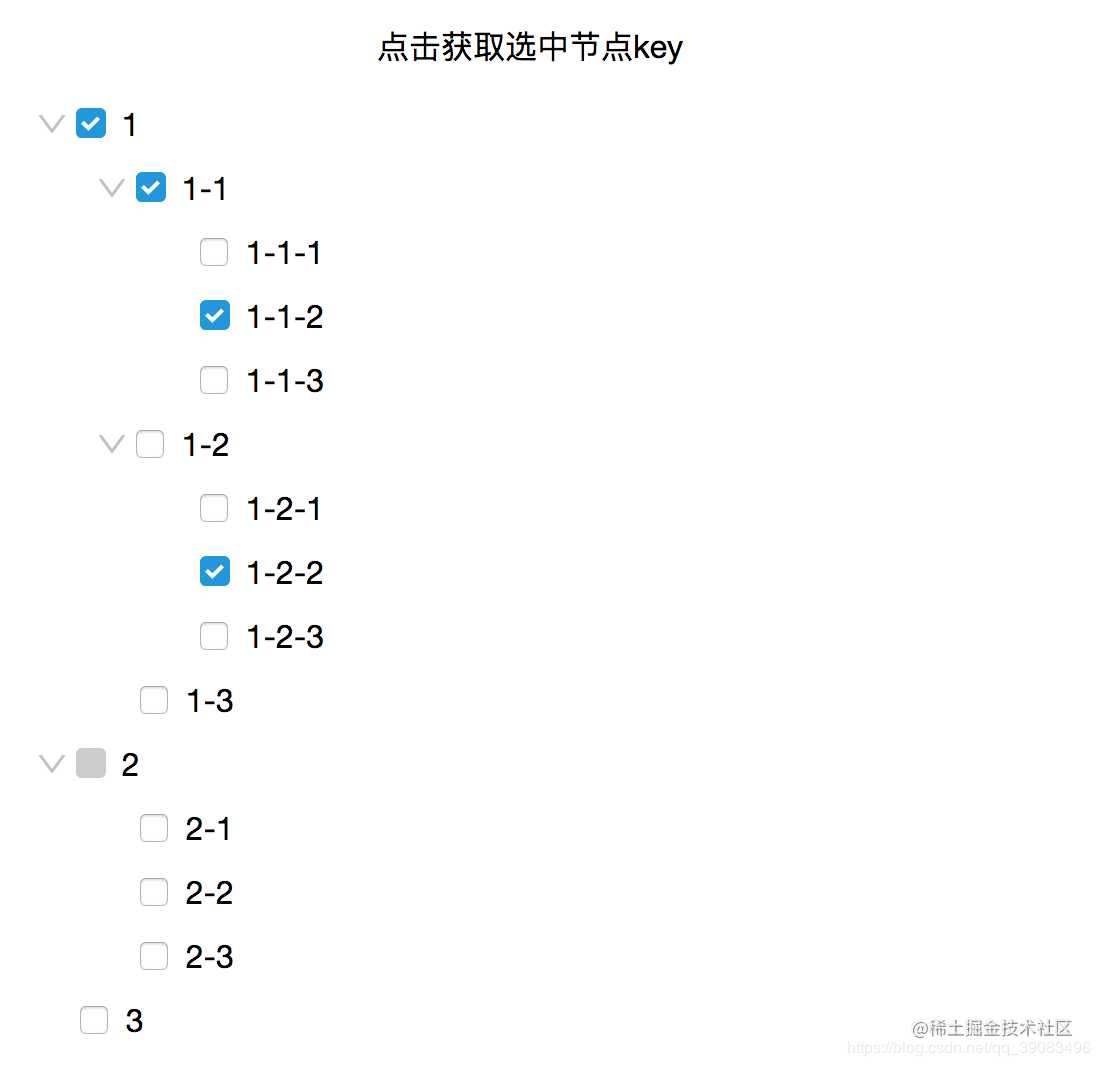
思考了两天时间,准备仿照ant-design-vue实现一个基于vue的树形控件。主要用到了vue递归组件思想、input的CheckBox类型输入框的使用。
需求
- 能够将传入的Json数据生成树形目录。
- 能够初始化选中节点。
- 能够手动选中节点,最终可将所有选中节点打印出来。
- 能够在初始化禁用节点。
- 能够折叠树形目录。
- 修改原生CheckBox样式。
实例截图
做好的树形控件如下所示,点击获取选中节点key将弹出所有选中的节点:

手把手实现
了解Vue递归组件
在vue的文档(cn.vuejs.org/v2/guide/co…
- 组件有name属性
- 递归调用需要有条件
根据以上说明创建了基础树形控件tree.vue:
全局变量:global.js
在写组件获取节点内容是发现由于是递归组件,并不好拿到每级选中的节点。因此在这里创建global.js全局变量记录所有选中节点。也便于删除和加入节点。 默认选中的节点如下:
const nodes = ['1', '1-1', '1-1-2', '1-2-2']

export default {
  nodes
}
写好后需要在main.js上挂载。
import global from 'common/js/global'
Vue.prototype.$global = global
基础组件(递归组件):tree.vue
说明:这里不需要再用components属性去声明自己了,有了name属性后直接在template中就可以调用名为name值的组件。
<template>
  <ul class="ul-wrapper">                                    <!-- 包裹层-->
    <li v-for="item in list" :key="item.key">                <!-- 遍历-->
      <div>                                                  <!-- 是否展开图标-->
          <img class="icon" v-show="item.children" @click="changeShow" :src="require(`../common/images/${imgUrl}`)" >                                                  <!-- CheckBox-->
        <input type="checkbox" :name="item.key" @click="clickbox" :checked="isChecked(item.key)" :disabled="item.disabled" >
        <div class="checkbox-title">{{item.title}}</div>      <!-- CheckBox内容-->
      </div>
      <tree v-if="showChildren" :list="item.children"></tree> <!-- 遍历children-->
    </li>
  </ul>
</template>

<script type='text/ecmascript-6'> export default { name: 'tree', props: { list: { // 所有树节点 type: Array, default: () => { return [] } } }, data () { return { showChildren: true // 是否展开根目录 } }, computed: { // computed属性计算展开图标 imgUrl () { return this.showChildren ? 'down.png' : 'right.png' } }, methods: { clickbox (e) { // 点击CheckBox时需要加入或删除已选中this.$global.nodes的节点数组中 const checked = e.target.checked const key = e.target.name const nodes = this.$global.nodes // this.$global.nodes是全局变量,便于递归组件记录选中节点 if (checked) { if (!nodes.includes(key)) { this.$global.nodes.push(key) } } else { this.$global.nodes = nodes.filter((item) => { return key !== item }) } }, changeShow () { // 点击是否展开根目录,当前状态取反即可 this.showChildren = !this.showChildren }, isChecked (key) { // 查看是否已经存在于选中节点中 return this.$global.nodes.includes(key) } } } </script>

<style lang="stylus"> .ul-wrapper // ul包裹层,每层需要向右偏移30px margin 10px 30px 0 .checkbox-title, .icon display inline-block vertical-align middle .icon margin-left -20px height 18px width 18px input[type="checkbox"] // CheckBox样式修改 position relative display inline-block vertical-align middle padding 0 margin-right 5px height 18px width 18px border 1px solid #ccc border-radius 3px input[type="checkbox"]:checked::before // CheckBox选中状态时样式修改 position absolute top 0 left 0 padding-left 2px content: "\2713"; height 15px width 13px font-size 12px font-weight: bold; background #1296db color #fff border-radius 3px border 0 input[type="checkbox"]:disabled::before // CheckBox禁用状态时样式修改 position absolute top 0 left 0 padding-left 2px content: ""; height 15px width 13px font-size 12px font-weight: bold; background #ccc color #fff border-radius 3px border 0 </style>
应用组件 tree-apply.vue
<template>
  <div class="tree-wrapper">
    <div class="btn" @click="showNodes">
      点击获取选中节点key
    </div>
    <Tree :list="treeData"></Tree>
  </div>
</template>

<script type='text/ecmascript-6'> import Tree from 'base/tree' export default { data () { return { treeData: [] // 全部节点 } }, created () { this.getData() }, methods: { getData () { this.axios.get('/tree').then((res) => { // 获取mock数据 this.treeData = res.data }) }, showNodes () { alert(this.$global.nodes) } }, components: { Tree } } </script>

<style lang="stylus"> .btn margin 20px text-align center </style>
mock数据tree.json
这里采用了模拟数据的方法,mock的具体使用方法在我上一篇写的《better-scroll实现轮播图组件》中有提到:blog.csdn.net/qq_39083496…
- 是否禁用CheckBox是根据 “disabled”: “true”,决定的。
- title(必须)是显示的label名。
- key(必须)才是真正的关键字,理解为最后提交时的必要字段。
[{ "title": "1", "key": "1", "children": [ { "title": "1-1", "key": "1-1", "children": [ { "title": "1-1-1", "key": "1-1-1" }, { "title": "1-1-2", "key": "1-1-2" }, { "title": "1-1-3", "key": "1-1-3" } ]
        },
        {
            "title": "1-2",
            "key": "1-2",
            "children": [
                { "title": "1-2-1", "key": "1-2-1" },
                { "title": "1-2-2", "key": "1-2-2" },
                { "title": "1-2-3", "key": "1-2-3" }
            ]
        },
        {
            "title": "1-3",
            "key": "1-3"
        }
    ]
  },
  {
    "title": "2",
    "key": "2",
    "disabled": "true",
    "children": [
        { "title": "2-1", "key": "2-1" },
        { "title": "2-2", "key": "2-2" },
        { "title": "2-3", "key": "2-3" }
    ]
  },
  {
    "title": "3",
    "key": "3"
  }]
接口:
const Mock = require('mockjs')

Mock.mock('/tree', 'get', require('./json/tree.json'))
总结
到此就完成了树形控件的生成,需求部分都已经满足。如果通过以上代码片段不能明白的话,可以在我的github上找到源码。欢迎来访,欢迎Star~
github.com/Gesj-yean/v…
更多推荐
今天的文章理解Vue递归组件,实现Tree树形控件实例~分享到此就结束了,感谢您的阅读。
版权声明:本文内容由互联网用户自发贡献,该文观点仅代表作者本人。本站仅提供信息存储空间服务,不拥有所有权,不承担相关法律责任。如发现本站有涉嫌侵权/违法违规的内容, 请发送邮件至 举报,一经查实,本站将立刻删除。
如需转载请保留出处:https://bianchenghao.cn/22637.html
