一、要求
1.背景页面

2.停留三秒自动跳转第二页面
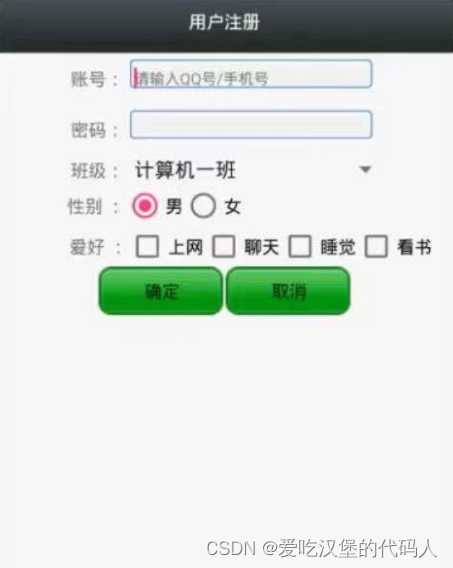
3.填写信息完点击确定跳转第三页面

二、代码演示
首先打开ADT程序
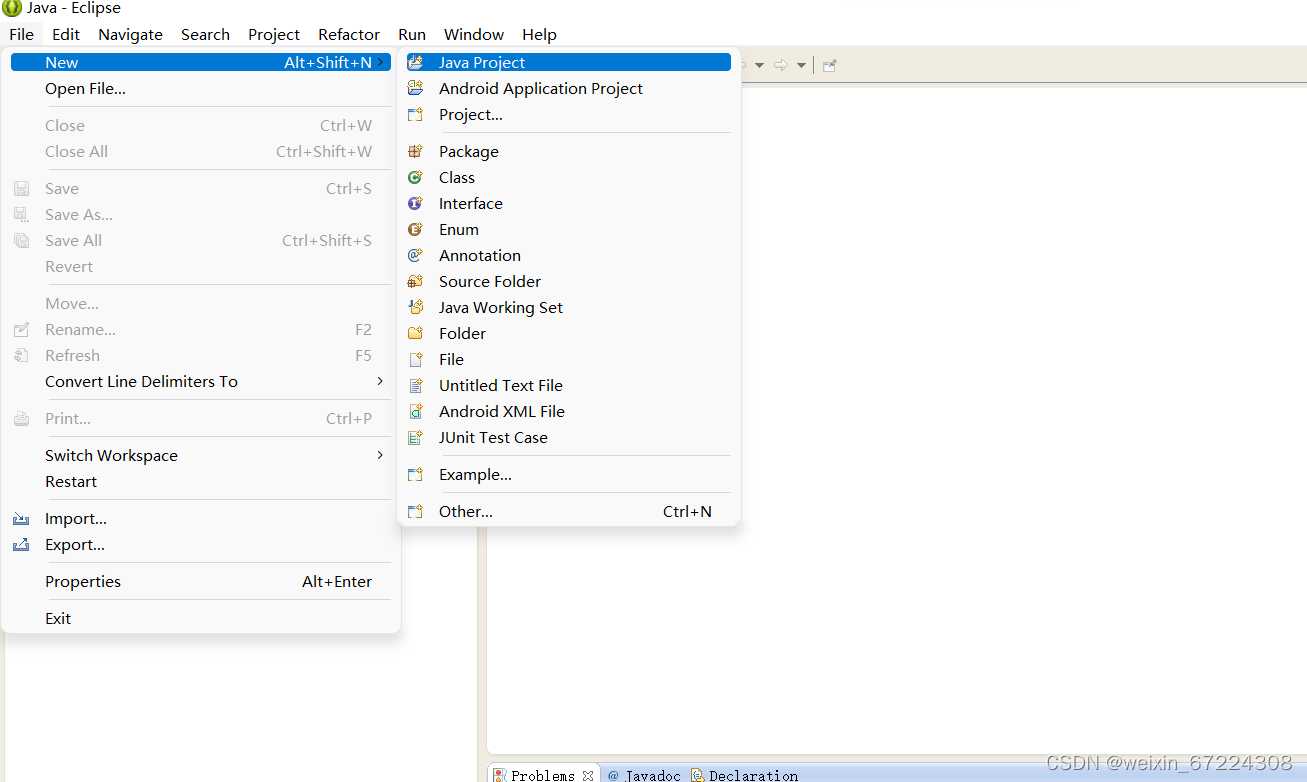
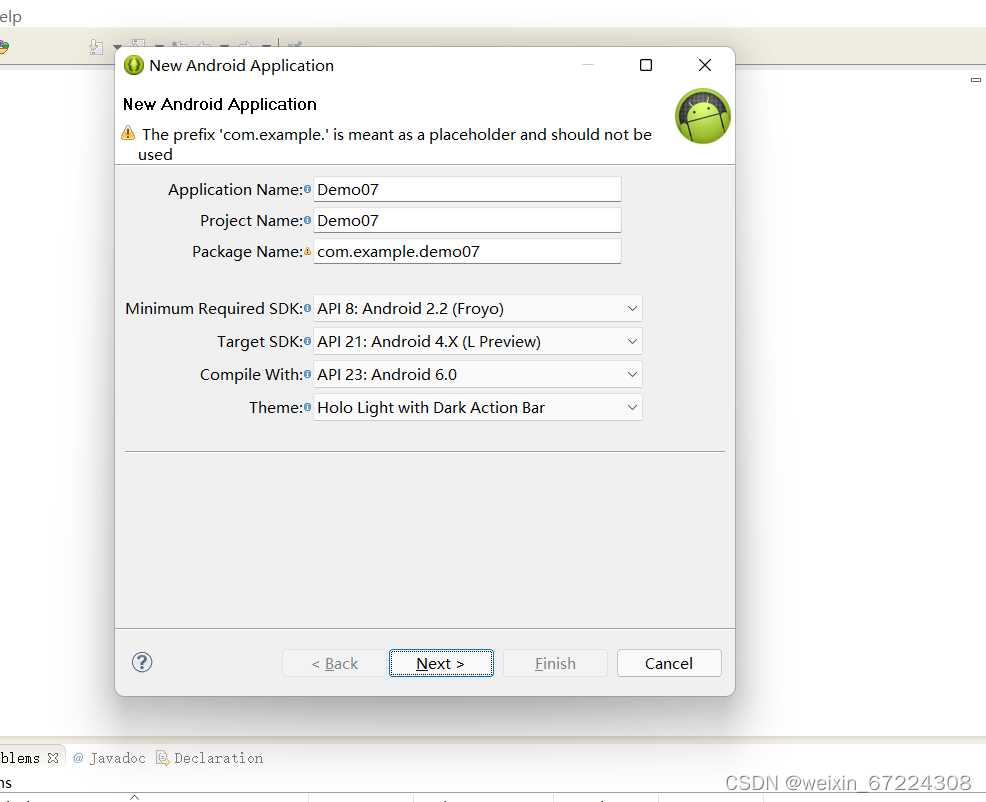
创建文件 如图:
命名Demo07
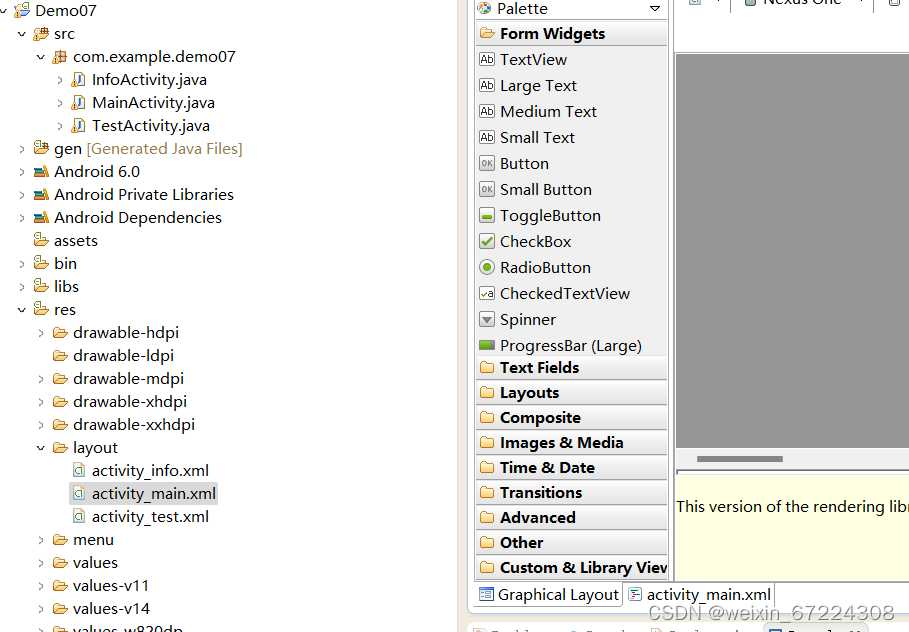
在res-layout中打开activiy_main.xml
右下角两个文件,第一个 左边为图片视图,第二个 右边为对左边图片试图进行代码编辑
点击第二个,我们放入一个背景图片,插入<LinerLayout>线性布局,并定义属性
具体代码如下:
<LinearLayout xmlns:android="http://schemas.android.com/apk/res/android"
    xmlns:tools="http://schemas.android.com/tools"
    android:layout_width="match_parent"
    android:layout_height="match_parent"
    android:background="@drawable/ic_launcher"
    tools:context=".MainActivity" >

</LinearLayout>
此代码演示 用背景图片将线性布局填充完整,要求隐藏状态栏和标题并停止页面三秒
打开src对包com.exeample.day01中的Java文件MainActivity进行编辑
定义类MainActivity继承其父类Activity
对方法onCreate方法进行重写
在界面停止三秒,运用到线程的知识,
首先new一个Thread类,
1.实现Runable接口,重写run方法
2.创建Runable子类对象
3.然后对界面进行跳转,Intent it = new Intent(表示当前文件,表示跳转的界面)
4.调用Thread()对象的start()方法启动线程
代码演示如下:
        //开启一个线程(等3秒后自动执行)
        Thread t = new Thread(new Runnable() {

			@Override
			public void run() {
				//等待三秒
				try {
					Thread.sleep(3000);
				} catch (InterruptedException e) {
					// TODO Auto-generated catch block
					e.printStackTrace();
				}
				//启动第二个页面
				Intent it = new Intent(getApplicationContext(),InfoActivity.class);
				startActivity(it);
			}
		});

        t.start();
    }
隐藏状态栏和标题的方法 代码如下:
getWindow().addFlags(WindowManager.LayoutParams.FLAG_FULLSCREEN);


getActionBar().hide();
注意代码放的位置 JDK小于11会报错
整合以上代码就完成了MainActivity.java的编辑
代码如下:
package com.example.demo07;

import android.app.Activity;
import android.content.Intent;

import android.os.Bundle;
import android.view.WindowManager;

public class MainActivity extends Activity {

    @Override
    protected void onCreate(Bundle savedInstanceState) {
        super.onCreate(savedInstanceState);
        //1:隐藏状态栏
        getWindow().addFlags(WindowManager.LayoutParams.FLAG_FULLSCREEN);

        //2:隐藏标题栏
        getActionBar().hide();

        setContentView(R.layout.activity_main);


        //开启一个线程(等3秒后自动执行)
        Thread t = new Thread(new Runnable() {

			@Override
			public void run() {
				//等待三秒
				try {
					Thread.sleep(3000);
				} catch (InterruptedException e) {
					// TODO Auto-generated catch block
					e.printStackTrace();
				}
				//启动第二个页面
				Intent it = new Intent(getApplicationContext(),InfoActivity.class);
				startActivity(it);
			}
		});

        t.start();
    }

}
对第二个页面的Android页面进行编辑
在项目中新健Android的文件
进行activiy_main.xml 的代码编辑,通过<LinearLayout><TextView><EditText><CheckBox><RadioButtn>等控件对安卓代码页面进行展示
代码如下:
<LinearLayout xmlns:android="http://schemas.android.com/apk/res/android"
    xmlns:tools="http://schemas.android.com/tools"
    android:layout_width="match_parent"
    android:layout_height="match_parent"
    android:orientation="vertical"
    tools:context=".MainActivity" >

    <LinearLayout
        android:layout_width="match_parent"
        android:layout_height="55dp" >

        <TextView
            android:layout_width="match_parent"
            android:layout_height="match_parent"
            android:background="#3b4141"
            android:gravity="center"
            android:text="用户注册"
            android:textColor="#ffffff"
            android:textSize="20dp" />
    </LinearLayout>

    <LinearLayout
        android:layout_width="match_parent"
        android:layout_height="40dp" >

        <TextView
            android:layout_width="0dp"
            android:layout_height="match_parent"
            android:layout_weight="1"
            android:gravity="center|right"
            android:text="账号:"
            android:textSize="15dp" />

        <EditText
            android:id="@+id/et_zh"
            android:layout_width="0dp"
            android:layout_height="35dp"
            android:layout_weight="3"
            android:background="@drawable/bk_border"
            android:hint="请输入QQ号/手机号" />
    </LinearLayout>

    <LinearLayout
        android:layout_width="match_parent"
        android:layout_height="40dp" >

        <TextView
            android:layout_width="0dp"
            android:layout_height="match_parent"
            android:layout_weight="1"
            android:gravity="center|right"
            android:text="密码:"
            android:textSize="15dp" />

        <EditText
            android:id="@+id/et_mm"
            android:layout_width="0dp"
            android:layout_height="35dp"
            android:layout_weight="3"
            android:background="@drawable/bk_border" />
    </LinearLayout>

    <LinearLayout
        android:layout_width="match_parent"
        android:layout_height="40dp"

        >

        <TextView
            android:layout_width="0dp"
            android:layout_height="match_parent"
            android:layout_weight="1"
            android:gravity="center|right"
            android:text="班级:"
            android:textSize="15dp" />

       <Spinner
        android:id="@+id/sp_item"
        android:layout_width="0dp"
        android:layout_weight="3"
        android:layout_height="40dp"/>

    </LinearLayout>

    <LinearLayout
        android:layout_width="match_parent"
        android:layout_height="40dp" >

        <TextView
            android:layout_width="0dp"
            android:layout_height="match_parent"
            android:layout_weight="1"
            android:gravity="center|right"
            android:text="性别:"
            android:textSize="15dp" />

        <RadioGroup
            android:layout_width="0dp"
            android:layout_height="wrap_content"
            android:layout_weight="3"
            android:orientation="horizontal" >

            <RadioButton
                android:id="@+id/rb_nan"
                android:layout_width="50dp"
                android:layout_height="40dp"
                android:text="男" />

            <RadioButton
                android:id="@+id/rb_nv"
                android:layout_width="50dp"
                android:layout_height="40dp"
                android:text="女" />
        </RadioGroup>
    </LinearLayout>

    <LinearLayout
        android:layout_width="match_parent"
        android:layout_height="wrap_content" >

        <TextView
            android:layout_width="0dp"
            android:layout_height="match_parent"
            android:layout_weight="1"
            android:gravity="center|right"
            android:text="爱好:"
            android:textSize="15dp" />

        <LinearLayout
            android:layout_width="0dp"
            android:layout_height="wrap_content"
            android:layout_weight="3"
            android:orientation="vertical" >

            <CheckBox
                android:id="@+id/cb_sw"
                android:layout_width="wrap_content"
                android:layout_height="wrap_content"
                android:text="上网" />

            <CheckBox
                android:id="@+id/cb_lt"
                android:layout_width="wrap_content"
                android:layout_height="wrap_content"
                android:text="聊天" />

            <CheckBox
                android:id="@+id/cb_sj"
                android:layout_width="wrap_content"
                android:layout_height="wrap_content"
                android:text="睡觉" />

            <CheckBox
                android:id="@+id/cb_ks"
                android:layout_width="wrap_content"
                android:layout_height="wrap_content"
                android:text="看书" />
        </LinearLayout>
    </LinearLayout>

    <LinearLayout
        android:layout_width="match_parent"
        android:layout_height="40dp"
        android:gravity="center" >

        <Button
            android:id="@+id/btn_qd"
            android:layout_width="100dp"
            android:layout_height="50dp"
            android:background="@drawable/an_border"
            android:text="确定" />

        <Button
            android:id="@+id/btn_qx"
            android:layout_width="100dp"
            android:layout_height="50dp"
            android:background="@drawable/an_border"
            android:text="取消" />
    </LinearLayout>

</LinearLayout>
度安卓跳转到的第二个页面进行设置
InfoActivity也是继承自其父类Activity,所以跟上面方法一样也要对方法进行重写
我们在安卓第二页面中进行了id的编写 在此界面我们应该先定义这些控件
1.定义所有有id的控件
private CheckBox cbsw, cblt, cbsj, cbks;
	private Button btnqd, btnqx;
	private RadioButton rbnan, rbnv;
	private EditText etmm, etzh;
	private Spinner spitem;
	String[] st = null;
2.找到所有有id的控件
init();

private void init() {
		cbsw = (CheckBox) findViewById(R.id.cb_sw);
		cblt = (CheckBox) findViewById(R.id.cb_lt);
		cbsj = (CheckBox) findViewById(R.id.cb_sj);
		cbks = (CheckBox) findViewById(R.id.cb_ks);
		btnqd = (Button) findViewById(R.id.btn_qd);
		btnqx = (Button) findViewById(R.id.btn_qx);
		rbnan = (RadioButton) findViewById(R.id.rb_nan);
		rbnv = (RadioButton) findViewById(R.id.rb_nv);
		spitem = (Spinner) findViewById(R.id.sp_item);
		etmm = (EditText) findViewById(R.id.et_mm);
		etzh = (EditText) findViewById(R.id.et_zh);
	}
3.设置按钮的点击事件
btnqd.setOnClickListener(this);对于下拉列表的的操作要另外进行,通过数组对其进行编辑内容数据,然后创建适配器及绑定适配器
代码如下:
st = new String[]{ "移动212", "移动213", "移动214", "移动215" };
		ArrayAdapter<String> adapter = new ArrayAdapter<String>(
				getApplicationContext(), R.layout.item1, st);

		spitem.setAdapter(adapter);
最后对获取内容,及页面的跳转和应用可使用 putExtra(java.lang.String, java.lang.String) 方法传入参数 ,代码如下
	public void onClick(View arg0) {
		// 4:获取用户名输入框内容
		String userName = etzh.getText().toString();

		// 5:获取密码输入框内容
		String pwd = etmm.getText().toString();

		//获取下拉列表选中的内容
				int i = spitem.getSelectedItemPosition();
				String spItem = st[i];
				Toast.makeText(getApplicationContext(), spItem, 1).show();

		// 6:获取性别单选输入框内容
		String sex = "";
		if (rbnan.isChecked()) {
			sex = rbnan.getText().toString();
		}
		if (rbnv.isChecked()) {
			sex = rbnv.getText().toString();
		}

		// 7:获取爱好多选输入框内容
		String fav = "";
		if (cbsw.isChecked()) {
			fav += cbsw.getText().toString();
		}
		if (cblt.isChecked()) {
			fav += cblt.getText().toString();
		}
		if (cbsj.isChecked()) {
			fav += cbsj.getText().toString();
		}
		if (cbks.isChecked()) {
			fav += cbks.getText().toString();
		}


		// 8:传值跳转
		Intent it = new Intent(getApplicationContext(), TestActivity.class);
		// 传递数据
		it.putExtra("a1", userName);
		it.putExtra("a2", pwd);
		it.putExtra("a3", spItem);
		it.putExtra("a4", sex);
		it.putExtra("a5", fav);
		startActivity(it);
	}

}
整合代码如下:
package com.example.demo07;

import com.example.demo07.InfoActivity;
import com.example.demo07.R;

import android.os.Bundle;
import android.app.Activity;
import android.content.Intent;
import android.view.Menu;
import android.view.View;
import android.view.View.OnClickListener;
import android.widget.ArrayAdapter;
import android.widget.Button;
import android.widget.CheckBox;
import android.widget.EditText;
import android.widget.RadioButton;
import android.widget.Spinner;
import android.widget.Toast;

public class InfoActivity extends Activity implements OnClickListener {
	// 1:定义所有有id的控件
	private CheckBox cbsw, cblt, cbsj, cbks;
	private Button btnqd, btnqx;
	private RadioButton rbnan, rbnv;
	private EditText etmm, etzh;
	private Spinner spitem;
	String[] st = null;

	@Override
	protected void onCreate(Bundle savedInstanceState) {
		super.onCreate(savedInstanceState);
		setContentView(R.layout.activity_info);
		// 2:找到所有有id的控件
		init();

		// 3:设置按钮的点击事件
		btnqd.setOnClickListener(this);

		st = new String[]{ "移动212", "移动213", "移动214", "移动215" };
		ArrayAdapter<String> adapter = new ArrayAdapter<String>(
				getApplicationContext(), R.layout.item1, st);

		spitem.setAdapter(adapter);

	}

	private void init() {
		cbsw = (CheckBox) findViewById(R.id.cb_sw);
		cblt = (CheckBox) findViewById(R.id.cb_lt);
		cbsj = (CheckBox) findViewById(R.id.cb_sj);
		cbks = (CheckBox) findViewById(R.id.cb_ks);
		btnqd = (Button) findViewById(R.id.btn_qd);
		btnqx = (Button) findViewById(R.id.btn_qx);
		rbnan = (RadioButton) findViewById(R.id.rb_nan);
		rbnv = (RadioButton) findViewById(R.id.rb_nv);
		spitem = (Spinner) findViewById(R.id.sp_item);
		etmm = (EditText) findViewById(R.id.et_mm);
		etzh = (EditText) findViewById(R.id.et_zh);
	}

	@Override
	public void onClick(View arg0) {
		// 4:获取用户名输入框内容
		String userName = etzh.getText().toString();

		// 5:获取密码输入框内容
		String pwd = etmm.getText().toString();

		//获取下拉列表选中的内容
				int i = spitem.getSelectedItemPosition();
				String spItem = st[i];
				Toast.makeText(getApplicationContext(), spItem, 1).show();

		// 6:获取性别单选输入框内容
		String sex = "";
		if (rbnan.isChecked()) {
			sex = rbnan.getText().toString();
		}
		if (rbnv.isChecked()) {
			sex = rbnv.getText().toString();
		}

		// 7:获取爱好多选输入框内容
		String fav = "";
		if (cbsw.isChecked()) {
			fav += cbsw.getText().toString();
		}
		if (cblt.isChecked()) {
			fav += cblt.getText().toString();
		}
		if (cbsj.isChecked()) {
			fav += cbsj.getText().toString();
		}
		if (cbks.isChecked()) {
			fav += cbks.getText().toString();
		}


		// 8:传值跳转
		Intent it = new Intent(getApplicationContext(), TestActivity.class);
		// 传递数据
		it.putExtra("a1", userName);
		it.putExtra("a2", pwd);
		it.putExtra("a3", spItem);
		it.putExtra("a4", sex);
		it.putExtra("a5", fav);
		startActivity(it);
	}

}
再建一个文件,对最后跳转的页面进行代码编辑,通过控件对第三页面activiy_test.xml 进行代码编辑
代码如下:
<LinearLayout xmlns:android="http://schemas.android.com/apk/res/android"
    xmlns:tools="http://schemas.android.com/tools"
    android:layout_width="match_parent"
    android:layout_height="match_parent"
    tools:context=".TestActivity" >

    <TextView
        android:id="@+id/tv_show"
        android:layout_width="wrap_content"
        android:layout_height="wrap_content"
        android:text="@string/hello_world" />

</LinearLayout>
再次进入scr中对进行显示的代码进行编辑,分别有吐司显示和文本显示
吐司显示
Toast.makeText(getApplicationContext(), st , 1).show();文本显示
	TextView tvshow = (TextView) findViewById(R.id.tv_show);
		tvshow.setText(st);
获取上个页面内容显示数据内容
Intent it = getIntent();

		String userName = it.getStringExtra("a1");
		String pwd = it.getStringExtra("a2");
		String spItem = it.getStringExtra("a3");
		String sex = it.getStringExtra("a4");
		String fav = it.getStringExtra("a5");

		String st = userName + ":" + pwd + ":" + spItem+":" + sex + ":" + fav;
具体代码如下:
package com.example.demo07;

import com.example.demo07.R;

import android.os.Bundle;
import android.app.Activity;
import android.content.Intent;
import android.view.Menu;
import android.widget.TextView;
import android.widget.Toast;

public class TestActivity extends Activity {

	@Override
	protected void onCreate(Bundle savedInstanceState) {
		super.onCreate(savedInstanceState);
		setContentView(R.layout.activity_test);

	//获取上一个页面传递过来的数据
		Intent it = getIntent();

		String userName = it.getStringExtra("a1");
		String pwd = it.getStringExtra("a2");
		String spItem = it.getStringExtra("a3");
		String sex = it.getStringExtra("a4");
		String fav = it.getStringExtra("a5");

		String st = userName + ":" + pwd + ":" + spItem+":" + sex + ":" + fav;

	//显示这些数据
	//1:吐司显示
		Toast.makeText(getApplicationContext(), st , 1).show();

	//2:文本框显示
		TextView tvshow = (TextView) findViewById(R.id.tv_show);
		tvshow.setText(st);

	}
}
以上就是页面之间的跳转和显示操作的具体
此代码运用到的几种具体方法
1.Toast.makeText(MainActivity.this, “提示的内容”, Toast.LENGTH_LONG).show(); 第一个是上下文对象!对二个是显示的内容!第三个是显示的时间(0或1),只有LONG和SHORT两种 会生效,即时你定义了其他的值,最后调用的还是这两个!
2.通过findViewById(android.R.id.)就可以通过id值,利用方法findViewById(R.id.id值)来访问
3.通过线程运用sleep方法对程序进行暂停sleep();()中占用时间,单位为毫秒
4.intent.setClass(this, InfoActivity.class); 中InfoActivity.class 要跳转到的界面
5.Intent跳转操作中传值只需调用意图的putExtra函数intent.putExtra(“name”,”chen”);创建一个name属性,并传chen这个参数
6.子线程表示程序的执行流程,线程创建的主要方法有两种,继承Thread类,使用this关键字进行访问
今天的文章Android使用ADT三个代码制作及交互跳转页面分享到此就结束了,感谢您的阅读。
版权声明:本文内容由互联网用户自发贡献,该文观点仅代表作者本人。本站仅提供信息存储空间服务,不拥有所有权,不承担相关法律责任。如发现本站有涉嫌侵权/违法违规的内容, 请发送邮件至 举报,一经查实,本站将立刻删除。
如需转载请保留出处:https://bianchenghao.cn/23999.html

