简介
Spring提供了监听器ContextLoaderListener,实现ServletContextListener接口,可监听 ServletContext的状态,在web服务器的启动,读取(加载)Spring的配置文件,创建Spring的IOC容器。必须在web.xml中配置。
本文章就是测试一下ContextLoaderListener能否使用。因为自己在看尚硅谷杨博超老师的视频时,虽然跟着操作,但一致报404,很烦,所以,在此记录一下成功创建的过程。
为什么使用ContextLoaderListener?
主要原因是在整合Spring和SpringMVC时遇到了问题。
SpringMVC 是表述层框架,处理请求并将结果响应给浏览器。
Mybatis是持久层框架,操作数据库。
Spring 是整合型框架,通过IOC来管理对象,通过AOP增强功能(如事务管理)。
Spring和SpringMV是同一个家族的,Spring和SpringMVC可以整合也可以不整合,不整合就是二者使用同一个IOC容器。整合就是各自用各自的IOC容器,分别管理自己的对象。
推荐整合。
SpringMVC的IOC管理的对象是控制层的对象。其他对象如service层对象、dao层对象等都要交给Spring的IOC管理。我们知道,SpringMVC的控制层要依赖于service层对象(组件),需要使用自动装配,自动装配后就可以在控制层使用service层对象了。要想装配成功,Spring的IOC中要有service层对象,也就是Spring的IOC要提前创建好,优先于SpringMVC的IOC的创建。
如何保证Spring的IOC 的创建 优先于 SpringMVC的IOC 的创建 ?
由于SpringMVC的IOC是在DispatcherServlet初始化时创建的,所以Spring的IOC的创建一定要在DispatcherServlet初始化之前创建,那要把创建Spring的IOC 的代码放到哪呢?
我们知道,服务器的三大组件的执行顺序是:监听器—-》过滤器——》Servlet
所以,可以放到监听器里——-ContextLoaderListener,上下文加载监听器。
1.创建Maven Module
环境:IDEA2022.2 maven版本3.8.6
步骤1
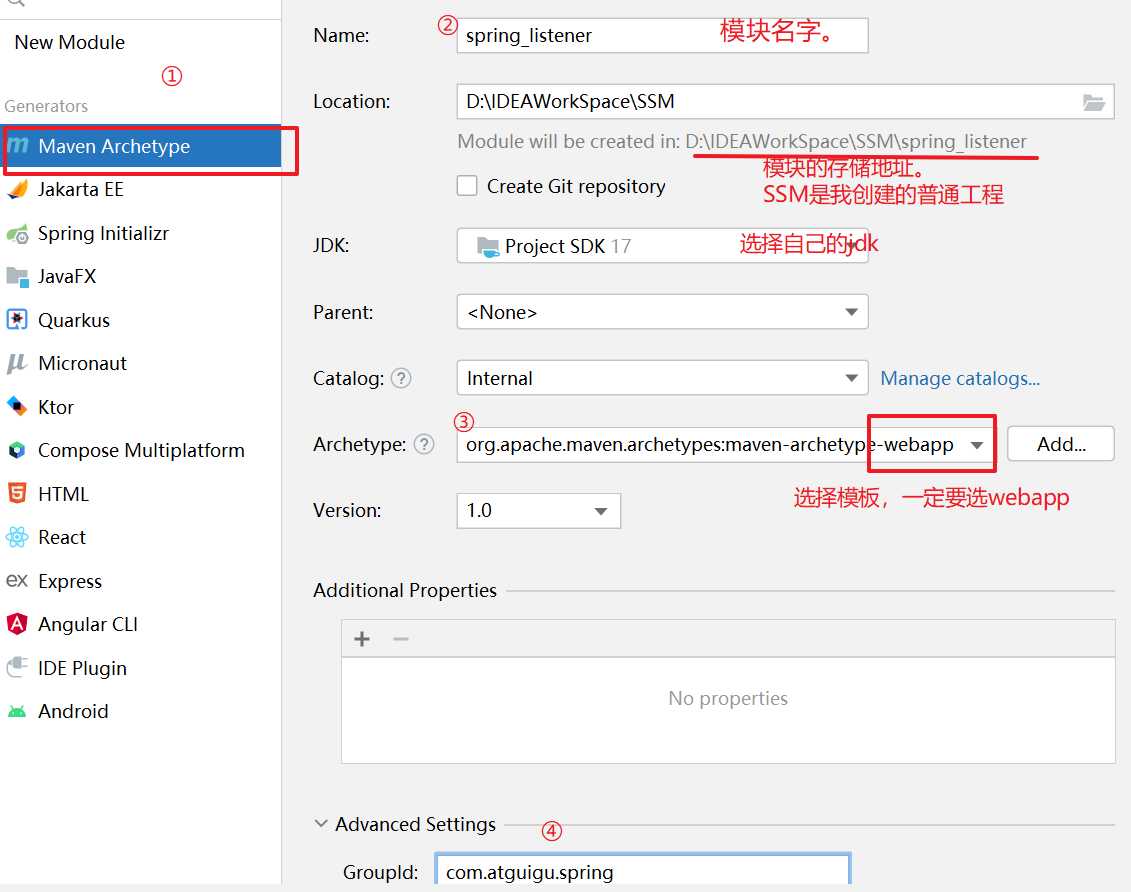
新建一个普通工程,然后,右击工程—-》 new—》module—->点击左侧Maven Archetype。然后按下图的提示填写信息。重点是ArcheType 要选择webapp这个模板。
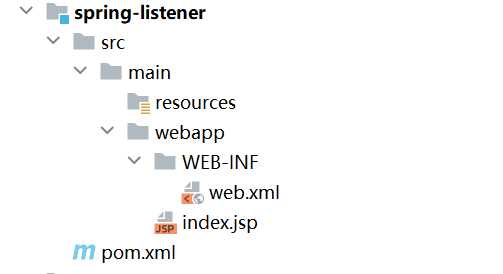
创建完成后结果如下:
和我不一样也没关系,后面会删除和增加一些东西。接着往下走
步骤二 添加依赖
点击pom.xml,添加如下依赖.
添加依赖时一定要连网,这样才能从远程仓库里将依赖下载到你电脑的工程模块里
  <dependencies>
    <!-- SpringMVC -->
    <dependency>
      <groupId>org.springframework</groupId>
      <artifactId>spring-webmvc</artifactId>
      <version>5.3.1</version>
    </dependency>
    <!-- 日志 -->
    <dependency>
      <groupId>ch.qos.logback</groupId>
      <artifactId>logback-classic</artifactId>
      <version>1.2.3</version>
    </dependency>
    <!-- ServletAPI -->
    <dependency>
      <groupId>javax.servlet</groupId>
      <artifactId>javax.servlet-api</artifactId>
      <version>3.1.0</version>
      <scope>provided</scope>
    </dependency>
    <!-- Spring5和Thymeleaf整合包 -->
    <dependency>
      <groupId>org.thymeleaf</groupId>
      <artifactId>thymeleaf-spring5</artifactId>
      <version>3.0.12.RELEASE</version>
    </dependency>
  </dependencies>
2 配置web.xml
在web.xml里配置SpringMVC的前端控制器 DispatcherServlet 和 监听器 ContextLoaderListener。
整个web.xml 如下:
<!DOCTYPE web-app PUBLIC "-//Sun Microsystems, Inc.//DTD Web Application 2.3//EN" "http://java.sun.com/dtd/web-app_2_3.dtd" >

<web-app>
  <display-name>Archetype Created Web Application</display-name>
  <!--自定义Spring配置文件的位置和名称-->
  <context-param>
    <param-name>contextConfigLocation</param-name>
    <param-value>classpath:spring.xml</param-value>
  </context-param>
  <listener>
    <!-- 配置Spring的监听器,在服务器启动时加载Spring的配置文件 Spring配置文件默认位置和名称:/WEB-INF/applicationContext.xml 可通过上下文参数自定义Spring配置文件的位置和名称 -->
    <listener-class>org.springframework.web.context.ContextLoaderListener</listener-class>
  </listener>


  <!--配置SpringMVC的前端控制器 ,对浏览器发送的请求统一进行处理-->
  <servlet>
    <servlet-name>SpringMVC</servlet-name>
    <servlet-class>org.springframework.web.servlet.DispatcherServlet</servlet-class>
    <!--设置DispatchServlet加载配置文件的路径和名字。设置后,配置文件就可以放到resources目录下了.SpringMVC.xml就是配置文件的名字-->
    <init-param>
      <param-name>contextConfigLocation</param-name>
      <param-value>classpath:SpringMVC.xml</param-value>
    </init-param>
    <!--将DispatcherServlet的初始化时间提前到服务器启动时-->
    <load-on-startup>1</load-on-startup>
  </servlet>
  <servlet-mapping>
    <servlet-name>SpringMVC</servlet-name>
    <!-- 设置springMVC的核心控制器所能处理的请求的请求路径 url-pattern中 / 和 /*的区别; /:匹配浏览器向服务器发送的所有请求(不包括.jsp),因为DispatcherServlet处理不了.jsp请求,.jsp请求得由 Tomcat里自带的JspServlet处理。 /*:匹配浏览器向服务器发送的所有请求(包括.jsp) -->
    <url-pattern>/</url-pattern>
  </servlet-mapping>
</web-app>
3 配置SpringMVC.xml
在resources下创建SpringMVC.xml。
注意:因为在web.xml里指定了SpringMVC的配置文件必须放到resources下,且名字必须为SpringMVC.xml
SpringMVC.xml里要配置的东西
- 开启扫描扫描控制层组件
- Thymeleaf视图解析器
- 视图控制器
为了防止废话太多,直接给出 完整的SpringMVC.xml
(里面所需的东西如index.html、Controller包会在后面的步骤路创建,别急)
<?xml version="1.0" encoding="UTF-8"?>
<beans xmlns="http://www.springframework.org/schema/beans" xmlns:xsi="http://www.w3.org/2001/XMLSchema-instance" xmlns:mvc="http://www.springframework.org/schema/mvc" xmlns:context="http://www.springframework.org/schema/context" xsi:schemaLocation="http://www.springframework.org/schema/beans http://www.springframework.org/schema/beans/spring-beans.xsd http://www.springframework.org/schema/mvc https://www.springframework.org/schema/mvc/spring-mvc.xsd http://www.springframework.org/schema/context https://www.springframework.org/schema/context/spring-context.xsd">
    <!--开启SpringMVC的扫描。扫描控制层组件-->
    <context:component-scan base-package="com.atguigu.srpingmvc.controller"></context:component-scan>
    <!-- 配置Thymeleaf视图解析器 -->
    <bean id="viewResolver" class="org.thymeleaf.spring5.view.ThymeleafViewResolver">
        <property name="order" value="1"/>
        <property name="characterEncoding" value="UTF-8"/>
        <property name="templateEngine">
            <bean class="org.thymeleaf.spring5.SpringTemplateEngine">
                <property name="templateResolver">
                    <bean class="org.thymeleaf.spring5.templateresolver.SpringResourceTemplateResolver">
                        <!-- 视图前缀 -->
                        <property name="prefix" value="/WEB-INF/templates/"/>
                        <!-- 视图后缀 -->
                        <property name="suffix" value=".html"/>
                        <property name="templateMode" value="HTML5"/>
                        <property name="characterEncoding" value="UTF-8" />
                    </bean>
                </property>
            </bean>
        </property>
    </bean>

     <!-- 开启mvc的注解驱动 -->
    <mvc:annotation-driven/>
    <!-- 配置视图控制器。实现访问首页-->
    <mvc:view-controller path="/" view-name="index"></mvc:view-controller>
</beans>
4 配置spring.xml
在resources下创建spring.xml。
注意:因为在web.xml里指定了Spring的配置文件必须放到resources下,且名字必须为sping.xml
此例子,在Spring的配置文件里只需开启Spring的注解扫描即可。
SpringMVC的注解扫描 的范围是 controller包。
Spring的注解扫描 的范围 是service包和dao包. 我的例子中没创建dao包,所以,只扫描到了service.impl。根据你的需要修改Spring注解的扫描范围。
<?xml version="1.0" encoding="UTF-8"?>
<beans xmlns="http://www.springframework.org/schema/beans" xmlns:xsi="http://www.w3.org/2001/XMLSchema-instance" xmlns:context="http://www.springframework.org/schema/context" xsi:schemaLocation="http://www.springframework.org/schema/beans http://www.springframework.org/schema/beans/spring-beans.xsd http://www.springframework.org/schema/context https://www.springframework.org/schema/context/spring-context.xsd">
<!-- 开启Spring的注解-->
    <context:component-scan base-package="com.atguigu.srpingmvc.service.impl"></context:component-scan>
</beans>
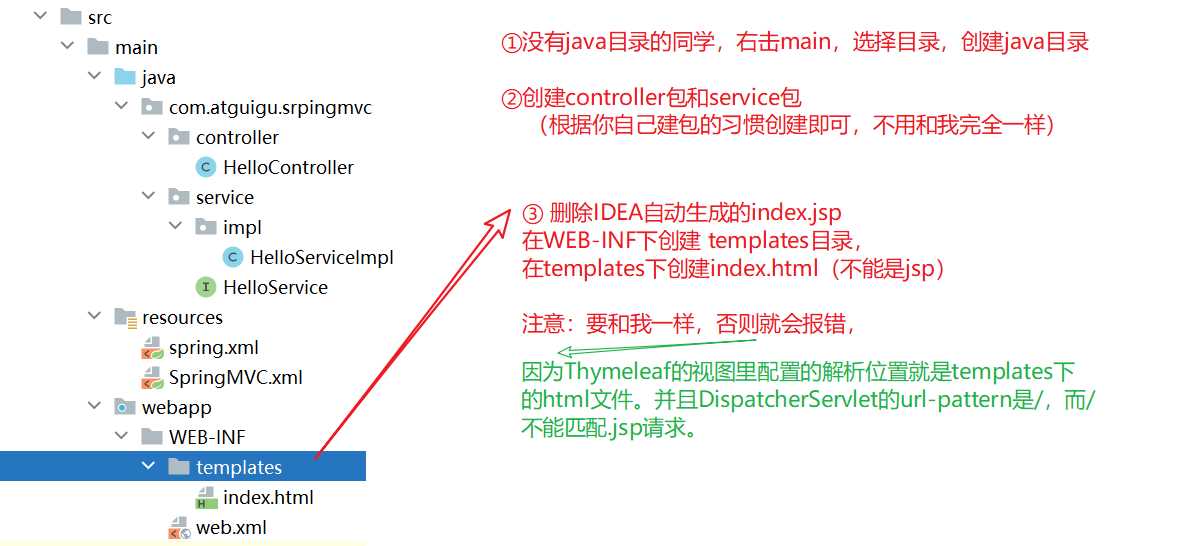
5 创建其他组件
HelloService接口:
public interface HelloService {

}
HelloServiceImpl类实现HelloService接口:
@Service    //声明为组件,放到IOC中管理
public class HelloServiceImpl implements HelloService {

}
HelloController类:
@Controller  //声明为组件,放到IOC中管理
public class HelloController {

    @Autowired //自动装配。
    private HelloService helloService;
}
index.html
在index.html里面随便写点东西就行。写完index.html后,在SpringMVC.xml里添加如下配置.(上面给出的SpringMVC.xml已经是完整的了,已经添加过了)
     <!-- 开启mvc的注解驱动 -->
    <mvc:annotation-driven/>
    <!-- 配置视图控制器。实现访问首页-->
    <mvc:view-controller path="/" view-name="index"></mvc:view-controller>
配置Tomcat后,只要能访问到这个index.html,就说明我们配置成功了。
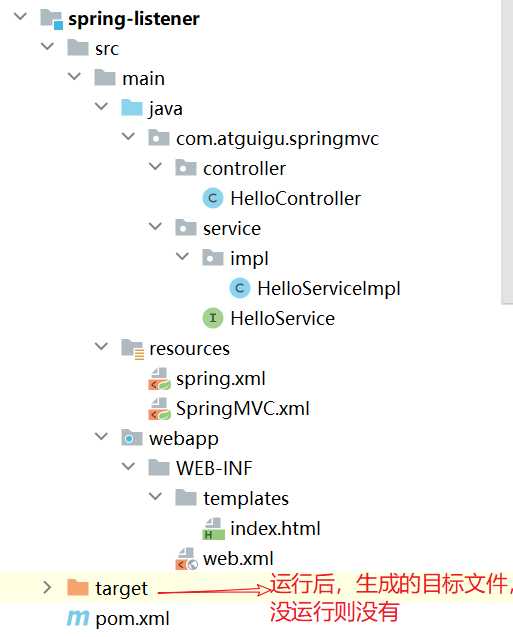
6 整个目录结构图
按照上面步骤,最后得到如下的一个Maven Module。
7 配置Tomcat
能学到SSM框架的,这个应该都会吧。
2 启动TomCat进行测试
启动Tomcat,如果能访问到index.html,说明成功了。
对于本例,成功实现了:SpingMVC的IOC容器管理Controller组件(对象),Spring的IOC容器管理Service组件,二者的IOC是独立的。也实现了自动装配。
今天的文章ContextLoaderListener分享到此就结束了,感谢您的阅读。
版权声明:本文内容由互联网用户自发贡献,该文观点仅代表作者本人。本站仅提供信息存储空间服务,不拥有所有权,不承担相关法律责任。如发现本站有涉嫌侵权/违法违规的内容, 请发送邮件至 举报,一经查实,本站将立刻删除。
如需转载请保留出处:https://bianchenghao.cn/24206.html


