WPF(Windows Presentation Foundation)是微软推出的基于Windows的用户界面框架,中文译为“Windows呈现基础”,属于.NET Framework 3.0的一部分。WPF类似于WinForm技术框架,但是相比于WinForm,WPF对大部分基础功能进行了更加强大的拓展,并且引入了XAML标记语言,真正实现了开发人员和设计人员的前后端分离,并且衍生出了一套MVVM开发框架。部分参考资料如下:
- 《深入浅出WPF》 —- 适合新手的详细入门教程
- WPF-Tutorial —- WPF快速入门与上手
- 微软官方文档 —- WPF类库查询大全
- 使用 .NET 创建新的 WPF 应用 —- WPF微软官方入门案例
- DependencyProperty.cs (microsoft.com) —- WPF源码查看器
- WPF转换器 – 痕迹g – 博客园 (cnblogs.com) —- 大佬博客笔记
一.基本控件介绍
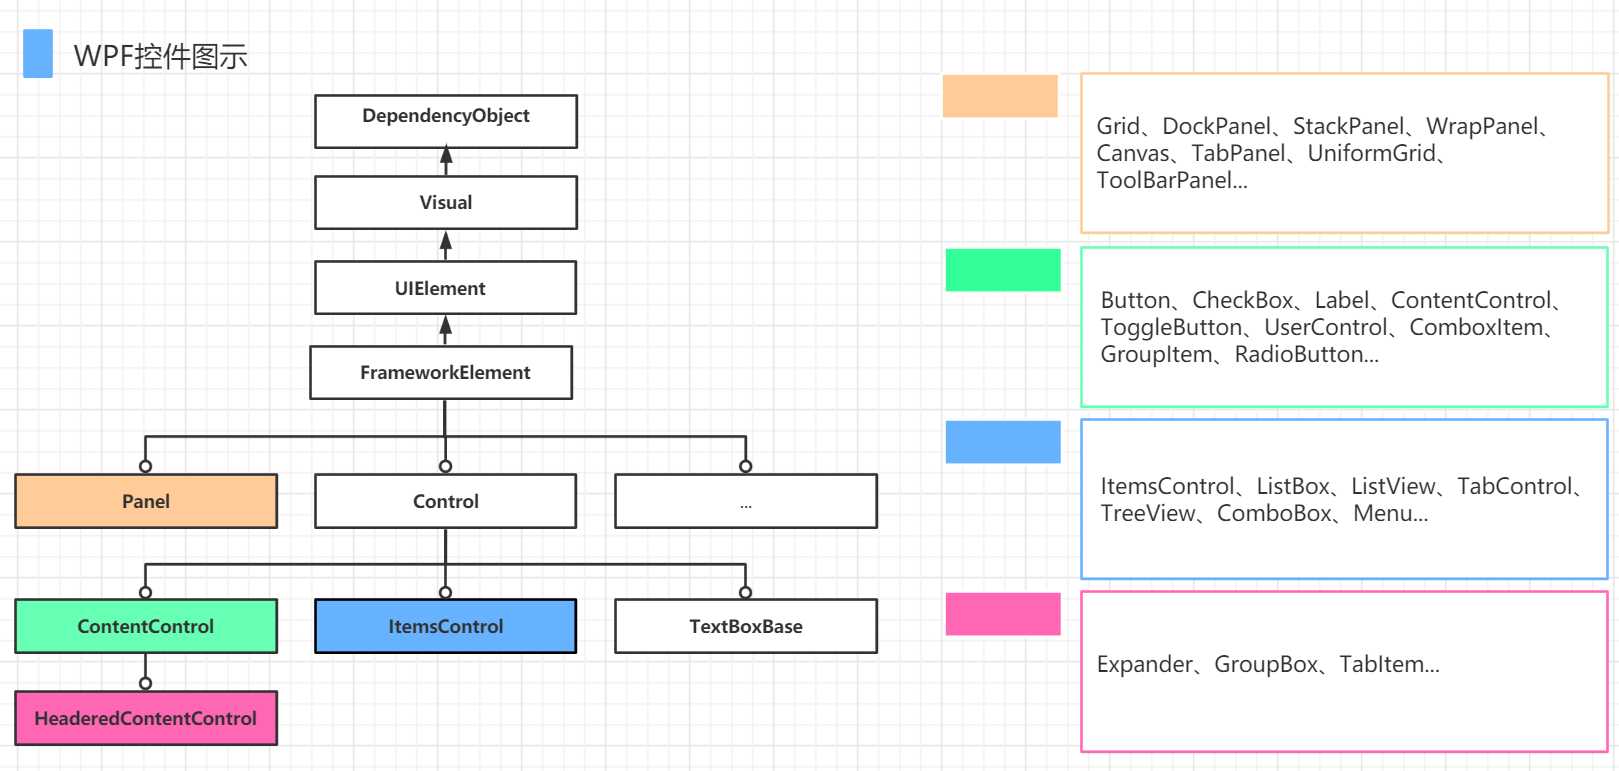
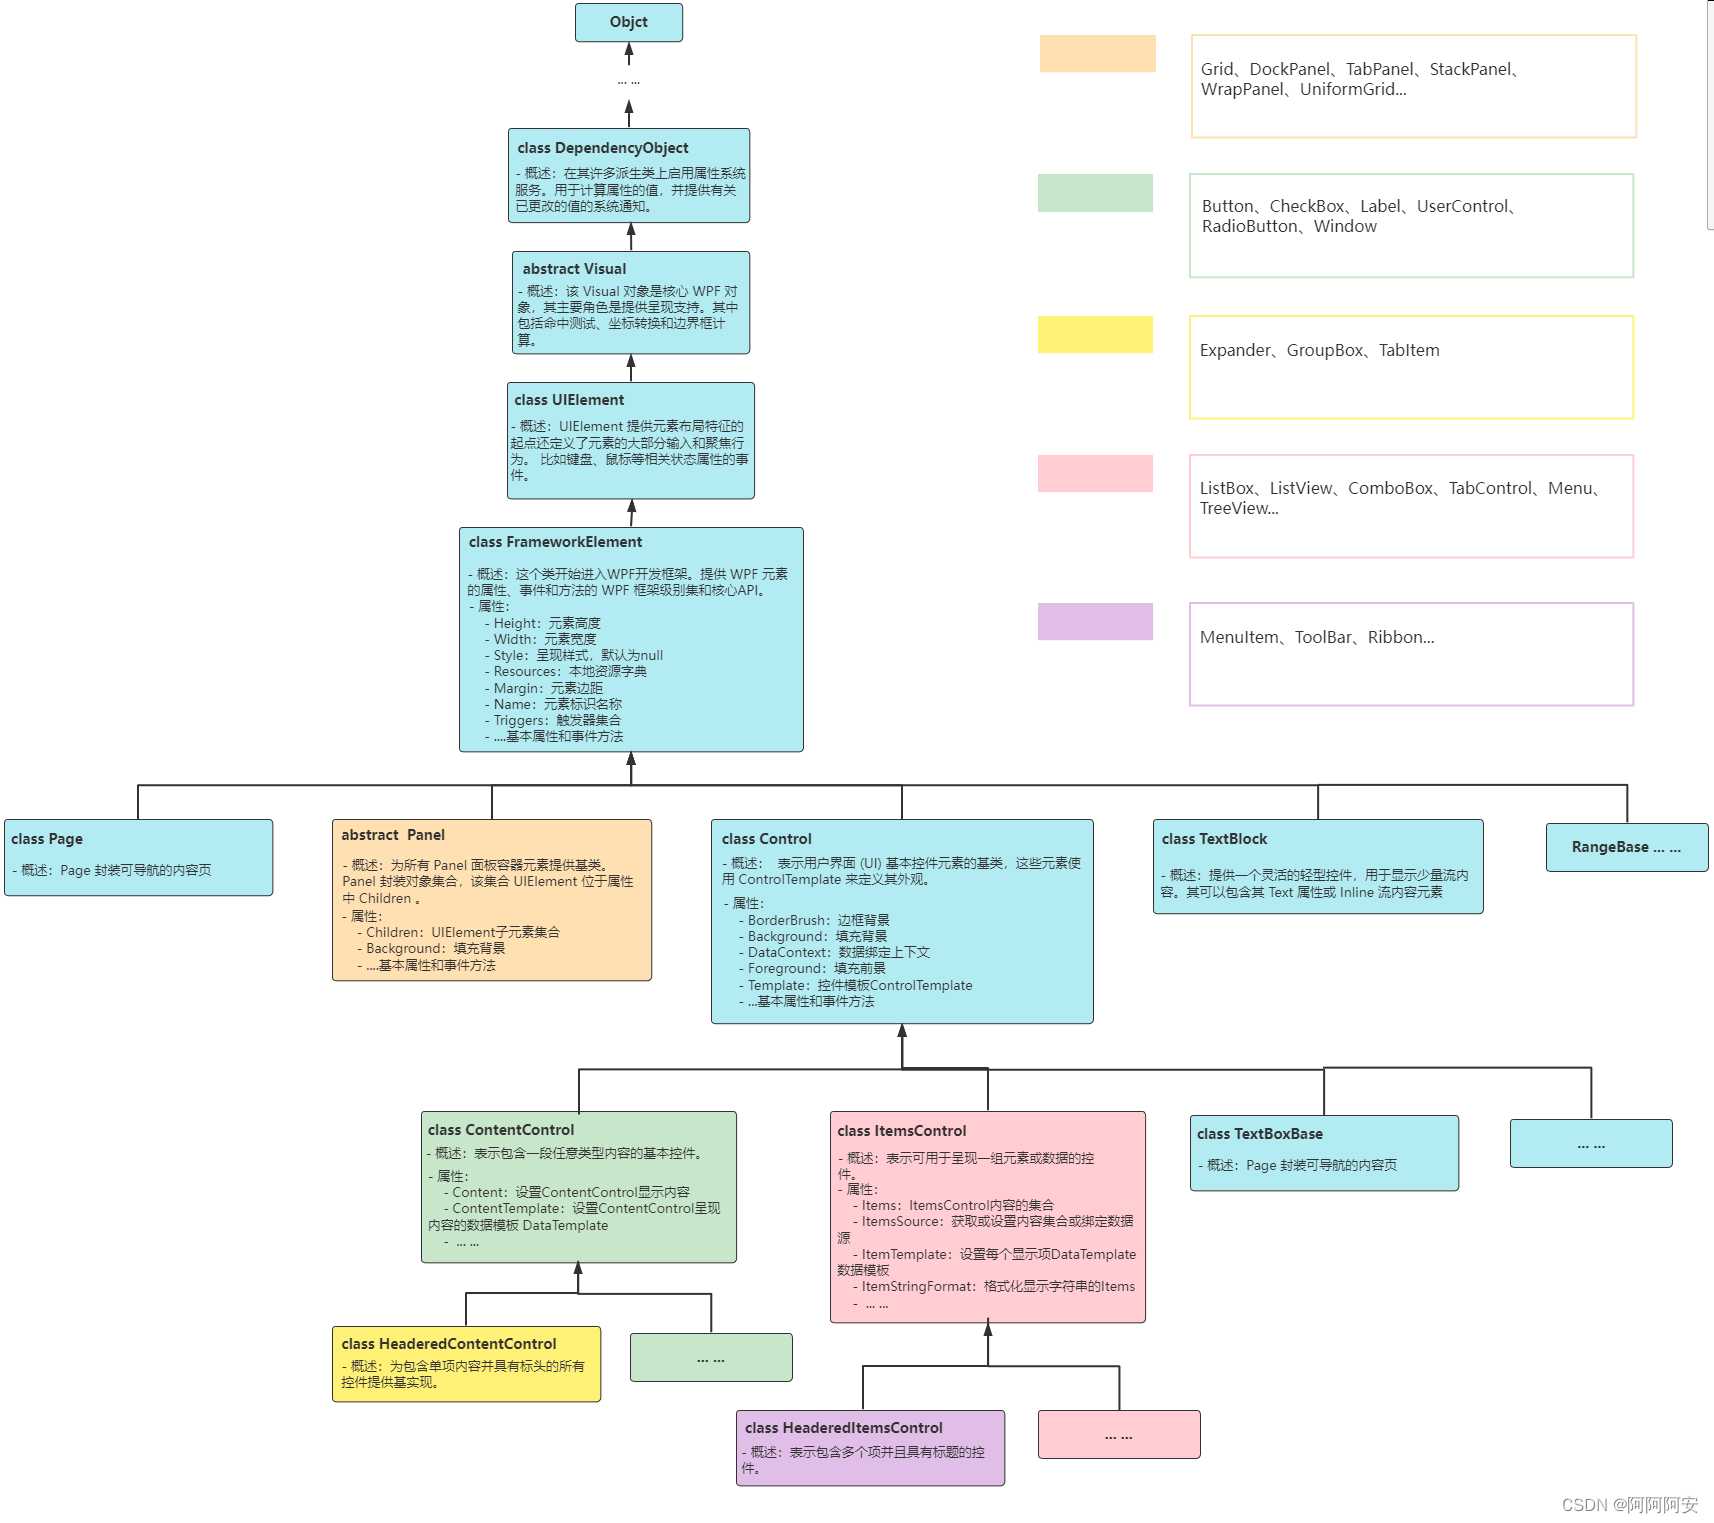
1.WPF UI元素继承关系
2.基本控件
2.1 TextBlock
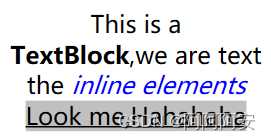
简单来说,TextBlock是一个用于呈现文本内容的文字块。TextBlock 可以包含其 Text 属性或 Inline 内联格式的流内容元素(和HTML语言很相似。这些类似控件的小构造都继承自Inline类,可以作为文本的一部分进行内联呈现,比如粗体Bold、斜体Italic、下划线Underline等)。
- Foreground : 获取或设置要应用到 TextBlock 的文本内容的 Brush(文本颜色刷)。
- Background : 获取或设置要用于填充内容区域背景的 Brush(文本块背景颜色刷)。
- TextTrimming : 获取或设置在内容超出内容区域时要采用的文本剪裁行为(CharacterEllipsis字符边界裁剪、None不裁剪、WordEllipsis单词边界裁剪)。
- TextWrapping : 获取或设置 TextBlock 对文本进行换行的方式(Wrap自动换行、NoWrap不换行)。
- Text : 获取或设置 TextBlock 的文本内容,等效于标签中间放置文字。
- Inlines : 获取包含顶级 Inline 元素的 InlineCollection,前者构成 TextBlock 的内容。
<!--TextBlock Inlines的XML格式-->
<TextBlock Margin="5" TextWrapping="Wrap" TextAlignment="Center">
     This is a <Bold>TextBlock</Bold>,we are text the <Italic Foreground="Blue">inline elements</Italic>
     <Span TextDecorations="Underline" Background="Silver">Look me,Hahahaha</Span>
</TextBlock>
//TextBlock Inlines的代码格式
TextBlock textBlock1 = new TextBlock();

textBlock1.TextWrapping = TextWrapping.Wrap;
textBlock1.TextAlignment = TextAlignment.Center;

textBlock1.Inlines.Add("This is a");
textBlock1.Inlines.Add(new Blob(new Run("TextBlock")));
textBlock1.Inlines.Add(",we are text the");
textBlock1.Inlines.Add(new Italic(new Run("inline elements")){
    Foreground = Brushes.Blue });
...
2.2 Label
Label表示控件的文本标签,类似于TextBlock。但Label使用的是Content属性而不是Text属性,这是因为Label内部可以放置任意类型的控件而不仅仅是文本,当然这个内容也可以是一个字符串。
- 访问键/助记符:用于启用对控件的快速键盘访问,即通过访问键可以快速聚焦到相关的控件上。Label支持助记符绑定。
- Label助记符配置:在应为访问密钥的字符之前添加下划线,然后按住[Alt]键快速定位。 如果内容包含多个下划线字符,则只有第一个字符转换为访问键,其他下划线显示为普通文本。第一个下划线使用两个连续下划线表示普通的下划线文本内容。
- Foreground : 前景色背景
- Content : 设置Label内容,类型为Object
- Target : 获取或设置当用户按下标签的访问键时获得焦点的元素。
<Window x:Class="WpfTutorialSamples.Basic_controls.LabelControlAdvancedSample" xmlns="http://schemas.microsoft.com/winfx/2006/xaml/presentation" xmlns:x="http://schemas.microsoft.com/winfx/2006/xaml" Title="LabelControlAdvancedSample" Height="180" Width="250">

	<StackPanel Margin="10">
		<Label Target="{Binding ElementName=txtName}">
            <!--Label内部Content包含堆叠对象-->
			<StackPanel Orientation="Horizontal">
				<Image Source="http://cdn1.iconfinder.com/data/icons/fatcow/16/bullet_green.png" />
                <!--AccessText控件用下划线来指定用作访问键的字符并呈现-->
				<AccessText Text="__Na_me:" />
			</StackPanel>
		</Label>
		<TextBox Name="txtName" />
		<Label Target="{Binding ElementName=txtMail}">
			<StackPanel Orientation="Horizontal">
				<Image Source="http://cdn1.iconfinder.com/data/icons/fatcow/16/bullet_blue.png" />
				<AccessText Text="_Mai_l:" />
			</StackPanel>
		</Label>
		<TextBox Name="txtMail" />
	</StackPanel>

</Window>
2.3 TextBox
TextBox控件是WPF中最基本的文字输入控件。它允许显示或编辑无格式文本,就像是个编辑器。
- AcceptsReturn : 获取或设置一个值,该值指示在用户按 ENTER 键时文本编辑控件如何响应(如果按ENTER键可在当前光标位置处插入新行,则为true;否则将忽略ENTER键)
- TextWrapping : 获取或设置文本框中文本的换行方式
- Text : 获取或设置文本框的文本内容
- SpellCheck : 获取一个 SpellCheck 对象,来设置拼写检查错误
- Language : 该属性指示拼写检查器使用的语言
- IsReadOnly : 文本框是否只读
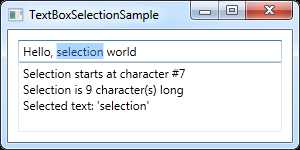
- TextBox的选择参数属性:
	- SelectionStart : 获取或设置当前选择的起始位置的字符索引(当前光标位置或是否有选择)
	- SelectionLength : 获取或设置一个值,该值指示文本框中当前选择的字符数(当前选择的长度,否则为0)
	- SelectedText : 获取或设置文本框中当前选择的内容(当前选择的字符串,否则为空)
- SelectionChanged : 订阅SelectionChanged事件,在文本选择改变时发生
<Window x:Class="WpfTutorialSamples.Basic_controls.TextBoxSelectionSample" xmlns="http://schemas.microsoft.com/winfx/2006/xaml/presentation" xmlns:x="http://schemas.microsoft.com/winfx/2006/xaml" Title="TextBoxSelectionSample" Height="150" Width="300">
	<DockPanel Margin="10">
		<TextBox SelectionChanged="TextBox_SelectionChanged" DockPanel.Dock="Top" />
		<TextBox Name="txtStatus" AcceptsReturn="True" TextWrapping="Wrap" IsReadOnly="True" />
	</DockPanel>
</Window>
namespace WpfTutorialSamples.Basic_controls
{

	public partial class TextBoxSelectionSample : Window
	{

		public TextBoxSelectionSample()
		{

			InitializeComponent();
		}

		private void TextBox_SelectionChanged(object sender, RoutedEventArgs e)
		{

			TextBox textBox = sender as TextBox;
			txtStatus.Text = "Selection starts at character #" + textBox.SelectionStart + Environment.NewLine;
			txtStatus.Text += "Selection is " + textBox.SelectionLength + " character(s) long" + Environment.NewLine;
			txtStatus.Text += "Selected text: '" + textBox.SelectedText + "'";
		}
	}
}
2.4 Button
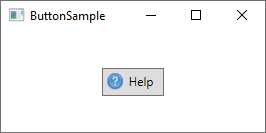
Button表示 Windows 按钮控件,该按钮可以对 Click 事件做出反应。若要将相同的属性设置应用于多个 Button 控件,请使用该 Style 属性。也可以修改默认值 ControlTemplate,使控件具有唯一的外观。
- Content : 设置Button内容,类型为Object。可以包括字符串或一些复杂类型
- Foreground, Background, FontWeight : 设置Button控件文字的样式
- Padding : 获取或设置控件内部的填充边距
- 事件
	- Click : 在单击 Button 时发生事件
	- ClickMode : 获取或设置 Click 事件何时发生。
<Button Padding="5">
    <StackPanel Orientation="Horizontal">
    <Image Source="/WpfTutorialSamples;component/Images/help.png" />
    <TextBlock Margin="5,0">Help</TextBlock>
    </StackPanel>
</Button>
2.5 列表集合控件
列表集合控件表示可用于呈现一组项/数据的控件。WPF中的列表集合控件均派生自 ItemsControl 类,属于 ItemsControl 族的元素,比如 ListBox和ComboBox等。我们这里以 ItemsControl和ListBox为例进行控件分析。
(1)ItemsControl
ItemsControl 是最简单的数据列表呈现控件,它几乎仅简单的遍历呈现列表数据,而不提供其他任何的条目选择(ListBox可以进行条目选择)。ItemsControl 继承自Control类,因此其列表集合数据本质上也不过是控件内包含的一块Content。ItemsControl除了作为ItemsControl族的顶层元素,还经常作为自定义列表控件(定义模板)进行使用。
- ItemsControl 族的自动包装
– ItemsControl族最有特色的一点就是会自动使用条目容器(Item Container)对其列表集合的每项数据内容进行包装。每种 ItemsControl 类型都有其对应的条目容器类型,比如ListBox的Item Container是ListBoxItem控件;ComboBox的Item Container是ComboBoxItem控件。
– Item Container本质上也是一个控件元素,大部分继承自ContentControl类(比如ListBoxItem),这也意味着它可以包含任何类型的 (如字符串、图像或面板)的单个对象。
– 当我们把集合数据作为内容提交给 ItemsControl 时,ItemsControl 不会把这个集合直接拿来使用,而是先使用对应的Item Container控件将集合中的每项数据逐个包装,然后再将包装好的 Item Container List作为ItemsControl的整体内容进行呈现。这样的好处是我们不仅可以定义ItemsControl的外观,也可以方便的定义每一项数据的外观!并且ItemsControl的集合数据类型可以是各种各样的。
– 可以为 ItemsControl 中的每个数据项显式的创建条目容器Item Container,但这不是必需的。 因为如果未显式创建条目容器Item Container,ItemsControl会自动为每一个数据项内容包装Item Container。
 <ListBox>
	<ListBoxItem>ListBox Item 1</ListBoxItem>
	<ListBoxItem>ListBox Item 2</ListBoxItem>
	<ListBoxItem>ListBox Item 3</ListBoxItem>
	<ListBoxItem>ListBox Item 4</ListBoxItem>
</ListBox>

<!-- 等价于 -->

<ListBox>
	<system:String>ListBox Item 1</system:String>
	<system:String>ListBox Item 2</system:String>
	<system:String>ListBox Item 3</system:String>
	<system:String>ListBox Item 4</system:String>
</ListBox>
- ItemsControl类属性
public class ItemsControl : Control,IContainItemStorage,IAddChild
- 属性:
	- DataContext: 获取或设置元素参与数据绑定时的数据上下文。
	- DisplayMemberPath: 获取或设置源对象上的值的路径,以用作对象的可视表示形式。(只能显示简单的字符串数据)
	- HasItems: 获取一个值,该值指示 ItemsControl 是否包含项。
	- ItemContainerStyle: 获取或设置应用于为每个项生成的容器元素的 Style(设置其Item Container的Style)。
	- Items: 获取用于生成 ItemsControl 的内容的集合。
	- ItemsPanel: 获取或设置模板,该模板定义对项的布局进行控制的面板(默认值是一个纵向排列的指定StackPanel)
	- ItemsSource: 获取或设置用于生成 ItemsControl 的内容的集合(常用于数据绑定,ItemsSource设置属性后,集合Items是只读且固定大小)
	- ItemStringFormat: 获取或设置一个复合/格式化字符串,如果 ItemsControl 中的项显示为字符串,则用于指定如何格式化这些项。(仅用于string数据项)
	- ItemTemplate: 获取或设置用来显示[每个项]的 DataTemplate。
	- Template: 获取或设置控件模板。(整个ItemsControl的样式模板,非数据项)
(2)ListBox
ListBox控件继承自ItemsControl下的Selector,ListBox除了可以列表显示一组数据元素,还可以允许用户从其子元素中[选择项]的控件。
public class ListBox : Selector
- 属性:
	- 继承 ItemsControl 的大部分属性
	- SelectedIndex: 获取或设置当前选择中第一项的索引,如果选择为空,则返回负一(-1)。
	- SelectedItem: 获取或设置当前选择中的第一项(Object),或者,如果选择为空,则返回 null。
	- SelectedItems: 获取当前选定的所有项集合(IList)。
	- SelectedValue: 获取或设置通过使用 SelectedValuePath 而获取的 SelectedItem 的路径值。当调用SelectedValue时,ListBox先找到选中的Item所对应的数据对象,然后把SelectedValuePath的值当作数据对象的属性名称并把这个属性值取出来。
	- SelectedValuePath: 获取或设置用于从 SelectedItem 中获取 SelectedValue 的路径/属性名(string)。
	- SelectionMode: 获取或设置 ListBox 的选择行为。默认值为 Single 选择。
		- Extended: 用户可以按下 Shift 键来选择多个连续项。
		- Multiple: 用户可以选择多个项而无需按下修改键。
		- Single: 用户一次只能选择一项。
- 事件:
	- SelectionChanged:当 Selector 的选择更改时发生。
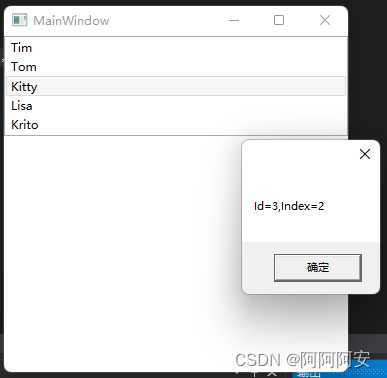
namespace WPF_Demo
{

    public partial class MainWindow : Window
    {

        public MainWindow()
        {

            InitializeComponent();

            List<Employee> empList = new List<Employee>()
            {

                new Employee(){
   Id=1,Name="Tim",Age=30},
                new Employee(){
   Id=2,Name="Tom",Age=26},
                new Employee(){
   Id=3,Name="Kitty",Age=28},
                new Employee(){
   Id=4,Name="Lisa",Age=30},
                new Employee(){
   Id=5,Name="Krito",Age=36}
            };

            this.listBoxEmplyee.DisplayMemberPath = "Name";
            this.listBoxEmplyee.SelectedValuePath = "Id";
            this.listBoxEmplyee.ItemsSource = empList;
        }

        private void listBoxEmplyee_SelectionChanged(object sender, SelectionChangedEventArgs e)
        {

            ListBox lst = sender as ListBox;
            if (lst != null)
            {

                int id = (int)lst.SelectedValue;
                int index = lst.SelectedIndex;
                MessageBox.Show("Id=" + id + ",Index=" + index);
            }
        }
    }


    public class Employee
    {

        public int Id {
    get; set; }
        public string Name {
    get; set; }
        public int Age {
    get; set; }
    }

}
3.WPF常用控件通用属性
3.1 ToolTip提示对象
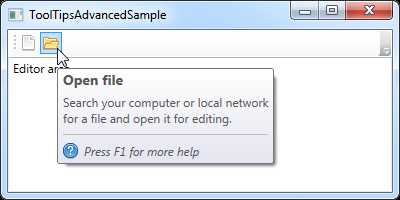
FrameworkElement类中具有一个ToolTip属性,几乎所有WPF控件都继承自该属性。该属性用于获取或设置用户界面中为此元素显示的工具提示对象 (UI,Object) ,比如一个简单的提示字符串或一个复杂的提示布局。除此之外,结合ToolTipService类可以实现一堆有趣的影响提示工具的行为,比如ShowDuration 属性扩展工具提示的时间等。
<Window x:Class="WpfTutorialSamples.Control_concepts.ToolTipsAdvancedSample" xmlns="http://schemas.microsoft.com/winfx/2006/xaml/presentation" xmlns:x="http://schemas.microsoft.com/winfx/2006/xaml" Title="ToolTipsAdvancedSample" Height="200" Width="400" UseLayoutRounding="True">
    <DockPanel>
        <ToolBar DockPanel.Dock="Top">
        	<!--简单字符串提示-->
            <Button ToolTip="Create a new file">
                <Button.Content>
                    <Image Source="/WpfTutorialSamples;component/Images/page_white.png" Width="16" Height="16" />
                </Button.Content>
            </Button>
            <Button>
                <Button.Content>
                    <Image Source="/WpfTutorialSamples;component/Images/folder.png" Width="16" Height="16" />
                </Button.Content>
                <!--复杂提示对象,布局Panel-->
                <Button.ToolTip>
                    <StackPanel>
                        <TextBlock FontWeight="Bold" FontSize="14" Margin="0,0,0,5">Open file</TextBlock>
                        <TextBlock>
                        Search your computer or local network
                        <LineBreak />
                        for a file and open it for editing.
                        </TextBlock>
                        <Border BorderBrush="Silver" BorderThickness="0,1,0,0" Margin="0,8" />
                        <WrapPanel>
                            <Image Source="/WpfTutorialSamples;component/Images/help.png" Margin="0,0,5,0" />
                            <TextBlock FontStyle="Italic">Press F1 for more help</TextBlock>
                        </WrapPanel>
                    </StackPanel>
                </Button.ToolTip>
            </Button>
        </ToolBar>

        <TextBox>
            Editor area...
        </TextBox>
    </DockPanel>
</Window>
3.2 文本渲染
Microsoft 在 .NET 框架 4.0 中为 WPF 文本渲染引擎做了很多优化,引入了 TextOptions 类和相关属性
- TextOptions.TextFormattingMode : 选择用 Ideal(默认值)或 Display(更清晰)
- TextOptions.TextRenderingMode : 控制显示文本所用的抗锯齿算法
<Label TextOptions.TextFormattingMode="Display" FontSize="9">TextFormattingMode.Ideal, small text</Label>
<Label TextOptions.TextRenderingMode="Auto" FontSize="9">TextRenderingMode.Auto, small text</Label>
二.资源与转换器
1.WPF 资源
1.1 资源定义
资源是可以在应用中的不同位置重复使用的对象数据集合。所有的数据、控件、字符串等都可以作为资源存储,这使你能够将数据一处存放,随处使用,非常实用。WPF的界面元素都具有一个Resources的属性,其类型为ResourceDictionary,能够以“键-值”对的形式存储数据资源。资源字典中的每个资源都必须具有唯一键。 在标记中定义资源时,可通过x:Key 指令来分配唯一键。 通常情况下,这个键是一个字符串。
(1)控件范围: 控件定义的资源字典,只能在当前控件内部使用 <StackPanel.Resources>…</StackPanel.Resources>
(2)窗口/页面范围: 只能在当前窗口/页面中使用 <Window.Resources> …</Window.Resources>
(3)全局应用: 全局可用 <Application.Resources>…</Application.Resources>
1.2 资源使用
WPF会自动地从当前区域控制项(控件范围)到视窗再到App.xaml 沿着UI树自底向上寻找指定的资源,找到即停止,但不会向下搜寻。资源和资源字典不仅仅能定义元素的样式,还能定义资源的模板、故事版、触发器等等,方便了为较多同样控件定义样式时代码的冗余、重复定义同一样式。
静态资源:编译时查找,通过使用 StaticResource 标记扩展创建引用(使用标记扩展可以处理属性字符串并将对象返回到 XAML 加载程序,从而指定对象引用/绑定引用对象),静态资源引用只会在程序运行时加载一次。
动态资源:运行时查找, 通过使用DynamicResource 标记扩展创建引用。在初始编译期间创建一个临时表达式,从而推迟资源的查找,直到实际需要请求的资源值才能构造对象。 该资源的查找行为类似于运行时查找,这会影响性能。 在应用程序中尽可能使用静态资源,仅在必要时使用动态资源。
(1)XAML声明:<子元素 (对应)属性名=”{StaticResource 资源标记名}” /> 或 <子元素 (对应)属性名=”{DynamicResource 资源标记名}” /> XAML自动匹配数据类型,无需强转,类型不匹配时会抛出异常。
(2)代码引用:
-
string text = (string)this.FindResource("str");资源字典值为Object,需强转。FindResource方式为自UI树底向上查找 -
string text1 = (string)this.Resources["str"];资源字典值为Object,需强转。Resources方式为只查找本控件的资源字典
1.3 资源合并
(1)定义资源字典
除了在上述的控件/窗口内部定义局部资源字典,我们也可以独立的定义资源字典来在不同应用/不同项目之间使用。ResourceDictionary 类提供一个哈希表/字典实现(键值对Map),其中包含组件所使用的 WPF 资源以及 WPF 应用程序的其他元素。VS2019中提供了添加 资源字典.xaml文件 的创建项。资源字典的写法和资源一样,直接在文件里定义你的资源就可以了。
<ResourceDictionary xmlns="http://schemas.microsoft.com/winfx/2006/xaml/presentation" xmlns:x="http://schemas.microsoft.com/winfx/2006/xaml" xmlns:local="clr-namespace:WPF_Demo">

    <Style TargetType="TextBox"> <Setter Property="FontFamily" Value="楷体"></Setter> <Setter Property="FontSize" Value="50"></Setter> <Setter Property="Foreground" Value="Red"></Setter> </Style>
</ResourceDictionary>
(2)资源合并
新定义的独立资源字典并不能直接使用,因为该字典还并不能被WPF所识别,我们需要将它合并添加到相应的控件/窗口/APP范围内,所使用的合并属性为 MergedDictionaries 。MergedDictionaries为ResourceDictionary 类的一个属性,该属性是一个ResourceDictionary 集合类型。
通常情况下,MergedDictionaries 集合中的每个 ResourceDictionary 都指定一个 Source 属性。 Source 的值应为统一资源标识符 (URI),该标识符解析为要合并的资源文件的位置。 该 URI 的目标必须是另一个 XAML 文件,并以 ResourceDictionary 作为其根元素。
- 单项目中合并
<ResourceDictionary>
     <ResourceDictionary.MergedDictionaries>
         <!--<ResourceDictionary Source="资源字典路径"/>-->
           <ResourceDictionary Source="/Dictionarys/ColorDictionary.xaml"/>
           <ResourceDictionary Source="..."/>
     </ResourceDictionary.MergedDictionaries>
</ResourceDictionary>
- 多项目中合并
<ResourceDictionary>
    <ResourceDictionary.MergedDictionaries>
       <!--<ResourceDictionary Source="/项目名;component/资源字典路径"/>-->
       <ResourceDictionary Source="/CommonModel;component/Dictionarys/PathDictionary.xaml"/>
       <ResourceDictionary Source="..."/>
    </ResourceDictionary.MergedDictionaries>
</ResourceDictionary>
2.类型转换器
参考资料:
2.1 转换器的概念
值转换器经常与数据绑定一起使用,用于将不同类型之间的数据进行自定义转换并显示到绑定UI上。WPF数据转换器需要实现 IValueConverter接口,或者IMultiValueConverter接口(多路绑定)。只需要实现两个方法:Convert() 和ConvertBack() 用于将值转换为目标格式,然后再返回。
namespace System.Windows.Data
{

    public interface IValueConverter
    {

        // 摘要: 数据绑定引擎在将值从绑定源传播到绑定目标时会调用此方法,即源属性传给目标属性时
        // 参数:
        // value: 绑定源生成的值。
        // targetType: 绑定目标属性的类型。
        // parameter: 要使用的转换器参数。
        // culture: 要用在转换器中的区域化/国际化信息。
        // 返回结果:
        // 转换后的值。 如果该方法返回 null,则使用有效的 null 值。
        object Convert(object value, Type targetType, object parameter, CultureInfo culture);

        // 摘要: 数据绑定引擎在将值从绑定目标传播到绑定源时调用此方法,此方法的实现必须是Convert方法的反向实现。
        // 参数:
        // value: 绑定源生成的值。
        // targetType: 绑定目标属性的类型。
        // parameter: 要使用的转换器参数。
        // culture: 要用在转换器中的区域化/国际化信息。
        // 返回结果:
        // 转换后的值。 如果该方法返回 null,则使用有效的 null 值。
        object ConvertBack(object value, Type targetType, object parameter, CultureInfo culture);
    }
}
2.2 转换器实现实例
背景:绑定字符串,自动转换相应的颜色显示在UI,具体实现如下
(1)转换器实现
namespace WPF_Demo.Convert
{

    [ValueConversion(typeof(string), typeof(SolidColorBrush))]
    class DemoConvert : IValueConverter
    {

        public object Convert(object value, Type targetType, object parameter, CultureInfo culture)
        {

            string str = value.ToString().ToLower();
            if (str.Equals("x-red"))
            {

                return new SolidColorBrush(Color.FromRgb(222, 32,37));
            }else if (str.Equals("x-blue"))
            {

                return new SolidColorBrush(Color.FromRgb(19, 21, 190));
            }
            return new SolidColorBrush(Color.FromRgb(0, 0, 0));
        }

        public object ConvertBack(object value, Type targetType, object parameter, CultureInfo culture)
        {

            throw new NotImplementedException();
        }
    }
}
(2)XAML界面使用
- 引入Convert命名空间:xmlns:cv=“clr-namespace:WPF_Demo.Converts”
- 添加Window资源:<cv:StringToColorConvert x:Key=“bgCV”/>
- 绑定数据转换:Background=“{Binding} ElementName=txt,Path=Text,Converter={StaticResource bgCV}}”
<Window x:Class="WPF_Demo.MainWindow" xmlns="http://schemas.microsoft.com/winfx/2006/xaml/presentation" xmlns:x="http://schemas.microsoft.com/winfx/2006/xaml" xmlns:d="http://schemas.microsoft.com/expression/blend/2008" xmlns:mc="http://schemas.openxmlformats.org/markup-compatibility/2006" xmlns:local="clr-namespace:WPF_Demo" xmlns:cv="clr-namespace:WPF_Demo.Converts" mc:Ignorable="d" Title="MainWindow" Height="250" Width="400">
    <Window.Resources>
        <cv:StringToColorConvert x:Key="bgCV"/>
    </Window.Resources>

    <StackPanel Margin="10">
        <TextBox x:Name="txt" Margin="10" Text="x-blue"/>
        <TextBlock Height="50" Margin="10" Background="{Binding ElementName=txt,Path=Text,Converter={StaticResource bgCV}}"/>
    </StackPanel>
</Window>
三.基本布局介绍
布局子元素的常用布局附加属性:
- VerticalAlignment : 该属性用于获取或设置在父元素(如 Panel 或项控件)中组合此元素时所应用的垂直对齐特征
- HorizontalAlignment : 该属性用于获取或设置在父元素(如 Panel 或项控件)中组合此元素时所应用的水平对齐特征
1 StackPanel 堆叠布局
(1)概念:StackPanel是堆叠布局,将其子元素依次排列成水平或垂直的一行。StackPanel 包含一个UIElement 对象集合(子元素集合),这些对象位于属性Children中 。
- Orientation : 获取或设置一个值,该值指示子元素的堆叠维度(方向),其中 Horizontal水平,Vertical垂直
- Children : 获取此Panel的 UIElementCollection 子元素集合(继承自 Panel)
- CanVerticallyScroll : 获取或设置一个值,该值指示内容能否垂直滚动。
- CanHorizontallyScroll : 获取或设置一个值,该值指示 StackPanel 能否水平滚动。
<Window x:Class="WpfTutorialSamples.Panels.StackPanel" xmlns="http://schemas.microsoft.com/winfx/2006/xaml/presentation" xmlns:x="http://schemas.microsoft.com/winfx/2006/xaml" Title="StackPanel" Height="160" Width="300">
	<StackPanel Orientation="Horizontal">
		<Button VerticalAlignment="Top">Button 1</Button>
		<Button VerticalAlignment="Center">Button 2</Button>
		<Button VerticalAlignment="Bottom">Button 3</Button>
		<Button VerticalAlignment="Bottom">Button 4</Button>
		<Button VerticalAlignment="Center">Button 5</Button>
		<Button VerticalAlignment="Top">Button 6</Button>
	</StackPanel>
</Window>
(2)滚动:StackPanel默认不会提供内容的物理滚动功能,如果需要物理滚动而不是逻辑滚动,请将 StackPanel 元素包装在一个 ScrollViewer 控件中,并将其 CanContentScroll 属性设置为
false。
2 Grid 网格布局
(1)概念:Grid是网格布局,用于定义由列和行组成的灵活的网格区域。Grid 包含一个UIElement 对象集合(子元素集合),这些对象位于属性Children中 。 Grid 子元素按标记或代码中显示的顺序绘制。,因此当元素共享相同的坐标时,可以实现分层显示顺序 (也称为 z 顺序) 。
- Children : 获取此Panel的 UIElementCollection 子元素集合(继承自 Panel)
- ColumnDefinitions : 获取在 Grid 的实例上定义的 ColumnDefinitionCollection 列的定义信息集合
	- ColumnDefinition : 定义将应用于 Grid 元素的特定于列的属性,每个 ColumnDefinition 都成为表示最终网格布局中的列的占位符。
		- Width : 获取或设置 ColumnDefinition 定义的列的宽度值, GridLength 对象
			- 单位(Star) * : 占用剩余的空间按比例划分,宽度2*是1*的两倍
			- 单位(Auto) Auto : 该大小由内容对象元素的大小属性确定
			- 单位(Pixel) 像素绝对值 : 该值表示为一个绝对的像素值
- RowDefinitions : 获取在 Grid 的实例上定义的 RowDefinitionCollection 行的定义信息集合,
	- RowDefinition : 定义将应用于 Grid 元素的特定于行的属性, 每个 RowDefinition 都成为表示最终网格布局中的行的占位符。
		- Height : 获取或设置 RowDefinition 定义的行的高度值, GridLength 对象
			- 单位(Star) * : 占用剩余的空间按比例划分,宽度2*是1*的两倍
			- 单位(Auto) Auto : 该大小由内容对象元素的大小属性确定
			- 单位(Pixel) 像素绝对值 : 该值表示为一个绝对的像素值
- ShowGridLines : 获取或设置一个值,该值指示网格线在此 Grid 中是否可见
(2)附加属性(Attached):附加属性是一种特殊的依赖属性,用于非定义该属性的类。例如Grid面板的RowDefinition、ColumnDefinition、Canvas面板的Left、Right等
- Column : 获取或设置一个值,该值表示 Grid 中的子内容所在的列,从0开始下同
- ColumnSpan : 获取或设置一个值,该值指示 Grid 中的子内容所跨越的总列数。默认1
- Row : 获取或设置一个值,该值表示 Grid 中的子内容所在的行
- RowSpan : 获取或设置一个值,该值表示在一个 Grid 中子内容所跨越的总行数。默认1
<Window x:Class="WpfTutorialSamples.Panels.GridColRowSpan" xmlns="http://schemas.microsoft.com/winfx/2006/xaml/presentation" xmlns:x="http://schemas.microsoft.com/winfx/2006/xaml" Title="GridColRowSpan" Height="110" Width="300">
	<Grid>
		<Grid.ColumnDefinitions>
			<ColumnDefinition Width="1*" />
			<ColumnDefinition Width="1*" />
		</Grid.ColumnDefinitions>
		<Grid.RowDefinitions>
			<RowDefinition Height="*" />
			<RowDefinition Height="*" />
		</Grid.RowDefinitions>
		<Button>Button 1</Button>
		<Button Grid.Column="1">Button 2</Button>
		<Button Grid.Row="1" Grid.ColumnSpan="2">Button 3</Button>
	</Grid>
</Window>
3 Canvas 画布
Canvas继承自Controls.Panel,用于定义一个区域,可在其中使用相对于 Canvas 区域的坐标以显式方式来定位子元素。Canvas的特点如下:
(1)Canvas 的 Height 和 Width 属性的默认值为 0。如果不设置这些值,除非子元素自动调整大小,否则您将看不到画布。
(2)Canvas 上的子元素永远不会调整大小(随着窗体变化),它们只是放置在指定坐标处。于希望自动调整和对齐子内容的情况,最好是使用 Grid 元素。
(3)子元素上的垂直和水平对齐不起作用。子元素仅放置在由 Canvas Left、Top、Right 和 Bottom 属性设置的位置上。
(4)位置优先级:如果设置了 Canvas 的 Left 属性,Right 属性将不起作用。如果设置了 Canvas 的 Top 属性,Bottom 属性将不起作用。
- 属性:
	- Children : 获取此Panel的 UIElementCollection 子元素集合(继承自 Panel)
	- Width: 获取或设置元素的宽度。(继承自 FrameworkElement)
	- Height: 获取或设置元素的建议高度。(继承自 FrameworkElement)
- 附加属性:
	- Bottom:获取或设置一个值,该值表示元素底部与其父 Canvas 底部之间的相对距离。(单位是像素)
	- Left:获取或设置一个值,该值表示元素左侧与其父 Canvas 左侧之间的距离。
	- Right:获取或设置一个值,该值表示元素右侧与其父 Canvas 右侧之间的距离。
	- Top:获取或设置一个值,该值表示元素顶部与其父 Canvas 顶部之间的距离。
	- Panel.ZIndex:获取或设置一个值,该值表示元素在 Z 平面中的显示顺序(上下深度顺序/层叠顺序)
		- ZIndex值越大显示优先级越高,允许负值,ZIndex的最大值为32766,默认值为0)。
		- 相同ZIndex则按照绘制/添加顺序,依次覆盖显示
<!--Canvas实例:XAML版本-->
<Window x:Class="WPF_Demo.MainWindow" xmlns="http://schemas.microsoft.com/winfx/2006/xaml/presentation" xmlns:x="http://schemas.microsoft.com/winfx/2006/xaml" xmlns:d="http://schemas.microsoft.com/expression/blend/2008" xmlns:mc="http://schemas.openxmlformats.org/markup-compatibility/2006" xmlns:local="clr-namespace:WPF_Demo" xmlns:vm="clr-namespace:WPF_Demo.Status" xmlns:cm="clr-namespace:WPF_Demo.Commands" mc:Ignorable="d" Title="MainWindow" Height="275" Width="260">
    <Canvas>
        <Ellipse Fill="Gainsboro" Canvas.Left="25" Canvas.Top="25" Width="200" Height="200" />
        <Rectangle Fill="LightBlue" Panel.ZIndex="1" Canvas.Left="25" Canvas.Top="25" Width="50" Height="50" />
        <Rectangle Fill="LightCoral" Canvas.Left="50" Canvas.Top="50" Width="50" Height="50" />
        <Rectangle Fill="LightCyan" Panel.ZIndex="2" Canvas.Left="75" Canvas.Top="75" Width="50" Height="50" />
    </Canvas>
</Window>
//Canvas实例:代码版本
namespace WPF_Demo
{

    public partial class MainWindow : Window
    {

        public MainWindow()
        {

            InitializeComponent();
            //1.添加Ellipse对象
            Ellipse ellipse = new Ellipse();
            ellipse.Fill = new SolidColorBrush(Colors.Gainsboro);
            ellipse.Width = 200;
            ellipse.Height = 200;
            //Set Canvas position
            Canvas.SetLeft(ellipse, 25);
            Canvas.SetTop(ellipse, 25);
            //Add Ellips to Canvas
            this.canvas.Children.Add(ellipse);

            //2.添加Rectangle对象1
            Rectangle Red_rectangle = new Rectangle();
            Red_rectangle.Fill = new SolidColorBrush(Colors.Red);
            Red_rectangle.Width = 50;
            Red_rectangle.Height = 50;
            //Set Canvas position
            Canvas.SetLeft(Red_rectangle, 25);
            Canvas.SetTop(Red_rectangle, 25);
            Panel.SetZIndex(Red_rectangle, 1);
            //Add Ellips to Canvas
            this.canvas.Children.Add(Red_rectangle);

            //3.添加Rectangle对象2
            Rectangle Green_rectangle = new Rectangle();
            Green_rectangle.Fill = new SolidColorBrush(Colors.Green);
            Green_rectangle.Width = 50;
            Green_rectangle.Height = 50;
            //Set Canvas position
            Canvas.SetLeft(Green_rectangle, 50);
            Canvas.SetTop(Green_rectangle, 50);
            //Add Ellips to Canvas
            this.canvas.Children.Add(Green_rectangle);

            //4.添加Rectangle对象3
            Rectangle Yello_rectangle = new Rectangle();
            Yello_rectangle.Fill = new SolidColorBrush(Colors.Yellow);
            Yello_rectangle.Width = 50;
            Yello_rectangle.Height = 50;
            //Set Canvas position
            Canvas.SetLeft(Yello_rectangle, 75);
            Canvas.SetTop(Yello_rectangle, 75);
            Panel.SetZIndex(Yello_rectangle, 2);
            //Add Ellips to Canvas
            this.canvas.Children.Add(Yello_rectangle);
        }
    }

}
今天的文章WPF(一) WPF基本控件与布局分享到此就结束了,感谢您的阅读,如果确实帮到您,您可以动动手指转发给其他人。
版权声明:本文内容由互联网用户自发贡献,该文观点仅代表作者本人。本站仅提供信息存储空间服务,不拥有所有权,不承担相关法律责任。如发现本站有涉嫌侵权/违法违规的内容, 请发送邮件至 举报,一经查实,本站将立刻删除。
如需转载请保留出处:https://bianchenghao.cn/24475.html

