1.1 准备工作
-
查看当前系统的磁盘数据
root@Dog-li:/home/lizhi# fdisk -l
Disk /dev/sda: 20 GiB, 21474836480 bytes, 41943040 sectors
Units: sectors of 1 * 512 = 512 bytes
Sector size (logical/physical): 512 bytes / 512 bytes
I/O size (minimum/optimal): 512 bytes / 512 bytes
Disklabel type: dos
Disk identifier: 0xe4be13bb

Device     Boot Start      End  Sectors Size Id Type
/dev/sda1  *     2048 41940991 41938944  20G 83 Linux
/dev/sda:第a块硬盘设备
Disklabel type:磁盘类型
Disk identifier:磁盘编号
/dev/sda1:第a块硬盘设备的第一个分区
Boot:是不是启动分区
Start:分区的起始扇区编号
End:分区的结束扇区编号
Sectors:扇区的数量
Size:扇区大小
Id:分区类型编号
Type:分区类型编号对应的文字描述
其中0~2048号扇区属于操作系统的启动分区 -
关闭虚拟机,添加5G磁盘,再次查看磁盘数据
root@Dog-li:/home/lizhi# fdisk -l
Disk /dev/sda: 20 GiB, 21474836480 bytes, 41943040 sectors
Units: sectors of 1 * 512 = 512 bytes
Sector size (logical/physical): 512 bytes / 512 bytes
I/O size (minimum/optimal): 512 bytes / 512 bytes
Disklabel type: dos
Disk identifier: 0xe4be13bb

Device     Boot Start      End  Sectors Size Id Type
/dev/sda1  *     2048 41940991 41938944  20G 83 Linux


Disk /dev/sdb: 5 GiB, 5368709120 bytes, 10485760 sectors
Units: sectors of 1 * 512 = 512 bytes
Sector size (logical/physical): 512 bytes / 512 bytes
I/O size (minimum/optimal): 512 bytes / 512 bytes
添加磁盘b完成后,启动虚拟机可以看到添加的磁盘信息,sdb与sda的信息相比,少了Disklabel type和Disk identifier两个参数,是因为添加磁盘相当于只是进行了低级格式化,还没有进行高级格式化
1.2 MBR分区
1.2.1 将磁盘设置为MBR分区类型并创建分区
-
进入分区命令行
#通过fdisk /dev/sdb进入到分区设置的命令行 root@Dog-li:/dev# fdisk /dev/sdb Welcome to fdisk (util-linux 2.31.1). Changes will remain in memory only, until you decide to write them. Be careful before using the write command. Device does not contain a recognized partition table. Created a new DOS disklabel with disk identifier 0x71e3dd7d. Command (m for help): -
通过m或help查看命令
#键入m或help获取命令提示 Command (m for help): Help: DOS (MBR) a toggle a bootable flag b edit nested BSD disklabel c toggle the dos compatibility flag Generic d delete a partition F list free unpartitioned space l list known partition types ………… Create a new label g create a new empty GPT partition table G create a new empty SGI (IRIX) partition table o create a new empty DOS partition table s create a new empty Sun partition table -
查看支持的分区类型
#通过l可以看到分区类型,下面显示了Linux系统分区的编号为83 Command (m for help): l …… 2 XENIX root 39 Plan 9 83 Linux c4 DRDOS/sec (FAT- …… -
查看未选择磁盘分区类型时的分区信息
#通过p查看分区信息,默认是dos类型 Disk /dev/sdb: 5 GiB, 5368709120 bytes, 10485760 sectors Units: sectors of 1 * 512 = 512 bytes Sector size (logical/physical): 512 bytes / 512 bytes I/O size (minimum/optimal): 512 bytes / 512 bytes Disklabel type: dos Disk identifier: 0x71e3dd7d -
将磁盘设置为MBR类型分区
#通过o将磁盘设置为MBR类型分区
Command (m for help): o
Created a new DOS disklabel with disk identifier 0xe898ea3d.
DOS类型就是MBR分区 -
创建一个分区
#通过n在磁盘b创建一个分区,全部采用默认的方式来创建
Command (m for help): n
Partition type
   p   primary (0 primary, 0 extended, 4 free)
   e   extended (container for logical partitions)
Select (default p): #分区类型,p-基本分区 e-扩展分区

Using default response p.
Partition number (1-4, default 1): #分区编号
First sector (2048-10485759, default 2048): #起始扇区号
Last sector, +sectors or +size{
     K,M,G,T,P} (2048-10485759, default 10485759): #结束扇区号/分区大小

Created a new partition 1 of type 'Linux' and of size 5 GiB.
sdb磁盘从2048号扇区开始,所有的扇区都分给sdb1分区 -
查看创建分区后的磁盘信息
Command (m for help): p Disk /dev/sdb: 5 GiB, 5368709120 bytes, 10485760 sectors Units: sectors of 1 * 512 = 512 bytes Sector size (logical/physical): 512 bytes / 512 bytes I/O size (minimum/optimal): 512 bytes / 512 bytes Disklabel type: dos Disk identifier: 0xe898ea3d #该分区不是启动分区 Device Boot Start End Sectors Size Id Type /dev/sdb1 2048 10485759 10483712 5G 83 Linux -
使用w命令应用上面的分区修改,如果弃用自用q
Command (m for help): w
The partition table has been altered.
Calling ioctl() to re-read partition table.
Syncing disks.
分区的起始扇区号为2048,前面0~2047扇区为保留扇区,第0号扇区为MBR,如果是启动分区,则MBR中存放了BootLoader的代码
1.2.2 MBR的内部结构
主引导记录(MBR)是硬盘驱动器上的第一个扇区,MBR包含引导程序代码(440字节),可能还包含其他一些信息,紧接着是64字节的分区表和一个2字节的引导签名。64字节的分区表有4个16字节的条目(每个磁盘只能有4个普通分区),从偏移量446(1BEh)开始,应用程序与分区表之间的6个字节为保留字节,用于引导签名
MBR中分区表的布局如下:
| 偏移量(十六进制) | 长度 | 描述 |
|---|---|---|
| 0h | 1 | 状态。80h表示活动(或可引导)的分区 |
| 1h | 3 | 分区中第一个绝对扇区的CHS(柱面-磁头-扇区)地址 |
| 4h | 1 | 分区类型 |
| 5h | 3 | 分区中最后一个绝对扇区的CHS(柱面-磁头-扇区)地址 |
| 8h | 4 | 分区中第一个绝对扇区的逻辑地址(LBA) |
| Ch | 4 | 分区中的扇区数量 |
#通过如下命令,将MBR扇区以16进制形式打印出来,对照上面的分区布局,可以获得每个属性的值
root@Dog-li:/dev# dd if=/dev/sdb bs=512 count=1 2>/dev/null |hexdump -C
00000000  00 00 00 00 00 00 00 00  00 00 00 00 00 00 00 00  |................|
*
000001b0  00 00 00 00 00 00 00 00  3d ea 98 e8 00 00 00 20  |........=...... |
000001c0  21 00 83 b4 a8 8c 00 08  00 00 00 f8 9f 00 00 00  |!...............|
000001d0  00 00 00 00 00 00 00 00  00 00 00 00 00 00 00 00  |................|
*
000001f0  00 00 00 00 00 00 00 00  00 00 00 00 00 00 55 aa  |..............U.|
00000200

#使用下面的命令,只显示64字节的分区表信息,最后两个字节
root@Dog-li:/dev# dd if=/dev/sdb bs=510 count=1 2>/dev/null|tail -c 64 |hexdump -C
00000000  00 20 21 00 83 b4 a8 8c  00 08 00 00 00 f8 9f 00  |. !.............|
00000010  00 00 00 00 00 00 00 00  00 00 00 00 00 00 00 00  |................|
*
00000040
CHS(3D)是通过柱面、磁道和扇区来定位数据物理地址,对于内外磁道扇区数量固定的磁盘相对简单,但为了提高磁盘的利用率,现在很多磁盘采用同密度盘片,意味着内外磁道的扇区数量不同,扇区数量增加,容量增加,CHS很难定位定位寻址。
针对寻址空难的情况,出现了新的寻址模式LBA(Logical Block Addressing),在LBA地址中,地址不再表示实际硬盘的物理地址,LBA将所有的物理扇区通过一定的规则转变为一系列线性编号,系统效率大大提供,避免繁琐的磁头/磁道/扇区的寻址方式,在访问磁盘时,由磁盘控制器再将这种逻辑地址转换为实际的物理地址
上面MBR显示的LBA的信息为0x00 08 00 00,而sdb分区中的第一个绝对扇区的逻辑地址为2048,这里涉及到大端和小端的计算,MBR中采用小端表示,计算的时候需要将字节进行对调,将0x00 08 00 00的四个字节沿垂直方向的对称轴进行字节对调,变成了0x00 00 08 00就等于2048
扇区LBA号使用4个字节来编排,所以分区的最大扇区数为2^32个,扇区大小为512字节,则支持的最大存储量为2^32 * 512 = 2TB Bytes
MBR中分区数量最多是4个,为了超过这个限制,又引入了扩展分区
1.3 GPT分区
1.3.1 GPT分区磁盘结构

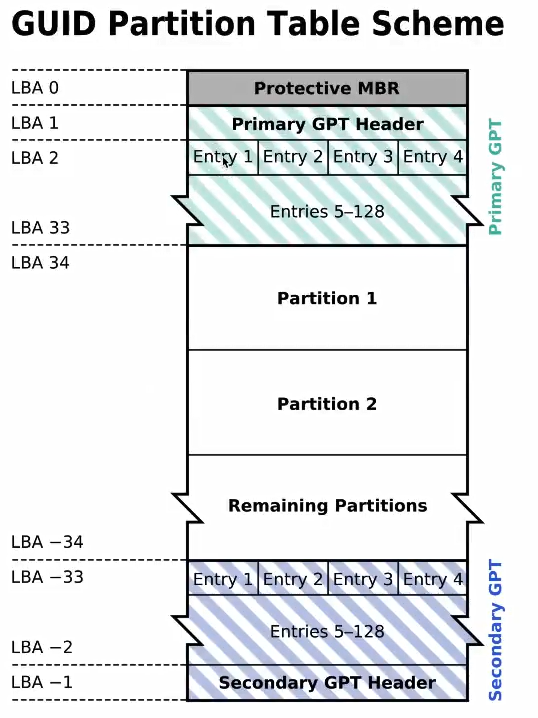
- 扇区按照LBA模式编排,第0号扇区存放一个叫做Protective MBR分区,是为了兼容老的系统,有些老的系统不认识GPT分区,里面的分区类型为0xEE,不支持GPT分区的系统读到这个标志就会报错
- 第1号扇区称为GTP的头部扇区,主要存放一些分区表信息
- 第2号扇区到第33号扇区,用于存放每个分区的信息。每个扇区可以存放4个分区信息,每个分区信息占用128Bytes,那么GPT可以支持的分区数为128个
- GTP中扇区号使用8字节进行编排,因此每个分区最大支持容量为2^64 * 512 = 8ZBytes(TB->PB->EB->ZB->YB->BB->NB->DB)
1.3.2 创建两个GPT分区
#先创建一个2G的1号分区
root@Dog-li:/dev# fdisk /dev/sdb
Command (m for help): g
Created a new GPT disklabel (GUID: E9E0D503-7B52-5442-8056-138548A82A74).
The old dos signature will be removed by a write command.

Command (m for help): n
Partition number (1-128, default 1):
First sector (2048-10485726, default 2048):
Last sector, +sectors or +size{
   K,M,G,T,P} (2048-10485726, default 10485726): +2G

Created a new partition 1 of type 'Linux filesystem' and of size 2 GiB.

#再用剩下的扇区创建2号分区
Command (m for help): n
Partition number (2-128, default 2):
First sector (4196352-10485726, default 4196352):
Last sector, +sectors or +size{
   K,M,G,T,P} (4196352-10485726, default 10485726):

Created a new partition 2 of type 'Linux filesystem' and of size 3 GiB.

#查看b磁盘的分区情况
Command (m for help): p
Disk /dev/sdb: 5 GiB, 5368709120 bytes, 10485760 sectors
Units: sectors of 1 * 512 = 512 bytes
Sector size (logical/physical): 512 bytes / 512 bytes
I/O size (minimum/optimal): 512 bytes / 512 bytes
Disklabel type: gpt
Disk identifier: E9E0D503-7B52-5442-8056-138548A82A74

Device       Start      End Sectors Size Type
/dev/sdb1     2048  4196351 4194304   2G Linux filesystem
/dev/sdb2  4196352 10485726 6289375   3G Linux filesystem
1.3.3 更改分区类型
#通过t命令修改分区类型
Command (m for help): t
Partition number (1,2, default 2): 2  #指明需要修改的分区编号
#通过L查看分区类型编号
Partition type (type L to list all types): L
…………
10 Microsoft reserved             E3C9E316-0B5C-4DB8-817D-F92DF00215AE
11 Microsoft basic data           EBD0A0A2-B9E5-4433-87C0-68B6B72699C7
…………
Partition type (type L to list all types): 11  #修改为windows对应的分区

Changed type of partition 'Linux filesystem' to 'Microsoft basic data'.

#修改后的2号分区,分区类型变成了windows的分区类型
Command (m for help): p

Disk /dev/sdb: 5 GiB, 5368709120 bytes, 10485760 sectors
Units: sectors of 1 * 512 = 512 bytes
Sector size (logical/physical): 512 bytes / 512 bytes
I/O size (minimum/optimal): 512 bytes / 512 bytes
Disklabel type: gpt
Disk identifier: E9E0D503-7B52-5442-8056-138548A82A74

Device       Start      End Sectors Size Type
/dev/sdb1     2048  4196351 4194304   2G Linux filesystem
/dev/sdb2  4196352 10485726 6289375   3G Microsoft basic data
1.4 格式化
前面的操作只是将磁盘进行了低级格式化和简单的分区,接下来将要对每个分区进行高级格式化:构建文件系统
1.4.1 构建文件系统
#使用mkfs命令构建文件系统,可以使用Tab查看有哪些文件系统类型
root@Dog-li:/dev# mkfs.
mkfs.bfs     mkfs.ext2    mkfs.ext4    mkfs.minix   mkfs.ntfs
mkfs.cramfs  mkfs.ext3    mkfs.fat     mkfs.msdos   mkfs.vfat

#列出磁盘b的分区信息
root@Dog-li:/dev# ls -l /dev/sdb*
brw-rw---- 1 root disk 8, 16 9月   6 18:08 /dev/sdb
brw-rw---- 1 root disk 8, 17 9月   6 18:08 /dev/sdb1
brw-rw---- 1 root disk 8, 18 9月   6 18:08 /dev/sdb2

#为1号分区构建ext4的文件系统
root@Dog-li:/dev# mkfs.ext4 /dev/sdb1
mke2fs 1.44.1 (24-Mar-2018)
Creating filesystem with 524288 4k blocks and 131072 inodes
Filesystem UUID: 27f53a14-0a34-45cb-a9d2-4924ea5583e3
Superblock backups stored on blocks:
	32768, 98304, 163840, 229376, 294912

Allocating group tables: done
Writing inode tables: done
Creating journal (16384 blocks): done
Writing superblocks and filesystem accounting information: done

#为2号分区构建ntfs的文件系统
root@Dog-li:/dev# mkfs.ntfs /dev/sdb2
Cluster size has been automatically set to 4096 bytes.
Initializing device with zeroes: 100% - Done.
Creating NTFS volume structures.
mkntfs completed successfully. Have a nice day.
1.4.2 分区挂载
为分区构建完文件系统后,怎么才能进入这个分区呢?这就是分区挂载要干的事情。
目的:为了让分区可用
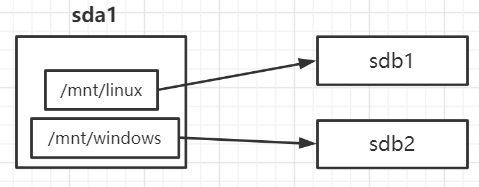
分区挂载是将分区挂载到某个文件目录下,当进入这个目录时,就相当于进入了这个分区
通常在“/mnt”和“/media”这两个目录下挂载分区,media主要挂载U盘、光驱等,当然也可以在任何文件夹下挂载分区
#先在/mnt目录下创建两个目录linux和windows分别用于挂载sdb1和sdb2
root@Dog-li:/mnt# mkdir linux
root@Dog-li:/mnt# mkdir windows
root@Dog-li:/mnt# ls
cdrom  hgfs  linux  windows

#使用mount命令挂载分区
root@Dog-li:/mnt# mount /dev/sdb1 /mnt/linux/
root@Dog-li:/mnt# mount /dev/sdb2 /mnt/windows/
虚拟机现有a和b两块磁盘,挂载分区目录linux和windows是存在于a磁盘中,但是/mnt/linux/和/mnt/windows/目录下的数据分别b磁盘的1号分区和2号分区

1.4.3 查看分区挂载情况
root@Dog-li:/mnt# lsblk -f
NAME FSTYPE LABEL       UUID                                    MOUNTPOINT
sda
└─sda1 ext4          aa09f28f-0c28-4805-8199-66babfd62582        /
sdb
├─sdb1 ext4          27f53a14-0a34-45cb-a9d2-4924ea5583e3    	 /mnt/linux
└─sdb2 ntfs          212CF1FB3D0B66BA                            /mnt/windows
今天的文章Linux硬盘格式化分享到此就结束了,感谢您的阅读,如果确实帮到您,您可以动动手指转发给其他人。
版权声明:本文内容由互联网用户自发贡献,该文观点仅代表作者本人。本站仅提供信息存储空间服务,不拥有所有权,不承担相关法律责任。如发现本站有涉嫌侵权/违法违规的内容, 请发送邮件至 举报,一经查实,本站将立刻删除。
如需转载请保留出处:https://bianchenghao.cn/28907.html
