目录
几个简单的问题与答案
简单的故事背景
这些年的MacBook Pro 的独显都是A卡,想玩点机器学习,又不想花钱买新卡,遂翻出了七年前的一台双显卡的老本,折腾起来,玩玩物体识别。期间碰到了很多问题,逐一解决之后,把它们都记录了下来。
老本 (Acer 超级本) 的配置:
-
Intel(R) Core(TM) i5-3337U CPU @ 1.80GHz
-
Nvidia GeForce 710M
-
8G 内存
-
120G SSD
安装好 Nvidia 驱动后,执行 nvidia-smi 结果如下
[root@Acer-CentOS7 deviceQuery]# nvidia-smi
Sun Oct 25 22:05:00 2020
+-----------------------------------------------------------------------------+
| NVIDIA-SMI 390.138                Driver Version: 390.138                   |
|-------------------------------+----------------------+----------------------+
| GPU  Name        Persistence-M| Bus-Id        Disp.A | Volatile Uncorr. ECC |
| Fan  Temp  Perf  Pwr:Usage/Cap|         Memory-Usage | GPU-Util  Compute M. |
|===============================+======================+======================|
|   0  GeForce 710M        Off  | 00000000:01:00.0 N/A |                  N/A |
| N/A   55C    P0    N/A /  N/A |      0MiB /  1985MiB |     N/A      Default |
+-------------------------------+----------------------+----------------------+

+-----------------------------------------------------------------------------+
| Processes:                                                       GPU Memory |
|  GPU       PID   Type   Process name                             Usage      |
|=============================================================================|
|    0                    Not Supported                                       |
+-----------------------------------------------------------------------------+
安装好后编译执行 cuda 示例 deviceQuery ,结果如下
[root@Acer-CentOS7 deviceQuery]# ./deviceQuery
./deviceQuery Starting...

 CUDA Device Query (Runtime API) version (CUDART static linking)

Detected 1 CUDA Capable device(s)

Device 0: "GeForce 710M"
  CUDA Driver Version / Runtime Version          9.1 / 9.1
  CUDA Capability Major/Minor version number:    2.1
  Total amount of global memory:                 1985 MBytes (2081816576 bytes)
MapSMtoCores for SM 2.1 is undefined.  Default to use 64 Cores/SM
MapSMtoCores for SM 2.1 is undefined.  Default to use 64 Cores/SM
  ( 2) Multiprocessors, ( 64) CUDA Cores/MP:     128 CUDA Cores
  GPU Max Clock rate:                            1550 MHz (1.55 GHz)
  Memory Clock rate:                             900 Mhz
  Memory Bus Width:                              64-bit
  L2 Cache Size:                                 131072 bytes
  Maximum Texture Dimension Size (x,y,z)         1D=(65536), 2D=(65536, 65535), 3D=(2048, 2048, 2048)
  Maximum Layered 1D Texture Size, (num) layers  1D=(16384), 2048 layers
  Maximum Layered 2D Texture Size, (num) layers  2D=(16384, 16384), 2048 layers
  Total amount of constant memory:               65536 bytes
  Total amount of shared memory per block:       49152 bytes
  Total number of registers available per block: 32768
  Warp size:                                     32
  Maximum number of threads per multiprocessor:  1536
  Maximum number of threads per block:           1024
  Max dimension size of a thread block (x,y,z): (1024, 1024, 64)
  Max dimension size of a grid size    (x,y,z): (65535, 65535, 65535)
  Maximum memory pitch:                          2147483647 bytes
  Texture alignment:                             512 bytes
  Concurrent copy and kernel execution:          Yes with 1 copy engine(s)
  Run time limit on kernels:                     No
  Integrated GPU sharing Host Memory:            No
  Support host page-locked memory mapping:       Yes
  Alignment requirement for Surfaces:            Yes
  Device has ECC support:                        Disabled
  Device supports Unified Addressing (UVA):      Yes
  Supports Cooperative Kernel Launch:            No
  Supports MultiDevice Co-op Kernel Launch:      No
  Device PCI Domain ID / Bus ID / location ID:   0 / 1 / 0
  Compute Mode:
     < Default (multiple host threads can use ::cudaSetDevice() with device simultaneously) >

deviceQuery, CUDA Driver = CUDART, CUDA Driver Version = 9.1, CUDA Runtime Version = 9.1, NumDevs = 1
Result = PASS
安装 CentOS 7
制作启动U盘
我下载的是 Everything DVD 版本,参考链接 http://mirrors.163.com/centos/7/isos/x86_64/CentOS-7-x86_64-Everything-2003.iso
下载后使用UltraISO软碟通 写入硬盘镜像即可。
安装必定会遇上的坑
Warning: /dev/root does not exist 参考解决办法:https://blog.csdn.net/bajiudongfeng/article/details/47732377
根据搜到的资料说到,由于 磁盘 Label的长度有限,原始磁盘Label 应为 CentOS 7 x86_64,最终被截断了,变为了 CentOS 7 x8,所以我的解决办法是修改启动菜单时把这个 Label 改一下再启动。具体操作如下:
- 进入到第一个界面时,上下键移动到 Install CentOS 7 这个菜单上
- 按 e 健进入编辑状态
- 将 vmlinuz initrd=initrd.imginst.stage2=hd:LABEL=CentOS\x207\x20x86_64 rd.live.check quiet 改为 vmlinuz initrd=initrd.imginst.stage2=hd:LABEL=CentOS\x207\x20x8 rd.live.check quiet
- (上一步就是去掉 6_64)
- 按 Ctrl + x 启动
安装编译环境
# 安装开发工具
yum groupinstall "Development Tools"

# 安装内核开发库和头文件
yum install kernel-devel kernel-headers


# 上一步安装的东东 和 内核版本 可能存在不一致的情况,执行以下操作即可同步

yum distro-sync

# 查看内核
[root@Acer-CentOS7 bandwidthTest]# uname -r
3.10.0-1127.19.1.el7.x86_64

# 查看安装的 kernel-devel kernel-headers 版本

[root@Acer-CentOS7 bandwidthTest]# rpm -qa |grep kernel
kernel-devel-3.10.0-1127.19.1.el7.x86_64
kernel-3.10.0-1062.el7.x86_64
kernel-headers-3.10.0-1127.19.1.el7.x86_64
kernel-3.10.0-1127.19.1.el7.x86_64
kernel-tools-libs-3.10.0-1127.19.1.el7.x86_64
kernel-tools-3.10.0-1127.19.1.el7.x86_64
kernel-doc-3.10.0-1127.19.1.el7.noarch
abrt-addon-kerneloops-2.1.11-57.el7.centos.x86_64
删掉 nouveau
修改 blacklist.conf
这是一个第三方开源的Nvidia 驱动,必须禁用掉,才能装 Nvidia 的驱动。
# 找到这一行,在行前加井号,注释掉
blacklist nvidiafb
# 增加以下两行
blacklist nouveau
options nouveau modeset=0
[root@Acer-CentOS7 deviceQuery]# vim /lib/modprobe.d/dist-blacklist.conf

#
# Listing a module here prevents the hotplug scripts from loading it.
# Usually that'd be so that some other driver will bind it instead,
# no matter which driver happens to get probed first.  Sometimes user
# mode tools can also control driver binding.
#
# Syntax: see modprobe.conf(5).
#

# watchdog drivers
blacklist i8xx_tco

# framebuffer drivers
blacklist aty128fb
blacklist atyfb
blacklist radeonfb
blacklist i810fb
blacklist cirrusfb
blacklist intelfb
blacklist kyrofb
blacklist i2c-matroxfb
blacklist hgafb
# 找到这一行,注释掉
#blacklist nvidiafb
# 增加以下两行
blacklist nouveau
options nouveau modeset=0
blacklist rivafb
blacklist savagefb
blacklist sstfb
blacklist neofb
blacklist tridentfb
blacklist tdfxfb
blacklist virgefb
blacklist vga16fb
blacklist viafb

# ISDN - see bugs 154799, 159068
blacklist hisax
blacklist hisax_fcpcipnp

# sound drivers
blacklist snd-pcsp

# I/O dynamic configuration support for s390x (bz #563228)
blacklist chsc_sch

# crypto algorithms
blacklist sha1-mb

# see bz #1562114
blacklist sha256-mb
blacklist sha512-mb
修改grub
# 修改  /etc/default/grub
# 在 GRUB_CMDLINE_LINUX 行尾部、双引号内 后增加内容 rdblacklist=nouveau
# 文件内容如下:

GRUB_TIMEOUT=5
GRUB_DISTRIBUTOR="$(sed 's, release .*$,,g' /etc/system-release)"
GRUB_DEFAULT=saved
GRUB_DISABLE_SUBMENU=true
GRUB_TERMINAL_OUTPUT="console"
GRUB_CMDLINE_LINUX="crashkernel=auto rd.lvm.lv=centos/root rd.lvm.lv=centos/swap rhgb quiet rdblacklist=nouveau"
GRUB_DISABLE_RECOVERY="true"
重新生成配置
# 重新生成grub.cfg

grub2-mkconfig -o /boot/grub2/grub.cfg


# 如果是EFI启动,不是BIOS的话,应该是 ,自己判断下路径,find 也行呢

grub2-mkconfig -o /boot/efi/EFI/centos/grub.cfg
重新生成 initramfs image file
这一步非常重要,要不然无法禁用 nouveau
# 进入 /boot/
[root@Acer-CentOS7 ~]# cd /boot/

# 找到当前使用的内核版本所对应的 initramfs
[root@Acer-CentOS7 boot]# ll
总用量 283840
-rw-r--r--. 1 root root   152976 8月   7 2019 config-3.10.0-1062.el7.x86_64
-rw-r--r--. 1 root root   153567 8月  25 13:27 config-3.10.0-1127.19.1.el7.x86_64
drwx------. 3 root root    16384 12月 31 1969 efi
drwxr-xr-x. 2 root root       27 10月 25 12:41 grub
drwx------. 2 root root       37 10月 25 14:07 grub2
-rw-------. 1 root root 78623661 10月 25 12:47 initramfs-0-rescue-9499a8e5ead6495493bc04bb41e58279.img
-rw-------. 1 root root 42354323 10月 25 15:13 initramfs-3.10.0-1062.el7.x86_64.img
-rw-------. 1 root root 33766003 10月 25 13:50 initramfs-3.10.0-1062.el7.x86_64.img.bak
-rw-------. 1 root root 15670688 10月 25 14:05 initramfs-3.10.0-1062.el7.x86_64kdump.img
-rw-------. 1 root root 42362518 10月 25 15:14 initramfs-3.10.0-1127.19.1.el7.x86_64.img
-rw-------. 1 root root 33759904 10月 25 14:13 initramfs-3.10.0-1127.19.1.el7.x86_64.img.bak
-rw-------. 1 root root 15675591 10月 25 14:11 initramfs-3.10.0-1127.19.1.el7.x86_64kdump.img
-rw-r--r--. 1 root root   318717 8月   7 2019 symvers-3.10.0-1062.el7.x86_64.gz
-rw-r--r--. 1 root root   320536 8月  25 13:27 symvers-3.10.0-1127.19.1.el7.x86_64.gz
-rw-------. 1 root root  3594971 8月   7 2019 System.map-3.10.0-1062.el7.x86_64
-rw-------. 1 root root  3612420 8月  25 13:27 System.map-3.10.0-1127.19.1.el7.x86_64
-rwxr-xr-x. 1 root root  6734016 10月 25 12:47 vmlinuz-0-rescue-9499a8e5ead6495493bc04bb41e58279
-rwxr-xr-x. 1 root root  6734016 8月   7 2019 vmlinuz-3.10.0-1062.el7.x86_64
-rwxr-xr-x. 1 root root  6765160 8月  25 13:27 vmlinuz-3.10.0-1127.19.1.el7.x86_64


# 我这里是 1127
# 备份是个好习惯
cp initramfs-3.10.0-1127.19.1.el7.x86_64.img initramfs-3.10.0-1127.19.1.el7.x86_64.img.bak

# 执行 dracut
dracut -v initramfs-3.10.0-1127.19.1.el7.x86_64.img --force

# 等待成功执行之后,重启机器

reboot
确认nouveau被成功禁用
# 执行 lsmod | grep nouveau 没有任何输出,则已经成功禁用
# 如果还有其他输出,请重来以上步骤吧
[root@Acer-CentOS7 boot]# lsmod | grep nouveau
[root@Acer-CentOS7 boot]#
安装 Nvidia 驱动
检测需要安装哪个版本的驱动
检测显卡
[root@Acer-CentOS7 boot]# lspci | grep -i "vga\|nvidia"
00:02.0 VGA compatible controller: Intel Corporation 3rd Gen Core processor Graphics Controller (rev 09)
01:00.0 3D controller: NVIDIA Corporation GF117M [GeForce 610M/710M/810M/820M / GT 620M/625M/630M/720M] (rev a1)


# 如果找不到命令,安装一下
# yum install pciutils
检测显卡需要的NVIDIA驱动版本
# 这一步操作参考 http://elrepo.org/tiki/HomePage

[root@Acer-CentOS7 ~]# rpm --import https://www.elrepo.org/RPM-GPG-KEY-elrepo.org
[root@Acer-CentOS7 ~]# yum install https://www.elrepo.org/elrepo-release-7.el7.elrepo.noarch.rpm
已加载插件:fastestmirror, langpacks
elrepo-release-7.el7.elrepo.noarch.rpm                                                                                                                                                                 | 8.6 kB  00:00:00
正在检查 /var/tmp/yum-root-phlquT/elrepo-release-7.el7.elrepo.noarch.rpm: elrepo-release-7.0-5.el7.elrepo.noarch
/var/tmp/yum-root-phlquT/elrepo-release-7.el7.elrepo.noarch.rpm 将被安装
正在解决依赖关系
--> 正在检查事务
---> 软件包 elrepo-release.noarch.0.7.0-5.el7.elrepo 将被 安装
--> 解决依赖关系完成

依赖关系解决

==============================================================================================================================================================================================================================
 Package                                           架构                                      版本                                                源                                                                      大小
==============================================================================================================================================================================================================================
正在安装:
 elrepo-release                                    noarch                                    7.0-5.el7.elrepo                                    /elrepo-release-7.el7.elrepo.noarch                                    5.0 k

事务概要
==============================================================================================================================================================================================================================
安装  1 软件包

总计:5.0 k
安装大小:5.0 k
Is this ok [y/d/N]: y
Downloading packages:
Running transaction check
Running transaction test
Transaction test succeeded
Running transaction
  正在安装    : elrepo-release-7.0-5.el7.elrepo.noarch                                                                                                                                                                    1/1
  验证中      : elrepo-release-7.0-5.el7.elrepo.noarch                                                                                                                                                                    1/1

已安装:
  elrepo-release.noarch 0:7.0-5.el7.elrepo

完毕!
[root@Acer-CentOS7 ~]# yum -y install nvidia-detect
已加载插件:fastestmirror, langpacks
Loading mirror speeds from cached hostfile
 * elrepo: mirrors.tuna.tsinghua.edu.cn
elrepo                                                                                                                                                                                                 | 2.9 kB  00:00:00
elrepo/primary_db                                                                                                                                                                                      | 479 kB  00:00:01
正在解决依赖关系
--> 正在检查事务
---> 软件包 nvidia-detect.x86_64.0.440.64-1.el7.elrepo 将被 安装
--> 解决依赖关系完成

依赖关系解决

==============================================================================================================================================================================================================================
 Package                                                架构                                            版本                                                            源                                               大小
==============================================================================================================================================================================================================================
正在安装:
 nvidia-detect                                          x86_64                                          440.64-1.el7.elrepo                                             elrepo                                           25 k

事务概要
==============================================================================================================================================================================================================================
安装  1 软件包

总下载量:25 k
安装大小:37 k
Downloading packages:
nvidia-detect-440.64-1.el7.elrepo.x86_64.rpm                                                                                                                                                           |  25 kB  00:00:00
Running transaction check
Running transaction test
Transaction test succeeded
Running transaction
  正在安装    : nvidia-detect-440.64-1.el7.elrepo.x86_64                                                                                                                                                                  1/1
  验证中      : nvidia-detect-440.64-1.el7.elrepo.x86_64                                                                                                                                                                  1/1

已安装:
  nvidia-detect.x86_64 0:440.64-1.el7.elrepo

完毕!


[root@Acer-CentOS7 ~]# nvidia-detect -v
Probing for supported NVIDIA devices...
[10de:1140] NVIDIA Corporation GF117M [GeForce 610M/710M/810M/820M / GT 620M/625M/630M/720M]
This device requires the legacy 390.xx NVIDIA driver kmod-nvidia-390xx
[8086:0166] Intel Corporation 3rd Gen Core processor Graphics Controller
An Intel display controller was also detected
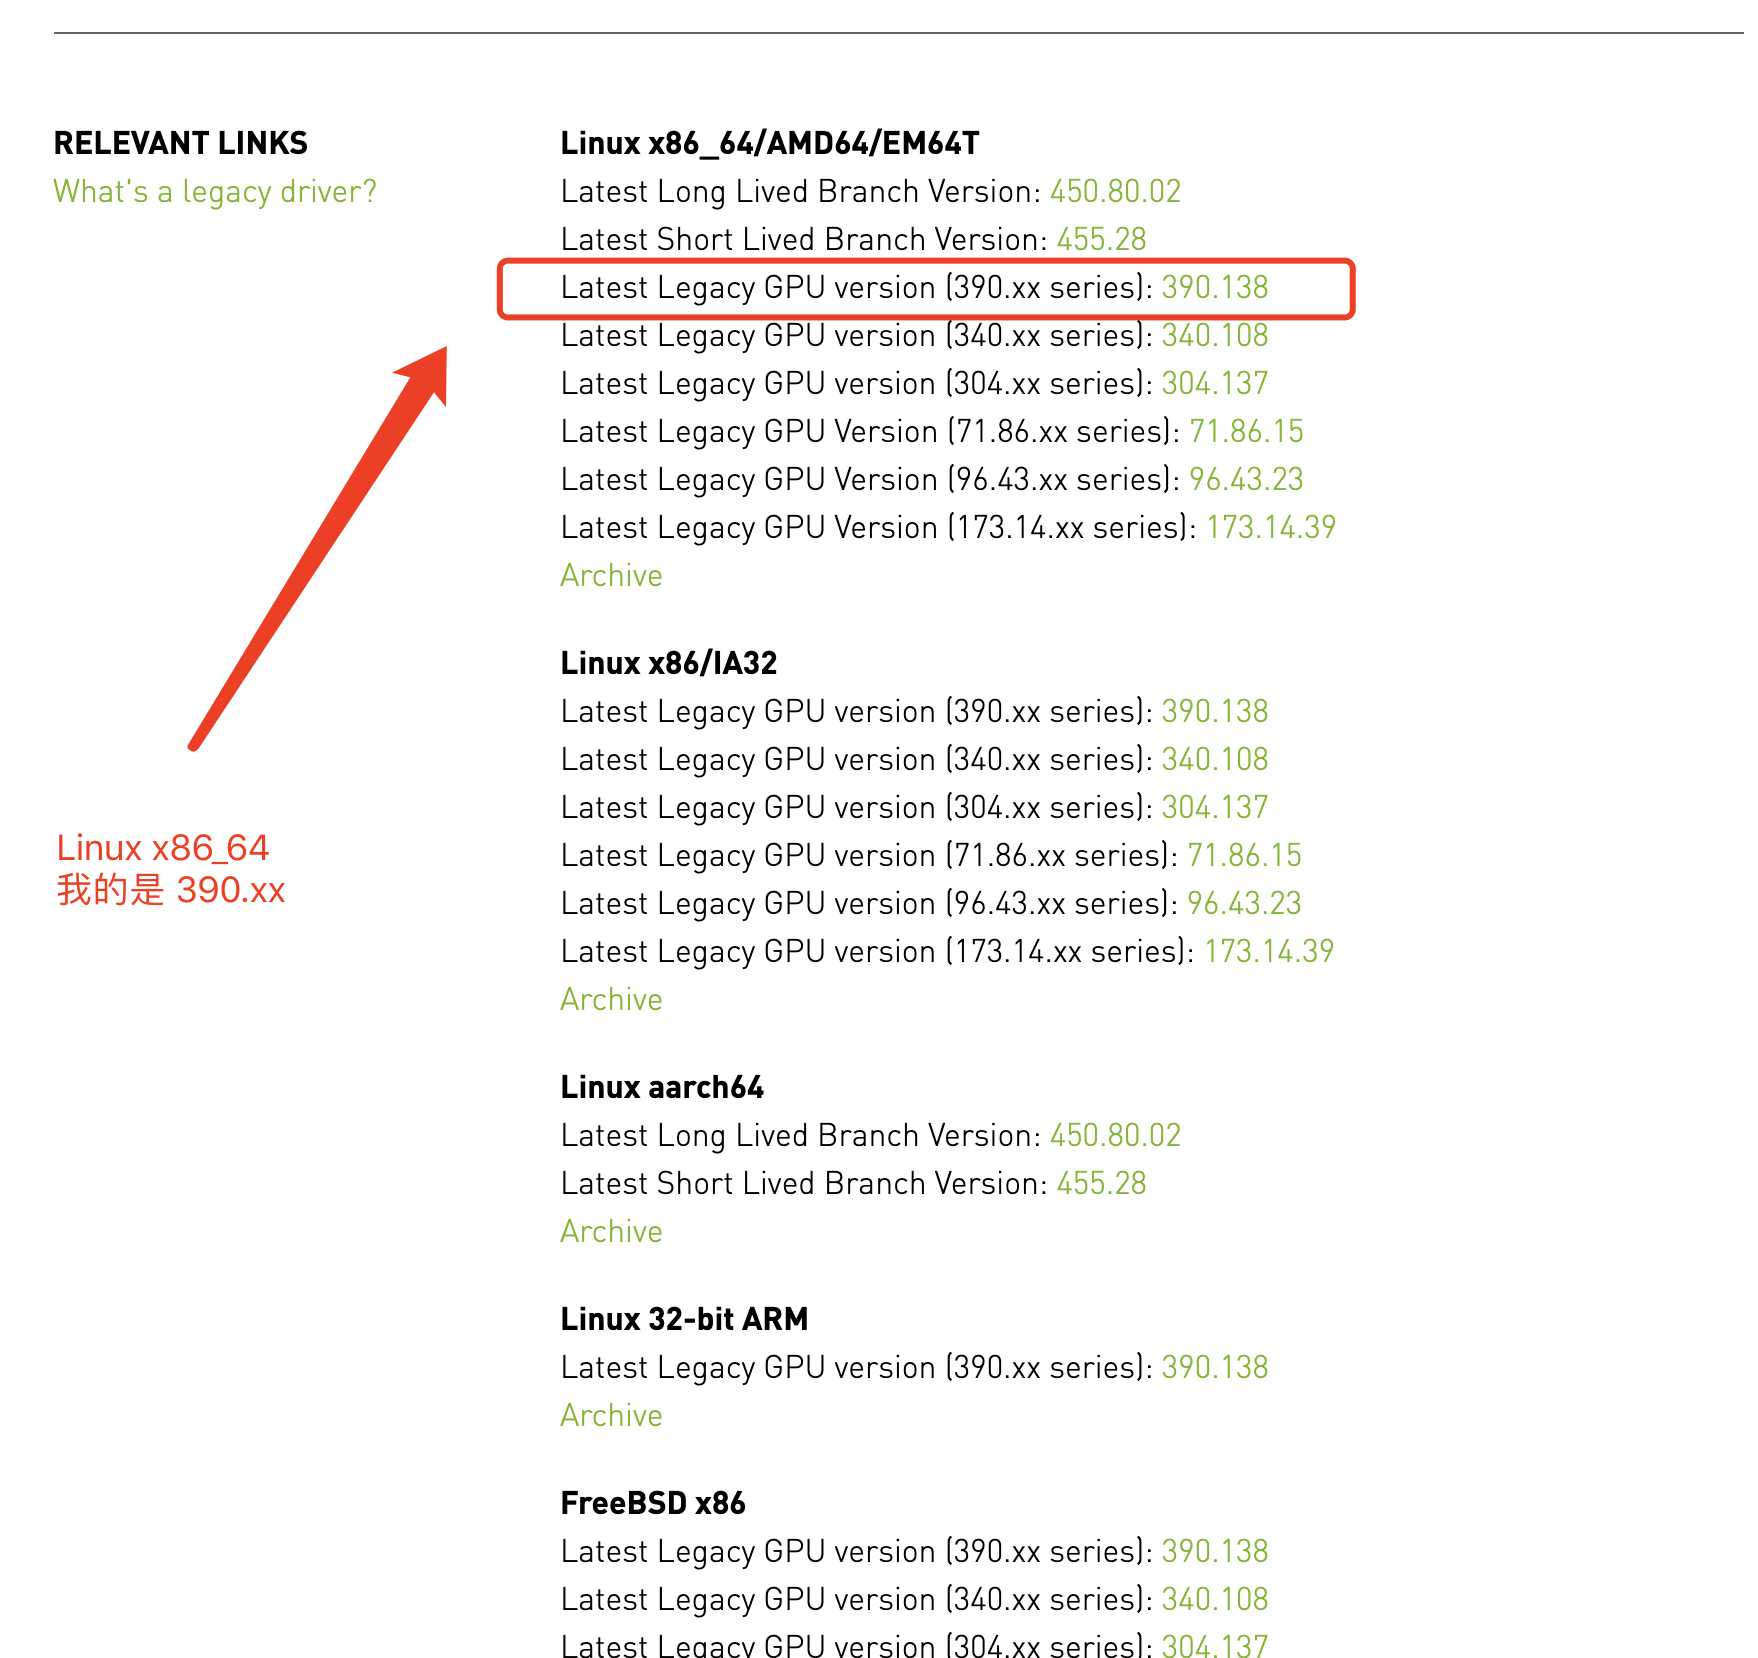
使用 nvidia-detect 检测得到的结果为 390.xx
下载驱动
打开 https://www.nvidia.com/en-us/drivers/unix/ 这个网站,下载对应版本的驱动即可!如下图
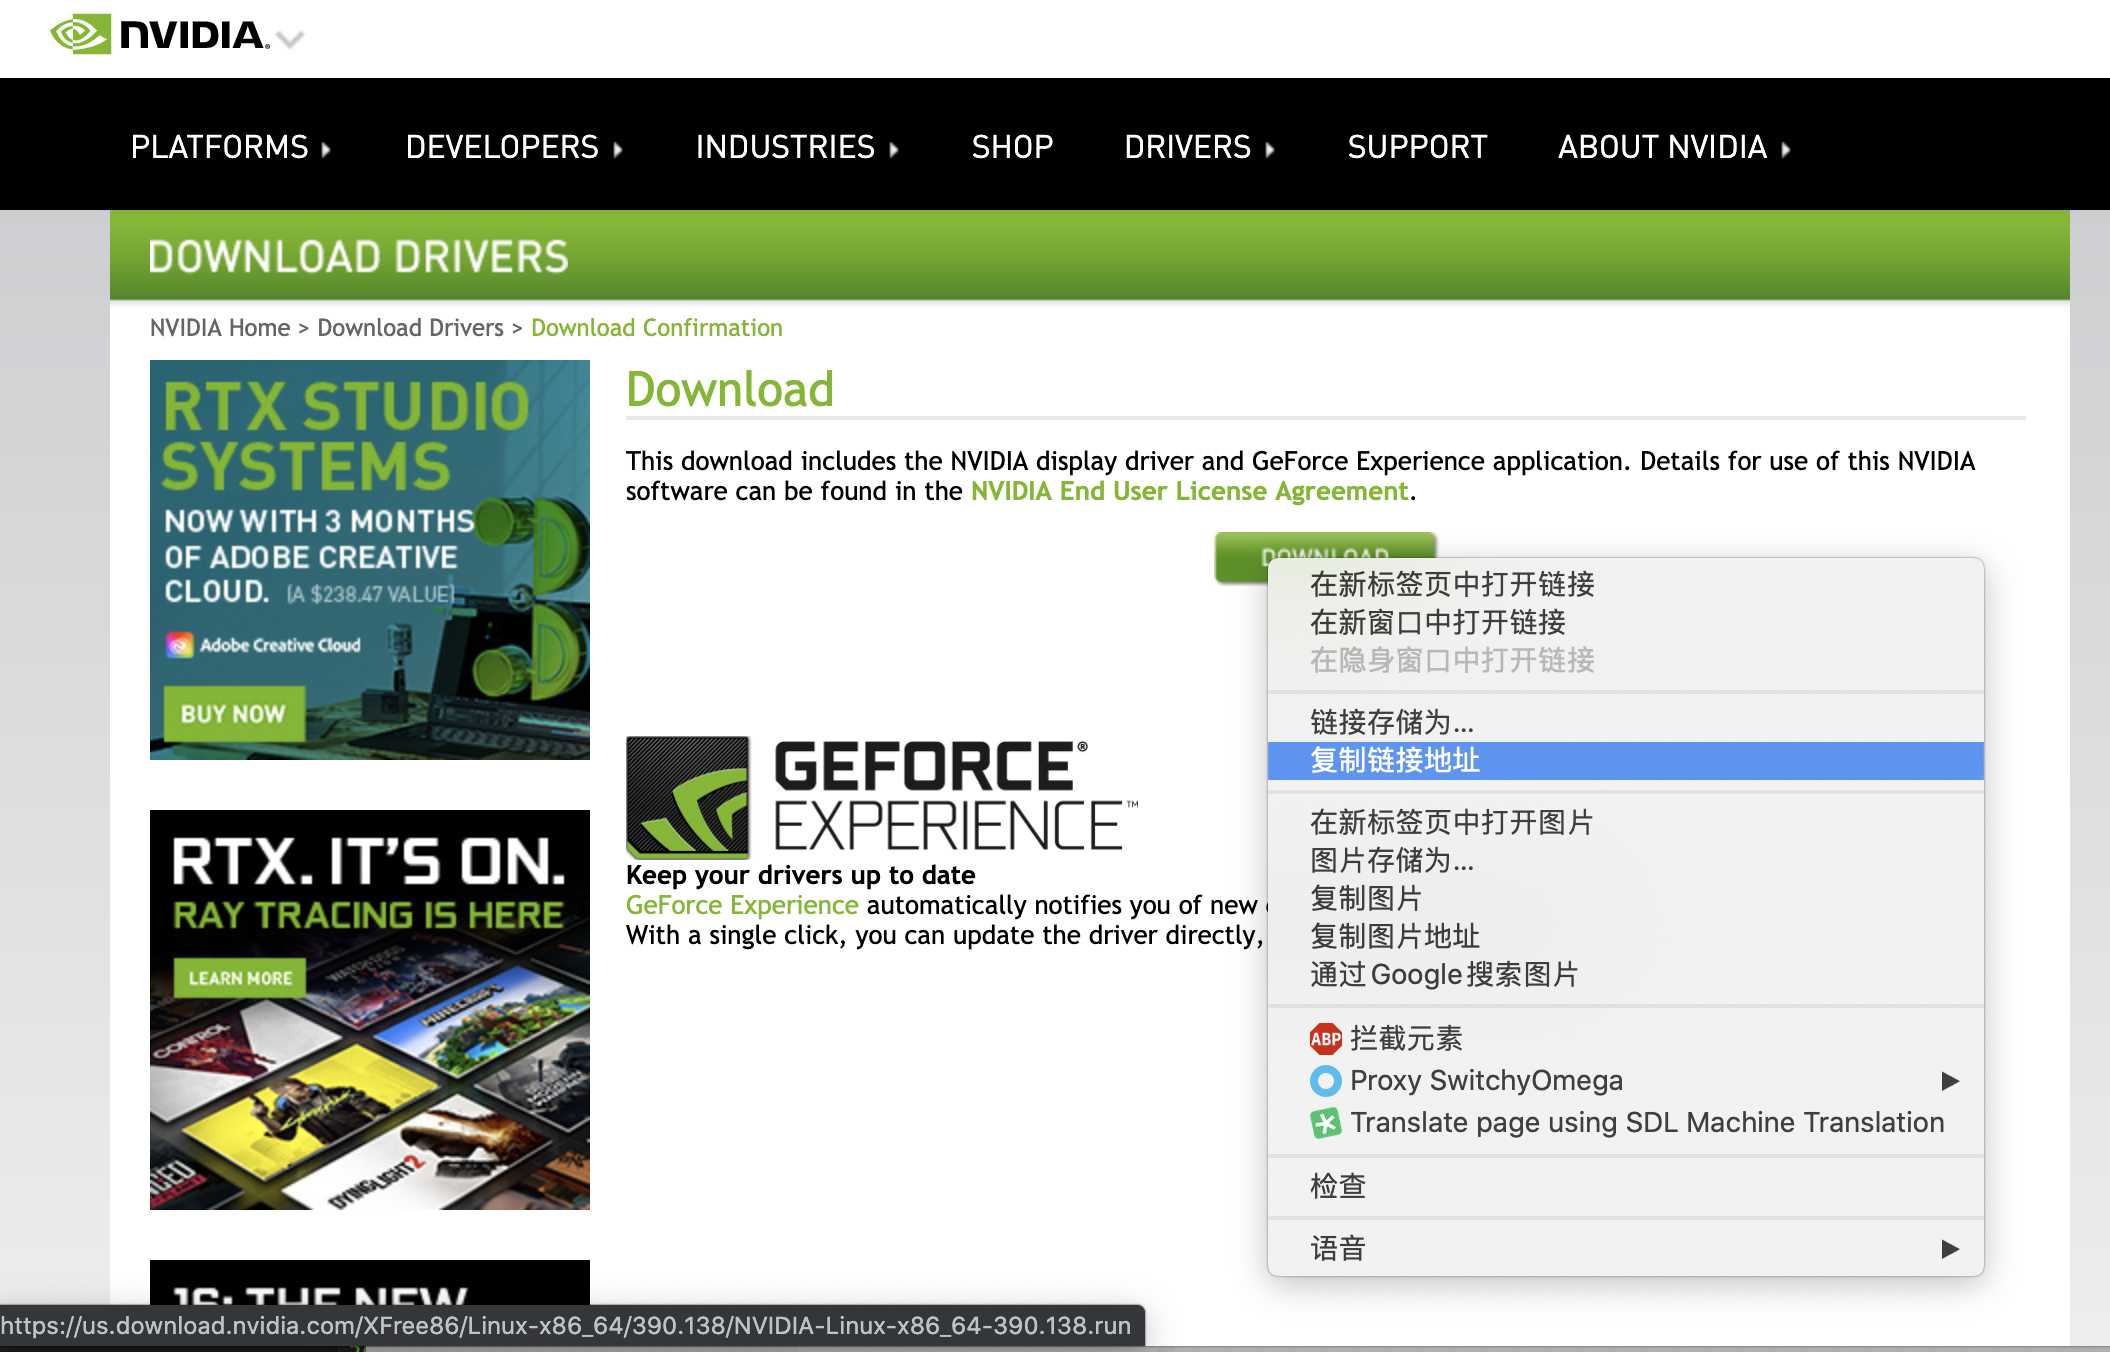
根据提示,会到达这个页面,其实可以使用下载工具下载
可以看到下载链接为 https://us.download.nvidia.com/XFree86/Linux-x86_64/390.138/NVIDIA-Linux-x86_64-390.138.run
安装驱动
下载下来的 *.run 其实是可执行的,按提示安装即可
sh NVIDIA-Linux-x86_64-390.138.run没有安装桌面环境的,以上操作即可,但已经安装桌面环境的系统会报异常,这时候需要多加一个参数进行安装。
sh NVIDIA-Linux-x86_64-390.138.run -no-x-check


[root@Acer-CentOS7 ~]# sh NVIDIA-Linux-x86_64-390.138.run  -no-x-check
Verifying archive integrity... OK
Uncompressing NVIDIA Accelerated Graphics Driver for Linux-x86_64 390.138...............
验证
安装完成后,使用 nvidia-smi 来检测显卡信息
[root@Acer-CentOS7 deviceQuery]# nvidia-smi
Mon Oct 26 05:07:24 2020
+-----------------------------------------------------------------------------+
| NVIDIA-SMI 390.138                Driver Version: 390.138                   |
|-------------------------------+----------------------+----------------------+
| GPU  Name        Persistence-M| Bus-Id        Disp.A | Volatile Uncorr. ECC |
| Fan  Temp  Perf  Pwr:Usage/Cap|         Memory-Usage | GPU-Util  Compute M. |
|===============================+======================+======================|
|   0  GeForce 710M        Off  | 00000000:01:00.0 N/A |                  N/A |
| N/A   55C    P0    N/A /  N/A |      0MiB /  1985MiB |     N/A      Default |
+-------------------------------+----------------------+----------------------+

+-----------------------------------------------------------------------------+
| Processes:                                                       GPU Memory |
|  GPU       PID   Type   Process name                             Usage      |
|=============================================================================|
|    0                    Not Supported                                       |
+-----------------------------------------------------------------------------+
安装 CUDA
下载 CUDA
cuda 支持的版本和对应显卡驱动的关系在 https://docs.nvidia.com/deploy/cuda-compatibility/index.html 这里有列,简单的说明一下怎么看这个关系。
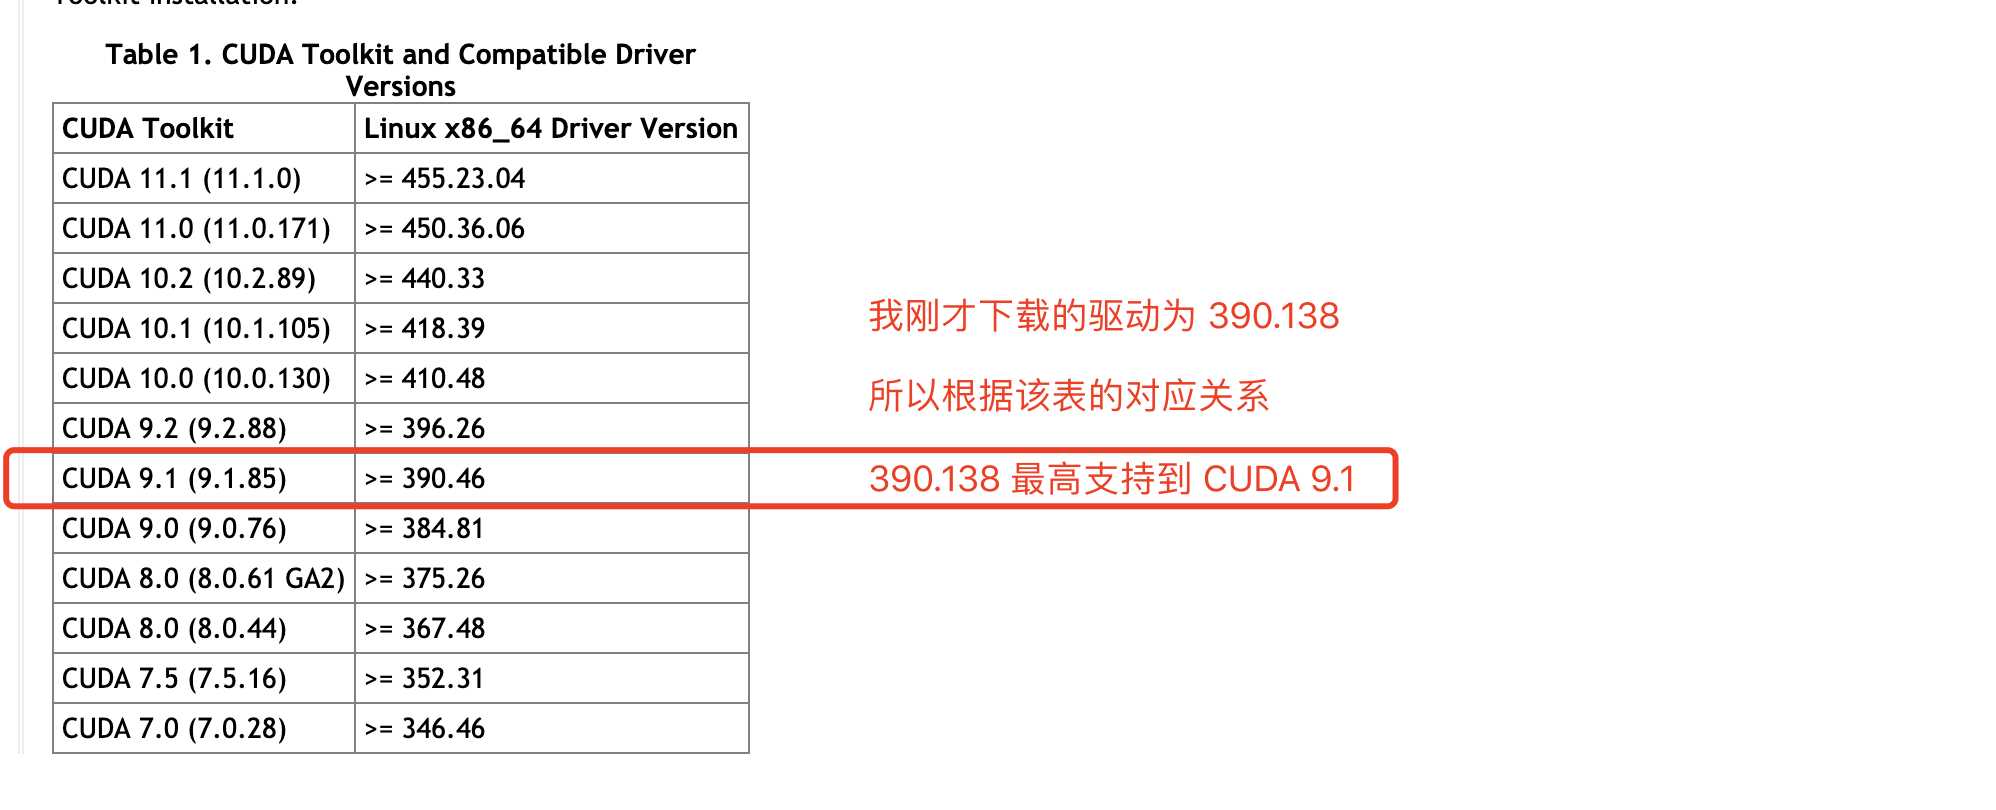
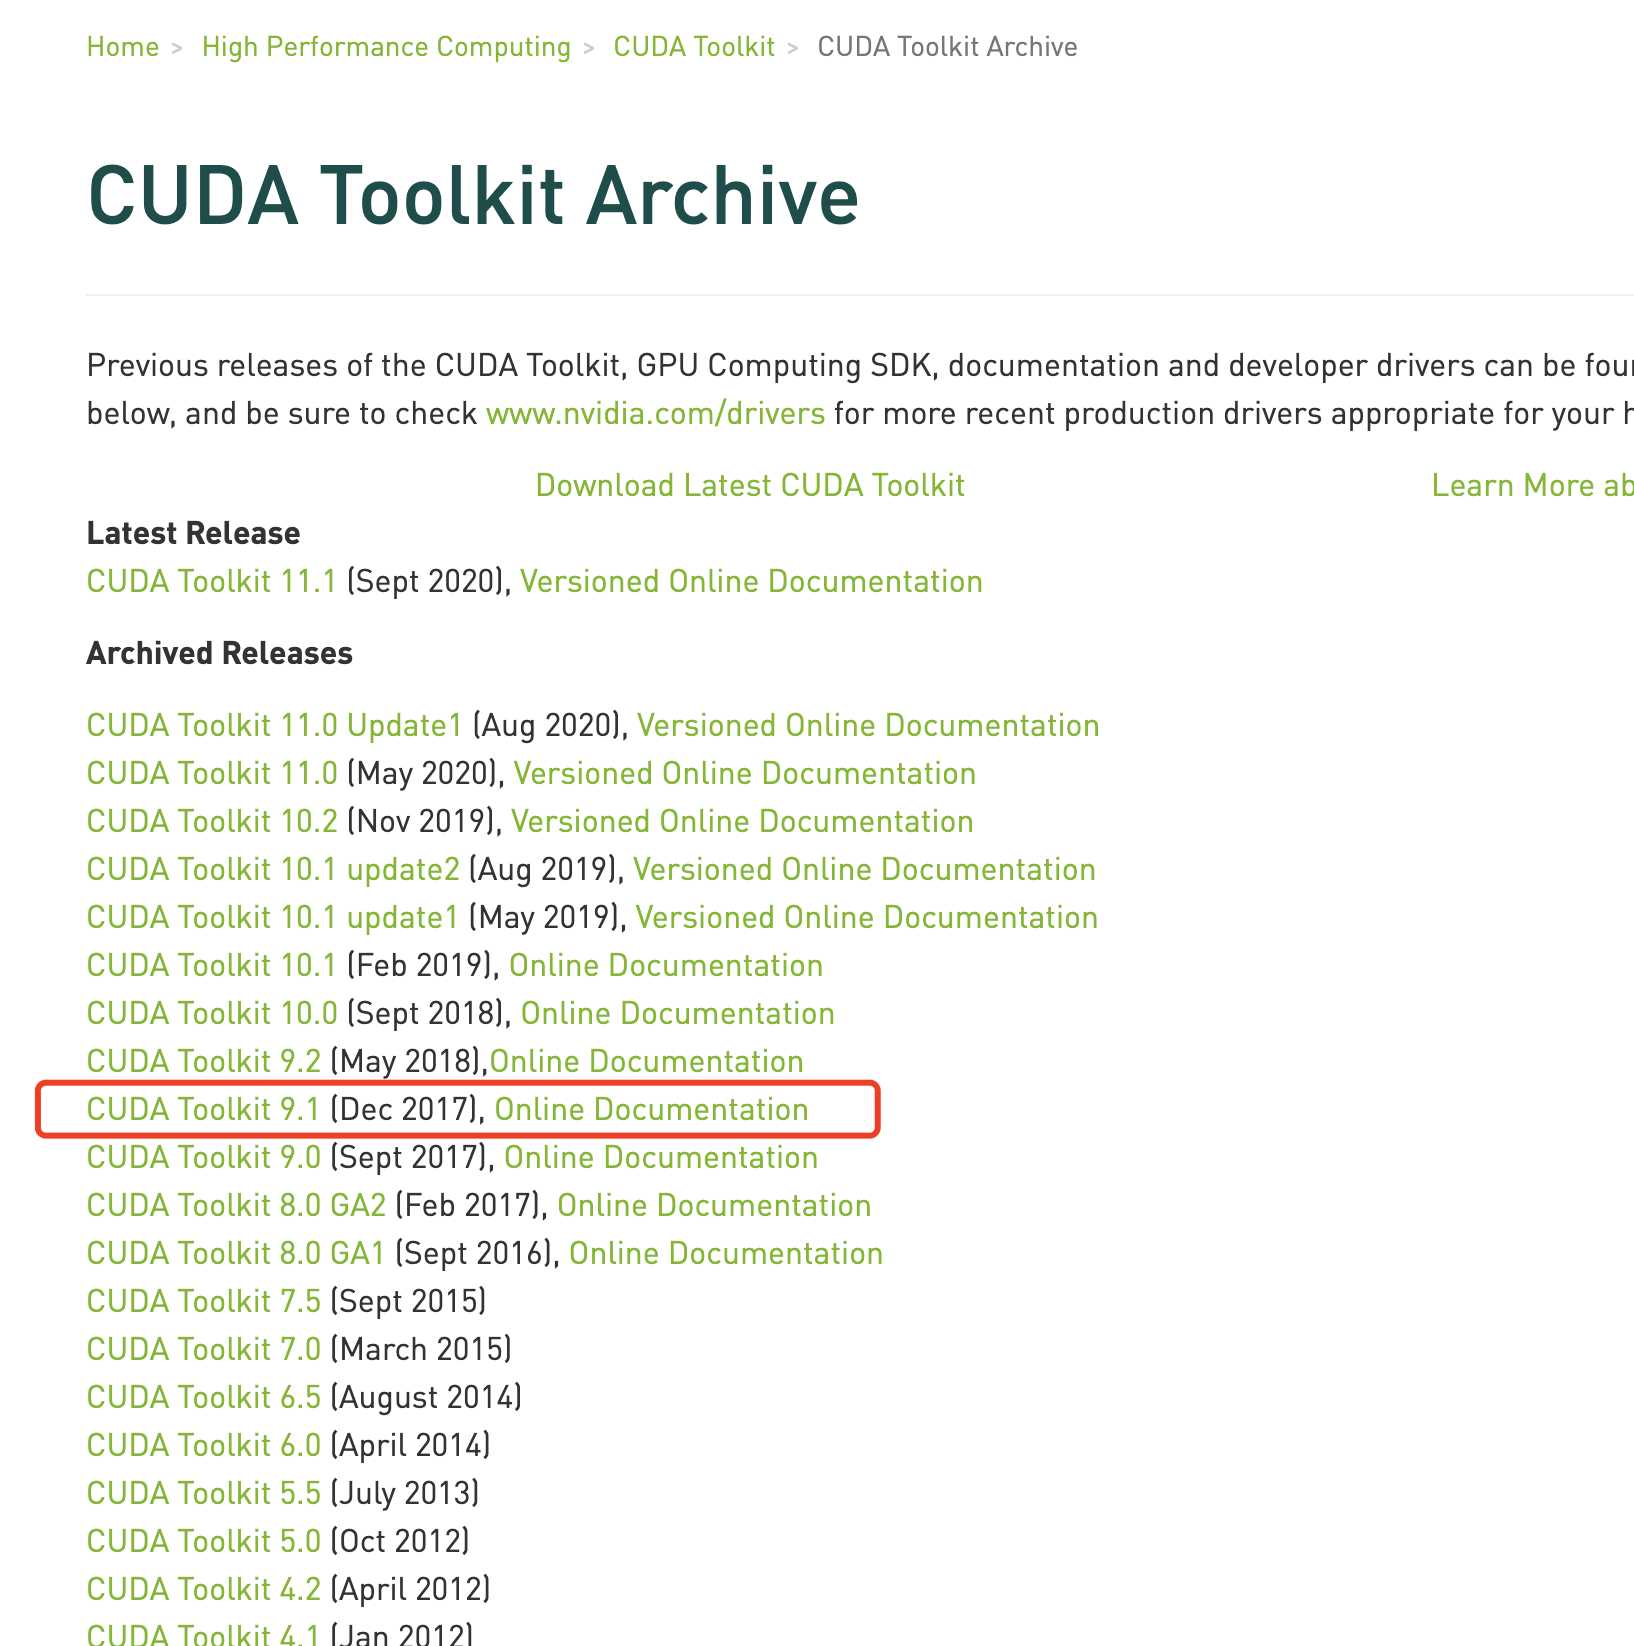
打开 CUDA 下载页面 https://developer.nvidia.com/cuda-toolkit-archive ,选择 9.1
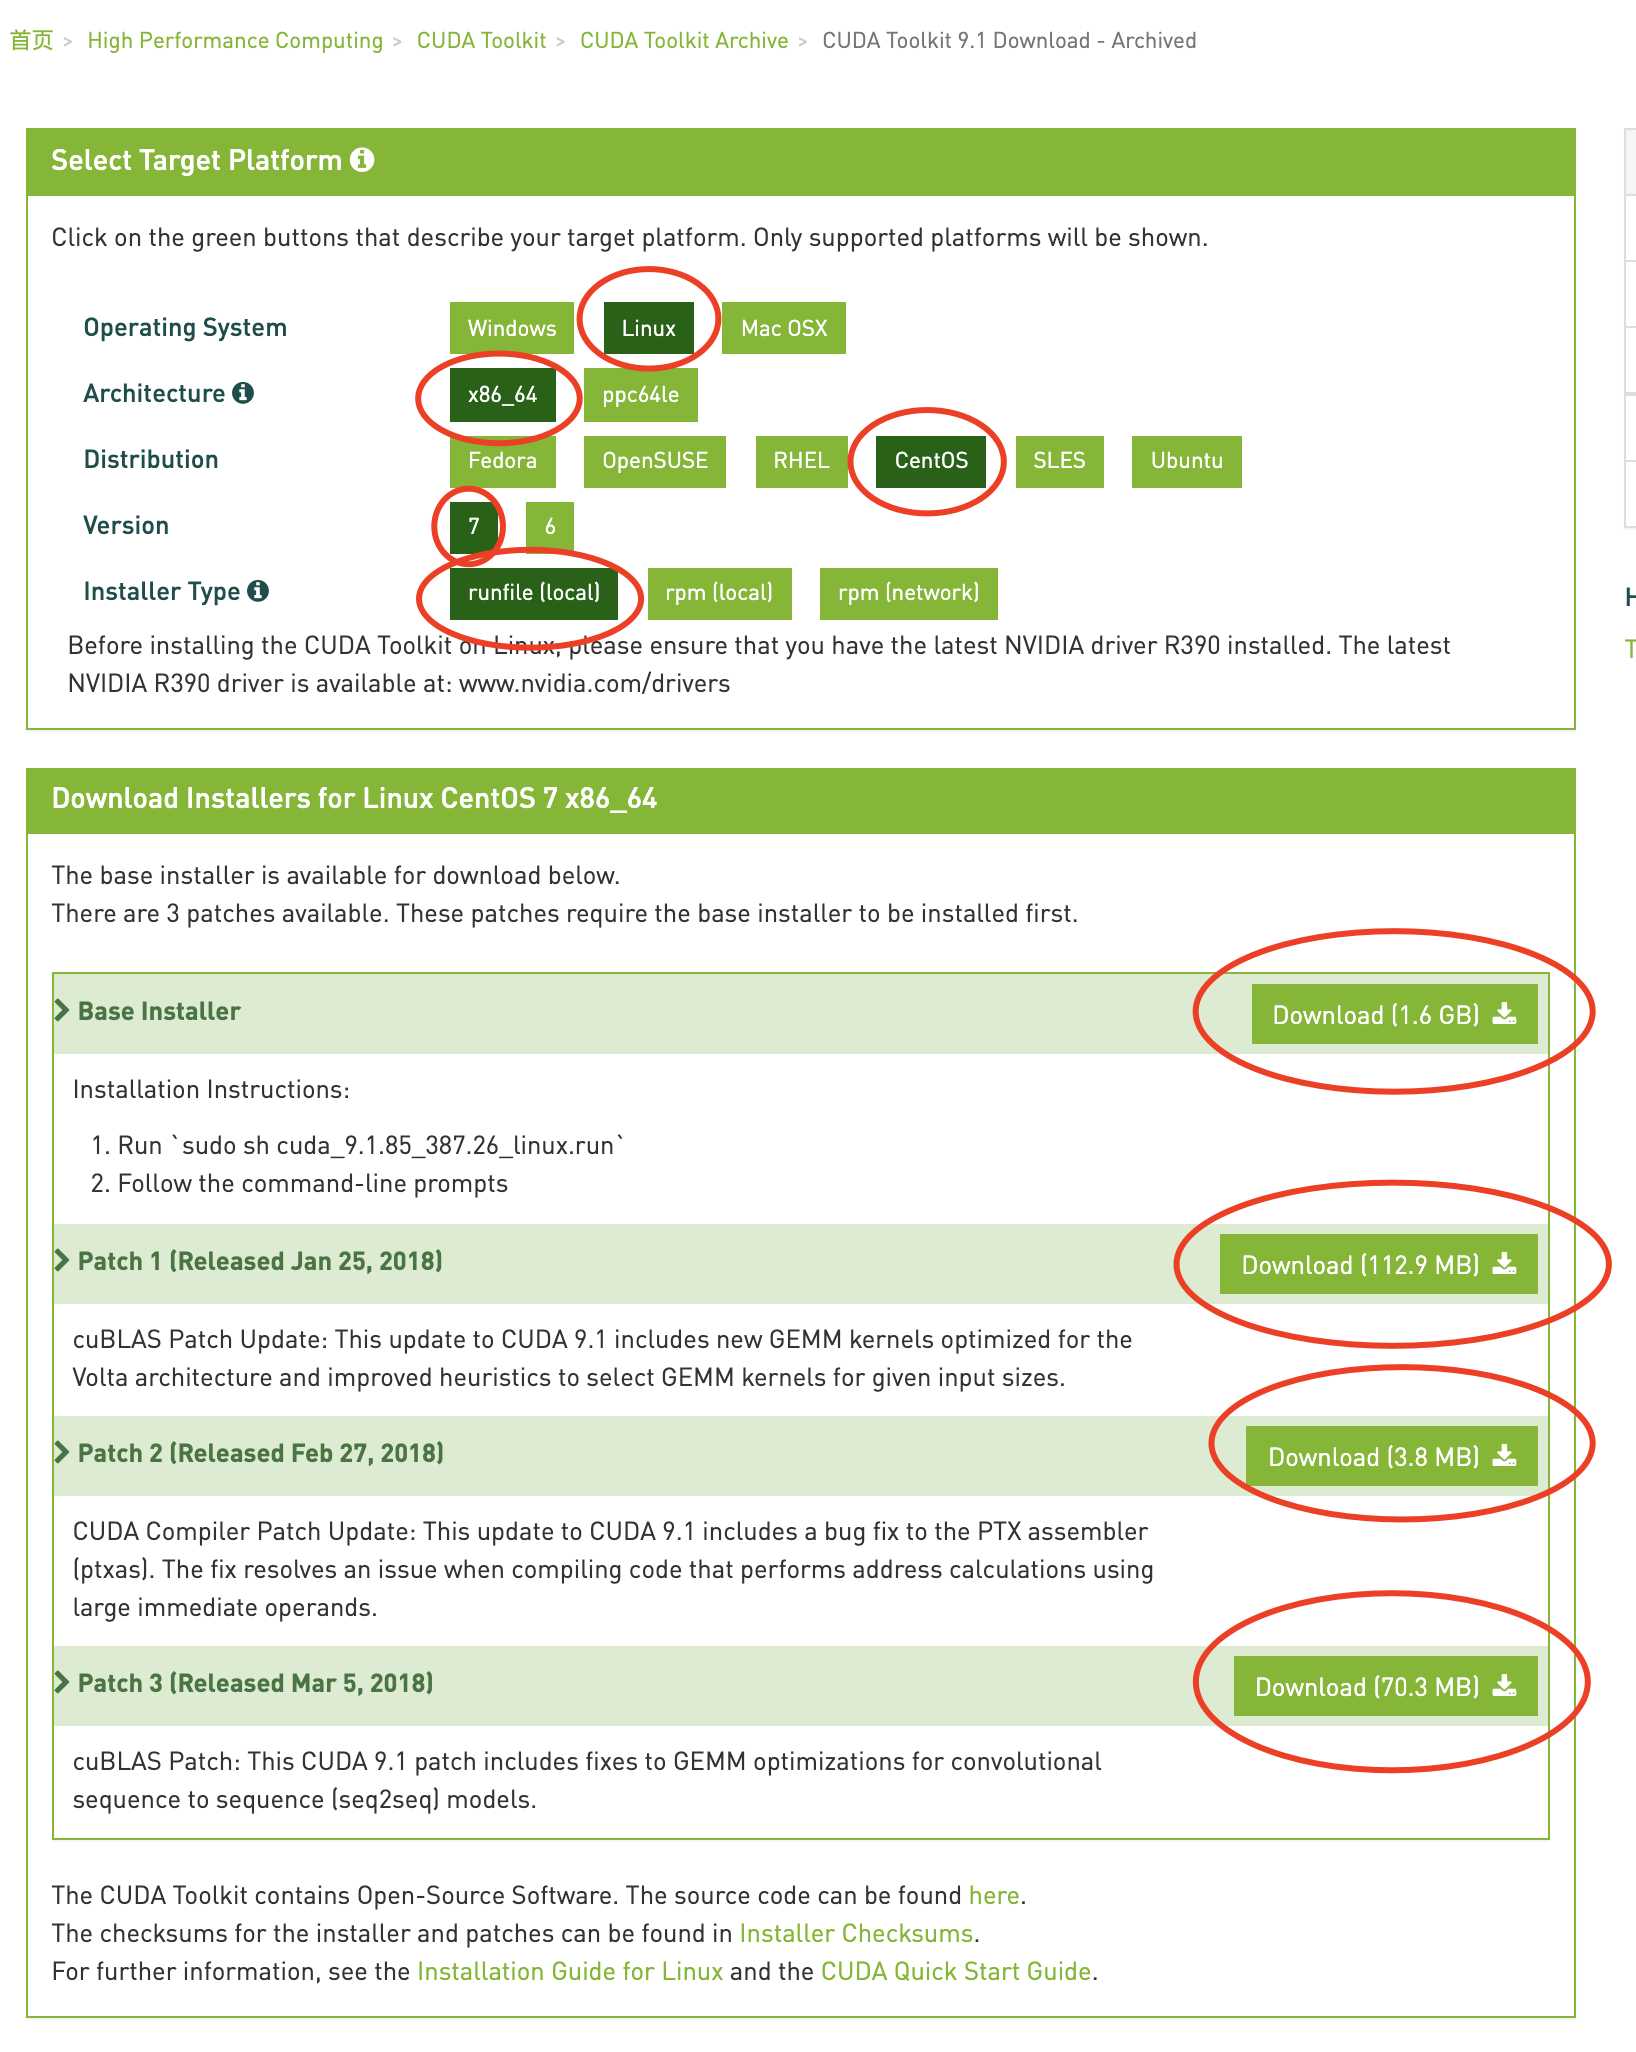
点击后进入到如下的下载页面,依次选择
- Linux
- x86_64
- CentOS
- 7
- runfile (local)
可以看到有一个安装包 1.6GB,另外有 3个补丁包,都把它们下载了。
安装CUDA
# 执行安装
sh cuda_9.1.85_387.26_linux


# 会展示一堆用户许可协议,可以直接按 q ,然后按提示操作即可,以下是部分交互

# 输入 accept 回车 同意 NVIDIA Software License Agreement

1. NVIDIA Software License Agreement
Do you accept the previously read EULA?
accept/decline/quit: accept

# 是否安装CUDA安装包中的驱动,驱动版本是 387.26 ? 明显不必安装,我们都已经安装了390.138 了...

Install NVIDIA Accelerated Graphics Driver for Linux-x86_64 387.26?
(y)es/(n)o/(q)uit: n

# 肯定 y 了
Install the CUDA 9.1 Toolkit?
(y)es/(n)o/(q)uit: y

# 默认,直接回车
Enter Toolkit Location
 [ default is /usr/local/cuda-9.1 ]:

Do you want to install a symbolic link at /usr/local/cuda?
(y)es/(n)o/(q)uit: y

Install the CUDA 9.1 Samples?
(y)es/(n)o/(q)uit: y

# 这里它会释放一个文件及,里面包含很多CUDA示例,等会我们测试也要用到
Enter CUDA Samples Location
 [ default is /root ]:

Installing the CUDA Toolkit in /usr/local/cuda-9.1 ...
Installing the CUDA Samples in /root ...
Copying samples to /root/NVIDIA_CUDA-9.1_Samples now...
Finished copying samples.

===========
= Summary =
===========

Driver:   Not Selected
Toolkit:  Installed in /usr/local/cuda-9.1
Samples:  Installed in /root

Please make sure that
 -   PATH includes /usr/local/cuda-9.1/bin
 -   LD_LIBRARY_PATH includes /usr/local/cuda-9.1/lib64, or, add /usr/local/cuda-9.1/lib64 to /etc/ld.so.conf and run ldconfig as root

To uninstall the CUDA Toolkit, run the uninstall script in /usr/local/cuda-9.1/bin

Please see CUDA_Installation_Guide_Linux.pdf in /usr/local/cuda-9.1/doc/pdf for detailed information on setting up CUDA.

***WARNING: Incomplete installation! This installation did not install the CUDA Driver. A driver of version at least 384.00 is required for CUDA 9.1 functionality to work.
To install the driver using this installer, run the following command, replacing <CudaInstaller> with the name of this run file:
    sudo <CudaInstaller>.run -silent -driver

Logfile is /tmp/cuda_install_8091.log
根据安装提示,需要把 /usr/local/cuda-9.1/bin 加入 PATH 环境变量,把 /usr/local/cuda-9.1/lib64 加入到 LD_LIBRARY_PATH
根据自己的shell来修改,我这儿用的是bash,所以编辑 ~/.bash_profile ,增加两行
PATH=$PATH:$HOME/bin:/usr/local/cuda-9.1/bin
export LD_LIBRARY_PATH=$LD_LIBRARY_PATH:/usr/local/cuda-9.1/lib64


#source 一下,或者重新登录

source ~/.bash_profile
测试CUDA
使用 nvcc 来初步测试
[root@Acer-CentOS7 deviceQuery]# nvcc -V
nvcc: NVIDIA (R) Cuda compiler driver
Copyright (c) 2005-2017 NVIDIA Corporation
Built on Fri_Nov__3_21:07:56_CDT_2017
Cuda compilation tools, release 9.1, V9.1.85
编译 CUDA 的示例程序来进行测试
deviceQuery
# 我安装时示例代码放到 /root/ 下
[root@Acer-CentOS7 deviceQuery]# cd /root/NVIDIA_CUDA-9.1_Samples/1_Utilities/deviceQuery
[root@Acer-CentOS7 deviceQuery]# make
"/usr/local/cuda-9.1"/bin/nvcc -ccbin g++ -I../../common/inc  -m64    -gencode arch=compute_30,code=sm_30 -gencode arch=compute_35,code=sm_35 -gencode arch=compute_37,code=sm_37 -gencode arch=compute_50,code=sm_50 -gencode arch=compute_52,code=sm_52 -gencode arch=compute_60,code=sm_60 -gencode arch=compute_61,code=sm_61 -gencode arch=compute_70,code=sm_70 -gencode arch=compute_70,code=compute_70 -o deviceQuery.o -c deviceQuery.cpp
"/usr/local/cuda-9.1"/bin/nvcc -ccbin g++   -m64      -gencode arch=compute_30,code=sm_30 -gencode arch=compute_35,code=sm_35 -gencode arch=compute_37,code=sm_37 -gencode arch=compute_50,code=sm_50 -gencode arch=compute_52,code=sm_52 -gencode arch=compute_60,code=sm_60 -gencode arch=compute_61,code=sm_61 -gencode arch=compute_70,code=sm_70 -gencode arch=compute_70,code=compute_70 -o deviceQuery deviceQuery.o
mkdir -p ../../bin/x86_64/linux/release
cp deviceQuery ../../bin/x86_64/linux/release
[root@Acer-CentOS7 deviceQuery]# ./deviceQuery
./deviceQuery Starting...

 CUDA Device Query (Runtime API) version (CUDART static linking)

Detected 1 CUDA Capable device(s)

Device 0: "GeForce 710M"
  CUDA Driver Version / Runtime Version          9.1 / 9.1
  CUDA Capability Major/Minor version number:    2.1
  Total amount of global memory:                 1985 MBytes (2081816576 bytes)
MapSMtoCores for SM 2.1 is undefined.  Default to use 64 Cores/SM
MapSMtoCores for SM 2.1 is undefined.  Default to use 64 Cores/SM
  ( 2) Multiprocessors, ( 64) CUDA Cores/MP:     128 CUDA Cores
  GPU Max Clock rate:                            1550 MHz (1.55 GHz)
  Memory Clock rate:                             900 Mhz
  Memory Bus Width:                              64-bit
  L2 Cache Size:                                 131072 bytes
  Maximum Texture Dimension Size (x,y,z)         1D=(65536), 2D=(65536, 65535), 3D=(2048, 2048, 2048)
  Maximum Layered 1D Texture Size, (num) layers  1D=(16384), 2048 layers
  Maximum Layered 2D Texture Size, (num) layers  2D=(16384, 16384), 2048 layers
  Total amount of constant memory:               65536 bytes
  Total amount of shared memory per block:       49152 bytes
  Total number of registers available per block: 32768
  Warp size:                                     32
  Maximum number of threads per multiprocessor:  1536
  Maximum number of threads per block:           1024
  Max dimension size of a thread block (x,y,z): (1024, 1024, 64)
  Max dimension size of a grid size    (x,y,z): (65535, 65535, 65535)
  Maximum memory pitch:                          2147483647 bytes
  Texture alignment:                             512 bytes
  Concurrent copy and kernel execution:          Yes with 1 copy engine(s)
  Run time limit on kernels:                     No
  Integrated GPU sharing Host Memory:            No
  Support host page-locked memory mapping:       Yes
  Alignment requirement for Surfaces:            Yes
  Device has ECC support:                        Disabled
  Device supports Unified Addressing (UVA):      Yes
  Supports Cooperative Kernel Launch:            No
  Supports MultiDevice Co-op Kernel Launch:      No
  Device PCI Domain ID / Bus ID / location ID:   0 / 1 / 0
  Compute Mode:
     < Default (multiple host threads can use ::cudaSetDevice() with device simultaneously) >

deviceQuery, CUDA Driver = CUDART, CUDA Driver Version = 9.1, CUDA Runtime Version = 9.1, NumDevs = 1
Result = PASS
bandwidthTest
[root@Acer-CentOS7 bandwidthTest]# cd /root/NVIDIA_CUDA-9.1_Samples/1_Utilities/bandwidthTest
[root@Acer-CentOS7 bandwidthTest]# make
"/usr/local/cuda-9.1"/bin/nvcc -ccbin g++ -I../../common/inc  -m64    -gencode arch=compute_30,code=sm_30 -gencode arch=compute_35,code=sm_35 -gencode arch=compute_37,code=sm_37 -gencode arch=compute_50,code=sm_50 -gencode arch=compute_52,code=sm_52 -gencode arch=compute_60,code=sm_60 -gencode arch=compute_61,code=sm_61 -gencode arch=compute_70,code=sm_70 -gencode arch=compute_70,code=compute_70 -o bandwidthTest.o -c bandwidthTest.cu
"/usr/local/cuda-9.1"/bin/nvcc -ccbin g++   -m64      -gencode arch=compute_30,code=sm_30 -gencode arch=compute_35,code=sm_35 -gencode arch=compute_37,code=sm_37 -gencode arch=compute_50,code=sm_50 -gencode arch=compute_52,code=sm_52 -gencode arch=compute_60,code=sm_60 -gencode arch=compute_61,code=sm_61 -gencode arch=compute_70,code=sm_70 -gencode arch=compute_70,code=compute_70 -o bandwidthTest bandwidthTest.o
mkdir -p ../../bin/x86_64/linux/release
cp bandwidthTest ../../bin/x86_64/linux/release
[root@Acer-CentOS7 bandwidthTest]# ./bandwidthTest
[CUDA Bandwidth Test] - Starting...
Running on...

 Device 0: GeForce 710M
 Quick Mode

 Host to Device Bandwidth, 1 Device(s)
 PINNED Memory Transfers
   Transfer Size (Bytes)	Bandwidth(MB/s)
   33554432			2843.6

 Device to Host Bandwidth, 1 Device(s)
 PINNED Memory Transfers
   Transfer Size (Bytes)	Bandwidth(MB/s)
   33554432			3291.3

 Device to Device Bandwidth, 1 Device(s)
 PINNED Memory Transfers
   Transfer Size (Bytes)	Bandwidth(MB/s)
   33554432			12519.4

Result = PASS

NOTE: The CUDA Samples are not meant for performance measurements. Results may vary when GPU Boost is enabled.
打补丁
打补丁也没啥好记录的,依次执行1-3即可。
sh cuda_9.1.85.1_linux
sh cuda_9.1.85.2_linux
sh cuda_9.1.85.3_linux
今天的文章GeForce 710M 双显卡笔记本安装 CentOS 7 + CUDA 9.1 踩坑手记分享到此就结束了,感谢您的阅读,如果确实帮到您,您可以动动手指转发给其他人。
版权声明:本文内容由互联网用户自发贡献,该文观点仅代表作者本人。本站仅提供信息存储空间服务,不拥有所有权,不承担相关法律责任。如发现本站有涉嫌侵权/违法违规的内容, 请发送邮件至 举报,一经查实,本站将立刻删除。
如需转载请保留出处:https://bianchenghao.cn/31439.html

