1、检查我们的scrapy版本。截至2020年11月29日,scrapy的版本为2.4.0,方法是在cmd命令行中 scrapy version
如果你也与我一样,使用这个版本,那么可以确定,你可以复现我的这篇教程。
2、创建项目。在cmd中scrapy startproject text
这里我使用了text这个名字,如果你喜欢别的,也可以改成别的任何名字。如果你是新手,那么建议你还是像我一样照做,不然会在后面的代码里混淆掉。
2.1 创建一只爬虫。正如你在命令行中看到的提示那样,一般我们在创建完一个项目之后,马上就创建一只蜘蛛。
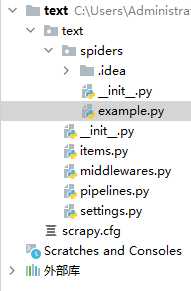
这时,我们已经完成了一只蜘蛛的创建,我们可以检查一下。使用pycharm打开这个项目,我们发现确实已经有一个example.py,这就是我们创建的蜘蛛的模块了。
这时,我们的准备工作算是完成了。
3、正式开始
3.1 定义我们需要的内容items.py
import scrapy
from scrapy.item import Item,Field
class TextItem(scrapy.Item):
    # define the fields for your item here like:
    # name = scrapy.Field()
    title = Field()  # 标题
    number = Field()  # 番号
    issuedate = Field()  # 发行时间
    actress = Field()  # 演员
    type = Field()  # 类型
    magent = Field()  # 磁力链接
    size = Field()  # 大小
    image_urls = scrapy.Field()  # 存储图片下载地址,必须是list列表形式,是下一步下载图片时图片的网页地址
    image = scrapy.Field()  # 存储图片下载地址及下载后的存储位置(相对路径)
    imagepath = scrapy.Field()  # 图片本地存储的位置
    torrent_urls = scrapy.Field()
    torrent = scrapy.Field()
    torrent_magnet = scrapy.Field()
    pass
3.2 编写蜘蛛。example.py
import scrapy
from text.items import TextItem  # 此处如果报错是pyCharm的原因
from scrapy.http import Request

class ExampleSpider(scrapy.Spider):
    name = 'example'
    allowed_domains = ['bbs.xxxxxxxx.site']#抱歉这里是某网站的域名
    start_urls = [
        'https://xxxxxxxxxx',#抱歉这里是某网站的地址:)
    ]

    def parse(self, response):
        book_urls = response.xpath('//td/a[@class="subject"]/@href').extract()
        for book_url in book_urls:
            book_url ="https://bbs.ojxqsc.site/2048/" + book_url
            yield Request(book_url, callback=self.parse_read)

    def parse_read(self, response):
        title = str(response.xpath('//td[@class="tal h"]/text()').extract_first()).replace("\n主题 : 【新片原档首发】 ","")
        title = title.replace("\n","")
        title = title.replace("主题 : ","")
        title = title.replace("/", "")
        if (str(response.xpath('//div[@class="f14"]/text()').extract()).find('品番: ') >= 0):
            number = str(response.xpath('//div[@class="f14"]/text()').extract()).split('品番: ')[1].split("'")[0]
        else:
            number = 'null'
        if (str(response.xpath('//div[@class="f14"]/text()').extract()).find('影片容量:') >= 0):
            size =str(response.xpath('//div[@class="f14"]/text()').extract()).split('影片容量:')[1].split("'")[0]
        else:
            size ='null'
        if (str(response.xpath('//div[@class="f14"]/text()').extract()).find('発売日: ') >= 0):
            issuedate=str(response.xpath('//div[@class="f14"]/text()').extract()).split('発売日: ')[1].split("'")[0]
        else:
            issuedate='null'
        if (str(response.xpath('//div[@class="f14"]/text()').extract()).find('出演者: ')>=0):
            actress=str(response.xpath('//div[@class="f14"]/text()').extract()).split('出演者: ')[1].split("'")[0]
        else:
            actress = 'null'
        if(str(response.xpath('//*[@id="read_tpc"]/img/@src').extract_first())!="None"):
            print("筛选图片地址:"+str(response.xpath('//*[@id="read_tpc"]/img/@src').extract_first()))
            image = response.xpath('//*[@id="read_tpc"]/img/@src').extract_first()
        else:
            image = response.xpath('//*[@id="read_tpc"]/a[1]/img/@src').extract_first()  # 图片地址

        torrent_urls = response.xpath('//*[@id="read_tpc"]/a/@href').extract()
        for torrent_url in torrent_urls:
            print("所有的网址是:"+str(torrent_url))
            if("download" in str(torrent_url)):
                print("现在的网址是:" +str(torrent_url))
                yield Request(torrent_url, meta = {'image_urls':[image],'title':title,'number':number,'size':size,'issuedate':issuedate,'actress':actress},callback=self.parse_magnet, dont_filter=True)
            else:
                print("oh no!")
    def parse_magnet(self, response):
        torrent_magnet = response.xpath('//*[@class="uk-button "]/@href').extract_first()  # 图片地址
        print("现在的种子的内容是:" + str(torrent_magnet))
        item = TextItem()
        item['image_urls'] = response.meta['image_urls']
        item['title'] = response.meta['title']
        item['number']=response.meta['number']
        item['size'] = response.meta['size']
        item['issuedate'] = response.meta['issuedate']
        item['actress'] = response.meta['actress']
        print("图片地址:" + str(item['image_urls']))
        print("文件路径:" + str(item['title']))
        imagepath = str(response.meta['title'])
        item['imagepath'] = "G:\GOO\\"+ imagepath+".jpg"
        item['torrent_magnet'] = str(torrent_magnet)
        yield item
3.3 编写管道 pipelines.py
from scrapy.pipelines.images import ImagesPipeline
from scrapy.http import Request
import pymysql.cursors

class TextPipeline(ImagesPipeline):
    def get_media_requests(self, item, info):
        for image_url in item['image_urls']:
            yield Request(image_url, meta={'mid_item': item['title']})
    def file_path(self, request, response=None, info=None):
        title = request.meta['mid_item']+".jpg"
        print("现在的标题是:"+title)
        return title
class MySQLPipeline(object):
    def __init__(self):
        # 连接数据库
        self.connect = pymysql.connect(
            host='127.0.0.1',  # 数据库地址
            port=3306,  # 数据库端口
            db='liab',  # 数据库名
            user='root',  # 数据库用户名
            passwd='123456',  # 数据库密码
            charset='utf8',  # 编码方式
            use_unicode=True)
        # 通过cursor执行增删查改
        self.cursor = self.connect.cursor()
    def process_item(self, item, spider):
        self.cursor.execute(
            """insert into code(title,number,size,issuedate,actress,imageurl,torrentmagnet)
            value (%s,%s,%s,%s,%s,%s,%s)""",  # 纯属python操作mysql知识,不熟悉请恶补
            (item['title'],
             item['number'],
             item['size'],
             item['issuedate'],
             item['actress'],
             item['imagepath'],# item里面定义的字段和表字段对应
             item['torrent_magnet'],  # item里面定义的字段和表字段对应
            ))
        # 提交sql语句
        self.connect.commit()
        return item  # 必须实现返回
3.4 编写设置 setting.py
BOT_NAME = 'text'
SPIDER_MODULES = ['text.spiders']
NEWSPIDER_MODULE = 'text.spiders'
HTTPERROR_ALLOWED_CODES = [403]
HTTPERROR_ALLOWED_CODES = [404]
ROBOTSTXT_OBEY = True
ITEM_PIPELINES = {
   'text.pipelines.TextPipeline': 1,
   'text.pipelines.MySQLPipeline': 300,
}
到这里,我们的项目就结束了。简单说一下它的功能。第一是将封面下载到本地。第二是将其他字段保存在本地的数据库中,封面图片在数据库中的保持方式为图片的地址,而不是图片的数据流。
4、让我们测试一下!
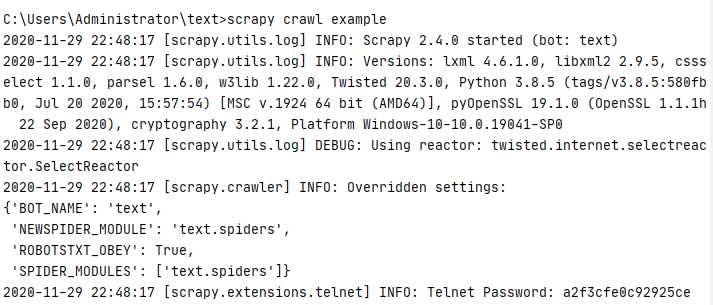
4.1 项目的启动。我们可以在pycharm中的terminal窗口键入scrapy crawl example
也可以在cmd窗口中使用相同的方法启动。
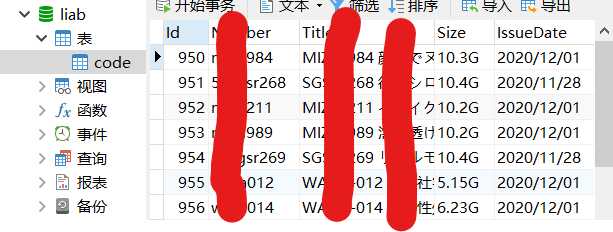
4.2 你可以在你的保存目录中找到这些图片。并且,你也可以在数据库中找到这些数据。
如果有什么地方不懂,欢迎留言或私信!
版权声明:本文内容由互联网用户自发贡献,该文观点仅代表作者本人。本站仅提供信息存储空间服务,不拥有所有权,不承担相关法律责任。如发现本站有涉嫌侵权/违法违规的内容, 请发送邮件至 举报,一经查实,本站将立刻删除。
如需转载请保留出处:https://bianchenghao.cn/36247.html


