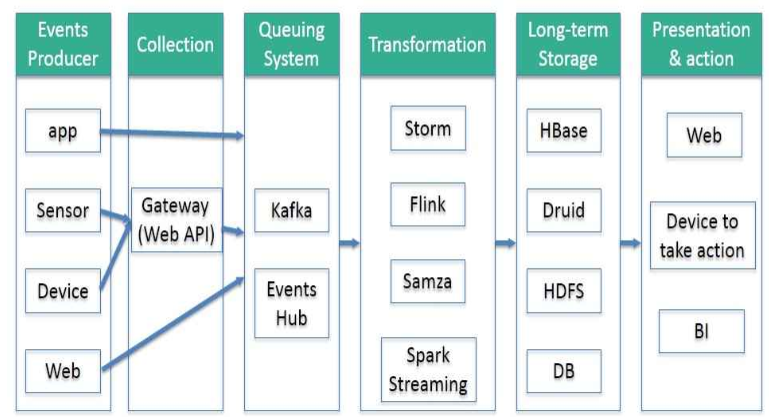
随着大数据技术在各行各业的广泛应用,要求能对海量数据进行实时处理的需求越来越多,同时数据处理的业务逻辑也越来越复杂,传统的批处理方式和早期的流式处理框架也越来越难以在延迟性、吞吐量、容错能力以及使用便捷性等方面满足业务日益苛刻的要求。
在这种形势下,新型流式处理框架Flink通过创造性地把现代大规模并行处理技术应用到流式处理中来,极大地改善了以前的流式处理框架所存在的问题。
一句话:flink是etl的工具。
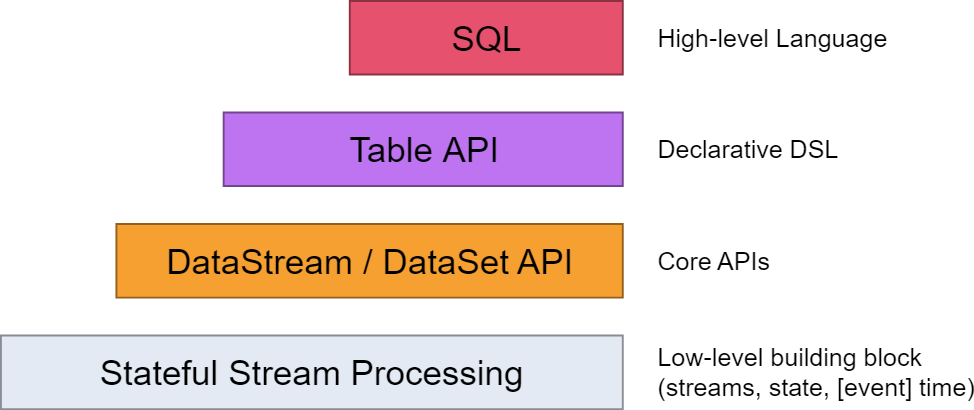
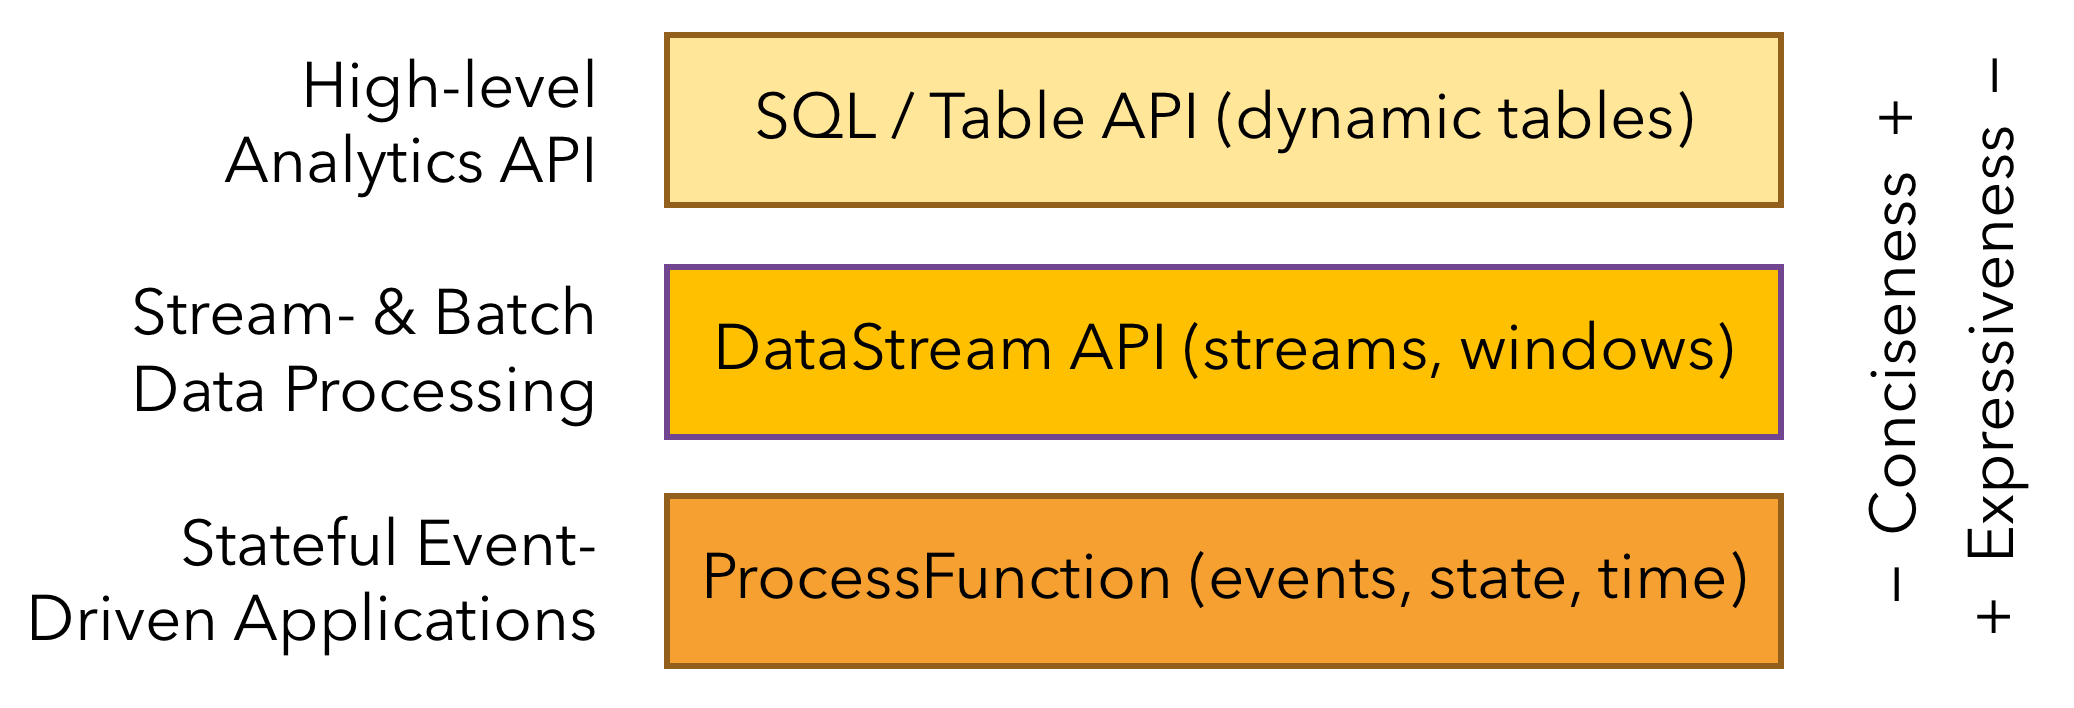
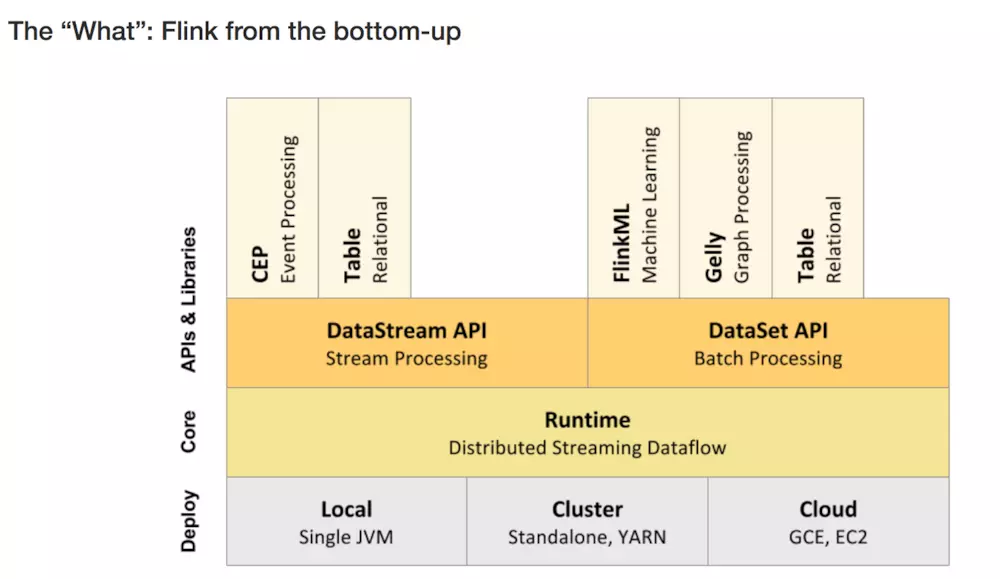
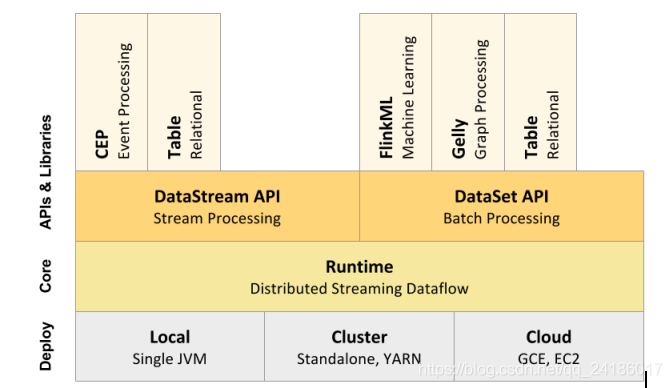
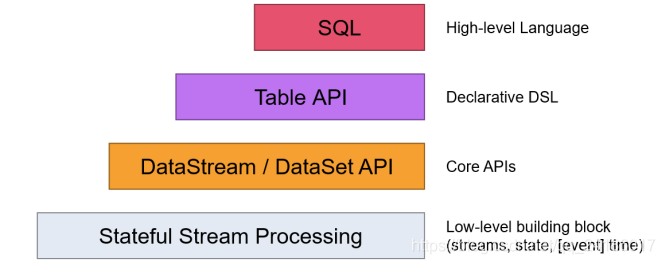
flink的层次结构:
其中,
windows下flink示例程序的执行 简单介绍了一下flink在windows下如何通过flink-webui运行已经打包完成的示例程序(jar)
从flink-example分析flink组件(1)WordCount batch实战及源码分析讲到DataSet的转换
从flink-example分析flink组件(2)WordCount batch实战及源码分析—-flink如何在本地执行的?flink batch批处理如何在本地执行的
从flink-example分析flink组件(3)WordCount 流式实战及源码分析 flink stream流式处理如何在本地执行的?
使用flink Table &Sql api来构建批量和流式应用(1)Table的基本概念介绍了Table的基本概念及使用方法
使用flink Table &Sql api来构建批量和流式应用(2)Table API概述介绍了如何使用Table
使用flink Table &Sql api来构建批量和流式应用(3)Flink Sql 使用 介绍了如何使用sql
flink dataset api使用及原理 介绍了DataSet Api
flink DataStream API使用及原理介绍了DataStream Api
flink中的时间戳如何使用?—Watermark使用及原理 介绍了底层实现的基础Watermark
flink window实例分析 介绍了window的概念及使用原理
Flink中的状态与容错 介绍了State的概念及checkpoint,savepoint的容错机制
flink的特征
最后,给出官网给出的特征作为结束:
1、一切皆为流(All streaming use cases )
- 事件驱动应用(Event-driven Applications)
- 流式 & 批量分析(Stream & Batch Analytics)
- 数据管道&ETL(Data Pipelines & ETL)
2、正确性保证(Guaranteed correctness)
- 唯一状态一致性(Exactly-once state consistency)
- 事件-事件处理(Event-time processing)
- 高超的最近数据处理(Sophisticated late data handling)
3、多层api(Layered APIs)
- 基于流式和批量数据处理的SQL(SQL on Stream & Batch Data)
- 流水数据API & 数据集API(DataStream API & DataSet API)
- 处理函数 (时间 & 状态)(ProcessFunction (Time & State))
4、易用性
- 部署灵活(Flexible deployment)
- 高可用安装(High-availability setup)
- 保存点(Savepoints)
5、可扩展性
- 可扩展架构(Scale-out architecture)
- 大量状态的支持(Support for very large state)
- 增量检查点(Incremental checkpointing)
6、高性能
- 低延迟(Low latency)
- 高吞吐量(High throughput)
- 内存计算(In-Memory computing)
flink架构
1、层级结构
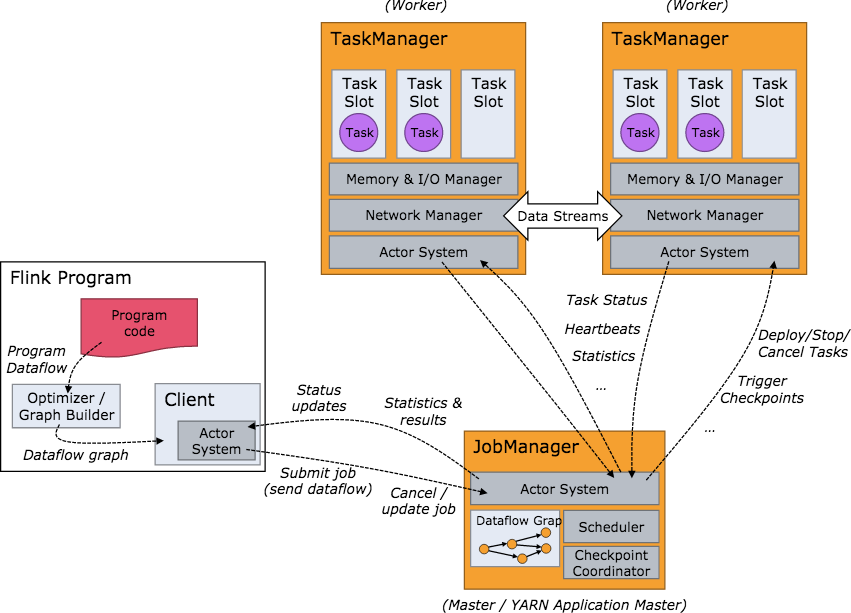
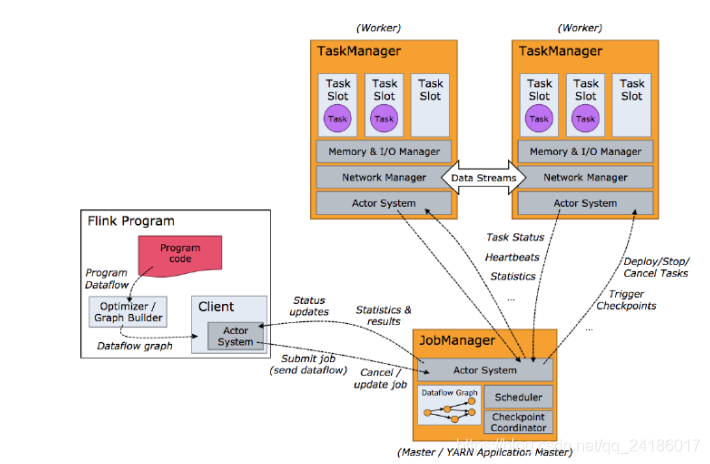
2.工作架构图
一:flink初识
Flink起源于Stratosphere项目,Stratosphere是在2010~2014年由3所地处柏林的大学和欧洲的一些其他的大学共同进行的研究项目,2014年4月Stratosphere的代码被复制并捐赠给了Apache软件基金会,参加这个孵化项目的初始成员是Stratosphere系统的核心开发人员,2014年12月,Flink一跃成为Apache软件基金会的顶级项目。
Flink主页在其顶部展示了该项目的理念:“Apache Flink是为分布式、高性能、随时可用以及准确的流处理应用程序打造的开源流处理框架”
Flink将批处理(即处理有限的静态数据)视作一种特殊的流处理。
DataStream API 流式处理的接口,DataSet API 面相批处理的接口
FlinkML:机器学习 CEP:复杂事件处理 Gelly图计算 针对流式和批处理的Table API
二:flink基本架构
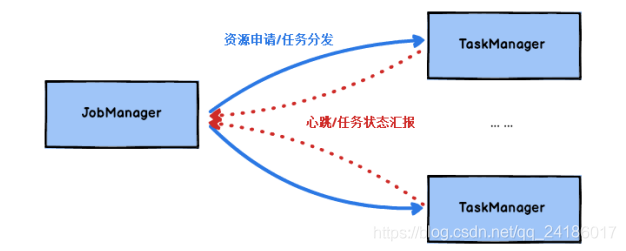
2.1:JobManager 与TaskManager
Flink运行时包含了两种类型的处理器:JobManager处理器,TaskManager处理器
2.2 无界数据流与有界数据流
无界数据流:以特定的顺序获取event,立即处理
有界数据流:处理有界流不需要有序获取,因为可以始终对有界数据集进行排序,有界的处理也称为批处理
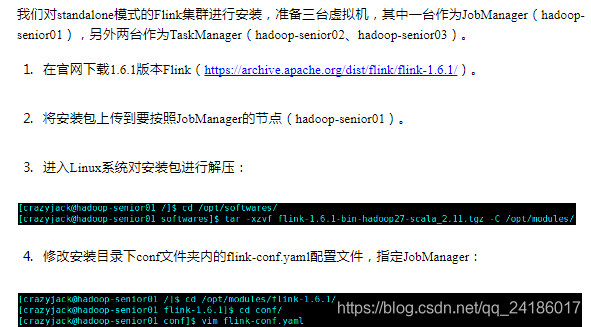
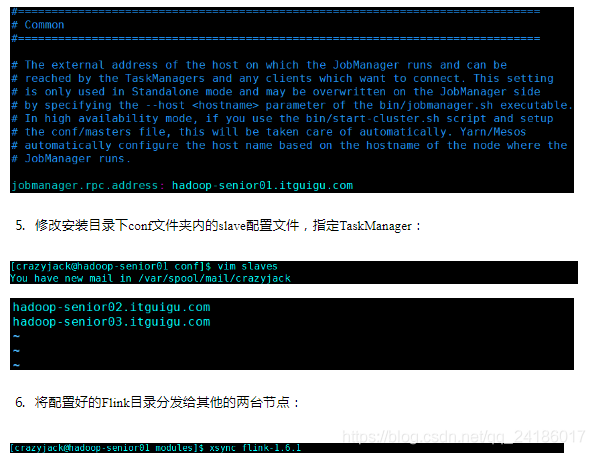
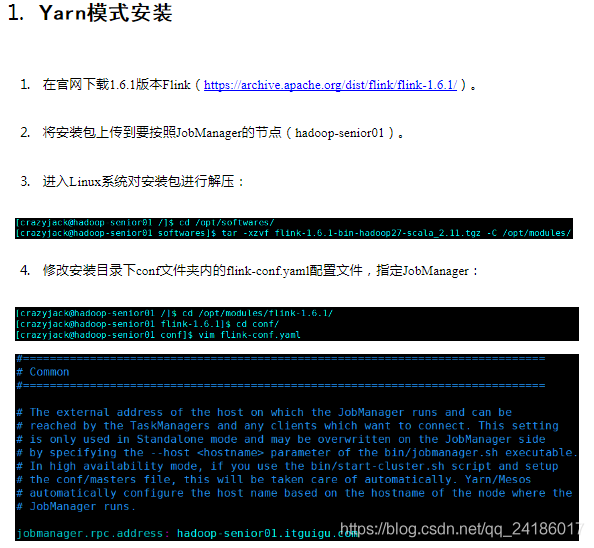
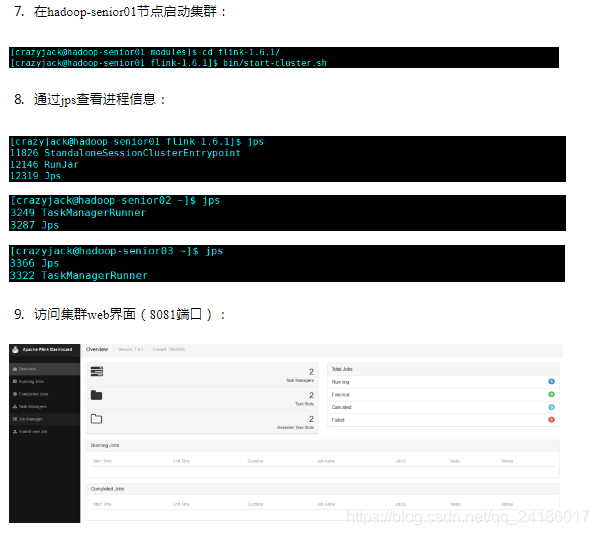
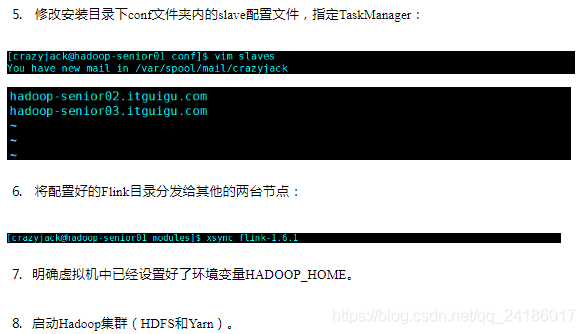
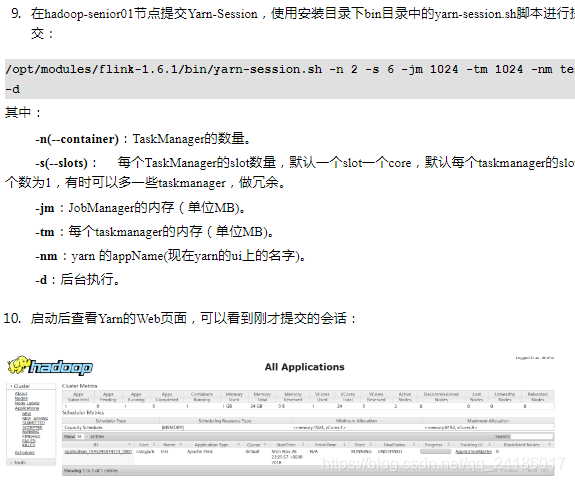
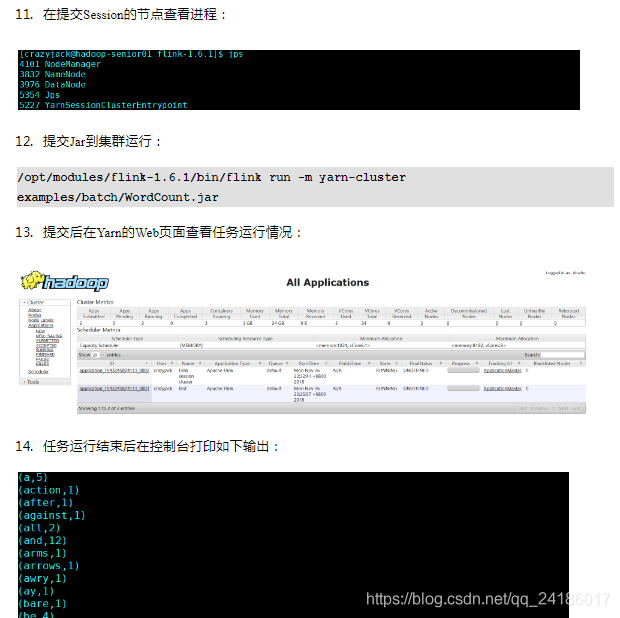
三:flink集群搭建
四:flink运行架构
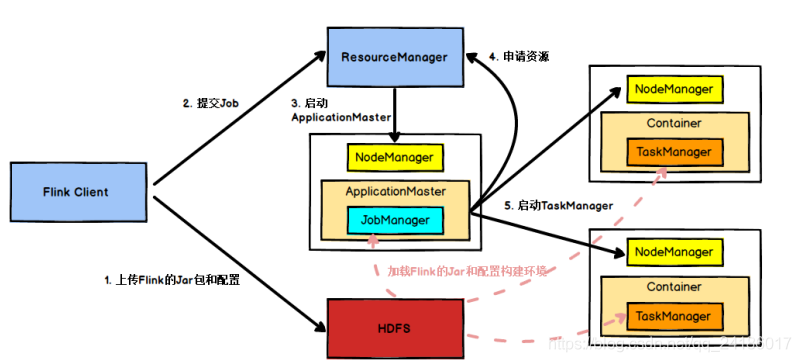
4.1任务提交流程
4.2 任务调度原理
4.3 TaskManager与slots
每一个TaskManager是一个JVM进程,它可能会在独立的线程上执行一个进程或多个subtask。为了控制一个TaskManager能接收多少task,TaskManager通过task slot来进行控制(一个TaskManager至少有一个task slot)
每个task slot 表示TaskManager拥有资源的一个固定大小的子集。假如一个TaskManager有三个slot,那么他将其内存内存分成三份给各个slot。需要注意的是,这里不涉及到CPU的隔离。
Task Slot是静态的概念,是指TaskManager具有的并发执行的能力,可以通过taskmanager.numberOfTaskSlots进行配置,而并行度parallelism是动态概念,即TaskManager运行程序时实际使用的并发能力,可以通过paramllelism.default设置。
例:假设一共有3个TaskManager,每个TaskManager中分配3个TaskSlot,也就是每个TaskManager可以接收3 个Task,一共9个TaskSlot,如果我们设置parallelism.default=1,即运行程序的并行度为1,9个TaskSlot只用了1个,有8个空闲,因此要设置合适的并行度才可以提高效率。
五:flink DataStream API
六:Time与Window
七:EventTime与Window
Checkpoint 源码流程:
Flink CheckpointCoordinator 启动流程
先贴段简单的代码
val kafkaSource = new FlinkKafkaConsumer[String]("kafka_offset", new SimpleStringSchema(), prop)
val kafkaSource1 = new FlinkKafkaConsumer[String]("kafka_offset", new SimpleStringSchema(), prop)
val kafkaProducer = new FlinkKafkaProducer[String]("kafka_offset_out", new SimpleStringSchema(), prop)
val source = env
  .addSource(kafkaSource)
  .setParallelism(1)
  .name("source")
val source1 = env
  .addSource(kafkaSource1)
  .setParallelism(1)
  .name("source1")

source.union(source1)
  .map(node => {
    node.toString + ",flinkx"
  })
  .addSink(kafkaProducer)
很简单,就是读Kafka,再写回kafka,主要是Checkpoint 的流程,代码在这里就不重要了
——————————————-
一个简化的 Checkpoint 流图
1、CheckpointCoordicator tirgger checkpoint 到 source
2、Source
1、生成并广播 CheckpointBarrier
2、Snapshot state(完成后 ack Checkpoint 到 CheckpointCoordicator)
3、Map
1、接收到 CheckpointBarrier
2、广播 CheckpointBarrier
3、Snapshot state(完成后 ack Checkpoint 到 CheckpointCoordicator)
4、Sink
1、接收到 CheckpointBarrier
2、Snapshot state(完成后 ack Checkpoint 到 CheckpointCoordicator)
5、CheckpointCoordicator 接收到 所有 ack
1、给所有算子发 notifyCheckpointComplete
6、Source、Map、Sink 收到 notifyCheckpointComplete
这里有个更好的图: https://www.cnblogs.com/bethunebtj/p/9168274.html
从流程图上可以看出,Checkpoint 由 CheckpointCoordinator 发起、确认,通过Rpc 通知 Taskmanager 的具体算子完成 Checkpoint 操作。
Checkpoint Timer 启动
Flink Checkpoint 是由 CheckpointCoordinator 协调启动,有个内部类来做这个事情
private final class ScheduledTrigger implements Runnable {

    @Override
    public void run() {
        try {
            triggerCheckpoint(true);
        }
        catch (Exception e) {
            LOG.error("Exception while triggering checkpoint for job {}.", job, e);
        }
    }
}
JobMaster.java 启动 Checkpoint 的 timer
private void startScheduling() {
        checkState(jobStatusListener == null);
        // register self as job status change listener
        jobStatusListener = new JobManagerJobStatusListener();
        schedulerNG.registerJobStatusListener(jobStatusListener);
        // 这个会调用到 CheckpointCoordinator.scheduleTriggerWithDelay 方法启动第一次 Checkpoint,后续就由 CheckpointCoordinator 自己启动
        schedulerNG.startScheduling();
    }
ScheduledTrigger 由 Timer 定时调用
private ScheduledFuture<?> scheduleTriggerWithDelay(long initDelay) {
    return timer.scheduleAtFixedRate(
        new ScheduledTrigger(),
        initDelay, baseInterval, TimeUnit.MILLISECONDS);
}

/**
 * Executes the given command periodically. The first execution is started after the
 * {@code initialDelay}, the second execution is started after {@code initialDelay + period},
 * the third after {@code initialDelay + 2*period} and so on.
 * The task is executed until either an execution fails, or the returned {@link ScheduledFuture}
 * is cancelled.
 *
 * @param command the task to be executed periodically
 * @param initialDelay the time from now until the first execution is triggered  第一次启动 Checkpoint 时间
 * @param period the time after which the next execution is triggered            后续的时间间隔
 * @param unit the time unit of the delay and period parameter
 * @return a ScheduledFuture representing the periodic task. This future never completes
 * unless an execution of the given task fails or if the future is cancelled
 */
ScheduledFuture<?> scheduleAtFixedRate(
    Runnable command,
    long initialDelay,
    long period,
    TimeUnit unit);
ScheduledTrigger 开始 checkpoint
ScheduledTrigger.run 方法 调用 triggerCheckpoint 开始执行 checkpoint
public CompletableFuture<CompletedCheckpoint> triggerCheckpoint(boolean isPeriodic) {
    return triggerCheckpoint(checkpointProperties, null, isPeriodic, false);
}

@VisibleForTesting
public CompletableFuture<CompletedCheckpoint> triggerCheckpoint(
        CheckpointProperties props,
        @Nullable String externalSavepointLocation,
        boolean isPeriodic,
        boolean advanceToEndOfTime) {


    CheckpointTriggerRequest request = new CheckpointTriggerRequest(props, externalSavepointLocation, isPeriodic, advanceToEndOfTime);
    requestDecider
        .chooseRequestToExecute(request, isTriggering, lastCheckpointCompletionRelativeTime)
        //  调用 startTriggeringCheckpoint 方法
        .ifPresent(this::startTriggeringCheckpoint);
    return request.onCompletionPromise;
}

private void startTriggeringCheckpoint(CheckpointTriggerRequest request) {

    // 获取 需要触发 Checkpoint 的算子
    final Execution[] executions = getTriggerExecutions();
....
    // no exception, no discarding, everything is OK
    final long checkpointId = checkpoint.getCheckpointId();
    snapshotTaskState(
        timestamp,
        checkpointId,
        checkpoint.getCheckpointStorageLocation(),
        request.props,
        executions,
        request.advanceToEndOfTime);

    coordinatorsToCheckpoint.forEach((ctx) -> ctx.afterSourceBarrierInjection(checkpointId));

    onTriggerSuccess();
............
}


private void snapshotTaskState(
        long timestamp,
        long checkpointID,
        CheckpointStorageLocation checkpointStorageLocation,
        CheckpointProperties props,
        Execution[] executions,
        boolean advanceToEndOfTime) {

        // send the messages to the tasks that trigger their checkpoint
        // 给每个 Execution (在这里可以理解为每个 Source 算子,因为Checkpoint 是从 Source 开始的) 发送 trigger checkpoint 消息
        for (Execution execution: executions) {
            if (props.isSynchronous()) {
                execution.triggerSynchronousSavepoint(checkpointID, timestamp, checkpointOptions, advanceToEndOfTime);
            } else {
                execution.triggerCheckpoint(checkpointID, timestamp, checkpointOptions);
            }
        }
    }
Execution.java 的 triggerCheckpoint 方法 调用 triggerCheckpointHelper 方法, 通过 TaskManagerGateway 发送 triggerCheckpoint 的 RPC 请求,
调用 RpcTaskManagerGateway.triggerCheckpoint 方法,然后调用 TaskExecutorGateway 的 triggerCheckpoint 方法(TaskExecutor继承自 TaskExecutorGateway,就到 TaskManager 端了)
private void triggerCheckpointHelper(long checkpointId, long timestamp, CheckpointOptions checkpointOptions, boolean advanceToEndOfEventTime) {

    final CheckpointType checkpointType = checkpointOptions.getCheckpointType();
    if (advanceToEndOfEventTime && !(checkpointType.isSynchronous() && checkpointType.isSavepoint())) {
        throw new IllegalArgumentException("Only synchronous savepoints are allowed to advance the watermark to MAX.");
    }

    final LogicalSlot slot = assignedResource;

    if (slot != null) {
        final TaskManagerGateway taskManagerGateway = slot.getTaskManagerGateway();

        taskManagerGateway.triggerCheckpoint(attemptId, getVertex().getJobId(), checkpointId, timestamp, checkpointOptions, advanceToEndOfEventTime);
    } else {
        LOG.debug("The execution has no slot assigned. This indicates that the execution is no longer running.");
    }
}
到这里, JobManager 端触发 checkpoint 就完成了,下面就是 TaskManager 端接收 triggerCheckpoint 消息了
TaskManager 接收 triggerCheckpoint 消息
从上面可以知道,JobManager 给 TaskManager 发送 Rpc 请求,调用 RpcTaskManagerGateway.triggerCheckpoint 发送checkpoint 的 Rpc 到 TaskManager,TaskManager 接收到 Rpc 后,会反射到 TaskExecutor 的 triggerCheckpoint 方法,这里就进入 TaskManager 里面了
@Override
public CompletableFuture<Acknowledge> triggerCheckpoint(
        ExecutionAttemptID executionAttemptID,
        long checkpointId,
        long checkpointTimestamp,
        CheckpointOptions checkpointOptions,
        boolean advanceToEndOfEventTime) {
    log.debug("Trigger checkpoint {}@{} for {}.", checkpointId, checkpointTimestamp, executionAttemptID);

    final CheckpointType checkpointType = checkpointOptions.getCheckpointType();
    if (advanceToEndOfEventTime && !(checkpointType.isSynchronous() && checkpointType.isSavepoint())) {
        throw new IllegalArgumentException("Only synchronous savepoints are allowed to advance the watermark to MAX.");
    }
    // 使用 operator id 获取 job 对应的 Source 算子 (如果有多个 Source,JobManager 端会发送两个 Rpc 请求,TaskManager 也是执行两次)
    final Task task = taskSlotTable.getTask(executionAttemptID);

    if (task != null) {
        // 对 task 触发 一个 Checkpoint Barrier
        task.triggerCheckpointBarrier(checkpointId, checkpointTimestamp, checkpointOptions, advanceToEndOfEventTime);

        return CompletableFuture.completedFuture(Acknowledge.get());
    } else {
        final String message = "TaskManager received a checkpoint request for unknown task " + executionAttemptID + '.';

        log.debug(message);
        return FutureUtils.completedExceptionally(new CheckpointException(message, CheckpointFailureReason.TASK_CHECKPOINT_FAILURE));
    }
}
Flink Checkpoint 在 TaskManager 端的处理过程是从 Source 开始的,JobManager 会给每个Source 算子发送一个 触发 Checkpoint 的 Rpc 请求,TaskManager 接收到对应 Source 算子的 Checkpoint Rpc 请求后,就开始执行对应流程,同时会往自己的下游算子广播 CheckpointBarrier。
对应 Kafka Source,执行 Checkpoint 的方法 是 FlinkKafkaConsumerBase.snapshotState,Checkpoint 的时候,从 TaskExecutor 到 FlinkKafkaConsumerBase.snapshotState 的调用栈如下,调用栈比较长,就简单列下调用的方法
TaskExecutor.triggerCheckpoint  --> task.triggerCheckpointBarrier

Task.triggerCheckpointBarrier   --> invokable.triggerCheckpointAsync

SourceStreamTask.triggerCheckpointAsync   -->   super.triggerCheckpointAsync

StreamTask.triggerCheckpointAsync   -->  triggerCheckpoint

StreamTask.triggerCheckpoint  ---> performCheckpoint

StreamTask.performCheckpoint  --> subtaskCheckpointCoordinator.checkpointState

SubtaskCheckpointCoordinatorImpl.checkpointState       --->  takeSnapshotSync    (会广播 CheckpointBarrier 到下游算子, takeSnapshotSync 成成功后会发送 ack 到 JobMaster)

SubtaskCheckpointCoordinatorImpl.takeSnapshotSync   --->  buildOperatorSnapshotFutures

SubtaskCheckpointCoordinatorImpl.buildOperatorSnapshotFutures   ---> checkpointStreamOperator

SubtaskCheckpointCoordinatorImpl.checkpointStreamOperator   --->  op.snapshotState

AbstractStreamOperator.snapshotState   ---> stateHandler.snapshotState

StreamOperatorStateHandler.snapshotState   --->  snapshotState              (会调用 operatorStateBackend.snapshot/keyedStateBackend.snapshot 将 state 持久化到 stateBackend )

StreamOperatorStateHandler.snapshotState   --->  streamOperator.snapshotState(snapshotContext)

AbstractUdfStreamOperator.snapshotState   ---> StreamingFunctionUtils.snapshotFunctionState

StreamingFunctionUtils.snapshotFunctionState   ---> trySnapshotFunctionState

StreamingFunctionUtils.trySnapshotFunctionState   ---> ((CheckpointedFunction) userFunction).snapshotState  (就进入 udf 了,这里是:FlinkKafkaConsumerBase, 如果是自定义的 Source,会进入对应Source 的 snapshotState 方法)

FlinkKafkaConsumerBase.snapshotState
Kafka Source Checkpoint
Flink State 可以分为 KeyedState 和 OperatorState,KeyedState 在keyBy 算子之后使用,OperatorState 使用较多的就是存储Source 和 Sink 的状态,比如Kafka Source 存储当前消费的 offset。 其他算子想使用 OperatorState 需要实现 CheckpointedFunction,Operator state 存在 taskManager 的 heap 中,不建议存储大状态。
Kafka Source 的 checkpoint 是在 FlinkKafkaConsumerBase 中实现的,具体方法是: snapshotState
FlinkKafkaConsumerBase 的 checkpoint 流程 大概是,获取 kafkaFetcher 的
/** Accessor for state in the operator state backend. */
// ListState 存储状态,Checkpoint 的时候只需要将 KafkaTopicPartition 和 Offset 放入这个对象中,Checkpoint 的时候,就会写入 statebackend
// Operator state 都是这样的,自己实现的也是,将对应内容写入状态就可以了
private transient ListState<Tuple2<KafkaTopicPartition, Long>> unionOffsetStates;


@Override
public final void snapshotState(FunctionSnapshotContext context) throws Exception {
    if (!running) {
        LOG.debug("snapshotState() called on closed source");
    } else {
        // 消费者还在运行
        // 清楚之前的状态
        unionOffsetStates.clear();

        final AbstractFetcher<?, ?> fetcher = this.kafkaFetcher;
        if (fetcher == null) {
            // the fetcher has not yet been initialized, which means we need to return the
            // originally restored offsets or the assigned partitions
            for (Map.Entry<KafkaTopicPartition, Long> subscribedPartition : subscribedPartitionsToStartOffsets.entrySet()) {
                unionOffsetStates.add(Tuple2.of(subscribedPartition.getKey(), subscribedPartition.getValue()));
            }

            if (offsetCommitMode == OffsetCommitMode.ON_CHECKPOINTS) {
                // the map cannot be asynchronously updated, because only one checkpoint call can happen
                // on this function at a time: either snapshotState() or notifyCheckpointComplete()
                pendingOffsetsToCommit.put(context.getCheckpointId(), restoredState);
            }
        } else {
            // 获取对应的 KafkaTopicPartition 和 offset
            HashMap<KafkaTopicPartition, Long> currentOffsets = fetcher.snapshotCurrentState();
            // 放到 pendingOffsetsToCommit 中
            if (offsetCommitMode == OffsetCommitMode.ON_CHECKPOINTS) {
                // the map cannot be asynchronously updated, because only one checkpoint call can happen
                // on this function at a time: either snapshotState() or notifyCheckpointComplete()
                pendingOffsetsToCommit.put(context.getCheckpointId(), currentOffsets);
            }
            // 将 KafkaTopicPartition 和 offset 写入 operator state 中
            for (Map.Entry<KafkaTopicPartition, Long> kafkaTopicPartitionLongEntry : currentOffsets.entrySet()) {
                unionOffsetStates.add(
                        Tuple2.of(kafkaTopicPartitionLongEntry.getKey(), kafkaTopicPartitionLongEntry.getValue()));
            }
        }
        // 移除还未 提交的 offset
        if (offsetCommitMode == OffsetCommitMode.ON_CHECKPOINTS) {
            // truncate the map of pending offsets to commit, to prevent infinite growth
            while (pendingOffsetsToCommit.size() > MAX_NUM_PENDING_CHECKPOINTS) {
                pendingOffsetsToCommit.remove(0);
            }
        }
    }
}
当 Checkpoint 完成的时候,会调用到 FlinkKafkaConsumerBase 的 notifyCheckpointComplete 方法,会提交 offset 到 kafka 中,到这里 Kafka Source 的 Checkpoint 就完成了。
fetcher.commitInternalOffsetsToKafka(offsets, offsetCommitCallback);
算子快照完成后会给 JobMaster 发个消息说快照完成了
AsyncCheckpointRunnable.java
private void finishAndReportAsync(Map<OperatorID, OperatorSnapshotFutures> snapshotFutures, CheckpointMetaData metadata, CheckpointMetrics metrics, CheckpointOptions options) {
    // we are transferring ownership over snapshotInProgressList for cleanup to the thread, active on submit
    // AsyncCheckpointRunnable 的 run 方法,会给 JobMaster 发送 Checkpoint 完成的消息
    executorService.execute(new AsyncCheckpointRunnable(
        snapshotFutures,
        metadata,
        metrics,
        System.nanoTime(),
        taskName,
        registerConsumer(),
        unregisterConsumer(),
        env,
        asyncExceptionHandler));
}
AsyncCheckpointRunnable.run
public void run() {

    ..........
    if (asyncCheckpointState.compareAndSet(AsyncCheckpointState.RUNNING, AsyncCheckpointState.COMPLETED)) {
        // report ack
        reportCompletedSnapshotStates(
            jobManagerTaskOperatorSubtaskStates,
            localTaskOperatorSubtaskStates,
            asyncDurationMillis);

    } else {
        LOG.debug("{} - asynchronous part of checkpoint {} could not be completed because it was closed before.",
            taskName,
            checkpointMetaData.getCheckpointId());
    }
    .........

private void reportCompletedSnapshotStates(
    TaskStateSnapshot acknowledgedTaskStateSnapshot,
    TaskStateSnapshot localTaskStateSnapshot,
    long asyncDurationMillis) {


    // we signal stateless tasks by reporting null, so that there are no attempts to assign empty state
    // to stateless tasks on restore. This enables simple job modifications that only concern
    // stateless without the need to assign them uids to match their (always empty) states.
    taskEnvironment.getTaskStateManager().reportTaskStateSnapshots(
        checkpointMetaData,
        checkpointMetrics,
        hasAckState ? acknowledgedTaskStateSnapshot : null,
        hasLocalState ? localTaskStateSnapshot : null);

}
一路往下查看,会找到发送 Rpc 消息的地方:
下游算子 map Checkpoint
看 map 的 Checkpoint 流程,直接在 Map 算子上打个断点,看下 调用栈就知道了
StreamTaskNetworkInput.emitNext 处理输入数据和消息(Checkpoint)
StreamTaskNetworkInput.processElement
OneInputStreamTask.emitRecord
StreamMap.processElement 调用 userFunction.map 就是 我们代码中的map 了
由于 Map 没有状态需要缓存,所以没有实现 CheckpointedFunction,这里只列 出 CheckpointBarrier 广播部分
如果消息是 Checkpoint:
StreamTaskNetworkInput.emitNext
@Override
public InputStatus emitNext(DataOutput<T> output) throws Exception {

    while (true) {
        // get the stream element from the deserializer
        if (currentRecordDeserializer != null) {
            DeserializationResult result = currentRecordDeserializer.getNextRecord(deserializationDelegate);
            if (result.isBufferConsumed()) {
                currentRecordDeserializer.getCurrentBuffer().recycleBuffer();
                currentRecordDeserializer = null;
            }

            if (result.isFullRecord()) {
                // 数据的处理流程,从这里调用直到 user function 的map 中
                processElement(deserializationDelegate.getInstance(), output);
                return InputStatus.MORE_AVAILABLE;
            }
        }
        // 从 Checkpoint InputGate 读 CheckpointBarrier
        Optional<BufferOrEvent> bufferOrEvent = checkpointedInputGate.pollNext();
        ...
    }
}
CheckpointedInputGate.pollNext
@Override
public Optional<BufferOrEvent> pollNext() throws Exception {
    while (true) {

        ....
        Optional<BufferOrEvent> next = inputGate.pollNext();

        else if (bufferOrEvent.getEvent().getClass() == CheckpointBarrier.class) {
            CheckpointBarrier checkpointBarrier = (CheckpointBarrier) bufferOrEvent.getEvent();
            // CheckpointBarrier 的处理流程
            barrierHandler.processBarrier(checkpointBarrier, bufferOrEvent.getChannelInfo());
            return next;
        }
    ...
    }
}
barrierHandler.processBarrier 方法中对 Checkpoint 的处理流程跟 FlinkKafkaConsumerBase.snapshotState 调用的流程差不多
从 barrierHandler.processBarrier 调用到 SubtaskCheckpointCoordinatorImpl.checkpointState 往下游广播 CheckpointBarrier
Kafka Sink Checkpoint
Kafka Sink 的 Checkpoint 也是从 Sink 收到 CheckpointBarrier 开始的
接收 CheckpointBarrier 的流程和 Map 一样(所有算子都一样,Source 是生成 CheckpointBarrier 的算子)
之后的流程就和 Source 一样,一路调用到 FlinkKafkaConsumerBase.snapshotState 做快照
与 Kafka Source 一样,Kafka Sink 也是将这次提交的内容放入 ListState 中,Sink 的 Checkpoint 实现了 TwoPhaseCommitSinkFunction(用以实现 精确一次 语义)
FlinkKafkaProducer.java
/**
 * State for nextTransactionalIdHint.
 */
private transient ListState<FlinkKafkaProducer.NextTransactionalIdHint> nextTransactionalIdHintState;

@Override
public void snapshotState(FunctionSnapshotContext context) throws Exception {
    super.snapshotState(context);

    nextTransactionalIdHintState.clear();
    // To avoid duplication only first subtask keeps track of next transactional id hint. Otherwise all of the
    // subtasks would write exactly same information.
    if (getRuntimeContext().getIndexOfThisSubtask() == 0 && semantic == FlinkKafkaProducer.Semantic.EXACTLY_ONCE) {
        checkState(nextTransactionalIdHint != null, "nextTransactionalIdHint must be set for EXACTLY_ONCE");
        long nextFreeTransactionalId = nextTransactionalIdHint.nextFreeTransactionalId;

        // If we scaled up, some (unknown) subtask must have created new transactional ids from scratch. In that
        // case we adjust nextFreeTransactionalId by the range of transactionalIds that could be used for this
        // scaling up.
        if (getRuntimeContext().getNumberOfParallelSubtasks() > nextTransactionalIdHint.lastParallelism) {
            nextFreeTransactionalId += getRuntimeContext().getNumberOfParallelSubtasks() * kafkaProducersPoolSize;
        }
        // 精确一次语义的 Checkpoint 状态
        nextTransactionalIdHintState.add(new FlinkKafkaProducer.NextTransactionalIdHint(
            getRuntimeContext().getNumberOfParallelSubtasks(),
            nextFreeTransactionalId));
    }
}
TwoPhaseCommitSinkFunction.java
protected transient ListState<State<TXN, CONTEXT>> state;

@Override
public void snapshotState(FunctionSnapshotContext context) throws Exception {
    // this is like the pre-commit of a 2-phase-commit transaction
    // we are ready to commit and remember the transaction

    checkState(currentTransactionHolder != null, "bug: no transaction object when performing state snapshot");

    long checkpointId = context.getCheckpointId();
    LOG.debug("{} - checkpoint {} triggered, flushing transaction '{}'", name(), context.getCheckpointId(), currentTransactionHolder);
    // 预提交即调用 producer.flush 提交数据到 Kafka
    preCommit(currentTransactionHolder.handle);
    pendingCommitTransactions.put(checkpointId, currentTransactionHolder);
    LOG.debug("{} - stored pending transactions {}", name(), pendingCommitTransactions);
    //     开启事务
    currentTransactionHolder = beginTransactionInternal();
    LOG.debug("{} - started new transaction '{}'", name(), currentTransactionHolder);

    state.clear();
    // 将 事务信息写入 状态
    state.add(new State<>(
        this.currentTransactionHolder,
        new ArrayList<>(pendingCommitTransactions.values()),
        userContext));
}
看到这里,应该都发现了 FlinkkafkaConsumerBase 和 TwoPhaseCommitSinkFunction 都有 notifyCheckpointComplete,在这个方法才真正完成 Checkpoint 往外部数据写入 offset,提交事务。
注: Sink 完成 snaposhot 完成后会给 JobMaster 发送 ack 消息,与 Source 部分相同
JobManager 发送 confirmCheckpoint 消息给 TaskManager
JobManager 接收 checkpoint snapshotState 完成的消息
jobmanager接收完成 snapshotState 消息,然后会给 TaskManager 发送 所以算子完成快照的消息,调用算子的 notifyCheckpointComplete 方法,完成 Checkpoint 全部过程。
CheckpointCoordinator.receiveAcknowledgeMessage
CheckpointCoordinator.completePendingCheckpoint
CheckpointCoordinator.sendAcknowledgeMessages
private void sendAcknowledgeMessages(long checkpointId, long timestamp) {
    // commit tasks
    for (ExecutionVertex ev : tasksToCommitTo) {
        Execution ee = ev.getCurrentExecutionAttempt();
        if (ee != null) {
            ee.notifyCheckpointComplete(checkpointId, timestamp);
        }
    }

    // commit coordinators
    for (OperatorCoordinatorCheckpointContext coordinatorContext : coordinatorsToCheckpoint) {
        coordinatorContext.checkpointComplete(checkpointId);
    }
}
从 ee.notifyCheckpointComplete 进去,可以看到发送 Rpc 消息的地方
Kafka Source/Sink 接收 notifyCheckpointComplete
对于 Source 从TaskManager 收到 confirmCheckpoint 开始
图片: tm接收confirmCheckpoint消息
一路调用到 FlinkKafkaConsumerBase.notifyCheckpointComplete 提交 offset 到 Kafka
Sink 基本一样,不过 FlinkKafkaProducer 的 notifyCheckpointComplete 在 TwoPhaseCommitSinkFunction 中(继承来的)
里面会调用到 FlinkKafkaProducer.commit 方法,提交 Kafka 事务
@Override
protected void commit(FlinkKafkaProducer.KafkaTransactionState transaction) {
    if (transaction.isTransactional()) {
        try {
            // 调用 KafkaProduce 的方法,提交事务
            transaction.producer.commitTransaction();
        } finally {
            recycleTransactionalProducer(transaction.producer);
        }
    }
}
至此 Checkpoint的前台流程就全部完成了
今天的文章flink基础教程分享到此就结束了,感谢您的阅读,如果确实帮到您,您可以动动手指转发给其他人。
版权声明:本文内容由互联网用户自发贡献,该文观点仅代表作者本人。本站仅提供信息存储空间服务,不拥有所有权,不承担相关法律责任。如发现本站有涉嫌侵权/违法违规的内容, 请发送邮件至 举报,一经查实,本站将立刻删除。
如需转载请保留出处:https://bianchenghao.cn/51564.html

