Augur安装与使用
Augur&Auspice安装
参考官方技术文档安装:Augur
一、conda安装
安装命令
curl http://data.nextstrain.org/nextstrain.yml --compressed -o nextstrain.yml
conda env create -f nextstrain.yml
conda activate nextstrain
npm install --global auspice

# Optionally, if you want to use the nextstrain command
nextstrain check-setup --set-default
测试是否安装成功
condo activate nextstrain
augur -h
auspice -h
nextstrain -h
conda deactivate
更新
conda activate nextstrain

pip install --upgrade nextstrain-augur nextstrain-cli

npm update --global auspice
二、使用python进行安装(版本3.4以上)
- augur安装
python3 -m pip install nextstrain-augur

sudo apt install mafft iqtree raxml fasttree vcftools
- npm安装auspice
 npm install --global auspice
 #更新
 npm update --global auspice
三、使用源码安装(python安装augur,npm安装auspice)
- augur
git clone https://github.com/nextstrain/augur.git

python3 -m pip install
or
python3 -m pip install -e '.[dev]'
- auspice
  # activate the correct conda enviornment
    conda activate auspice

  # grab the GitHub auspice repo
    git clone https://github.com/nextstrain/auspice.git
    cd auspice
 # install dependencies and make `auspice` available globally
    npm install --global
 # build auspice (builds the JS client bundle using webpack)
    auspice build
 # test it works
    auspice --version
Augur的使用
参考Augur解析文档:augur parse
一、sequences&metadata预处理
- metadata文件strain和fasta文件头要一一对应(导致filter出错
- 注意日期格式:Y-M-D(导致refine出错
- 注意metadata空的地方补‘?’,?号格式要注意,encoding=‘utf-8’(数据处理出错
- 注意reference不要放在一起比对(突变统计时蛋白出错
- 配置文件(颜色、经纬度、显示
二、运行命令
- filter(把序列和原数据不匹配的部分过滤掉)
augur filter --sequences [sequence position&name.fasta] --metadata [metadata position&name.tsv] --output [output file position&name] - align(多序列比对,使用内置的mattf实现)
augur align --sequences [filtered file position&name] --output[output file position&name] --fill-gaps(设置gap参数,默认false) - tree(建树,默认使用iqtree建树)
augur tree --alignment [aligned file position/name.fasta] --output [file position/name.nwk] - refine (优化,指定净化率、置信区间、指定根…)
augur refine --tree [file position/name.nwk] --alignment [aligned file position/name.fasta] --metadata [metadata position&name.tsv] --output-tree [file position/name.nwk] --output-node-data [file position/name.json] --timetree (时间树) --coalescent opt (时间标度,逆时针频率) --data-confidence (置信区间) --data-inference marginal --clock-filter-igd 4 (时钟过滤) - traits (确实数据重构,数据缺失处要补?)
augur traits --tree [file position/name.nwk] --metadata [metadata position&name.tsv] --output [file position/name.json] --columns [columns name...](在这些字段上进行离散重构) --confidence (记住次要领导的分布) - ancestral (基于树推断祖先序列)
augur ancestral --tree [file position/name.nwk] --alignment [aligned file position/name.fasta] --output-node-data [file position/name.json] --output-sequences [file position/name.fasta] --inference joint - translate (翻译成蛋白质序列)
augur translate --tree [file position/name.nwk] --ancestal-sequences [node-data file position/name.json] --reference-sequence [position/name.gb] --output [positon/name.json] - export(导出适合可视化的json文件)
augur export v2 --tree [file position/name.nwk] --metadata [metadata position&name.tsv] --node-data [traits.json ancestral.json translate.json] --color [config file] --aupice-config [aupice config file] --output [json file] - 可视化
auspice view --datasetDir [json file position]
eg:
augur filter --sequences data/sequences_beijing.fasta --metadata data/metadata.tsv --output results/filtered.fasta

augur align --sequences results2/filtered.fasta --output results2/aligned.fasta --fill-gaps

augur tree --alignment results2/aligned.fasta --output results2/tree_raw.nwk

augur refine --tree results2/tree_raw.nwk --alignment results2/aligned.fasta --metadata data2/metadata2.tsv --output-tree results2/tree.nwk --output-node-data results2/branch_lengths.json --timetree --coalescent opt --date-confidence --date-inference marginal --clock-filter-iqd 4

augur traits --tree results2/tree.nwk --metadata data2/metadata2.tsv --output results2/traits.json --columns region country --confidence

augur ancestral --tree results2/tree.nwk  --alignment results2/aligned.fasta --output-node-data results2/nt_muts.json --output-sequences results2/nt_muts.fasta  --inference joint

augur translate --tree results2/tree.nwk --ancestral-sequences results2/nt_muts.json --reference-sequence config2/NC_045512.gb --output results2/aa_muts.json

augur export v2 --tree results2/tree.nwk --metadata data2/metadata2.tsv --node-data results2/branch_lengths.json results2/traits.json results2/nt_muts.json results2/aa_muts.json --colors config2/colors.tsv --auspice-config config2/auspice_config.json --output auspice2/Beijing.json
Auspice部署至服务器上
参考Auspice技术文档:Auspice
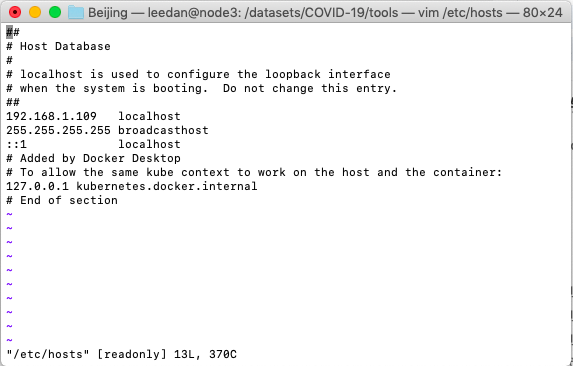
- 修改hosts文件localhost ip
#Ubuntu
sudo vim /etc/hosts
把localhost前面ip改为 局域网ip(mac同) - 添加localhost解析
127.0.0.1 baidu.com - 重启网络
sudo /etc/init.d/networking restart
今天的文章Augur安装与使用分享到此就结束了,感谢您的阅读。
版权声明:本文内容由互联网用户自发贡献,该文观点仅代表作者本人。本站仅提供信息存储空间服务,不拥有所有权,不承担相关法律责任。如发现本站有涉嫌侵权/违法违规的内容, 请发送邮件至 举报,一经查实,本站将立刻删除。
如需转载请保留出处:https://bianchenghao.cn/61235.html

