Revit Openings 洞口
Openings 洞口
级别:High
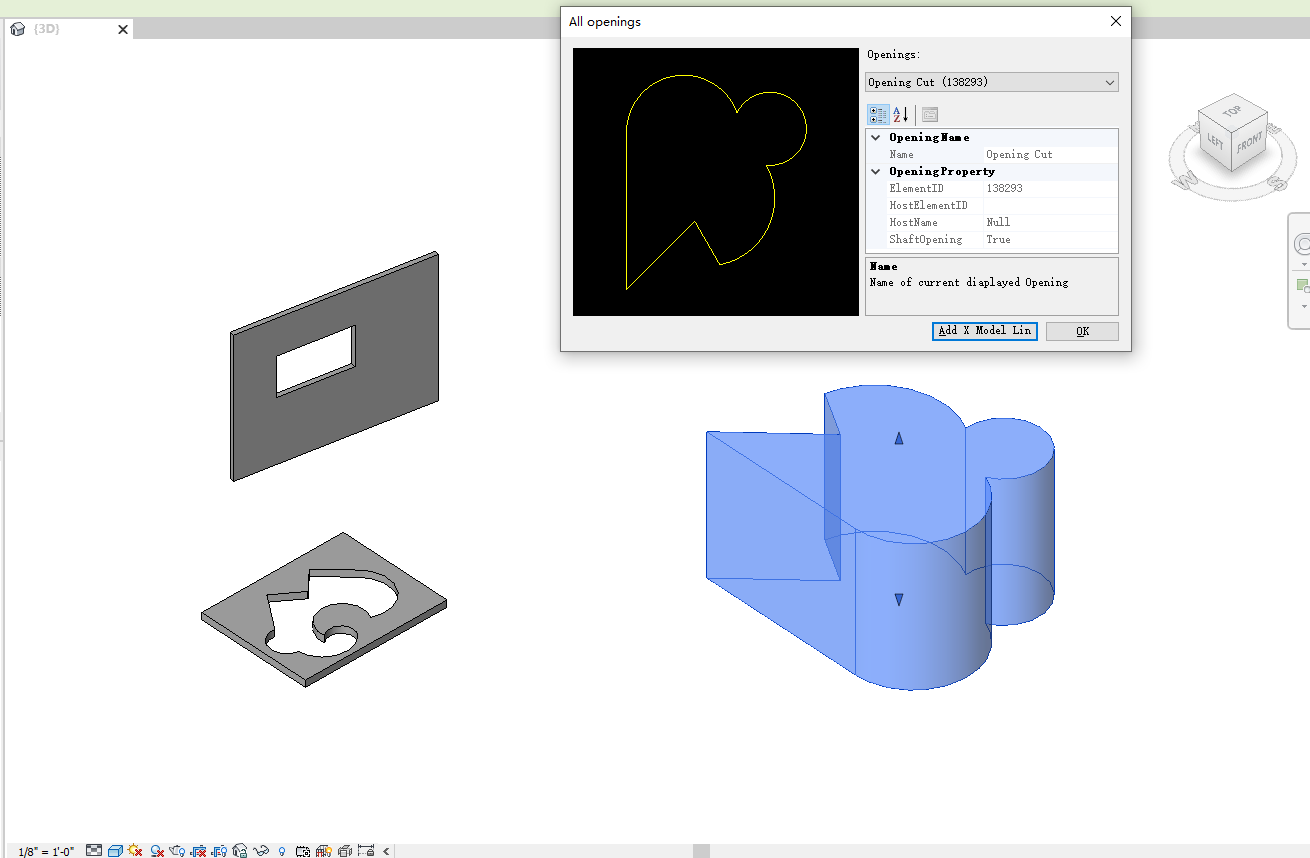
效果:
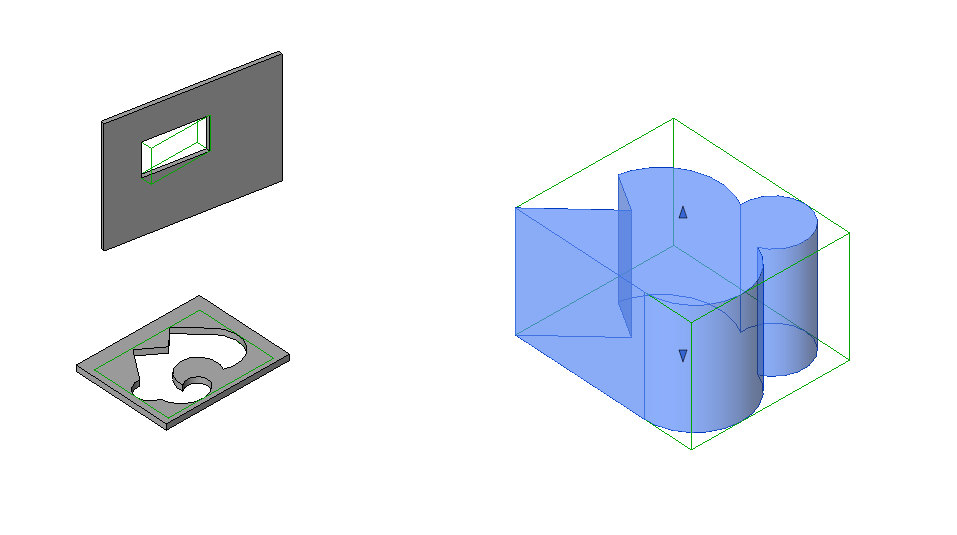
Shows how to get geometry profile and properties of an opening and how to add x model lines to opening bounding box.
如何获取一个洞口的几何轮廓及属性,以及如何给洞口的包围盒增加若干模型线
提取洞口的轮廓信息:
添加包围盒信息,其中绿色线就是包围盒大小:
1、洞口的类型
SDK的sample中共展示了3类洞口类型,对应的宿主元素(host)情况如下:
OST_ShaftOpening Host-null
OST_FloorOpening Host-Floors
OST_SWallRectOpening Host-Walls
2、洞口的常用属性信息
private string m_name = "Opening"; //name of opening名称
private string m_elementId = ""; //Element Id of Opening id号
private string m_hostElementId = ""; // Element Id of Opening,'s host 宿主元素id号
private string m_hostName = "Null"; //Name of host 宿主元素名称
private bool m_isShaft; //whether Opening is Shaft Opening 是否竖井洞口
3、包围盒信息
//get BoundingBox of Opening
BoundingBoxXYZ boxXYZ = m_opening.get_BoundingBox(m_revit.ActiveUIDocument.Document.ActiveView);
这个包围盒信息很简单,就是boundBoxXYZ.Max和 boundBoxXYZ.Min的信息
4、轮廓信息
获取轮廓信息主要是SDK中的GetProfile() 函数
private void GetProfile()
{

    // 获取轮廓的curves曲线
    CurveArray curveArray = m_opening.BoundaryCurves;
    // 第一种情况是否为空
    if (null != curveArray)
    {

        m_lines.Clear();
        foreach (Curve curve in curveArray)
        {

            // curve.Tessellate离散化成为一小段直线形式,格式为List<XYZ>
            List<XYZ> points = curve.Tessellate() as List<XYZ>;
            AddLine(points);
        }
        WireFrame wireFrameSketch = new WireFrame(new ReadOnlyCollection<Line3D>(m_lines));
        m_sketch = wireFrameSketch;
    }
    //第二种情况 就是方形
    else if (m_opening.IsRectBoundary)
    {

        //if opening profile is RectBoundary,
        //just can get profile info from BoundaryRect Property
        m_lines.Clear();
        List<XYZ> boundRect = m_opening.BoundaryRect as List<XYZ>;
        // boundRect为两个角点 boundRect[0]/[1]
        List<XYZ> RectPoints = GetPoints(boundRect);
        AddLine(RectPoints);
        WireFrame wireFrameSketch = new WireFrame(new ReadOnlyCollection<Line3D>(m_lines));
        m_sketch = wireFrameSketch;
    }
    else
    {

        m_sketch = null;
    }
}
获取到轮廓之后,就是在二维的图形中根据XY坐标绘制出对应的线,这里不是重点。
5、核心的函数
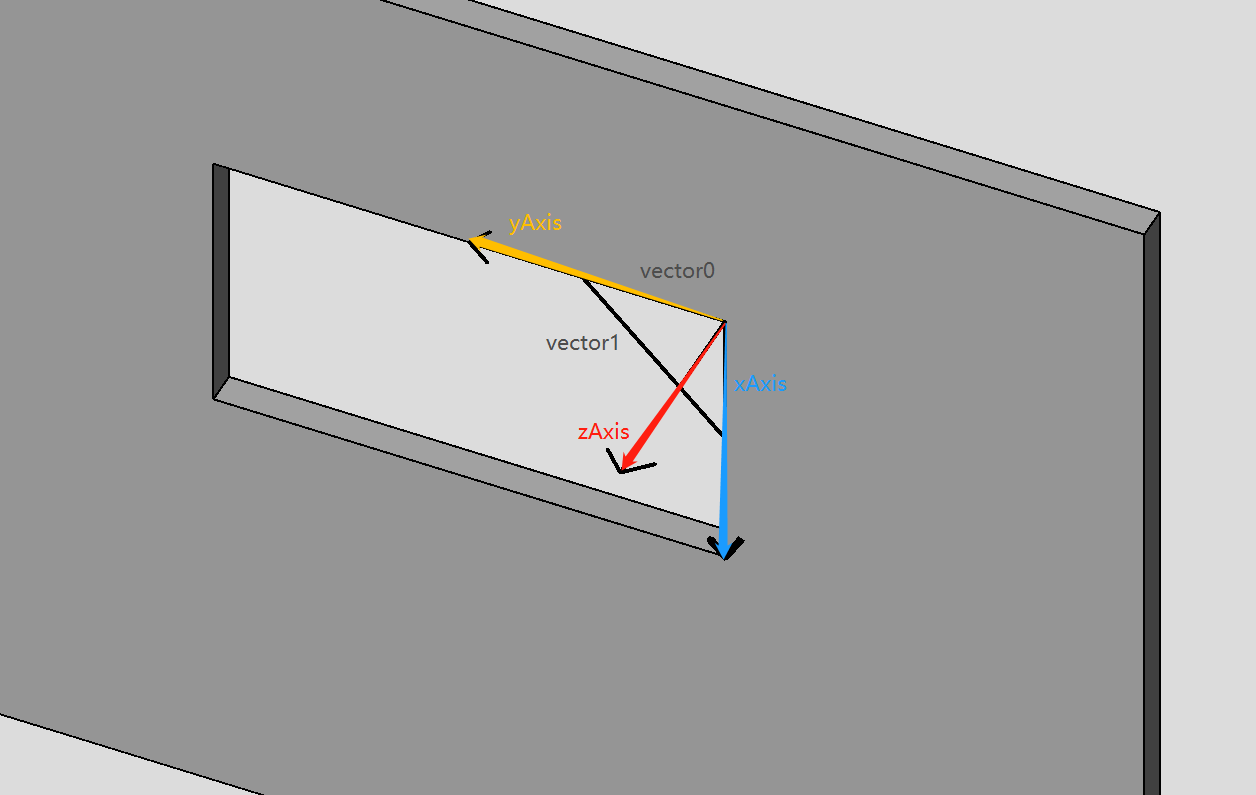
|————Frame3DTo2D(line3Ds) // transform 3d point to 2d (if all points in the same plane)将三维的点投影到二维平面之上。这个函数的主要步骤是:
1)找到3个点形成2个向量求出面的法向量,对长度和角度的过小值的判断
2)根据法向量形成局部坐标系;UCS ucs = new UCS(origin, xAxis, yAxis);
3)根据坐标系进行line3d的坐标系转换Line3D tmp = ucs.GC2LC(line);
4)局部坐标下X,Y坐标就是投影坐标
|————RectangleF.Union(m_boundingBox, aLineSketch.BoundingBox);
遍历全部包围盒求出最大包围盒
private void Frame3DTo2D(ReadOnlyCollection<Line3D> line3Ds)
{

    const double LengthEpsilon = 0.01;
    const double AngleEpsilon = 0.1;
    // find 3 points to form 2 lines whose length is bigger than LengthEpsilon
    // and angle between them should be bigger than AngleEpsilon
    // 找到2条线来构成一个平面
    Line3D line0 = line3Ds[0];
    Vector vector0 = new Vector();
    Vector vector1 = new Vector();
    // to find the first 2 points to form first line
    // 第一条线两个点
    int index = 0;
    for (int i = 1; i < line3Ds.Count; i++)
    {

        vector0 = line3Ds[i].StartPoint - line0.StartPoint;
        if (vector0.GetLength() > LengthEpsilon)
        {

            index = i;
            break;
        }
    }
    if (index == 0)
    {

        return;
    }
    // to find the last points to form the second line
    // 第二条线
    for (int j = index + 1; j < line3Ds.Count; j++)
    {

        vector1 = line3Ds[j].StartPoint - line3Ds[index].StartPoint;
        double angle = Vector.GetAngleOf2Vectors(vector0, vector1, true);
        if (vector1.GetLength() > LengthEpsilon && angle > AngleEpsilon)
        {

            break;
        }
    }

    // find the local coordinate system in which the profile of opening is horizontal
    // 构建局部坐标系,具体见下图
    //先求得vector0 和 vector1的法向量,投影面的法向量
    Vector zAxis = (vector0 & vector1).GetNormal();
    // 上一步求得的法向量再和Y向量求一个法向量 其实就是一个垂直于投影面的法向量
    Vector xAxis = zAxis & (new Vector(0.0, 1.0, 0.0));
    // 根据之前两个向量求第三个向量
    Vector yAxis = zAxis & xAxis;
    Vector origin = new Vector(0.0, 0.0, 0.0);
    // 构建局部坐标系
    UCS ucs = new UCS(origin, xAxis, yAxis);

    // transform all the 3D lines to UCS and create accordingly 2D lines
    bool isFirst = true;
    foreach (Line3D line in line3Ds)
    {

        // 进行坐标系的转换
        Line3D tmp = ucs.GC2LC(line);
        // 起始点
        PointF startPnt = new PointF((float)tmp.StartPoint.X, (float)tmp.StartPoint.Y);
        // 终点
        PointF endPnt = new PointF((float)tmp.EndPoint.X, (float)tmp.EndPoint.Y);
        // 形成二维的线
        Line2D line2D = new Line2D(startPnt, endPnt);
        LineSketch aLineSketch = new LineSketch(line2D);
        if (isFirst)
        {

            m_boundingBox = aLineSketch.BoundingBox;
            isFirst = false;
        }
        else
        {

            // 遍历全部包围盒求出最大包围盒
            m_boundingBox = RectangleF.Union(m_boundingBox, aLineSketch.BoundingBox);
        }
        m_objects.Add(aLineSketch);
    }
}
BIM树洞
做一个静谧的树洞君
用建筑的语言描述IT事物;
用IT的思维解决建筑问题;
共建BIM桥梁,聚合团队。
本学习分享资料不得用于商业用途,仅做学习交流!!如有侵权立即删除!!
-
微信公众号: BIM树洞
-
知乎专栏:BIM树洞
-
气氛组博客:http://www.31bim.com
-
BIM应用及咨询,CAD,Revit, OpenGL,图形开发交流,加Q群1083064224
今天的文章revit洞口怎么开_revit楼梯洞口怎么开分享到此就结束了,感谢您的阅读。
版权声明:本文内容由互联网用户自发贡献,该文观点仅代表作者本人。本站仅提供信息存储空间服务,不拥有所有权,不承担相关法律责任。如发现本站有涉嫌侵权/违法违规的内容, 请发送邮件至 举报,一经查实,本站将立刻删除。
如需转载请保留出处:https://bianchenghao.cn/63868.html


