from:layer-list — layer-list的基本使用介绍
1. layer-list 是啥?有啥作用?
点击查看 安卓官方开发指南中关于layerlsit的说明
(1). layer-list 是啥?
简单理解,layer 是层,list 是列表,那么 layer-list 就是层列表的意思。但是,是什么层列表呢?? 其实 layer-list 是用来创建 LayerDrawable 的,LayerDrawable 是 DrawableResource 的一种, 所以,layer-list 创建出来的是 图层列表,也就是一个drawable 图形。
(2). layer-list 有啥作用?
上面已经说过,layer-list 是用来创建 图层列表的,通过它能创建出一些特殊的 drawable, 比如:
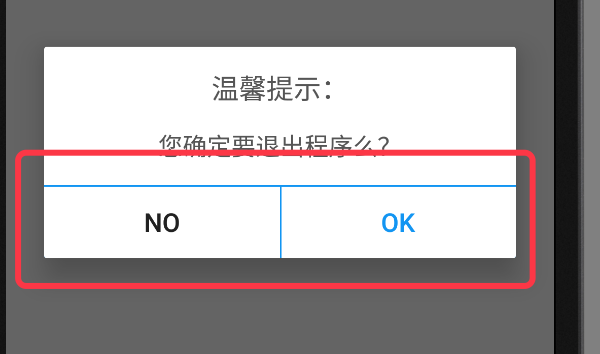
下图 AlertDialog 中,我们只需要设置 button 的 顶部边线,以及 左侧button的右边线(或者右侧button的左边线),这种时候我们就无法直接使用 shape 了,因为直接使用 shape 绘制出来的是四个边框; 如果让美工切图也可以,但那样的话灵活度就差了很多,而且会增加app的体积;这种情况下,使用 layer-list 就是最佳选择。当然,layer-list 的用途还有很多,这里只是举一个例子,具体的使用请继续往下看。
2. layer-list 的大致原理
layer-list 的大致原理类似 RelativeLayout(或者FrameLayout) ,也是一层层的叠加 ,后添加的会覆盖先添加的。在 layer-list 中可以通过 控制后添加图层距离最底部图层的 左上右下的四个边距等属性,得到不同的显示效果。
上面示例图中,AlertDialog 底部的 ok按钮 的背景就是用layer-list实现的。该layer-list 中,底层使用一个填充色为蓝色 的shape,上层使用一个填充色为白色的shape ,然后控制上层距离最底层的顶部边距为1dp , 这样在视觉上就形成了一个 具有蓝色顶部边线的白色背景。具体代码继续往下看。
3. layer-list 基本使用示例:
因 layer-list 创建出来的也是 drawable 资源,所以,同 shape selector 一样,都是定义在 res 中的 drawable 文件夹中,也是一个 xml 文件。使用的时候,同shape selector , 布局文件中使用 @drawable/ xxx 引用, 代码中使用 R.drawable.xxx 引用。
layer-list 中不同的图层使用 item 节点来定义。
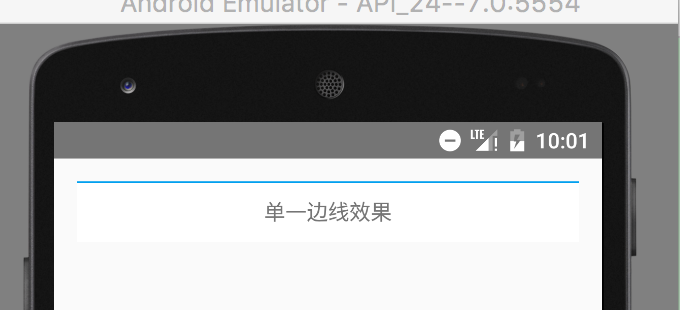
(1). 效果1 :单一边线
效果图:
图中,TextView 只有一个顶部边线
具体代码:
- 创建带有蓝色顶部边线的 layer-list 图
在 res 目录中的 drawable 目录下,创建名称为 singleline.xml 的xml 文件,然后编辑 layer-list 的详细代码,如下:
<?xml version="1.0" encoding="utf-8"?>
<layer-list xmlns:android="http://schemas.android.com/apk/res/android">

    <!--底层使用蓝色填充色-->
    <item>
        <shape>
            <solid android:color="#02a0ef"/>
        </shape>
    </item>

    <!--上面一层距离底层的顶部1dp,类似marginTop,填充色为白色,这样就形成了一个带有蓝色顶部边线的白色背景的图-->
    <item android:top="1dp">
        <shape>
            <solid android:color="#fff"/>
        </shape>
    </item>
</layer-list>
- 1
- 2
- 3
- 4
- 5
- 6
- 7
- 8
- 9
- 10
- 11
- 12
- 13
- 14
- 15
- 16
- 17
- 使用 layer-list 图,设置为textView的背景
 <TextView
        android:layout_width="match_parent"
        android:layout_height="40dp"
        android:background="@drawable/singleline"
        android:gravity="center"
        android:text="单一边线效果"/>
- 1
- 2
- 3
- 4
- 5
- 6
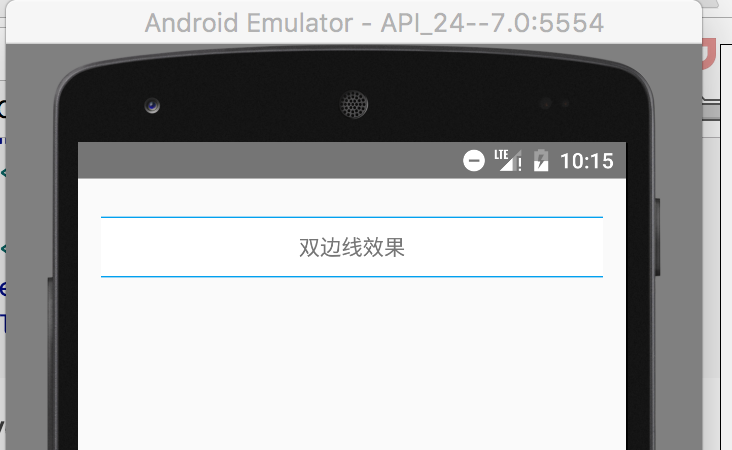
(2). 效果2 :双边线
效果图:
图中,TextView 具有上下边线
具体代码:
- 创建带有蓝色顶部和底部边线的 layer-list 图
<?xml version="1.0" encoding="utf-8"?>
<layer-list xmlns:android="http://schemas.android.com/apk/res/android">

    <!--底层使用蓝色填充色-->
    <item>
        <shape>
            <solid android:color="#02a0ef"/>
        </shape>
    </item>

    <!--上面一层距离底层的顶部1dp,距离底部1dp,类似marginTop,填充色为白色,这样就形成了一个带有蓝色顶部边线和底部边线的白色背景的图-->
    <item android:bottom="1dp" android:top="1dp">
        <shape>
            <solid android:color="#fff"/>
        </shape>
    </item>
</layer-list>
- 1
- 2
- 3
- 4
- 5
- 6
- 7
- 8
- 9
- 10
- 11
- 12
- 13
- 14
- 15
- 16
- 17
- 18
- 使用 layer-list 图,设置为textView的背景
  <TextView
        android:layout_width="match_parent"
        android:layout_height="40dp"
        android:layout_marginTop="10dp"
        android:background="@drawable/doubleline"
        android:gravity="center"
        android:text="双边线效果"/>
- 1
- 2
- 3
- 4
- 5
- 6
- 7
- 8
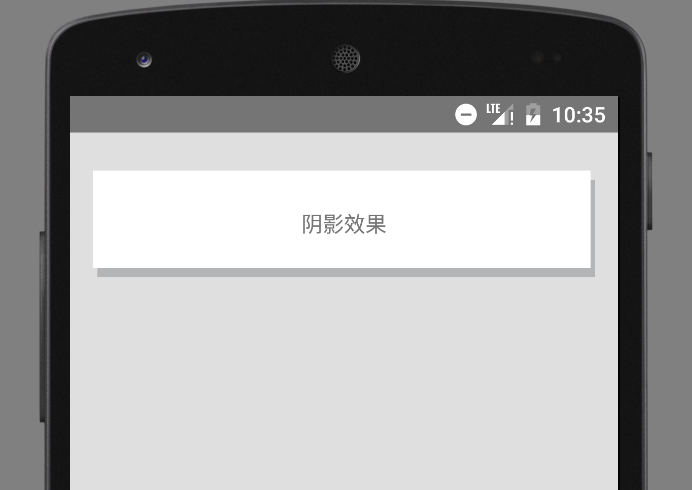
(3). 效果3 :阴影
效果图:
具体代码:
- 创建 layer-list
<?xml version="1.0" encoding="utf-8"?>
<layer-list xmlns:android="http://schemas.android.com/apk/res/android">

    <!--底层的左边距离上层左边3dp, 底层的顶部,距离上层的顶部6dp,如果不做这个控制,底层和上层的左侧和上侧会重合在一起-->
    <item android:left="3dp" android:top="6dp">
        <shape>
            <solid android:color="#b4b5b6"/>
        </shape>
    </item>

    <!--上层的右边距离底层的右边3dp, 上层的底部距离底层的底部6dp-->
    <item android:bottom="6dp" android:right="3dp">
        <shape>
            <solid android:color="#fff"/>
        </shape>
    </item>
</layer-list>
- 1
- 2
- 3
- 4
- 5
- 6
- 7
- 8
- 9
- 10
- 11
- 12
- 13
- 14
- 15
- 16
- 17
- 18
- 19
- 使用 layer-list 图,
  <TextView
        android:layout_width="match_parent"
        android:layout_height="70dp"
        android:layout_marginTop="10dp"
        android:background="@drawable/shadow"
        android:gravity="center"
        android:text="阴影效果"/>
- 1
- 2
- 3
- 4
- 5
- 6
- 7
(4). 效果4 : 图片层叠
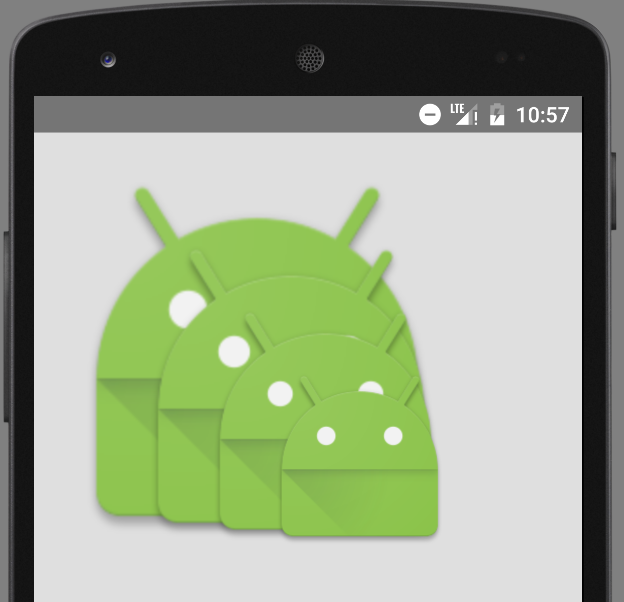
图片层叠的时候,有两种效果,一种是缩放后层叠,一种是不缩放的层叠。默认是缩放效果。具体效果以及实现代码如下:
效果图 1) : 带有缩放效果的
具体代码 1):
- 创建 layer-list
<?xml version="1.0" encoding="utf-8"?>
<layer-list xmlns:android="http://schemas.android.com/apk/res/android">
    <!--默认缩放-->
    <item>
        <bitmap  android:src="@drawable/ic_launcher"/>
    </item>

    <item android:left="35dp" android:top="35dp">
        <bitmap  android:src="@drawable/ic_launcher"/>
    </item>

    <item android:left="70dp" android:top="70dp">
        <bitmap  android:src="@drawable/ic_launcher"/>
    </item>
</layer-list>
- 1
- 2
- 3
- 4
- 5
- 6
- 7
- 8
- 9
- 10
- 11
- 12
- 13
- 14
- 15
- 16
- 17
- 18
- 19
- 20
或者也可以使用如下代码,实现缩放的叠加图:
<?xml version="1.0" encoding="utf-8"?>
<layer-list xmlns:android="http://schemas.android.com/apk/res/android">
    <!--这种方式拿到的是带有缩放的效果,即便给item 设置了gravity 并且从模拟器上看到的效果是不缩放的,但是真机上依旧是缩放的效果-->
    <item android:drawable="@drawable/ic_launcher">
    </item>
    <item android:drawable="@drawable/ic_launcher" android:left="45dp" android:top="45dp">
    </item>
    <item android:drawable="@drawable/ic_launcher" android:left="90dp" android:top="90dp">
    </item>
</layer-list>
- 1
- 2
- 3
- 4
- 5
- 6
- 7
- 8
- 9
- 10
- 11
- 12
- 13
- 14
- 15
- 使用 layer-list 图,
<ImageView android:layout_width="wrap_content" android:layout_height="wrap_content" android:background="@drawable/overlay" />
- 1
- 2
- 3
- 4
- 5
效果图 2):不带缩放效果的
注意:
A. 不缩放的时候,必须在 item 节点中使用 bitmap 节点,并给 bitmap 设置 gravity=center ;B. 虽然在实现缩放效果的时候,可以直接使用 item 中的 drawable属性,但实现不缩放的效果时,如果还用drawable 属性,即便给item 设置了gravity =center ,在真机上的效果依旧是缩放的。(但模拟器是不缩放的)
具体代码 2):
- 创建 layer-list
<?xml version="1.0" encoding="utf-8"?>
<layer-list xmlns:android="http://schemas.android.com/apk/res/android">
    <!--不缩放-->
    <item>
        <bitmap  android:gravity="center" android:src="@drawable/ic_launcher"/>
    </item>

    <item android:left="35dp" android:top="35dp">
        <bitmap android:gravity="center" android:src="@drawable/ic_launcher"/>
    </item>

    <item android:left="70dp" android:top="70dp">
        <bitmap android:gravity="center" android:src="@drawable/ic_launcher"/>
    </item>

</layer-list>
- 1
- 2
- 3
- 4
- 5
- 6
- 7
- 8
- 9
- 10
- 11
- 12
- 13
- 14
- 15
- 16
- 17
- 18
- 19
- 20
- 21
- 22
- 使用 layer-list 图,
<ImageView android:layout_width="wrap_content" android:layout_height="wrap_content" android:background="@drawable/overlay" />
- 1
- 2
- 3
- 4
- 5
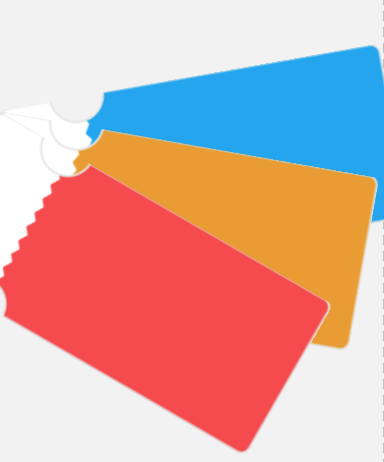
(5). 效果5 :叠加旋转
效果图:
具体代码:
- 创建 layer-list
<?xml version="1.0" encoding="utf-8"?>
<layer-list xmlns:android="http://schemas.android.com/apk/res/android">

    <item>
        <rotate android:fromDegrees="-10" android:pivotX="0" android:pivotY="0">
            <bitmap android:src="@drawable/decibel_blue_background"/>
        </rotate>
    </item>
    <item>
        <rotate android:fromDegrees="10" android:pivotX="0" android:pivotY="0">
            <bitmap android:src="@drawable/decibel_orange_background"/>
        </rotate>
    </item>
    <item>
        <rotate android:fromDegrees="30" android:pivotX="0" android:pivotY="0">
            <bitmap android:src="@drawable/decibel_red_background"/>
        </rotate>
    </item>


</layer-list>
- 1
- 2
- 3
- 4
- 5
- 6
- 7
- 8
- 9
- 10
- 11
- 12
- 13
- 14
- 15
- 16
- 17
- 18
- 19
- 20
- 21
- 22
- 23
- 24
旋转的时候,只需要给出 起始的角度( fromdegress )即可。
- 使用 layer-list 图,
     <!--图片叠加并带旋转效果-->
    <ImageView  android:layout_width="wrap_content" android:layout_height="wrap_content" android:background="@drawable/rotate"/>
- 1
- 2
- 3
- 4
- 5
4. layer-list 的扩展使用
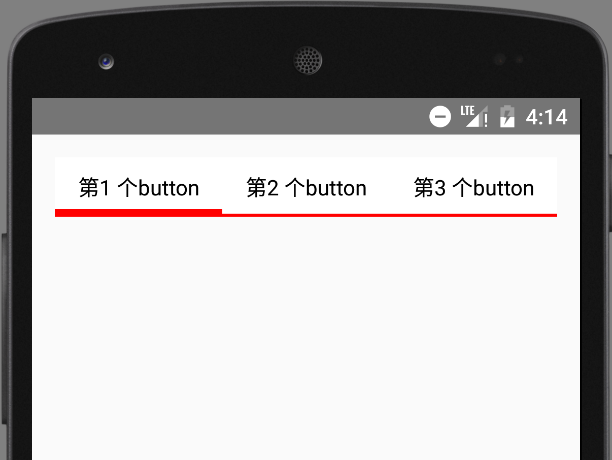
(1).实现选择器的效果
主要使用组件:RadioGroup Selector layer-list
1). 效果图:
2). 具体代码
- 定义 selector 选择器
selector 的 item 节点中,直接嵌套 layer-list
当然也可以先写好layer-list ,然后再去引用
<?xml version="1.0" encoding="utf-8"?>
<selector xmlns:android="http://schemas.android.com/apk/res/android">
    <!--被选中时是4dp的底部边线-->
    <item android:state_checked="true">
        <layer-list>
            <item>
                <shape>
                    <solid android:color="#f00"/>
                </shape>
            </item>
            <item android:bottom="4dp">
                <shape>
                    <solid android:color="#fff"/>
                </shape>
            </item>
        </layer-list>
    </item>

    <!--未被选中的是2dp的底部边线-->
    <item>
        <layer-list>
            <item>
                <shape>
                    <solid android:color="#f00"/>
                </shape>
            </item>
            <item android:bottom="2dp">
                <shape>
                    <solid android:color="#fff"/>
                </shape>
            </item>
        </layer-list>
    </item>
</selector>
- 1
- 2
- 3
- 4
- 5
- 6
- 7
- 8
- 9
- 10
- 11
- 12
- 13
- 14
- 15
- 16
- 17
- 18
- 19
- 20
- 21
- 22
- 23
- 24
- 25
- 26
- 27
- 28
- 29
- 30
- 31
- 32
- 33
- 34
注意:
在上面的代码中,由于并没有具体的shape ,所以可以省略shape , 直接用 color , 简化后的代码如下:
<?xml version="1.0" encoding="utf-8"?>
<selector xmlns:android="http://schemas.android.com/apk/res/android">

    <!--被选中时是4dp的底部边线-->
    <item android:state_checked="true">
        <layer-list>
            <item>
                <color android:color="#f00"/>
            </item>
            <item android:bottom="5dp">
                <color android:color="#fff"/>
            </item>
        </layer-list>
    </item>

    <!--未被选中的是2dp的底部边线-->
    <item>
        <layer-list>
            <item>
                <color android:color="#f00"/>
            </item>
            <item android:bottom="2dp">
                <color android:color="#fff"/>
            </item>
        </layer-list>
    </item>
</selector>
- 1
- 2
- 3
- 4
- 5
- 6
- 7
- 8
- 9
- 10
- 11
- 12
- 13
- 14
- 15
- 16
- 17
- 18
- 19
- 20
- 21
- 22
- 23
- 24
- 25
- 26
- 27
- 使用selector
<LinearLayout xmlns:android="http://schemas.android.com/apk/res/android" android:layout_width="match_parent" android:layout_height="match_parent" android:orientation="vertical" android:padding="15dp">
    <RadioGroup  android:id="@+id/rg" android:layout_width="match_parent" android:layout_height="wrap_content" android:orientation="horizontal">
        <RadioButton  android:id="@+id/rb1" android:layout_width="0dp" android:layout_height="wrap_content" android:layout_weight="1" android:background="@drawable/selector_bk_rb" android:button="@null" android:checked="true" android:gravity="center" android:padding="10dp" android:text="第1 个button"/>
        <RadioButton  android:layout_width="0dp" android:layout_height="wrap_content" android:layout_weight="1" android:background="@drawable/selector_bk_rb" android:button="@null" android:gravity="center" android:padding="10dp" android:text="第2 个button"/>
        <RadioButton  android:layout_width="0dp" android:layout_height="wrap_content" android:layout_weight="1" android:background="@drawable/selector_bk_rb" android:button="@null" android:gravity="center" android:padding="10dp" android:text="第3 个button"/>

    </RadioGroup>
</LinearLayout>
- 1
- 2
- 3
- 4
- 5
- 6
- 7
- 8
- 9
- 10
- 11
- 12
- 13
- 14
- 15
- 16
- 17
- 18
- 19
- 20
- 21
- 22
- 23
- 24
- 25
- 26
- 27
- 28
- 29
- 30
- 31
- 32
- 33
- 34
- 35
- 36
- 37
- 38
- 39
- 40
- 41
- 42
注意:
在 RadioGroup 中,是通过 RadioButton 的 id 来控制是否选中。
所以,如果需要设置某一个 RadioButton 为默认选中,就必须给该 RadioButton 设置 id ;
如果不设置 id ,导致的结果就是该 RadioButton 会一直处于选中状态!!!
今天的文章layer list android_groupby的用法及原理详解分享到此就结束了,感谢您的阅读。
版权声明:本文内容由互联网用户自发贡献,该文观点仅代表作者本人。本站仅提供信息存储空间服务,不拥有所有权,不承担相关法律责任。如发现本站有涉嫌侵权/违法违规的内容, 请发送邮件至 举报,一经查实,本站将立刻删除。
如需转载请保留出处:https://bianchenghao.cn/79175.html

