前言
动态添加表单组件的需求在实际开发中十分常见。本文将讲解如何使用 vue 实现动态添加表单的功能,让你轻松应对此类需求。
一、整个表单内容都是动态的
<template>
  <div class="addFormBox">
    <!-- 循环data中定义的数组 -->
    <div v-for="(item,index) in formLabelAlign" :key="index">
      <div class="formOuterBox">
        <div class="formCotantBox">
          <h3>车辆信息 {

  {index+1}}</h3>
          <!-- 表单内容 -->
          <el-form label-width="80px">
            <el-form-item label="车牌号">
              <el-input v-model="item.carBoard"></el-input>
            </el-form-item>
            <el-form-item label="车牌颜色">
              <el-input v-model="item.carColor"></el-input>
            </el-form-item>
            <el-form-item label="排放阶段">
              <el-input v-model="item.discharge"></el-input>
            </el-form-item>
          </el-form>
        </div>
        <!-- 操作按钮 -->
        <div>
          <el-button @click="addForm" type="success">添加车辆信息</el-button>
          <el-button v-if="formLabelAlign.length > 1" @click="removeIdx(item, index)" type="danger">删除此条车辆信息</el-button>
        </div>
      </div>
    </div>
  </div>
</template>

<script> export default {
      data() {
      return {
      // 表单绑定数据 formLabelAlign: [ {
      carBoard: "", carColor: "", discharge: "", }, ], }; }, methods: {
      // 添加操作 addForm() {
      // 定义一个标识,通过标识判断是否能添加信息 let statusType = true; this.formLabelAlign.forEach((item) => {
      if ( item.carBoard == "" || item.carColor == "" || item.discharge == "" ) {
      this.$message({
      message: "请完善信息后在添加", type: "warning", }); statusType = false; } }); if (statusType) {
      this.formLabelAlign.push({
      carBoard: "", carColor: "", discharge: "", }); } }, // 删除操作 removeIdx(item, index) {
      this.formLabelAlign.splice(index, 1); this.$message({
      message: "删除成功", type: "success", }); }, }, }; </script>

<style scoped> .addFormBox {
      margin: 20px; } .formOuterBox {
      margin-bottom: 20px; padding: 30px 40px; background: white; border-radius: 30px; } h3 {
      margin: 0px 0px 20px 0px; } </style>
实现思路
-
在
data中定义了一个名为formLabelAlign的数组,用于存储车辆信息的表单数据。初始时,数组中只有一个空对象,表示一个空的车辆信息表单; -
在模板中使用
v-for指令循环遍历formLabelAlign数组,生成多个车辆信息表单; -
每个车辆信息表单包含三个输入框,分别是车牌号、车牌颜色和排放阶段。这些输入框使用
v-model指令与formLabelAlign数组中的对应属性进行双向绑定,实现数据的同步更新; -
每个车辆信息表单下方有两个操作按钮,一个是”添加车辆信息”按钮,另一个是”删除此条车辆信息”按钮。点击”添加车辆信息”按钮时,会检查当前表单是否填写完整,如果有任何一个输入框为空,则会弹出警告消息,要求完善信息。如果所有输入框都填写完整,则会在
formLabelAlign数组末尾添加一个空的车辆信息对象,实现添加表单的功能; -
点击”删除此条车辆信息”按钮时,会根据按钮所在的表单索引,从
formLabelAlign数组中删除对应的车辆信息对象,实现删除表单的功能。
- 实现效果
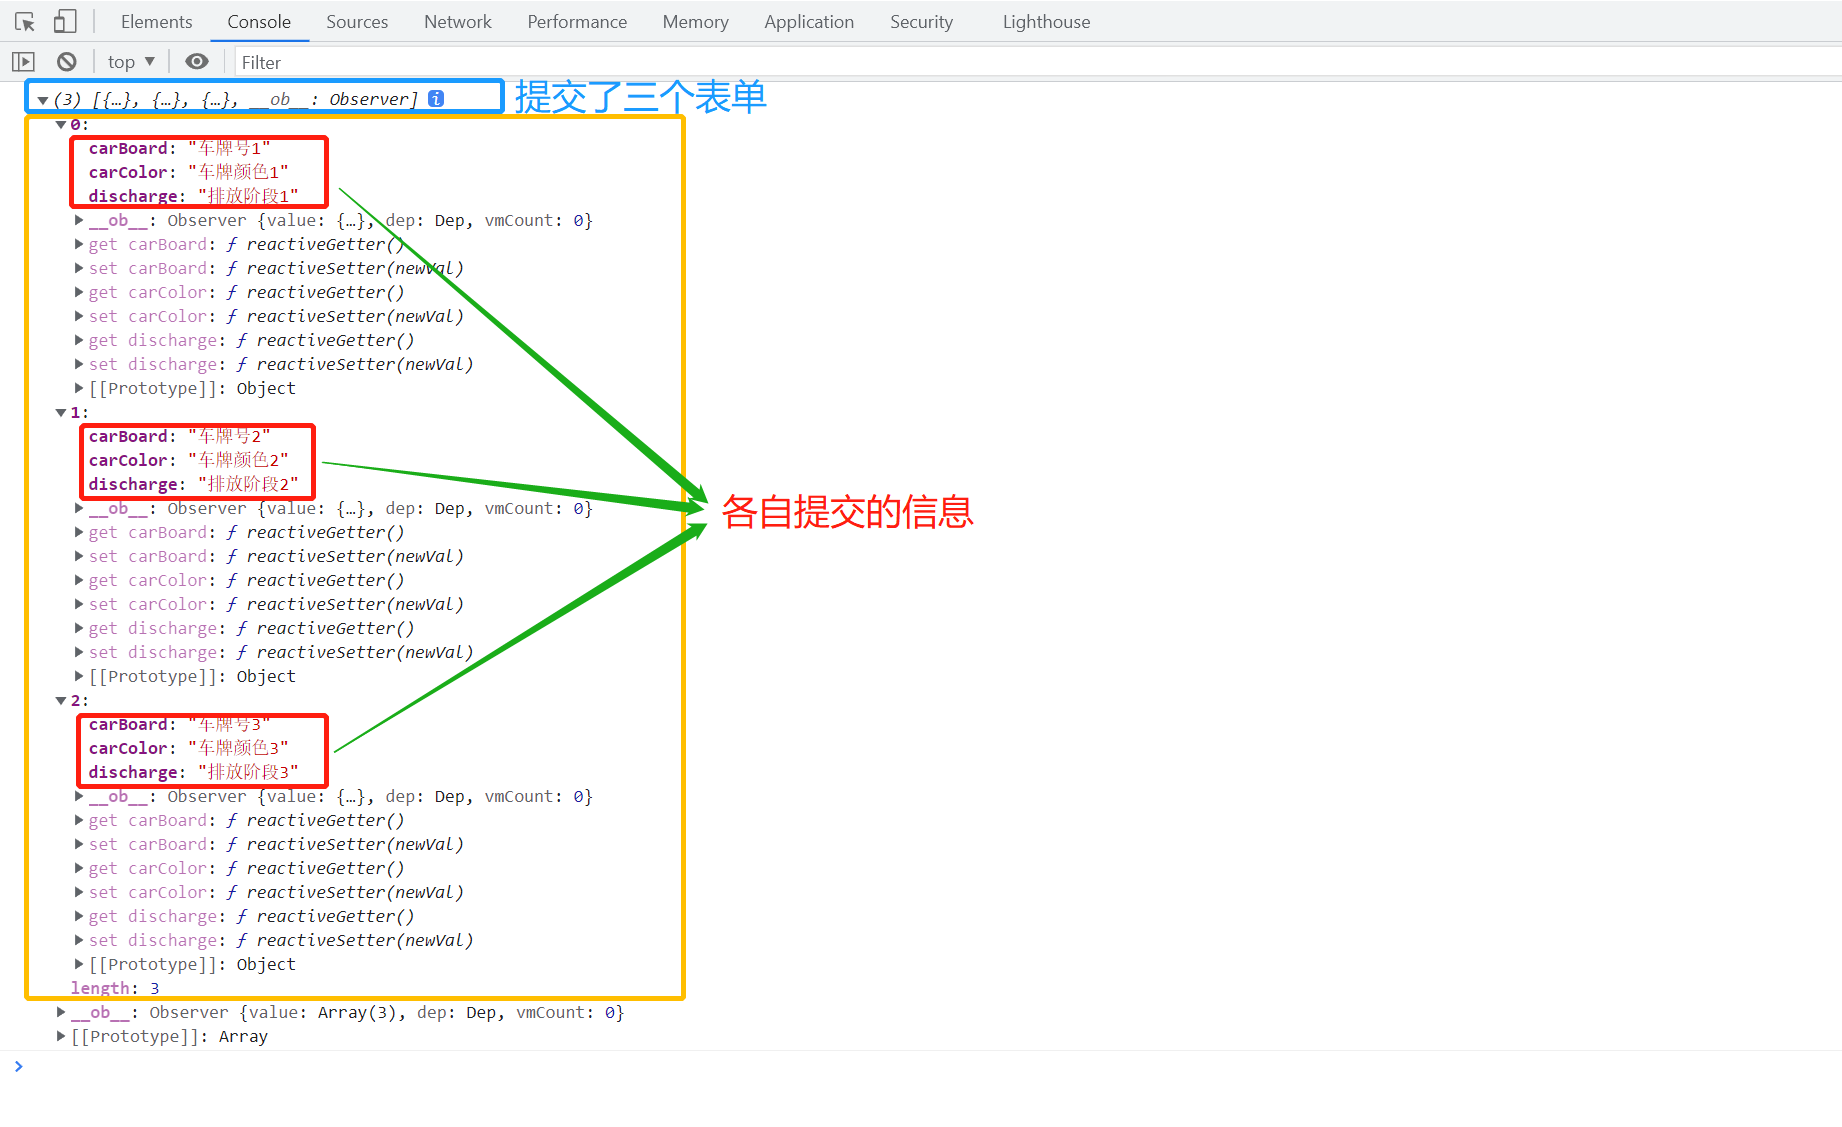
提交后的数据
二、表格中动态添加
<template>
  <div>
    <el-table :row-class-name="tableRowClassName" :data="formLabelAlign" border style="width: 100%">
      <el-table-column align="center" width="100px" type="index" label="序号"></el-table-column>
      <el-table-column align="center" prop="name" label="编号">
        <template slot-scope="scope">
          <el-input size="mini" v-model="scope.row.name"></el-input>
        </template>
      </el-table-column>
      <el-table-column align="center" prop="rylx" label="燃油类型">
        <template slot-scope="scope">
          <el-select @change="rylxChange(scope.row.rylx,scope.row.index)" size="mini" v-model="scope.row.rylx" placeholder="请选择燃油类型">
            <el-option v-for="item in rylxOptions" :key="item.value" :label="item.label" :value="item.value"></el-option>
          </el-select>
        </template>
      </el-table-column>
      <el-table-column align="center" prop="yh" label="油号">
        <template slot-scope="scope">
          <el-select size="mini" v-model="scope.row.yh">
            <el-option v-for="item in scope.row.yhOptions" :key="item.label" :label="item.label" :value="item.label">
            </el-option>
          </el-select>
        </template>
      </el-table-column>
      <el-table-column align="center" prop="address" label="地址">
        <template slot-scope="scope">
          <el-input size="mini" v-model="scope.row.address"></el-input>
        </template>
      </el-table-column>
      <el-table-column align="center" prop="date" label="操作">
        <template slot-scope="scope">
          <i @click="addForm" class="el-icon-circle-plus"></i>
          <i v-if="formLabelAlign.length>1" @click="removeIdx(scope.row,scope.row.index)" style="color:rgb(216,30,6)" class="el-icon-remove"></i>
        </template>
      </el-table-column>
    </el-table>
  </div>
</template>
<script> export default {
      data() {
      return {
      formLabelAlign: [ {
      name: "", rylx: "", yh: "", address: "", yhOptions: [ {
      value: "1", label: "5", }, {
      value: "2", label: "0", }, {
      value: "3", label: "-10", }, {
      value: "4", label: "-20", }, {
      value: "5", label: "-35", }, {
      value: "6", label: "-50", }, ], }, ], rylxOptions: [ {
      value: "0", label: "汽油", }, {
      value: "1", label: "柴油", }, ], }; }, methods: {
      // 添加index tableRowClassName({
       row, rowIndex }) {
      row.index = rowIndex; }, // 切换汽油柴油不同数据 rylxChange(e, index) {
      // 柴油 if (e == "1") {
      this.formLabelAlign[index].yhOptions = [ {
      value: "1", label: "5", }, {
      value: "2", label: "0", }, {
      value: "3", label: "-10", }, {
      value: "4", label: "-20", }, {
      value: "5", label: "-35", }, {
      value: "6", label: "-50", }, ]; } else {
      // 汽油 this.formLabelAlign[index].yhOptions = [ {
      value: "1", label: "89", }, {
      value: "2", label: "92", }, {
      value: "3", label: "95", }, {
      value: "4", label: "98", }, ]; } }, // 添加操作 addForm() {
      if (this.isDataComplete()) {
      this.formLabelAlign.push({
      name: "", rylx: "", yh: "", address: "", }); } else {
      this.$message({
      message: "请完善信息后再添加", type: "warning", }); } }, isDataComplete() {
      return this.formLabelAlign.every( (item) => item.name && item.rylx && item.yh && item.address ); }, // 删除操作 removeIdx(item, index) {
      this.formLabelAlign.splice(index, 1); this.$message({
      message: "删除成功", type: "success", }); }, }, }; </script>
<style scoped> i {
      font-size: 24px; cursor: pointer; } </style>
实现思路
- 在
data中定义了formLabelAlign数组,用于存储表格中的数据。数组中的每个元素都是一个对象,包含了编号、燃油类型、油号、地址和油号选项等属性; - 在
template中使用了el-table和el-table-column标签,分别表示表格和表格中的列。其中,el-table-column标签中使用了slot-scope属性,用于定义列中的内容; - 在
el-table-column标签中,使用了prop属性指定了列对应的数据属性,使用了v-model指令实现了数据的双向绑定; - 在燃油类型列中,使用了
el-select标签实现了下拉框,使用了v-for指令遍历rylxOptions数组生成选项; - 在油号列中,使用了
el-select标签实现了下拉框,使用了v-for指令遍历当前行的yhOptions数组生成选项; - 在操作列中,使用了
i标签实现了添加和删除按钮,使用了@click指令绑定了对应的方法; - 在
methods中定义了一些方法,包括tableRowClassName、rylxChange、addForm、isDataComplete和removeIdx等。其中,tableRowClassName方法用于给每一行数据添加一个index属性,rylxChange方法用于根据燃
油类型改变油号选项,addForm方法用于添加一行数据,isDataComplete方法用于判断数据是否完整,removeIdx方法用于删除一行数据。
- 实现效果
当然你也可以将操作按钮改成下面这种交互方式
<el-table-column align="center" prop="date" label="操作">
  <template slot-scope="scope">
    <i @click="addForm(scope.row, scope.$index)" class="el-icon-circle-plus" v-if="formLabelAlign.length == scope.$index + 1"></i>
    <i v-if="formLabelAlign.length > 1" @click="removeIdx(scope.row, scope.$index)" style="color:rgb(216,30,6)" class="el-icon-remove"></i>
  </template>
</el-table-column>
- 实现效果
三、表单部分内容动态添加
<template>
  <el-dialog class="ui-dialog" :close-on-click-modal="false" title="配置模板字段" width="30%" :visible.sync="dialogVisible" @close="$emit('update:dialogChild', false)">
    <div>
      <el-form ref="elForm" :model="formData" :rules="rules" size="medium" label-width="100px">
        <el-form-item label="模板类型" prop="type">
          <el-select v-model="formData.type" clearable placeholder="请选择模板类型">
            <el-option v-for="item in typeOptions" :key="item.value" :label="item.label" :value="item.value">
            </el-option>
          </el-select>
        </el-form-item>
        <div v-for="(input, index) in formData.inputs" :key="index">
          <el-form-item :label="'字段名称' + (index+1)" :prop="'inputs[' + index + '].value'" :rules="getInputRules(index)">
            <div class="inputRow"><el-input v-model="input.value" placeholder="请输入内容" :disabled="index > 0 && !formData.inputs[index - 1].value"></el-input>
              <span v-if="index === formData.inputs.length - 1">
                <el-button type="primary" icon="el-icon-plus" @click="addInput" :disabled="!input.value"></el-button>
                <el-button type="danger" icon="el-icon-minus" @click="removeInput(index)" :disabled="formData.inputs.length === 1"></el-button>
              </span>
            </div>
          </el-form-item>
        </div>
      </el-form>
      <div class="bomBtn">
        <el-button @click="$emit('update:dialogChild', false)">取消</el-button>
        <el-button type="primary" @click="submitForm">确定</el-button>
      </div>
    </div>
  </el-dialog>
</template>

<script> export default {
      data() {
      return {
      dialogVisible: true, //弹框显隐 typeOptions: [ {
      label: "生产", value: "0", }, {
      label: "存储", value: "1", }, {
      label: "运输", value: "2", }, ], // 表单数据 formData: {
      type: "0", inputs: [{
      value: "" }], // 初始只有一个输入框 }, rules: {
      type: [ {
      required: true, message: "请选择模板类型", trigger: "change", }, ], inputs: [ {
      required: true, message: "请输入字段名称", trigger: "change", }, ], }, }; }, props: {
      dialogChild: {
      type: Boolean, default: false, }, }, watch: {
      dialogChild: {
      handler(newName, oldName) {
      this.dialogVisible = newName; }, deep: true, }, }, methods: {
      // 添加 addInput() {
      const lastIndex = this.formData.inputs.length - 1; if (this.formData.inputs[lastIndex].value) {
      this.formData.inputs.push({
      value: "" }); } }, // 删除 removeInput(index) {
      this.formData.inputs.splice(index, 1); }, // 自定义校验 getInputRules(index) {
      return [ {
      required: true, message: `请输入字段名称${
       index + 1}`, trigger: "change", }, ]; }, // 提交 submitForm() {
      this.$refs["elForm"].validate((valid) => {
      if (valid) {
      // 提交表单逻辑 console.log(this.formData); } else {
      console.log("表单验证失败!"); return false; } }); }, }, }; </script>

<style lang="scss" scoped> .bomBtn {
      display: flex; justify-content: right; } .el-select {
      width: 100%; } .inputRow {
      display: flex; align-items: center; } .inputRow .el-input {
      flex: 1; margin-right: 10px; } </style>
实现思路
- 初始化数据,包括弹框的显隐状态、模板类型选项和表单数据;
- 在模板中使用
el-dialog组件来展示弹框,并绑定dialogVisible属性控制弹框的显隐; - 在
el-form中使用el-select组件来选择模板类型,并绑定formData.type属性; - 使用
v-for指令遍历formData.inputs数组,动态生成el-form-item和el-input组件,绑定对应的字段名称和值; - 在
el-input组件中使用v-model指令绑定输入框的值,并根据条件判断是否禁用输入框; - 在
el-form-item中使用getInputRules方法动态生成字段名称的校验规则; - 在
el-form中定义取消和确定按钮,并绑定对应的点击事件; - 在
methods中实现添加输入框、删除输入框、自定义校验和提交表单的逻辑。
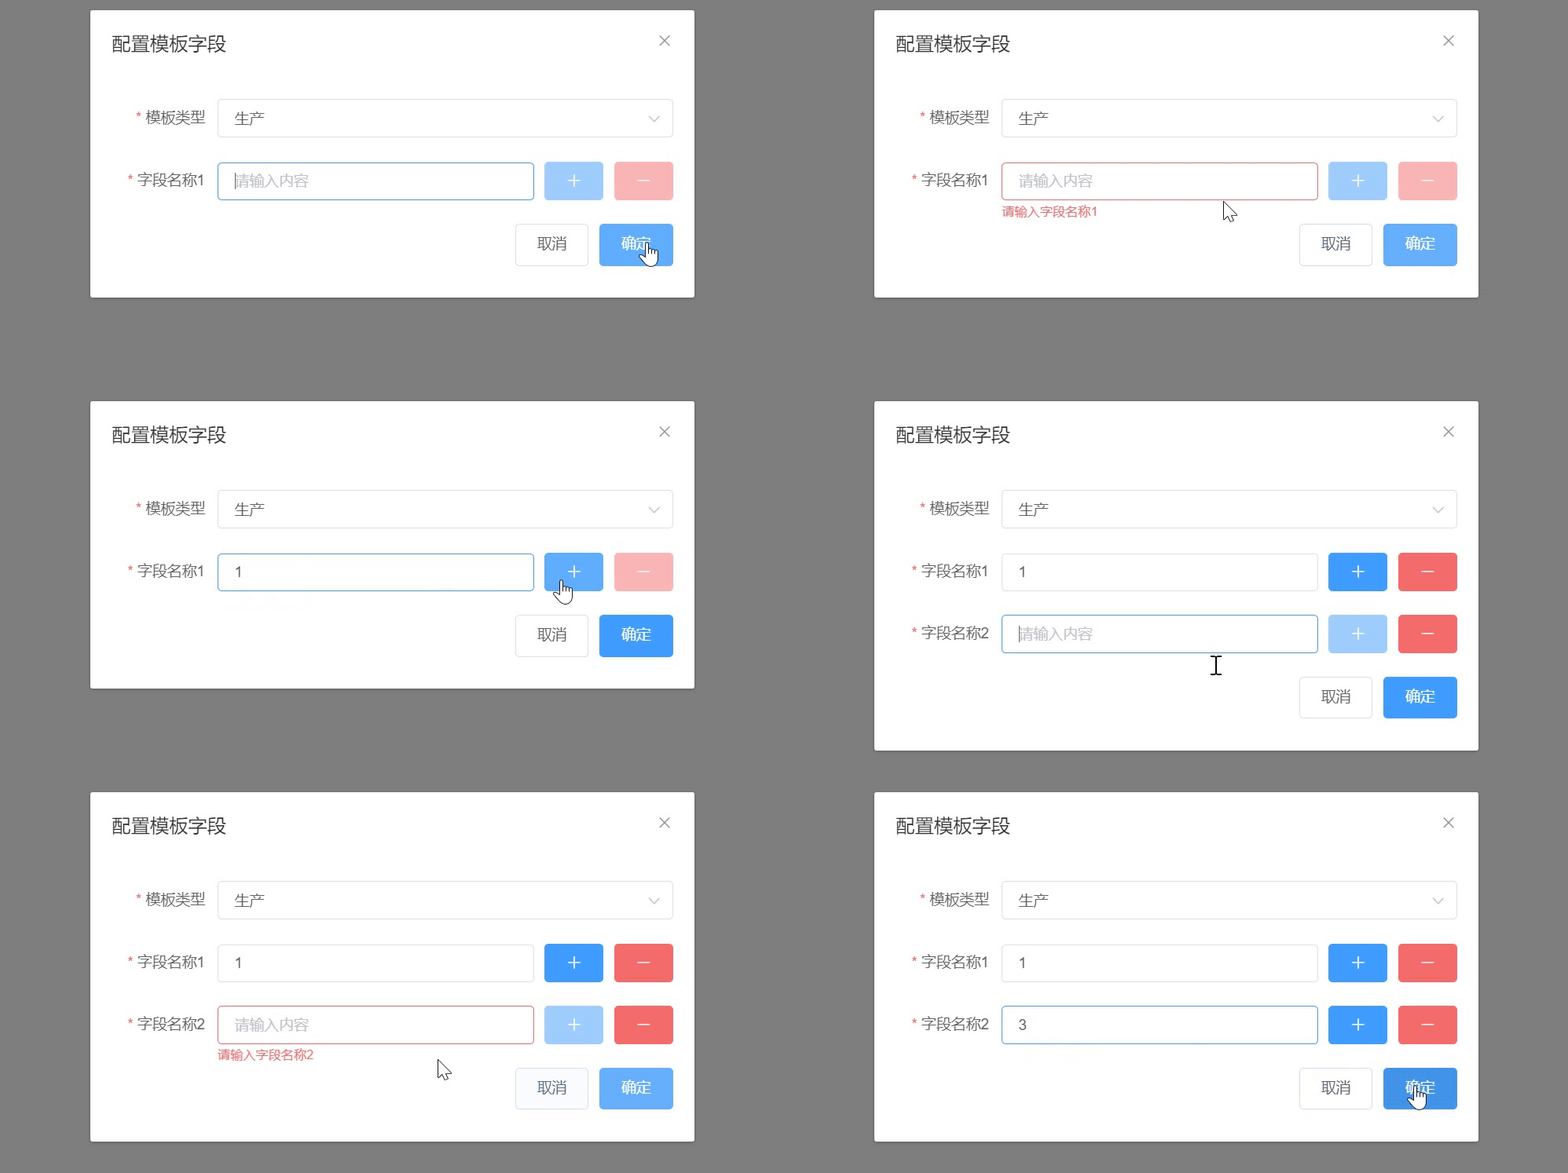
- 实现效果
当然你也可以将操作按钮改成下面这种交互方式
<template>
  <el-dialog class="ui-dialog" :close-on-click-modal="false" title="配置模板字段" width="30%" :visible.sync="dialogVisible" @close="$emit('update:dialogChild', false)">
    <div>
      <el-form ref="elForm" :model="formData" :rules="rules" size="medium" label-width="100px">
        <el-form-item label="模板类型" prop="type">
          <el-select v-model="formData.type" clearable placeholder="请选择模板类型">
            <el-option v-for="item in typeOptions" :key="item.value" :label="item.label" :value="item.value">
            </el-option>
          </el-select>
        </el-form-item>
        <div v-for="(input, index) in formData.inputs" :key="index">
          <el-form-item :label="'字段名称' + (index+1)" :prop="'inputs[' + index + '].value'" :rules="getInputRules(index)">
            <div class="inputRow">
              <el-input v-model="input.value" placeholder="请输入内容" :disabled="index > 0 && !formData.inputs[index - 1].value"></el-input>
              <span>
                <el-button type="primary" icon="el-icon-plus" @click="addInput(index)" :disabled="!input.value"></el-button>
                <el-button type="danger" icon="el-icon-minus" @click="removeInput(index)" :disabled="formData.inputs.length === 1"></el-button>
              </span>
            </div>
          </el-form-item>
        </div>
      </el-form>
      <div class="bomBtn">
        <el-button @click="$emit('update:dialogChild', false)">取消</el-button>
        <el-button type="primary" @click="submitForm">确定</el-button>
      </div>
    </div>
  </el-dialog>
</template>

<script> export default {
      data() {
      return {
      dialogVisible: true, //弹框显隐 typeOptions: [ {
      label: "生产", value: "0", }, {
      label: "存储", value: "1", }, {
      label: "运输", value: "2", }, ], // 表单数据 formData: {
      type: "0", inputs: [{
      value: "" }], // 初始只有一个输入框 }, rules: {
      type: [ {
      required: true, message: "请选择模板类型", trigger: "change", }, ], }, }; }, props: {
      dialogChild: {
      type: Boolean, default: false, }, }, watch: {
      dialogChild: {
      handler(newName, oldName) {
      this.dialogVisible = newName; }, deep: true, }, }, methods: {
      // 添加 addInput(index) {
      if (this.formData.inputs[index].value) {
      this.formData.inputs.splice(index + 1, 0, {
      value: "" }); } }, // 删除 removeInput(index) {
      this.formData.inputs.splice(index, 1); }, // 自定义校验 getInputRules(index) {
      return [ {
      required: true, message: `请输入字段名称${
       index + 1}`, trigger: "change", }, ]; }, // 提交 submitForm() {
      this.$refs["elForm"].validate((valid) => {
      if (valid) {
      console.log(this.formData); // 提交表单逻辑 } else {
      console.log("表单验证失败!"); return false; } }); }, }, }; </script>

<style lang="scss" scoped> .bomBtn {
      display: flex; justify-content: right; } .el-select {
      width: 100%; } .inputRow {
      display: flex; align-items: center; } .inputRow .el-input {
      flex: 1; margin-right: 10px; } </style>
- 实现效果
相关推荐
⭐ element表单验证技巧:如何应对动态数据循环
今天的文章vue动态表格添加方法_vueelement动态表单分享到此就结束了,感谢您的阅读。
版权声明:本文内容由互联网用户自发贡献,该文观点仅代表作者本人。本站仅提供信息存储空间服务,不拥有所有权,不承担相关法律责任。如发现本站有涉嫌侵权/违法违规的内容, 请发送邮件至 举报,一经查实,本站将立刻删除。
如需转载请保留出处:https://bianchenghao.cn/81411.html


