一、CSS
1、简介
这里是引用HTML用于控制网页的结构,CSS用于控制网页的外观,JavaScript控制的是网页的行为。
注意:
写CSS3属性的时候,可能需要在属性前面加上浏览器的私有前缀,然后该浏览器才能识别对应的CSS3属性。

如:实现边框阴影效果
box-shadow: 5px 5px 10px red;
不是所有的浏览器都会识别,这时就要这样写
box-shadow: 5px 5px 10px red;
-webkit-box-shadow: 5px 5px 10px red;
-moz-box-shadow: 5px 5px 10px red;
-ms-box-shadow: 5px 5px 10px red;
-o-box-shadow: 5px 5px 10px red;
2、css的引入
想要在一个页面引入CSS,共有以下3种方式
(1)外部样式表
(2)内部样式表
(3)行内样式表
2.1、外部样式表
外部样式表是最理想的CSS引入方式。在实际开发中,为了提升网站的性能速度和可维护性,一般都是使用外部样式表。所谓的外部样式表,指的是把CSS代码和HTML代码都单独放在不同文件中,然后在HTML文档中使用link标签来引用CSS样式表。
语法:
<link rel="stylesheet" type="text/css" href="文件路径" />
Demo
<!DOCTYPE html>
<html>
<head>
    <meta charset="utf-8" />
    <title></title>
    <link rel="stylesheet" type="text/css" href="css/index.css" />
</head>
<body>
</body>
</html>
如果你使用外部样式表,必须使用link标签来引入,而link标签是放在head标签内的。
2.2、内部样式表
内部样式表,指的是把HTML代码和CSS代码放到同一个HTML文件中。其中,CSS代码放在style标签内,并且style标签是放在head标签内部的。
语法:
<style type="text/css"> …… </style>
Demo:
<!DOCTYPE html>
<html>
<head>
    <meta charset="utf-8"/>
    <title></title>
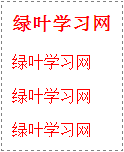
    <style type="text/css"> div{
     color:red;} </style>
</head>
<body>
    <div>绿叶,给你初恋般的感觉。</div>
    <div>绿叶,给你初恋般的感觉。</div>
    <div>绿叶,给你初恋般的感觉。</div>
</body>
</html>
2.3、行内样式表
内部样式表的CSS是在“style标签”内定义的,
而行内样式表的CSS是在“标签的style属性”中定义的。
Demo:
<!DOCTYPE html>
<html>
<head>
    <meta charset="utf-8"/>
    <title></title>
</head>
<body>
    <div style="color:red;">绿叶,给你初恋般的感觉。</div>
    <div style="color:red;">绿叶,给你初恋般的感觉。</div>
    <div style="color:red;">绿叶,给你初恋般的感觉。</div>
</body>
</html>
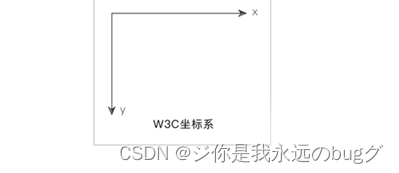
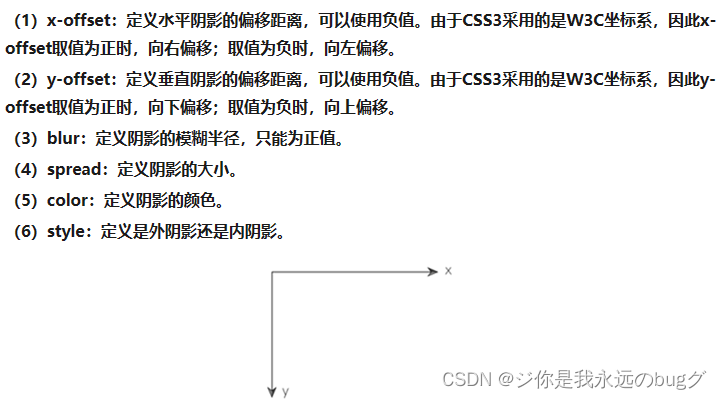
3、CSS3-坐标系
二、CSS选择器
2.1、元素的id和class
在HTML中,id和class是元素最基本的两个属性。
一般情况下,id和class都是用来选择元素,以便进行CSS操作或者JavaScript操作。
id
<div id="content">存在即合理</div>
class
<div class="content">存在即合理</div>
2.2、选择器
何为选择器?
<body>
    <div>绿叶学习网</div>
    <div>绿叶学习网</div>
    <div>绿叶学习网</div>
</body>
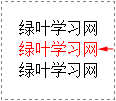
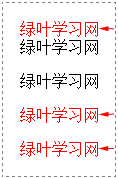
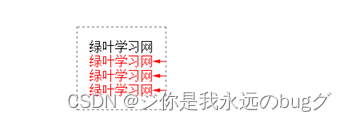
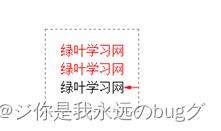
如果我们只想将第2个div文本颜色变为红色,该怎么实现呢?我们肯定要通过一种方式来“选中”第2个div(因为其他的div不能选中),只有选中了才可以为其改变颜色。
像上面这种选中你想要的元素的方式,我们称之为“选择器
最实用的5种选择器:(1)元素选择器
(2)id选择器
(3)class选择器
(4)后代选择器
(5)群组选择器
2.2.1、元素选择器
demo:
<!DOCTYPE html>
<html>
<head>
    <meta charset="utf-8"/>
    <title></title>
    <style type="text/css"> div{
     color:red;} </style>
</head>
<body>
    <div>绿叶学习网</div>
    <p>绿叶学习网</p>
    <span>绿叶学习网</span>
    <div>绿叶学习网</div>
</body>
</html>
2.2.2、id选择器
不允许出现两个相同的id的
id选择器,id名前面必须要加上前缀“#”
Demo:
<!DOCTYPE html>
<html>
<head>
    <meta charset="utf-8" />
    <title></title>
    <style type="text/css"> #lvye{
     color:red;} </style>
</head>
<body>
    <div>绿叶学习网</div>
    <div id="lvye">绿叶学习网</div>
    <div>绿叶学习网</div>
</body>
</html>
2.2.3、class选择器
可以对“相同的元素”或者“不同的元素”定义相同的class属性,然后针对拥有同一个class的元素进行CSS样式操作。
Demo:
<!DOCTYPE html>
<html>
<head>
    <meta charset="utf-8" />
    <title></title>
    <style type="text/css"> .lv{
     color:red;} </style>
</head>
<body>
    <div>绿叶学习网</div>
    <div class="lv">绿叶学习网</div>
    <div class="lv">绿叶学习网</div>
</body>
</html>
2.2.4、后代选择器
后代选择器,就是选择元素内部中所有的某一种元素,包括子元素和其他后代元素(如“孙元素”)。
父元素和后代元素必须要用空格隔开,从而表示选中某个元素内部的后代元素。
Demo:
<!DOCTYPE html>
<html>
<head>
    <meta charset="utf-8" />
    <title></title>
    <style type="text/css"> #father1 div {
     color:red;} #father2 span{
     color:blue;} </style>
</head>
<body>
    <div id="father1">
        <div>绿叶学习网</div>
        <div>绿叶学习网</div>
    </div>
    <div id="father2">
        <p>绿叶学习网</p>
        <p>绿叶学习网</p>
        <span>绿叶学习网</span>
    </div>
</body>
</html>
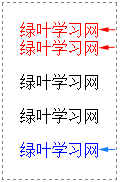
#father1 div {color:red;}表示选择“id为father1的元素”下的所有div元素,然后定义它们的文本颜色为红色。
#father2 span{ color:blue;}表示选择“id为father2的元素”下的所有span元素,然后定义它们文本颜色为蓝色。
2.2.5、群组选择器
群组选择器,指的是同时对几个选择器进行相同的操作。
对于群组选择器,两个选择器之间必须要用英文逗号(,)隔开,不然群组选择器就无法生效。
Demo;
<!DOCTYPE html>
<html>
<head>
    <meta charset="utf-8" />
    <title></title>
    <style type="text/css"> h3, div, p, span {
     color:red;} </style>
</head>
<body>
    <h3>绿叶学习网</h3>
    <div>绿叶学习网</div>
    <p>绿叶学习网</p>
    <span>绿叶学习网</span>
</body>
</html>
<!DOCTYPE html>
<html>
<head>
    <meta charset="utf-8" />
    <title></title>
    <style type="text/css"> #lvye,.lv,span{
     color:red;} </style>
</head>
<body>
    <div id="lvye">绿叶学习网</div>
    <div>绿叶学习网</div>
    <p>绿叶学习网</p>
    <p class="lv">绿叶学习网</p>
    <span>绿叶学习网</span>
</body>
</html>
2.2.6、CSS3-属性选择器
属性选择器,指的是通过“元素的属性”来选择元素的一种方式,元素的属性,像下面这句代码中的id、type、value就是input元素的属性。
<input id="btn" type="button" value="按钮" />
CSS3属性选择器
E[attr^=“xxx”] 选择元素E,其中E元素的attr属性是以xxx开头的任何字符
E[attr$=“xxx”] 选择元素E,其中E元素的attr属性是以xxx结尾的任何字符
E[attr*=“xxx”] 选择元素E,其中E元素的attr属性是包含xxx的任何字符
示例:
   <!DOCTYPE html>
<html>
<head>
    <meta charset="utf-8" />
    <title></title>
    <style type="text/css">
        /*清除所有元素默认的padding和margin*/
        *{
   padding:0;margin:0;}
        /*清除列表项符号*/
        ul{
   list-style-type:none;}
        a
        {

            display:inline-block;
            font-size:12px;
            height:20px;
            line-height:20px;
        }
        /*匹配doc文件*/
        a[href$="doc"]::before
        {

            content:url("img/1.png");
        }
        /*匹配pdf文件*/
        a[href$="pdf"]::before
        {

            content:url("img/2.png");
        }
        /*匹配ppt文件*/
        a[href$="ppt"]::before
        {

            content:url("img/3.png");
        }
    </style>
</head>
<body>
    <ul>
        <li><a href="test.doc" download>下载doc文件</a></li>
        <li><a href="test.pdf" download>下载pdf文件</a></li>
        <li><a href="test.ppt" download>下载ppt文件</a></li>
    </ul>
</body>
</html>
选择a 元素 匹配属性为 href,并以doc结尾的
:: brfore代表在匹配的元素之前展示
content :展示的内容
2.2.7、CSS3-子元素伪类选择器
子元素伪类选择器,指的就是选择某一个元素下的子元素。
在CSS3中,子元素伪类选择器有两大类。
- : 第一类
E:first-child 选择父元素下的第一个子元素(该子元素类型为E,以下类同)
E:last-child 选择父元素下的最后一个子元素
E:nth-child(n) 选择父元素下的第n个子元素或奇偶元素,n取值有3种:数字、odd和even,其中n从1开始
E:only-child 选择父元素下唯一的子元素,该父元素只有一个子元素
<!DOCTYPE html>
<html>
<head>
    <meta charset="utf-8" />
    <title></title>
    <style type="text/css">
        *{
   padding:0;margin:0;}
        ul{
   list-style-type:none;}
        ul li
        {

            height:20px;
        }
        ul li:first-child{
   background-color:red;}
        ul li:nth-child(2){
   background-color:orange;}
        ul li:nth-child(3){
   background-color:yellow;}
        ul li:nth-child(4){
   background-color:green;}
        ul li:last-child{
   background-color:blue;}
    </style>
</head>
<body>
    <ul>
        <li></li>
        <li></li>
        <li></li>
        <li></li>
        <li></li>
    </ul>
</body>
</html>
其中 ul 是指定父元素,li是父元素的子元素 li后的伪类,是指定哪一个子元素
可以使用第二类来选择
- : 第二类
E:first-of-type 选择父元素下的第一个E类型的子元素
E:last-of-type 选择父元素下的最后一个E类型的子元素
E:nth-of-type(n) 选择父元素下的第n个E类型的子元素或奇偶元素,n取值有3种:数字、odd和even,n从1开始
E:only-of-type 选择父元素下唯一的E类型的子元素,该父元素可以有多个子元素
注意:
<div>
    <h1></h1>
    <p></p>
    <span></span>
    <span></span>
</div>
- p:first-child:选择不到任何元素,因为父元素(即div)下的第一个子元素是h1,不是p。
- span:first-child:选择不到任何元素,因为父元素(即div)下的第一个子元素是h1,不是span。
- h1:first-of-type:选择的是h1,因为h1是父元素中h1类型的子元素,然后我们选择第一个h1
- p:first-of-type:选择的是p,因为p是父元素中p类型的子元素,然后我们选择第一个p(
2.2.8、CSS3-UI伪类选择器
UI伪类选择器,指的是针对“元素的状态”来选择元素的一种伪类选择器。
元素的状态包括:可用、不可用、选中、未选中、获取焦点、失去焦点等。
UI伪类选择器共同特点就是:对于指定的样式,在默认状态下不起作用,只有当元素处于某种状态时才起作用。此外,记住一点,大多数UI伪类选择器都是针对表单元素的。
在CSS3中,UI伪类选择器主要包括以下5类。
(1):focus
(2)::selection
(3):checked
(4):enabled和:disabled
(5):read-write和:read-only
1、focus:定义元素获取焦点时使用的样式
一般具有焦点的有两种
(1)表单元素(按钮、单选框、复选框、文本框、下拉列表)
(2)超链接
<!DOCTYPE html>
<html>
<head>
    <meta charset="utf-8" />
    <title></title>
    <style type="text/css">
        input:focus
        {

            outline:1px solid red;
        }
    </style>
</head>
<body>

    账号:<input type="text"> <br>
    密码:<input type="password">
</body>
</html>
2、 ::selection:定义页面中被选中文本的样式
默认情况下,使用鼠标来选取页面的文本内容时,该文本内容都是以“蓝色背景、白色字体”来显示的,可以使用这个 改变样式
<!DOCTYPE html>
<html>
<head>
    <meta charset="utf-8" />
    <title></title>
    <style type="text/css">

        div::selection
        {

            color: white;
            background-color: red;
        }

        p::selection
        {

            color: white;
            background-color: orange;
        }


    </style>
</head>
<body>
     <div>绿叶学习网,给你初恋般的感觉。</div>
    <p>绿叶学习网,给你初恋般的感觉。</p>
</body>
</html>
上述是定义 单独 元素的,::selection{}就可以实现整个页面的选中文本定义样式
3、:checked : 定义单选框或复选框被选中时的样式。
暂时只有Opera浏览器支持:checked。
<!DOCTYPE html>
<html>
<head>
    <meta charset="utf-8" />
    <title></title>
    <style type="text/css">
         input:checked {

            background-color: blue;
        }


    </style>
</head>
<body>

    <form >
        <input type="radio" name="gender" />男
        <input type="radio" name="gender" />女


    </form>
</body>
</html>
4、:enabled 和 :disabled :可用、不可用样式
使用:enabled选择器来定义表单元素“可用”时的样式,
使用:disabled选择器来定义表单元素“不可用”时的样式。
<!DOCTYPE html>
<html>
<head>
    <meta charset="utf-8" />
    <title></title>
    <style type="text/css">
        input:disabled{

            background-color: orange;
        }
        input:enabled{

            background-color: red;
        }

    </style>
</head>
<body>

    <form >
       可用:<input type="text" />
       禁用: <input type="text" disabled/>
    </form>
</body>
</html>
5、:read-write和:read-only :可读写 、只读样式
使用:read-write选择器来定义表单元素“可读写”时的样式,
使用:read-only选择器来定义表单元素“只读”时的样式。
<!DOCTYPE html>
<html>
<head>
    <meta charset="utf-8" />
    <title></title>
    <style type="text/css">
        input:read-write{

            background-color: orange;
        }
        input:read-only{

            background-color: slategray;
        }

    </style>
</head>
<body>

    <form >
       读写:<input type="text" />
       只读: <input type="text" readonly/>
    </form>
</body>
</html>
2.2.9、CSS3-其他伪类选择器
1、:root :定义整个页面的样式;body:定义body部分
<!DOCTYPE html>
<html>
<head>
    <meta charset="utf-8" />
    <title></title>
    <style type="text/css">

   :root{

    background-color: black;
   }
   body{

    background-color: red;
   }

    </style>
</head>
<body>

  <h1>你好</h1>
</body>
</html>
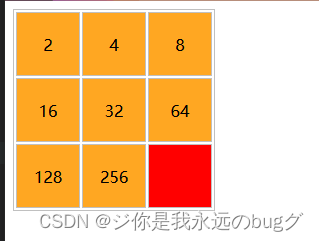
2、:empty:来选择一个“不包含任何子元素和内容”的元素
<!DOCTYPE html>
<html>
<head>
    <meta charset="utf-8" />
    <title></title>
    <style type="text/css">
        table,tr,td
        {

            border:1px solid silver;
        }
        td
        {

            width:60px;
            height:60px;
            line-height:60px;
            text-align:center;
            background-color: #FFA722;
        }
        td:empty
        {

            background-color:red;
        }
    </style>
</head>
<body>
    <table>
        <tr>
            <td>2</td>
            <td>4</td>
            <td>8</td>
        </tr>
        <tr>
            <td>16</td>
            <td>32</td>
            <td>64</td>
        </tr>
        <tr>
            <td>128</td>
            <td>256</td>
            <td></td>
        </tr>
    </table>
</body>
</html>
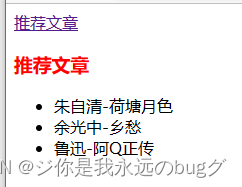
3、:target:选取页面中id被当成页面的锚点链接来使用的元素。
<head>
    <meta charset="utf-8" />
    <title></title>
    <style type="text/css">

       :target h3{

        color: red;
       }
    </style>
</head>
<body>
    <a href="#article">推荐文章</a><br />

    <div id="article">
            <h3>推荐文章</h3>
            <ul>
                <li>朱自清-荷塘月色</li>
                <li>余光中-乡愁</li>
                <li>鲁迅-阿Q正传</li>
            </ul>
        </div>

</body>
</html>
当点击 锚点时 下方的推荐文章 会变红, :target h3 指定 锚点的元素
4、:not()::选取某一个元素之外的所有元素
<!DOCTYPE html>
<html>
<head>
    <meta charset="utf-8" />
    <title></title>
    <style type="text/css">

        ul li:not(.a)
        {

            color:red;
        }
    </style>
</head>
<body>
    <ul>
        <li class="a">绿叶学习网</li>
        <li>绿叶学习网</li>
        <li>绿叶学习网</li>
        <li>绿叶学习网</li>
    </ul>
</body>
</html>
ul li:not(.a):选择ul元素下除了 classl类为a 之外的所有li元素。
三、字体样式
font-family		字体类型
font-size		字体大小
font-weight		字体粗细
font-style		字体风格
color			字体颜色
3.1、字体类型:font-family
语法;
font-family: 字体1, 字体2, … , 字体N; 从左到右,没有字体1,使用字体二…
Demo:
<!DOCTYPE html>
<html>
<head>
    <meta charset="utf-8" />
    <title></title>
    <style type="text/css"> #div1{
     font-family: Arial;} #div2{
     font-family: "Times New Roman";} #div3{
     font-family: "微软雅黑";} </style>
</head>
<body>
    <div id="div1">Arial</div>
    <div id="div2">Times New Roman</div>
    <div id="div3">微软雅黑</div>
</body>
</html>
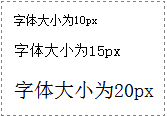
3.2、字体大小:font-size
语法:
font-size: 像素值;
Demo:
<!DOCTYPE html>
<html>
<head>
    <meta charset="utf-8" />
    <title></title>
    <style type="text/css"> #p1 {
     font-size: 10px;} #p2 {
     font-size: 15px;} #p3 {
     font-size: 20px;} </style>
</head>
<body>
    <p id="p1">字体大小为10px</p>
    <p id="p2">字体大小为15px</p>
    <p id="p3">字体大小为20px</p>
</body>
</html>
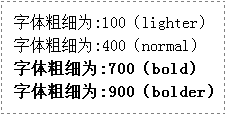
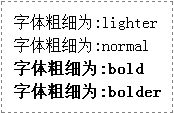
3.3、字体粗细:font-weight
语法:
font-weight: 取值;

属性值		说明
normal		正常(默认值)
lighter		较细
bold		较粗
bolder		很粗(其实效果跟bold差不多)
Demo1:
<!DOCTYPE html>
<html>
<head>
    <meta charset="utf-8" />
    <title></title>
    <style type="text/css"> #p1 {
     font-weight: 100;} #p2 {
     font-weight: 400;} #p3 {
     font-weight: 700;} #p4 {
     font-weight: 900;} </style>
</head>
<body>
    <p id="p1">字体粗细为:100(lighter)</p>
    <p id="p2">字体粗细为:400(normal)</p>
    <p id="p3">字体粗细为:700(bold)</p>
    <p id="p4">字体粗细为:900(bolder)</p>
</body>
</html>
<!DOCTYPE html>
<html>
<head>
    <meta charset="utf-8" />
    <title></title>
    <style type="text/css"> #p1{
     font-weight:lighter;} #p2{
     font-weight:normal;} #p3{
     font-weight:bold;} #p4{
     font-weight:bolder;} </style>
</head>
<body>
    <p id="p1">字体粗细为:lighter</p>
    <p id="p2">字体粗细为:normal</p>
    <p id="p3">字体粗细为:bold</p>
    <p id="p4">字体粗细为:bolder </p>
</body>
</html>
3.4、字体风格:font-style
语法:
font-style: 取值;

属性值		说明
normal		正常(默认值)
italic		斜体
oblique		斜体
Demo:
<!DOCTYPE html>
<html>
<head>
    <meta charset="utf-8" />
    <title></title>
    <style type="text/css"> #p1{
     font-style:normal;} #p2{
     font-style:italic;} #p3{
     font-style:oblique;} </style>
</head>
<body>
    <p id="p1">字体样式为normal</p>
    <p id="p2">字体样式为italic </p>
    <p id="p3">字体样式为oblique</p>
</body>
</html>
3.5、字体颜色:color
语法:
color: 颜色值;
Demo:
<!DOCTYPE html>
<html>
<head>
    <meta charset="utf-8" />
    <title></title>
    <style type="text/css"> #p1{
     color:gray;} #p2{
     color:orange;} #p3{
     color:red;} </style>
</head>
<body>
    <p id="p1">字体颜色为灰色</p>
    <p id="p2">字体颜色为橙色</p>
    <p id="p3">字体颜色为红色</p>
</body>
</html>
四、文本样式
text-indent				首行缩进
text-align				水平对齐
text-decoration			文本修饰
text-transform 			大小写转换
line-height				行高
letter-spacing			字母间距
word-spacing			词间距
4.1、首行缩进:text-indent
语法:
text-indent: 像素值;
Demo:
<!DOCTYPE html>
<html>
<head>
    <meta charset="utf-8" />
    <title></title>
    <style type="text/css"> p {
      font-size:14px; text-indent:28px; } </style>
</head>
<body>
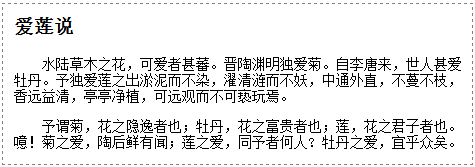
    <h3>爱莲说</h3>
    <p>水陆草木之花,可爱者甚蕃。晋陶渊明独爱菊。自李唐来,世人甚爱牡丹。予独爱莲之出淤泥而不染,濯清涟而不妖,中通外直,不蔓不枝,香远益清,亭亭净植,可远观而不可亵玩焉。</p>
    <p>予谓菊,花之隐逸者也;牡丹,花之富贵者也;莲,花之君子者也。噫!菊之爱,陶后鲜有闻;莲之爱,同予者何人? 牡丹之爱,宜乎众矣。</p>
</body>
</html>
中文段落首行一般需要缩进两个字的空间。如果想要实现这个效果,text-indent值应该是font-size值的2倍
4.2、水平对齐:text-align
语法:
text-align: 取值;

属性值		说明
left		左对齐(默认值)
center		居中对齐
right		右对齐
Demo:
<!DOCTYPE html>
<html>
<head>
    <meta charset="utf-8" />
    <title></title>
    <style type="text/css"> #p1{
     text-align:left;} #p2{
     text-align:center;} #p3{
     text-align:right;} </style>
</head>
<body>
    <p id="p1"><strong>左对齐</strong>:好好学习,天天向上。</p>
    <p id="p2"><strong>居中对齐</strong>:好好学习,天天向上。</p>
    <p id="p3"><strong>右对齐</strong>:好好学习,天天向上。</p>
</body>
</html>
4.3、划线
语法:
text-decoration: 取值;

属性值			说明
none			去除所有的划线效果(默认值)
underline		下划线
line-through	中划线
overline		顶划线
Demo:
<!DOCTYPE html>
<html>
<head>
    <meta charset="utf-8" />
    <title></title>
    <style type="text/css"> #p1{
     text-decoration:underline;} #p2{
     text-decoration:line-through;} #p3{
     text-decoration:overline;} </style>
</head>
<body>
    <p id="p1">这是“下划线”效果</p>
    <p id="p2">这是“删除线”效果</p>
    <p id="p3">这是“顶划线”效果</p>
</body>
</html>
使用text-decoration:none;去除a元素的下划线
4.4、大小写:text-transform
语法:
text-transform: 取值;

属性值					说明
none				无转换(默认值)
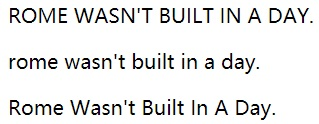
uppercase			转换为大写
lowercase			转换为小写
capitalize			只将每个英文单词首字母转换为大写
Demo:
<!DOCTYPE html>
<html>
<head>
    <meta charset="utf-8" />
    <title></title>
    <style type="text/css"> #p1{
     text-transform:uppercase;} #p2{
     text-transform:lowercase;} #p3{
     text-transform:capitalize;} </style>
</head>
<body>
    <p id="p1">rome wasn't built in a day.</p>
    <p id="p2">rome wasn't built in a day.</p>
    <p id="p3">rome wasn't built in a day.</p>
</body>
</html>
4.5、行高:line-height
语法
line-height: 像素值;
Demo:
<!DOCTYPE html>
<html>
<head>
    <meta charset="utf-8" />
    <title></title>
    <style type="text/css"> #p1{
     line-height:15px;} #p2{
     line-height:20px;} #p3{
     line-height:25px;} </style>
</head>
<body>
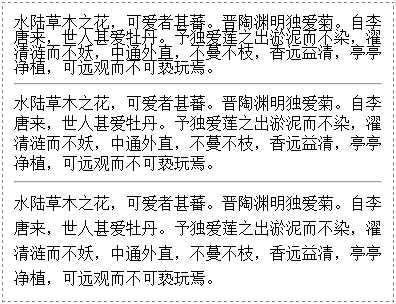
    <p id="p1">水陆草木之花,可爱者甚蕃。晋陶渊明独爱菊。自李唐来,世人甚爱牡丹。予独爱莲之出淤泥而不染,濯清涟而不妖,中通外直,不蔓不枝,香远益清,亭亭净植,可远观而不可亵玩焉。</p><hr/>
    <p id="p2">水陆草木之花,可爱者甚蕃。晋陶渊明独爱菊。自李唐来,世人甚爱牡丹。予独爱莲之出淤泥而不染,濯清涟而不妖,中通外直,不蔓不枝,香远益清,亭亭净植,可远观而不可亵玩焉。</p><hr/>
    <p id="p3">水陆草木之花,可爱者甚蕃。晋陶渊明独爱菊。自李唐来,世人甚爱牡丹。予独爱莲之出淤泥而不染,濯清涟而不妖,中通外直,不蔓不枝,香远益清,亭亭净植,可远观而不可亵玩焉。</p>
</body>
</html>
4.6、间距:letter-spacing、word-spacing
4.6.1、字间距:letter-spacing
语法;
letter-spacing: 像素值;
Demo:
<!DOCTYPE html>
<html>
<head>
    <meta charset="utf-8" />
    <title></title>
    <style type="text/css"> #p1{
     letter-spacing:0px;} #p2{
     letter-spacing:3px;} #p3{
     letter-spacing:5px;} </style>
</head>
<body>
    <p id="p1">Rome was't built in a day.罗马不是一天建成的。</p><hr/>
    <p id="p2">Rome was't built in a day.罗马不是一天建成的。</p><hr/>
    <p id="p3">Rome was't built in a day.罗马不是一天建成的。</p>
</body>
</html>
4.6.2、词间距:word-spacing
语法:
word-spacing: 像素值;
<!DOCTYPE html>
<html>
<head>
    <meta charset="utf-8" />
    <title></title>
    <style type="text/css"> #p1{
     word-spacing:0px;} #p2{
     word-spacing:3px;} #p3{
     word-spacing:5px;} </style>
</head>
<body>
    <p id="p1">Rome was't built in a day.罗马不是一天建成的。</p><hr/>
    <p id="p2">Rome was't built in a day.罗马不是一天建成的。</p><hr/>
    <p id="p3">Rome was't built in a day.罗马不是一天建成的。</p>
</body>
</html>
4.7、CSS3-文本阴影:text-shadow
语法:
text-shadow:x-offset y-offset blur color;
- x-offset是“水平阴影”,表示阴影的水平偏移距离,单位可以是px、em和百分比等,如果值为正,则阴影向右偏移;如果值为负,则阴影向左偏移
- y-offset是“垂直阴影”,表示阴影的垂直偏移距离,单位可以是px、em和百分比等。由于CSS3采用的是W3C坐标系,因此如果值为正,则阴影向下偏移;如果值为负,则阴影向上偏移。
- blur是“模糊距离”,表示阴影的模糊程度,单位可以是px、em、百分比等。blur值越大,则阴影越模糊;blur值越小,则阴影越清晰。此外,blur不能为负值。如果不需要阴影模糊效果,可以把blur值设置为0。
- color是“阴影颜色”,表示阴影的颜色。
所谓 X Y偏移 就是 阴影文本与 文本的 偏移 距离
<!DOCTYPE html>
<html>
<head>
    <meta charset="utf-8" />
    <title></title>
    <style type="text/css">
        div{

            font-size: 50px;
            text-shadow: 5px 5px 2px slategray;
        }
    </style>
</head>
<body>

    <div>南栖仙策科技有限公司</div>
</body>
</html>
定义多个阴影
text-shadow:0 0 4px red, 0 -5px 4px green, 2px -10px 6px blue;
当text-shadow属性是一个值列表时,阴影效果会按从左到右的顺序应用到文本上,因此可能会出现相互覆盖的效果。但是text-shadow属性永远不会覆盖文本本身,阴影效果也不会改变文本的大小。
4.8、CSS3-文本描边:text-stroke
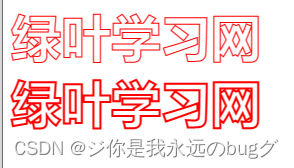
描边效果”,指的是给文字添加边框。
text-stroke:width color;
<!DOCTYPE html>
<html>
<head>
    <meta charset="utf-8" />
    <title></title>
    <style type="text/css">
        div
        {

            font-size:30px;
            font-weight:bold;
        }
        #d1{

            -webkit-text-stroke: 1px red;
        }
    </style>
</head>
<body>
    <div id="d1">绿叶学习网</div>
    <div id="d2">绿叶学习网</div>
</body>
</html>
镂空文字
<!DOCTYPE html>
<html>
<head>
    <meta charset="utf-8" />
    <title></title>
    <style type="text/css">
        div
        {

            font-family:Verdana;
            font-size:50px;
            font-weight:bold;
            color:transparent;    /*设置文字颜色为透明*/
            text-stroke:2px red;
            -webkit-text-stroke:2px red;
        }
        #d1{

            -webkit-text-stroke: 1px red;
        }
    </style>
</head>
<body>
    <div id="d1">绿叶学习网</div>
    <div id="d2">绿叶学习网</div>
</body>
</html>
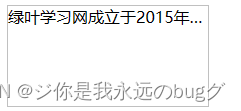
4.9、CSS3-文本溢出:text-overflow
:当文本超出一定范围时,会以省略号(…)显示,并且隐藏多余的文字
text-overflow:取值;
- ellipsis 当文本溢出时,显示省略号,并且隐藏多余的文字
- clip 当文本溢出时,不显示省略号,而是将溢出的文字裁切掉
实现文本溢出 固定搭配
overflow:hidden;
white-space:nowrap;
text-overflow:ellipsis;
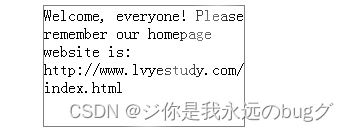
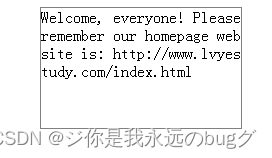
4.10、CSS3-强制换行
以使用word-wrap或word-break来定义长单词或URL地址是否换行到下一行。
word-wrap:取值;
- normal 自动换行(默认值)
- break-word 强制换行
word-break:取值;
- normal 自动换行(默认值)
- break-all 允许在单词内换行
- keep-all 只能在半角空格或连字符处换行
<!DOCTYPE html>
<html>
<head>
    <meta charset="utf-8" />
    <title></title>
    <style type="text/css">
        div
        {

            width: 200px;
            height: 120px;
            border: 1px solid gray;
        }
    </style>
</head>
<body>
    <div>Welcome, everyone! Please remember our homepage website is: http://www.lvyestudy.com/index.aspx</div>
</body>
</html>
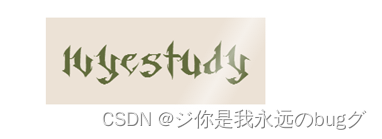
4.11、CSS3-给用户安装字体:@font-face
如果用户电脑没有该字体,就给他安装一个
@font-face
{

    font-family: 字体名称;
    src:url(文件路径);
}
<!DOCTYPE html>
<html>
<head>
    <meta charset="utf-8" />
    <title></title>
    <style type="text/css">
        /*定义字体*/
        @font-face
        {

            font-family: myfont;      /*定义字体名称为myfont*/
            src: url("css/font/Horst-Blackletter.ttf");
        }
        div
        {

            font-family:myfont;      /*使用自定义的myfont字体*/
            font-size:60px;
            background-color:#ECE2D6;
            color:#626C3D;
            padding:20px;
        }
    </style>
</head>
<body>
    <div>lvyestudy</div>
</body>
</html>
CSS3-火焰字
<!DOCTYPE html>
<html>
<head>
    <meta charset="utf-8" />
    <title></title>
    <style type="text/css">
        div
        {

            text-align:center;
            color:#45B823;
            padding:20px 0 0 20px;
            background-color:#FFF;
            font-size:60px;
            font-weight:bold;
            text-shadow:0 0 4px white,0 -5px 4px #ff3,2px -10px 6px #fd3,-2px -15px 11px #f80,2px -25px 18px #f20;
        }
    </style>
</head>
<body>
    <div>南栖仙策</div>
</body>
</html>
五、边框样式
border-width	边框的宽度

border-style	边框的外观
		属性值	说明
		none	无样式
		dashed	虚线
		solid	实线

border-color	边框的颜色
5.1、整体边框样式
Demo:给dev加边框
<!DOCTYPE html>
<html>
<head>
    <meta charset="utf-8" />
    <title></title>
    <style type="text/css"> /*定义所有div样式*/ div {
      width:100px; height:30px; } /*定义单独div样式*/ #div1 {
      border-width:1px; border-style:dashed; border-color:red; } #div2 {
      border-width:1px; border-style:solid; border-color:red; } </style>
</head>
<body>
    <div id="div1"></div>
    <div id="div2"></div>
</body>
</html>
<!DOCTYPE html>
<html>
<head>
    <meta charset="utf-8" />
    <title></title>
    <style type="text/css"> img {
      border-width: 2px; border-style:solid; border-color:red; } </style>
</head>
<body>
    <img src="img/haizei.png" alt="海贼王之索隆">
</body>
</html>
5.1.1、简写:
border: 1px solid red;
Demo:
<!DOCTYPE html>
<html>
<head>
    <meta charset="utf-8" />
    <title></title>
    <style type="text/css"> div{
      border: 1px solid red; } </style>
</head>
<body>
    <div>绿叶学习网,给你初恋般的感觉。</div>
</body>
</html>
5.2、局部边框样式
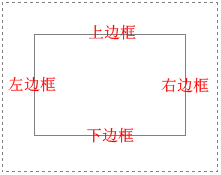
一个元素其实有4条边(上、下、左、右),上一节我们学习的是4条边的整体样式。那么如果想要对某一条边进行单独设置,这该怎么实现呢?
1.上边框border-top
2.下边框border-bottom
3.左边框border-left
4.右边框border-right
Demo:
<!DOCTYPE html>
<html>
<head>
    <meta charset="utf-8" />
    <title></title>
    <style type="text/css"> div {
      width: 100px; /*div元素宽为100px*/ height: 60px; /*div元素高为60px*/ border-top: 2px solid red; /*上边框样式*/ border-right: 2px solid yellow; /*右边框样式*/ border-bottom: 2px solid blue; /*下边框样式*/ border-left: 2px solid green; /*左边框样式*/ } </style>
</head>
<body>
    <div></div>
</body>
</html>
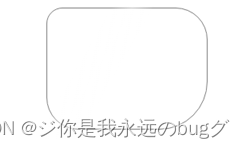
5.3、CSS3-圆角效果:border-radius
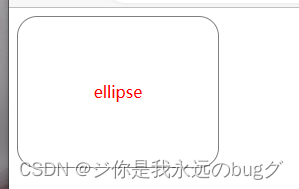
1、CSS3-border-radius实现圆角
border-radius:取值;
border-radius属性取值是一个长度值,单位可以是px、em和百分比等。
<!DOCTYPE html>
<html>
<head>
    <meta charset="utf-8" />
    <title></title>
    <style type="text/css">
        /*设置div公共样式*/
        div
        {

            width:200px;
            height:150px;
            line-height:150px;
            margin-bottom:10px;
            text-align:center;
            color:red;
        }
        #div1
        {

            border: 1px solid gray;
            border-radius: 20px;
        }

    </style>
</head>
<body>
    <div id="div1">ellipse</div>
</body>
</html>
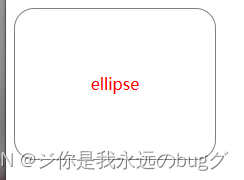
border-radius:20px;指的是元素4个角的圆角半径都是20px。
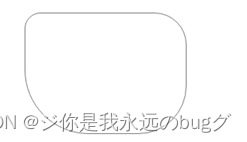
2、CSS3-border-radius属性值的4种写法
1、border-radius设置1个值
border-radius:20px;指的是元素4个角的圆角半径都是20px。
2、border-radius设置两个值
border-radius:10px 20px;表示左上角和右下角的圆角半径是10px,右上角和左下角的圆角半径都是20px,
3、border-radius设置3个值
border-radius:10px 20px 30px;
表示左上角的圆角半径是10px,左下角和右上角的圆角半径都是20px,右下角圆角半径是30px
4、border-radius设置4个值
border-radius:10px 20px 30px 40px;
表示左上角、右上角、右下角和左下角的圆角半径,依次是10px、20px、30px、40px,
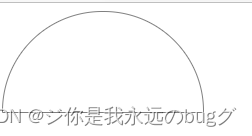
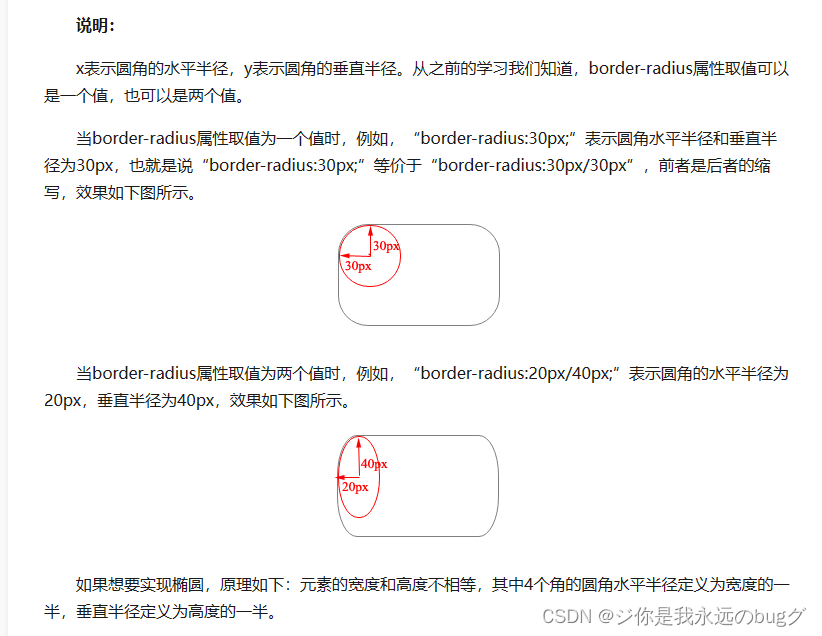
3、CSS3-border-radius实现半圆和圆
1、半圆
高度(height)设为宽度(width)的一半,并且左上角和右上角的圆角半径定义与元素的高度一致,而右下角和左下角的圆角半径定义为0。
<!DOCTYPE html>
<html>
<head>
    <meta charset="utf-8" />
    <title></title>
    <style type="text/css">
        /*设置div公共样式*/
        div
        {

            width:200px;
            height:100px;
            color:red;
        }
        #div1
        {

            border: 1px solid gray;
            border-radius: 100px 100px 0 0;
        }

    </style>
</head>
<body>
    <div id="div1"></div>
</body>
</html>
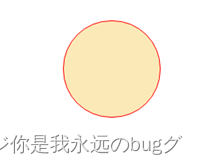
2、圆
圆的实现原理是这样的:元素的宽度和高度定义为相同值,然后4个角的圆角半径定义为宽度(或高度)的一半(或者50%)。
<!DOCTYPE html>
<html>
<head>
    <meta charset="utf-8" />
    <title></title>
    <style type="text/css">
        div
        {

            width:100px;
            height:100px;
            border:1px solid red;
            border-radius:50px;       /*或者:border-radius: 50%*/
            background-color:#FCE9B8;
        }
    </style>
</head>
<body>
    <div></div>
</body>
</html>
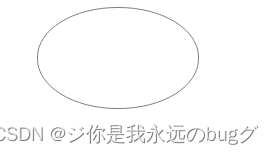
3、椭圆
border-radius:x/y;
<!DOCTYPE html>
<html>
<head>
    <meta charset="utf-8" />
    <title></title>
    <style type="text/css">
        div
        {

            width:160px;
            height:100px;
            border:1px solid gray;
            border-radius:80px/50px;
        }
    </style>
</head>
<body>
    <div></div>
</body>
</html>
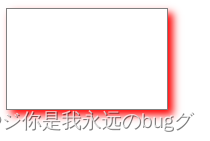
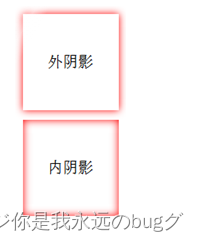
5.4、CSS3- 边框阴影:box-shadow
box-shadow:x-offset y-offset blur spread color style;
边框阴影相当于 边框的 复制品,X Y 偏移 就是 复制的边框 和 原本边框的位置距离
<!DOCTYPE html>
<html>
<head>
    <meta charset="utf-8" />
    <title></title>
    <style type="text/css">
        div
        {

            width:160px;
            height:100px;
            border:1px solid gray;
 //style取值有两种:outset和inset。当取值为outset时(默认值),表示外阴影;当取值为inset时,表示内阴影。
            box-shadow: 5px 5px 8px 0px red outset;
        }
    </style>
</head>
<body>
    <div></div>
</body>
</html>
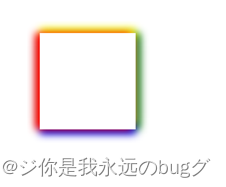
3、四个方向独立的阴影
box-shadow:左阴影, 上阴影, 下阴影, 右阴影;
<!DOCTYPE html>
<html>
<head>
    <meta charset="utf-8" />
    <title></title>
    <style type="text/css">
    body{
   padding:100px;}
        div
        {

            width:100px;
            height:100px;
            line-height:100px;
            text-align:center;
            box-shadow:-5px 0 12px red,
                       0 -5px 12px yellow,
                       0 5px 12px blue,
                       5px 0 12px green;
        }
    </style>
</head>
<body>
    <div></div>
</body>
</html>
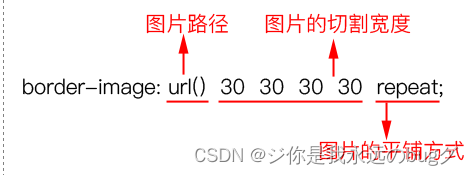
5.5、CSS3-边框背景:border-image
(1)图片路径。
(2)切割宽度:四条边的切割宽度,依次为上边、右边、下边、左边(顺时针)。
(3)平铺方式:有3种取值,分别为repeat、round和stretch。
<!DOCTYPE html>
<html>
<head>
    <meta charset="utf-8" />
    <title></title>
    <style type="text/css">
        div
        {

            width:210px;
            height:150px;
            border:30px solid gray;
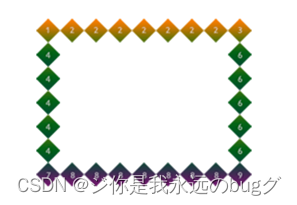
            border-image:url(img/border.png) 30 repeat;
        }
    </style>
</head>
<body>
    <div></div>
</body>
</html>
分析:
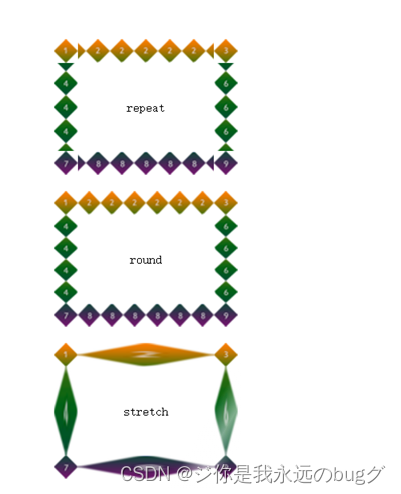
从预览效果我们可以知道,位于4个角的数字1、3、7、9还是乖乖地位于4个角。然后4条边框的2、4、6、8会不断地平铺。
对于border-image属性,我们总结如下:
(1)在制作边框背景图片时,应该制作4条边,中间部分需要挖空。
(2)边框背景图片每条边的宽度跟对应的边框宽度(即border-width)应该相同。
<!DOCTYPE html>
<html>
<head>
    <meta charset="utf-8" />
    <title></title>
    <style type="text/css">
        div
        {

            width:170px;
            height:110px;
            line-height:110px;
            text-align: center;
            border:30px solid gray;
            margin-top:20px;
        }
        /*第1个div平铺方式为:repeat*/
        #div1{border-image:url(img/border.png) 30 repeat;}
        /*第2个div平铺方式为:round*/
        #div2{border-image:url(img/border.png) 30 round;}
        /*第3个div平铺方式为:stretch*/
        #div3{border-image:url(img/border.png) 30 stretch;}
    </style>
</head>
<body>
    <div id="div1">repeat</div>
    <div id="div2">round</div>
    <div id="div3">stretch</div>
</body>
</html>
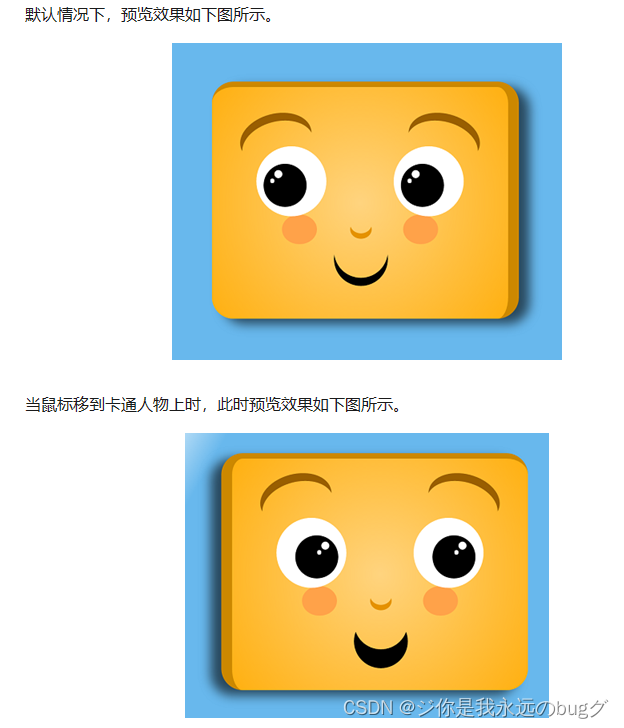
3D卡通头像
<!DOCTYPE html>
<html>
<head>
	<meta charset="utf-8">
	<title></title>
    <style type="text/css">
        /*整体布局方式*/
        body {
   background: #68b8ed;}
        .eye-brow,.eye,.pupil,.shine,.nose,.mouth {
   display: inline-block;}
        .mr-border-radius,.eye,.pupil,.shine,.nose,.mouth {
   position: relative;}
        .left-eye,.left-blush {
   float: left;}
        .right-eye,.right-blush {
   float: right;}
        /*外层div样式*/
        .mr-border-radius
        {

            margin: auto;
            margin-top: 10%;
            width: 550px;
            height: 430px;
            background-color: #FFB010;
            background-image: radial-gradient(circle, #FFD47F, #FFB010);
            border: solid #CC8800;
            border-radius: 40px;
            border-width: 10px 20px 0 0;
            box-shadow: 20px 10px 30px 0 rgba(0, 0, 0, .6);
            transition: all .5s;
        }
        /*眉毛*/
        .eye-brow
        {

            position: absolute;
            top: 15%;
            width: 135px;
            height: 90px;
            border-radius: 100%;
            background: transparent;
            box-shadow: 0 -15px 0 0 #995E00;
            transition: top .5s;
        }
        .left-eye-brow {
   left: 10%; transform: rotate(-15deg);}
        .right-eye-brow {
   right: 10%;transform: rotate(15deg);}
        /*眼睛*/
        .eye
        {

            width: 130px;
            height: 130px;
            margin-top: 20%;
            border-radius: 100%;
            background: white;
        }
        /*脸红*/
        .blush
        {

            width: 65px;
            height: 55px;
            margin-top: 43%;
            border-radius: 90%;
            background: #FFA249;
        }
        /*瞳孔*/
        .pupil
        {

            height: 80px;
            width: 80px;
            margin-top: 25%;
            margin-left: 10%;
            background: black;
            border-radius: 100%;
            transition: margin-left .5s;
        }
        .shine
        {

            height: 15px;
            width: 15px;
            margin-top: 15%;
            margin-left: 25%;
            border-radius: 100%;
            background: white;
            transition: all .5s;
        }
        .shine:after
        {

            content: "";
            position: relative;
            display: inline-block;
            top: 65%;
            left: -50%;
            height: 8px;
            width: 8px;
            border-radius: 100%;
            background: white;
        }
        .eye.left-eye {
   margin-left: 15%;}
        .blush.left-blush {
   margin-left: -15%; }
        .eye.right-eye {
    margin-right: 15%;}
        .blush.right-blush {
   margin-right: -15%;}
        /*鼻子*/
        .nose
        {

            left: 8%;
            top: 55%;
            width: 40px;
            height: 35px;
            border-radius: 100%;
            box-shadow: 0 10px 0 0 #E59200;
        }
        /*嘴巴*/
        .mouth
        {

            left: 2.5%;
            top: 50%;
            width: 100px;
            height: 100px;
            border-radius: 100%;
            background: transparent;
            box-shadow: 0 15px 0 0;
            transition: box-shadow .5s;
        }
        /*鼠标移到头像上时*/
        .mr-border-radius:hover
        {

            border-width: 10px 0 0 20px;
            box-shadow: -20px 10px 30px 0 rgba(0, 0, 0, .6);
        }
        .mr-border-radius:hover .pupil {
   margin-left: 27%; }
        .mr-border-radius:hover .shine {
   margin-left: 60%;}
        .mr-border-radius:hover .mouth {
   box-shadow: 0 35px 0 0;}
        .mr-border-radius:hover .eye-brow {
   top: 10%;}
    </style>
</head>
<body>
    <div class="mr-border-radius">
        <span class="eye-brow left-eye-brow"></span>
        <span class="eye left-eye">
            <span class="pupil">
                <span class="shine"></span>
            </span>
        </span>
        <span class="eye-brow right-eye-brow"></span>
        <span class="eye right-eye">
            <span class="pupil">
                <span class="shine"></span>
            </span>
        </span>
        <span class="blush left-blush"></span>
        <span class="blush right-blush"></span>
        <span class="nose"></span>
        <span class="mouth"></span>
    </div>
</body>
</html>
六、列表样式
6.1、列表项符号;list-style-type
list-style-type属性是针对ol或者ul元素的,而不是li元素。
去除列表项
list-style-type: none;
语法:
list-style-type: 取值;


		ol的list-style-type属性取值
属性值						说明
decimal				阿拉伯数字:1、2、3…(默认值)
lower-roman			小写罗马数字:i、ii、iii…
upper-roman			大写罗马数字:I、II、III…
lower-alpha			小写英文字母:a、b、c…
upper-alpha			大写英文字母:A、B、C…


		ul的list-style-type属性取值
属性值						说明
disc					实心圆●(默认值)
circle					空心圆○
square					正方形■

去除列表项
list-style-type: none;
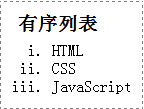
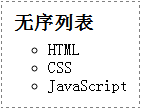
Demo:有序列表
<!DOCTYPE html>
<html>
<head>
    <meta charset="utf-8" />
    <title></title>
    <style type="text/css"> ol{
     list-style-type:lower-roman;} </style>
</head>
<body>
    <h3>有序列表</h3>
    <ol>
        <li>HTML</li>
        <li>CSS</li>
        <li>JavaScript</li>
    </ol>
</body>
</html>
<!DOCTYPE html>
<html>
<head>
    <meta charset="utf-8" />
    <title></title>
    <style type="text/css"> ul{
     list-style-type:circle;} </style>
</head>
<body>
    <h3>无序列表</h3>
    <ul>
        <li>HTML</li>
        <li>CSS</li>
        <li>JavaScript</li>
    </ul>
</body>
</html>
6.2、列表项图片:list-style-image
语法:
list-style-image: url(图片路径);
Demo:
<!DOCTYPE html>
<html>
<head>
    <meta charset="utf-8" />
    <title></title>
    <style type="text/css"> ul{
     list-style-image: url(img/leaf.png);} </style>
</head>
<body>
    <ul>
        <li>HTML</li>
        <li>CSS</li>
        <li>JavaScript</li>
    </ul>
</body>
</html>
七、表格样式
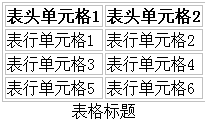
7.1、表格标题位置:caption-side
语法:
table{caption-side:取值;}

属性值			说明
top			标题在顶部(默认值)
bottom		标题在底部
Demo:
<!DOCTYPE html>
<html>
<head>
    <meta charset="utf-8" />
    <title></title>
    <style type="text/css"> table,tr, td,th{
     border:1px solid silver;} table{
     caption-side:bottom;} </style>
</head>
<body>
    <table>
        <caption>表格标题</caption>
        <!--表头-->
        <thead>
            <tr>
                <th>表头单元格1</th>
                <th>表头单元格2</th>
            </tr>
        </thead>
        <!--表身-->
        <tbody>
            <tr>
                <td>表行单元格1</td>
                <td>表行单元格2</td>
            </tr>
            <tr>
                <td>表行单元格3</td>
                <td>表行单元格4</td>
            </tr>
        </tbody>
        <!--表脚-->
        <tfoot>
            <tr>
                <td>表行单元格5</td>
                <td>表行单元格6</td>
            </tr>
        </tfoot>
    </table>
</body>
</html>
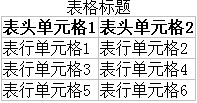
7.2、表格边框合并:border-collapse
语法:
border-collapse: 取值;

属性值			说明
separate	边框分开,有空隙(默认值)
collapse	边框合并,无空隙
Demo;
<!DOCTYPE html>
<html>
<head>
    <meta charset="utf-8" />
    <title></title>
    <style type="text/css"> table,th,td{
     border:1px solid silver;} table{
     border-collapse: collapse;} </style>
</head>
<body>
    <table>
        <caption>表格标题</caption>
        <!--表头-->
        <thead>
            <tr>
                <th>表头单元格1</th>
                <th>表头单元格2</th>
            </tr>
        </thead>
        <!--表身-->
        <tbody>
            <tr>
                <td>表行单元格1</td>
                <td>表行单元格2</td>
            </tr>
            <tr>
                <td>表行单元格3</td>
                <td>表行单元格4</td>
            </tr>
        </tbody>
        <!--表脚-->
        <tfoot>
            <tr>
                <td>表行单元格5</td>
                <td>表行单元格6</td>
            </tr>
        </tfoot>
    </table>
</body>
</html>
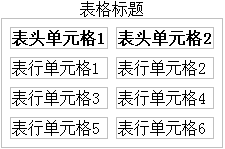
7.3、表格边框间距:border-spacing
语法:
border-spacing: 像素值;
Demo:
<!DOCTYPE html>
<html>
<head>
    <meta charset="utf-8" />
    <title></title>
    <style type="text/css"> table,th,td{
     border:1px solid silver;} table{
     border-spacing: 8px;} </style>
</head>
<body>
    <table>
        <caption>表格标题</caption>
        <!--表头-->
        <thead>
            <tr>
                <th>表头单元格1</th>
                <th>表头单元格2</th>
            </tr>
        </thead>
        <!--表身-->
        <tbody>
            <tr>
                <td>表行单元格1</td>
                <td>表行单元格2</td>
            </tr>
            <tr>
                <td>表行单元格3</td>
                <td>表行单元格4</td>
            </tr>
        </tbody>
        <!--表脚-->
        <tfoot>
            <tr>
                <td>表行单元格5</td>
                <td>表行单元格6</td>
            </tr>
        </tfoot>
    </table>
</body>
</html>
八、图片样式
8.1、图片大小
语法:
width: 像素值;
height: 像素值;
Demo
<!DOCTYPE html>
<html>
<head>
    <meta charset="utf-8" />
    <title></title>
    <style type="text/css"> img {
      width: 60px; height: 60px; } </style>
</head>
<body>
    <img src="img/girl.gif" alt="卡通女孩" />
</body>
</html>
8.2 、图片边框
语法:
border: 1px solid red;
<!DOCTYPE html>
<html>
<head>
    <meta charset="utf-8" />
    <title></title>
    <style type="text/css"> img {
      width: 60px; height: 60px; border: 1px solid red; } </style>
</head>
<body>
    <img src="img/girl.gif" alt="卡通女孩" />
</body>
</html>
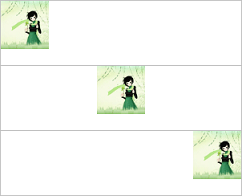
8.3、图片对齐
8.3.1、水平对齐
语法:
text-align: 取值;

属性值	说明
left	左对齐(默认值)
center	居中对齐
right	右对齐
Demo:
<!DOCTYPE html>
<html>
<head>
    <meta charset="utf-8" />
    <title></title>
    <style type="text/css"> div {
      width: 300px; height: 80px; border: 1px solid silver; } .div1{
      text-align: left; } .div2{
      text-align: center; } .div3{
      text-align: right; } img{
      width: 60px; height: 60px; } </style>
</head>
<body>
    <div class="div1">
        <img src="img/girl.gif" alt=""/>
    </div>
    <div class="div2">
        <img src=" img/girl.gif" alt=""/>
    </div>
    <div class="div3">
        <img src=" img/girl.gif" alt=""/>
    </div>
</body>
</html>
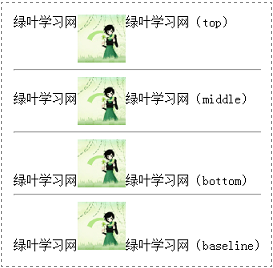
8.3.2、垂直对齐
语法:
vertical-align: 取值;

属性值		  说明
top			顶部对齐
middle		中部对齐
baseline	基线对齐
bottom		底部对齐
举例:
<!DOCTYPE html>
<html>
<head>
    <meta charset="utf-8" />
    <title></title>
    <style type="text/css"> img{
      width: 60px; height: 60px; } #img1{
      vertical-align: top; } #img2{
      vertical-align: middle; } #img3{
      vertical-align: bottom; } #img4{
      vertical-align: baseline; } </style>
</head>
<body>
    绿叶学习网<img id="img1" src="img/girl.gif" alt=""/>绿叶学习网(top)
    <hr/>
    绿叶学习网<img id="img2" src="img/girl.gif" alt=""/>绿叶学习网(middle)
    <hr/>
    绿叶学习网<img id="img3" src="img/girl.gif" alt=""/>绿叶学习网(bottom)
    <hr/>
    绿叶学习网<img id="img4" src="img/girl.gif" alt=""/>绿叶学习网(baseline)
</body>
</html>
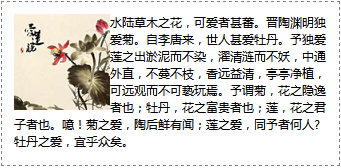
8.4、文字环绕:float
语法:
float: 取值;

left	元素向左浮动
right	元素向右浮动
Demo:
<!DOCTYPE html>
<html>
<head>
    <meta charset="utf-8" />
    <title></title>
    <style type="text/css"> img{
     float:left;} p{
      font-family:"微软雅黑"; font-size:12px; } </style>
</head>
<body>
    <img src="img/lotus.png" alt=""/>
    <p>水陆草木之花,可爱者甚蕃。晋陶渊明独爱菊。自李唐来,世人甚爱牡丹。予独爱莲之出淤泥而不染,濯清涟而不妖,中通外直,不蔓不枝,香远益清,亭亭净植,可远观而不可亵玩焉。予谓菊,花之隐逸者也;牡丹,花之富贵者也;莲,花之君子者也。噫!菊之爱,陶后鲜有闻;莲之爱,同予者何人? 牡丹之爱,宜乎众矣。</p>
</body>
</html>
九、背景样式
属性								说明
background-image			定义背景图片地址
background-repeat			定义背景图片重复,例如横向重复、纵向重复
background-position			定义背景图片位置
background-attachment		定义背景图片固定
9.1、背景颜色:background-color
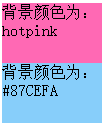
color属性用于定义“文本颜色”,而background-color属性用于定义“背景颜色”,这两个要区分好了。
语法:
background-color: 颜色值;
举例:两种颜色取值
<!DOCTYPE html>
<html>
<head>
    <meta charset="utf-8" />
    <title></title>
    <style type="text/css"> div {
      width:100px; height:60px; } #div1{
     background-color: hotpink} #div2{
     background-color: #87CEFA;} </style>
</head>
<body>
    <div id="div1">背景颜色为:hotpink</div>
    <div id="div2">背景颜色为:#87CEFA</div>
</body>
</html>
9.2、背景图片样式:background-image
语法:
background-image: url(图片路径);
<!DOCTYPE html>
<html>
<head>
    <meta charset="utf-8" />
    <title></title>
    <style type="text/css"> div {
      width:250px; height:170px; background-image: url(img/haizei.png); } </style>
</head>
<body>
    <div></div>
</body>
</html>
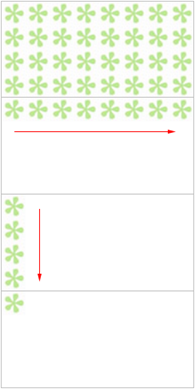
9.3、 背景图片重复:background-repeat
语法:
background-repeat: 取值;

属性值			说明
repeat		在水平方向和垂直方向上同时平铺(默认值)
repeat-x	只在水平方向(x轴)上平铺
repeat-y	只在垂直方向(y轴)上平铺
Demo:
<!DOCTYPE html>
<html>
<head>
    <meta charset="utf-8" />
    <title></title>
    <style type="text/css"> div {
      width:200px; height:100px; border: 1px solid silver; background-image: url(img/flower.png); } #div2{
     background-repeat: repeat-x} #div3{
     background-repeat: repeat-y} #div4{
     background-repeat: no-repeat} </style>
</head>
<body>
    <div id="div1"></div>
    <div id="div2"></div>
    <div id="div3"></div>
    <div id="div4"></div>
</body>
</html>
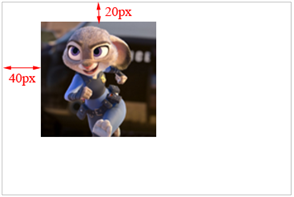
9.4、背景图片位置:background-position
语法:
background-position: 像素值/关键字;
9.4.1、像素值
语法:
background-position: 水平距离 垂直距离;
举例:
<!DOCTYPE html>
<html>
<head>
    <meta charset="utf-8" />
    <title></title>
    <style type="text/css"> div {
      width:300px; height:200px; border:1px solid silver; background-image:url(img/judy.png); background-repeat:no-repeat; background-position:40px 20px; } </style>
</head>
<body>
    <div></div>
</body>
</html>
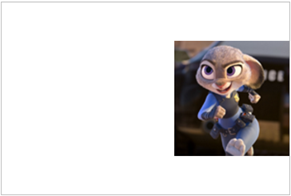
9.4.2、关键字
语法:
background-position:关键字


top left		左上
top center		靠上居中
top right		右上
center left		居中靠左
center center	正中
center right	居中靠右
bottom left		左下
bottom center	靠下居中
bottom right	右下
Demo:
<!DOCTYPE html>
<html>
<head>
    <meta charset="utf-8" />
    <title></title>
    <style type="text/css"> div {
      width:300px; height:200px; border:1px solid silver; background-image:url(img/judy.png); background-repeat:no-repeat; background-position:center right; } </style>
</head>
<body>
    <div></div>
</body>
</html>
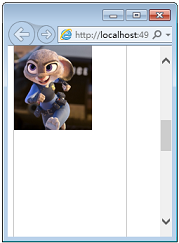
9.5、背景图片固定:background-attachment
语法:
background-attachment: 取值;

属性值	说明
scroll	随元素一起滚动(默认值)
fixed	固定不动
举例:
<!DOCTYPE html>
<html>
<head>
    <meta charset="utf-8" />
    <title></title>
    <style type="text/css"> div {
      width:160px; height:1200px; border:1px solid silver; background-image:url(img/judy.png); background-repeat:no-repeat; background-attachment:fixed; } </style>
</head>
<body>
    <div></div>
</body>
</html>
9.6、CSS3-背景图片大小:background-size
background-size属性来定义背景图片的大小,这样可以使得同一张背景图片可以在不同的场景重复使用。
background-size:取值;
<!DOCTYPE html>
<html>
<head>
    <meta charset="utf-8" />
    <title></title>
    <style type="text/css">
        div
        {

           width:160px;
           height:100px;
           border:1px solid red;
           margin-top:10px;
           background-image:url(img/2.jpg);
           background-repeat:no-repeat;
        }
        #div2{background-size:160px 100px;}
    </style>
</head>
<body>
    <div id="div2"></div>
</body>
</html>
9.7、CSS3-背景位置:background-origin
background-origin:取值;
- border-box 从边框开始平铺
- padding-box 从内边距开始平铺(默认值)
- content-box 从内容区开始平铺
background-origin往往都是配合background-position来使用的,其中background-origin定义background-position相对于什么位置来定位。
9.8、CSS3-背景图片剪切:background-clip
background-clip:取值;
- border-box 从边框开始剪切(默认值)
- padding-box 从内边距开始剪切
- content-box 从内容区开始剪切
9.9、CSS3-多背景图片
<!DOCTYPE html>
<html>
<head>
    <meta charset="utf-8" />
    <title></title>
    <style type="text/css">
        div
        {

            width:400px;
            height:200px;
            border:1px solid silver;
            background:url(img/2.png) bottom left no-repeat,
                       url(img/2.png) top right no-repeat;
        }
    </style>
</head>
<body>
    <div></div>
</body>
</html>
十、超链接伪类
10.1、超链接样式
语法:
a:link{…}
a:visited{…}
a:hover{…}
a:active{…}


伪类				说明
a:link		定义a元素未访问时的样式
a:visited	定义a元素访问后的样式
a:hover		定义鼠标经过a元素时的样式
a:active	定义鼠标点击激活时的样式
定义4个伪类,必须按照“link、visited、hover、active”的顺序进行,不然浏览器可能无法正常显示这4种样式
记忆方法:“love hate”
“爱恨原则”
<!DOCTYPE html>
<html>
<head>
    <meta charset="utf-8" />
    <title> </title>
    <style type="text/css"> a{
     text-decoration:none;} a:link{
     color:red;} a:visited{
     color:purple;} a:hover{
     color:yellow;} a:active{
     color:blue;} </style>
</head>
<body>
    <a href="http://www.lvyestudy.com" target="_blank">绿叶学习网</a>
</body>
</html>
10.2、深入了解超链接伪类
在实际开发中,我们只会用到两种状态:未访问时状态和鼠标经过状态。
语法:
a{…}
a:hover{…}
<!DOCTYPE html>
<html>
<head>
    <meta charset="utf-8" />
    <title> </title>
    <style type="text/css"> a {
      color:red; text-decoration: none; } a:hover {
      color:blue; text-decoration:underline; } </style>
</head>
<body>
    <div>
        <a href="http://www.lvyestudy.com" target="_blank">绿叶学习网</a>
    </div>
</body>
</html>
10.3、深入了解:hover
语法:
元素:hover{…}
举例:“:hover”用于div
<!DOCTYPE html>
<html>
<head>
    <meta charset="utf-8" />
    <title></title>
    <style type="text/css"> div {
      width:100px; height:30px; line-height:30px; text-align:center; color:white; background-color: lightskyblue; } div:hover {
      background-color: hotpink; } </style>
</head>
<body>
    <div>绿叶学习网</div>
</body>
</html>
<!DOCTYPE html>
<html>
<head>
    <meta charset="utf-8" />
    <title></title>
    <style type="text/css"> img:hover {
      border:2px solid red; } </style>
</head>
<body>
    <img src="img/girl.gif" alt="">
</html>
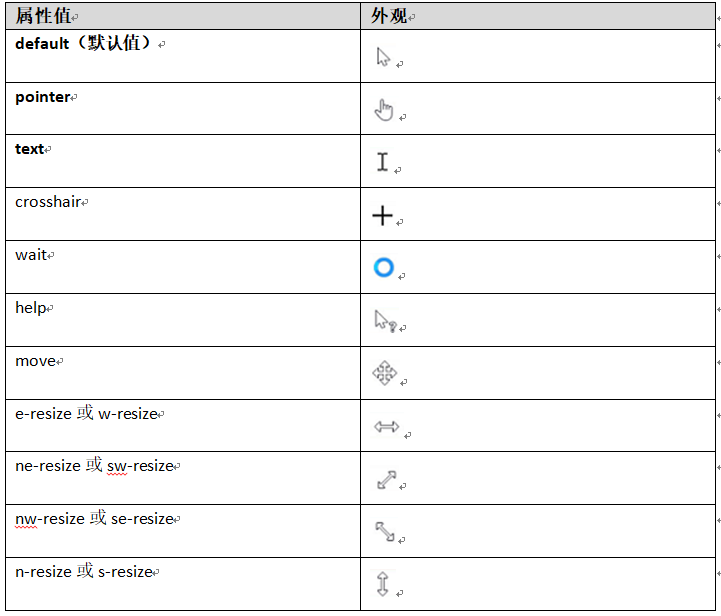
10.4、鼠标样式
10.4.1 、浏览器鼠标样式
语法:
cursor: 取值;
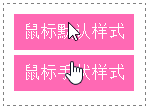
<!DOCTYPE html>
<html>
<head>
    <meta charset="utf-8" />
    <style type="text/css"> div {
      width:100px; height:30px; line-height:30px; text-align:center; background-color: hotpink; color:white; font-size:14px; } #div_default{
     cursor:default;} #div_pointer{
     cursor:pointer;} </style>
</head>
<body>
    <div id="div_default">鼠标默认样式</div>
    <div id="div_pointer">鼠标手状样式</div>
</body>
</html>
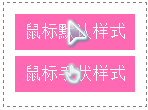
10.4.2、自定义鼠标样式
这个“图片地址”是鼠标图片地址,其中鼠标图片后缀名一般都是.cur
语法:.
cursor: url(图片地址), 属性值;
举例:
<!DOCTYPE html>
<html>
<head>
    <meta charset="utf-8" />
    <style type="text/css"> div {
      width:100px; height:30px; line-height:30px; text-align:center; background-color: hotpink; color:white; font-size:14px; } #div_default{
     cursor:url(img/cursor/default.cur),default;} #div_pointer{
     cursor:url(img/cursor/pointer.cur),pointer;} </style>
</head>
<body>
    <div id="div_default">鼠标默认样式</div>
    <div id="div_pointer">鼠标手状样式</div>
</body>
</html>
十一、盒子模型
在“CSS盒子模型”理论中,页面中的所有元素都可以看成一个盒子,并且占据着一定的页面空间。
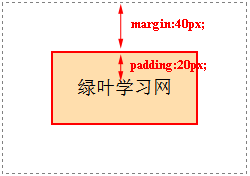
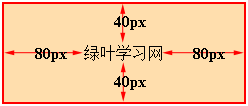
盒子模型是由四个属性组成的:content(内容)、padding(内边距)、margin(外边距)和border(边框)。此外,在盒子模型中,还有宽度width和高度height两大辅助性属性。记住,所有的元素都可以看成一个盒子
属性				说明
content		内容,可以是文本或图片:内容区是盒子模型必备的组成部分
			内容区有3个属性:width、height和overflow。使用width和height属性可以指定盒子内容区的高度和宽度
			当内容过多超出width和height时,可以使用overflow属性来指定溢出处理方式。

padding		内边距,指的是内容区和边框之间的空间
			padding-top、padding-bottom、padding-left、padding-right

margin		外边距,用于定义当前元素与其他元素之间的距离;两个盒子之间的距离
			margin-top、margin-bottom、margin-left、margin-right

border		边框,用于定义元素的边框
			border-width、border-style、border-color
Demo:
<!DOCTYPE html>
<html>
<head>
    <meta charset="utf-8" />
    <title></title>
    <style type="text/css"> div {
      display:inline-block; /*将块元素转换为inline-block元素*/ padding:20px; margin:40px; border:2px solid red; background-color:#FFDEAD; } </style>
</head>
<body>
    <div>绿叶学习网</div>
</body>
</html>
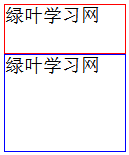
11.1、宽高:width、height
元素的宽度(width)和高度(height)是针对内容区而言的
只有块元素才可以设置width和height,行内元素是无法设置width和height的。
语法:
width: 像素值;
height: 像素值;
<!DOCTYPE html>
<html>
<head>
    <meta charset="utf-8" />
    <title></title>
    <style type="text/css"> #div1 {
      width:100px; height:40px; border:1px solid red; } #div2 {
      width:100px; height:80px; border:1px solid blue; } </style>
</head>
<body>
    <div id="div1">绿叶学习网</div>
    <div id="div2">绿叶学习网</div>
</body>
</html>
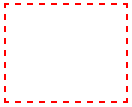
11.2、边框:border
语法:
border: 1px solid red;
第1个值指的是边框宽度(border-width),第2个值指的是边框外观(border-style),第3个值指的是边框颜色(border-color)。
<!DOCTYPE html>
<html>
<head>
    <meta charset="utf-8" />
    <title></title>
    <style type="text/css"> div {
      width:100px; height:80px; border: 2px dashed red; } </style>
</head>
<body>
    <div></div>
</body>
</html>
11.3、内边距:padding
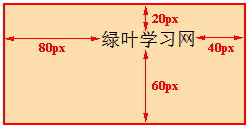
内边距padding,又常常被称为“补白”,它指的是内容区到边框之间的那一部分。内边距都是在边框内部的。
语法:
padding-top: 像素值;
padding-right: 像素值;
padding-bottom: 像素值;
padding-left: 像素值;
Demo:
<!DOCTYPE html>
<html>
<head>
    <meta charset="utf-8" />
    <title></title>
    <style type="text/css"> div {
      display:inline-block; /*将块元素转换为inline-block元素*/ padding-top:20px; padding-right:40px; padding-bottom:60px; padding-left:80px; border:2px solid red; background-color:#FFDEAD; } </style>
</head>
<body>
    <div>绿叶学习网</div>
</body>
</html>
语法:
padding: 像素值;
		:表示4个方向的内边距都是20px
padding: 像素值1 像素值2;
		padding-top和padding-bottom为20px,padding-right和padding-left为40px。
padding: 像素值1 像素值2 像素值3 像素值4;
		x表示padding-top为20px,padding-right为40px,padding-bottom为60px,padding-left为80px。
		按照顺时针方向记忆就可以了。
<!DOCTYPE html>
<html>
<head>
    <meta charset="utf-8" />
    <title></title>
    <style type="text/css"> div {
      display:inline-block; /*将块元素转换为inline-block元素*/ padding:40px 80px; margin:40px; border:2px solid red; background-color:#FFDEAD; } </style>
</head>
<body>
    <div>绿叶学习网</div>
</body>
</html>
11.4、外边距
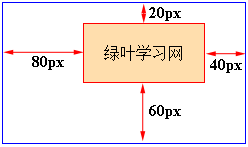
外边距margin,指的是边框到“父元素”或“兄弟元素”之间的那一部分。外边距是在元素边框的外部的。
语法:
margin-top: 像素值;
margin-right: 像素值;
margin-bottom: 像素值;
margin-left: 像素值;
<!DOCTYPE html>
<html>
<head>
    <meta charset="utf-8" />
    <title></title>
    <style type="text/css"> #father {
      display: inline-block; /*将块元素转换为inline-block元素*/ border:1px solid blue; } #son {
      display:inline-block; /*将块元素转换为inline-block元素*/ padding:20px; margin-top:20px; margin-right:40px; margin-bottom:60px; margin-left:80px; border:1px solid red; background-color:#FFDEAD; } </style>
</head>
<body>
    <div id="father">
        <div id="son">绿叶学习网</div>
    </div>
</body>
</html>
语法
margin: 像素值;
		表示4个方向的外边距都是20px。
margin: 像素值1 像素值2;
		表示margin-top和margin-bottom为20px,margin-right和margin-left为40px。
margin: 像素值1 像素值2 像素值3 像素值4;
		表示margin-top为20px,margin-right为40px,margin-bottom为60px,margin-left为80px。
		按照顺时针方向记忆就可以了
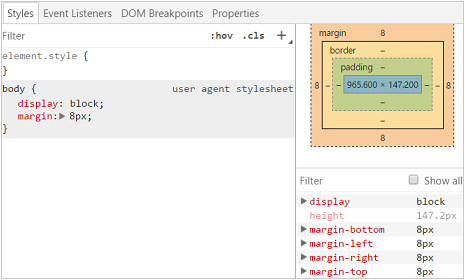
11.5、浏览器审查盒子
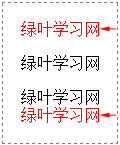
【第1步】:鼠标移到你想要的元素上面,然后按一下右键,选择“检查”(或者按Ctrl+Shift+I),如下图所示。
十二、浮动布局
12.1、文档流简介
正常文档流
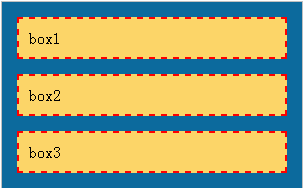
正常文档流,将一个页面从上到下分为一行一行,其中块元素独占一行,相邻行内元素在每一行中按照从左到右排列直到该行排满。”也就是说,正常文档流指的就是默认情况下页面元素的布局情况。
脱离文档流
脱离文档流,指的是脱离正常文档流
如果我们想要改变正常文档流,可以使用有两种方法:浮动和定位。
Demo:
<!DOCTYPE html>
<html>
<head>
    <meta charset="utf-8" />
    <title></title>
    <style type="text/css"> /*定义父元素样式*/ #father {
      width:300px; background-color:#0C6A9D; border:1px solid silver; } /*定义子元素样式*/ #father div {
      padding:10px; margin:15px; border:2px dashed red; background-color:#FCD568; } </style>
</head>
<body>
    <div id="father">
        <div id="son1">box1</div>
        <div id="son2">box2</div>
        <div id="son3">box3</div>
    </div>
</body>
</html>
上面定义了3个div元素。对于这个HTML来说,正常文档流指的就是从上到下依次显示这3个div元素。由于div是块元素,因此每个div元素独占一行。
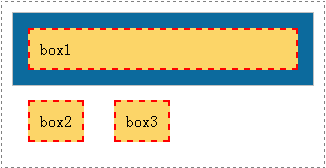
当我们为第2、3个div元素设置左浮动时,在浏览器预览效果如下图所示。
正常文档流情况下,div是块元素会独占一行。但是由于设置了浮动,第2、3个div元素却是并列一行,并且跑到父元素之外,跟正常文档流不一样。也就是说,设置浮动使得元素脱离了正常文档流。
2.设置定位
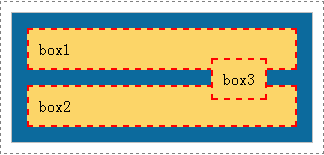
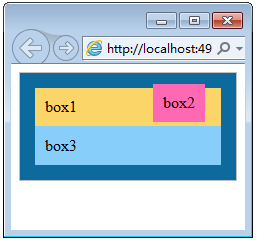
当我们为第3个div元素设置绝对定位的时候,浏览器预览效果如下图所示。
由于设置了定位,第3个div元素跑到父元素的上面去了。也就是说,设置了定位使得元素脱离了文档流。
12.2、浮动
语法:
float: 取值;

属性值				说明
left			元素向左浮动
right			元素向右浮动
Demo:
<!DOCTYPE html>
<html>
<head>
    <meta charset="utf-8" />
    <title></title>
    <style type="text/css"> /*定义父元素样式*/ #father {
      width:300px; background-color:#0C6A9D; border:1px solid silver; } /*定义子元素样式*/ #father div {
      padding:10px; margin:15px; } #son1 {
      background-color:hotpink; /*这里设置son1的浮动方式*/ } #son2 {
      background-color:#FCD568; /*这里设置son2的浮动方式*/ } </style>
</head>
<body>
    <div id="father">
        <div id="son1">box1</div>
        <div id="son2">box2</div>
    </div>
</body>
</html>
#son1
{
    background-color:hotpink;
    float:left;
}
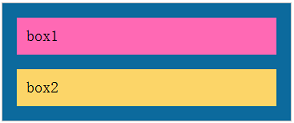
由于box1设置为左浮动,box1变成了浮动元素,因此此时box1的宽度不再延伸,而是由内容宽度决定其宽度。接着相邻的下一个div元素(box2)就会紧贴着box1,这是由于浮动引起的效果
2.设置第2个div浮动
#son2
{
    background-color:#FCD568;
    float:left;
}
由于box2变成了浮动元素,因此box2也跟box1一样,宽度不再延伸,而是由内容确定宽度。如果box2后面还有其他元素,则其他元素也会紧贴着box2。
12.3、清除浮动
clear: 取值;

属性值	说明
left	清除左浮动
right	清除右浮动
both	同时清除左浮动和右浮动
<!DOCTYPE html>
<html>
<head>
    <meta charset="utf-8" />
    <title></title>
    <style type="text/css"> /*定义父元素样式*/ #father {
      width:300px; background-color:#0C6A9D; border:1px solid silver; } /*定义子元素样式*/ #father div {
      padding:10px; margin:15px; } #son1 {
      background-color:hotpink; float:left; /*左浮动*/ } #son2 {
      background-color:#FCD568; float:right; /*右浮动*/ } .clear{
     clear:both;} </style>
</head>
<body>
    <div id="father">
        <div id="son1">box1</div>
        <div id="son2">box2</div>
        <div class="clear"></div>
    </div>
</body>
</html>
我们一般都是在浮动元素后面再增加一个空元素,然后为这个空元素定义clear:both来清除浮动。说白了,前面小弟干了太多坏事,后面得大哥出面才能解决。
十三、定位布局
13.1 、定位布局简介
CSS定位使你可以将一个元素精确地放在页面上你指定的地方。联合使用定位和浮动,能够创建多种高级而精确地布局。其中,定位布局共有4种方式。
通过position属性来实现的,其中position属性取值如下:
属性值			 说明
fixed			固定定位
relative		相对定位
absolute		绝对定位
static			静态定位(默认值)
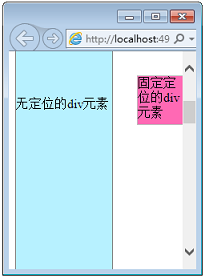
13.2、固定定位:fixed
在CSS中,我们可以使用“position:fixed;”来实现固定定位。
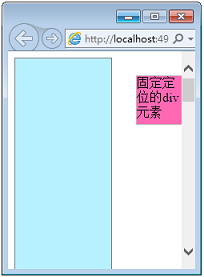
所谓的固定定位,指的是被固定的元素不会随着滚动条的拖动而改变位置。
语法:
position: fixed;
top: 像素值;
bottom: 像素值;
left: 像素值;
right: 像素值;
position:fixed;是结合top、bottom、left和right这4个属性一起使用的。其中,position:fixed使得元素成为固定定位元素,接着使用top、bottom、left和right这4个属性来设置元素相对浏览器的位置。
top、bottom、left和right这4个属性不一定全部都用到,一般只会用到其中两个。注意,这4个值的参考对象是浏览器的4条边。
举例:
<!DOCTYPE html>
<html>
<head>
    <meta charset="utf-8" />
    <title></title>
    <style type="text/css"> #first {
      width:120px; height:1800px; border:1px solid gray; line-height:600px; background-color:#B7F1FF; } #second {
      position:fixed; /*设置元素为固定定位*/ top:30px; /*距离浏览器顶部30px*/ left:160px; /*距离浏览器左部160px*/ width:60px; height:60px; border:1px solid silver; background-color:hotpink; } </style>
</head>
<body>
    <div id="first">无定位的div元素</div>
    <div id="second">固定定位的div元素</div>
</body>
</html>
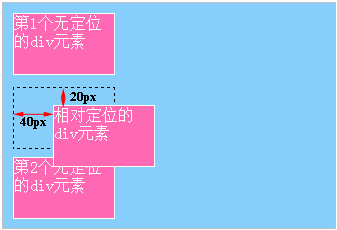
13.3、 相对定位:relative
在CSS中,我们可以使用“position:relative;”来实现相对定位。
所谓的相对定位,指的是该元素的位置是相对于它的原始位置计算而来的。
语法:
position: relative;
top: 像素值;
bottom: 像素值;
left: 像素值;
right: 像素值;
<html>
<head>
    <meta charset="utf-8" />
    <title></title>
    <style type="text/css"> #father {
      margin-top:30px; margin-left:30px; border:1px solid silver; background-color: lightskyblue; } #father div {
      width:100px; height:60px; margin:10px; background-color:hotpink; color:white; border:1px solid white; } #son2 {
      position:relative; top:20px; left:40px; } </style>
</head>
<body>
    <div id="father">
        <div id="son1">第1个无定位的div元素</div>
        <div id="son2">相对定位的div元素</div>
        <div id="son3">第2个无定位的div元素</div>
    </div>
</body>
</html>
13.4 绝对定位:absolute
在CSS中,我们可以使用“position:absolute;”来实现绝对定位。
绝对定位在几种定位方式中使用最为广泛,因为它能够很精确地把元素定位到任意你想要的位置。
语法:
position: absolute;
top: 像素值;
bottom: 像素值;
left: 像素值;
right: 像素值;
举例:
<!DOCTYPE html>
<html>
<head>
    <meta charset="utf-8" />
    <title></title>
    <style type="text/css"> #father {
      padding:15px; background-color:#0C6A9D; border:1px solid silver; } #father div{
     padding:10px;} #son1{
     background-color:#FCD568;} #son2 {
      background-color: hotpink; position:absolute; top:20px; right:40px; } #son3{
     background-color: lightskyblue;} </style>
</head>
<body>
    <div id="father">
        <div id="son1">box1</div>
        <div id="son2">box2</div>
        <div id="son3">box3</div>
    </div>
</body>
</html>
十四、CSS3-颜色样式
1、CSS3-opacity透明度
对某个元素使用opacity属性,则该元素中的所有的子元素以及文本内容都会受到影响。
opacity:数值;
取值范围为0.0~1.0。其中0.0表示完全透明,1.0表示完全不透明。
<!DOCTYPE html>
<html>
<head>
    <meta charset="utf-8" />
    <title></title>
    <style type="text/css">
        a
        {

            display:inline-block;
            padding:5px 10px;
            font-family:微软雅黑;
            color:white;
            background-color:hotpink;
            cursor:pointer;
        }
        a:hover{

            opacity: 0.6;
        }
    </style>
</head>
<body>
    <a>南栖仙策</a>
</body>
</html>
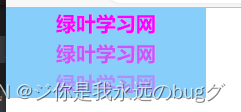
2、CSS3-RGBA颜色
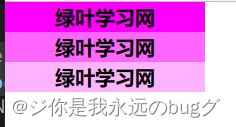
RGB是一种色彩标准,由红(Red)、绿(Green)、蓝(Blue)3种颜色变化来得到各种颜色。而RGBA,说白了就是在RGB基础上增加了一个透明度通道Alpha。
rgba(R, G, B, A)

rgba(255, 255, 0, 0.5)
rgba(50%, 80%, 50%, 0.5)
示例1、背景色的透明度
只针对背景色,不影响文本文字
<!DOCTYPE html>
<html>
<head>
    <meta charset="utf-8" />
    <title></title>
    <style type="text/css">
        *{
   padding:0;margin:0;}
        ul
        {

            display:inline-block;
            list-style-type:none;
            width:200px;
        }
        li
        {

            height:30px;
            line-height:30px;
            font-size:20px;
            font-weight:bold;
            text-align:center;
        }
        /*第1个li,透明度为1.0*/
        li:first-child
        {

            background-color:rgba(255,0,255,1.0);
        }
        /*第2个li,透明度为0.6*/
        li:nth-child(2)
        {

            background-color:rgba(255,0,255,0.6);
        }
        /*第3个li,透明度为0.3*/
        li:last-child
        {

            background-color:rgba(255,0,255,0.3);
        }
    </style>
</head>
<body>
    <ul>
        <li>绿叶学习网</li>
        <li>绿叶学习网</li>
        <li>绿叶学习网</li>
    </ul>
</body>
</html>
<!DOCTYPE html>
<html>
<head>
    <meta charset="utf-8" />
    <title></title>
    <style type="text/css">
        *{
   padding:0;margin:0;}
        ul
        {

            display:inline-block;
            list-style-type:none;
            width:200px;
        }
        li
        {

            height:30px;
            line-height:30px;
            font-size:20px;
            font-weight:bold;
            text-align:center;
            background-color:lightskyblue;
        }
        /*第1个li,透明度为1.0*/
        li:first-child
        {

            color:rgba(255,0,255,1.0);
        }
        /*第2个li,透明度为0.6*/
        li:nth-child(2)
        {

            color:rgba(255,0,255,0.6);
        }
        /*第3个li,透明度为0.3*/
        li:last-child
        {

            color:rgba(255,0,255,0.3);
        }
    </style>
</head>
<body>
    <ul>
        <li>绿叶学习网</li>
        <li>绿叶学习网</li>
        <li>绿叶学习网</li>
    </ul>
</body>
</html>
总结:RGBA中的透明度只会针对当前设置的属性(color、background-color等为属性)起作用。
3、渐变色
1、线性渐变
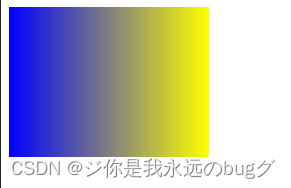
线性渐变,指的是在一条直线上进行的渐变。我们见到的大多数渐变效果都是线性渐变。
background:linear-gradient(方向, 开始颜色, 结束颜色)
方向属性值:
- to top 0deg 从下到上
- to bottom 180deg 从上到下(默认值)
- to left 270deg 从右到左
- to right 90deg 从左到右
- to top left 无 从右下角到左上角(斜对角)
- to top right 无 从左下角到右上角(斜对角)
<!DOCTYPE html>
<html>
<head>
    <meta charset="utf-8" />
    <title></title>
    <style type="text/css">
        div
        {

            width:200px;
            height:150px;
            background:linear-gradient(to right,blue,yellow);
        }
    </style>
</head>
<body>
    <div></div>
</body>
</html>
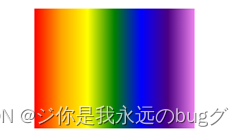
多种颜色渐变
同时定义多种颜色的线性渐变,颜色值之间用英文逗号隔开即可。
background:linear-gradient(to right, red, orange, yellow, green, blue, indigo, violet);
2、径向渐变
是颜色从内到外进行的圆形渐变(从中间往外拉,像圆一样)
background:radial-gradient(position, shape size, start-color, stop-color)
- position用于定义圆心位置。
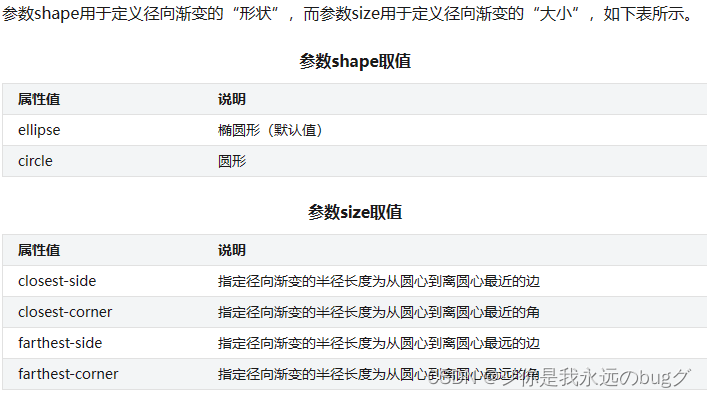
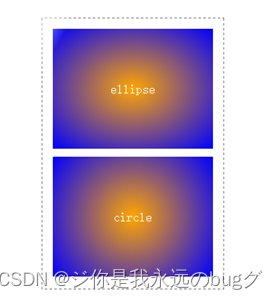
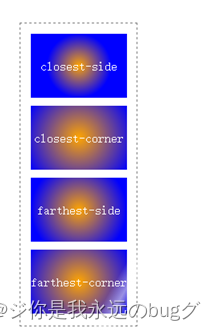
- shape size用于定义形状大小,由两部分组成,shape定义形状,size定义大小。
- start-color和stop-color分别用于定义开始颜色和结束颜色。
其中,position和shape size都是可选参数。如果省略,则表示采用默认值。start-color和stop-color都是必选参数,可以有多个颜色值。
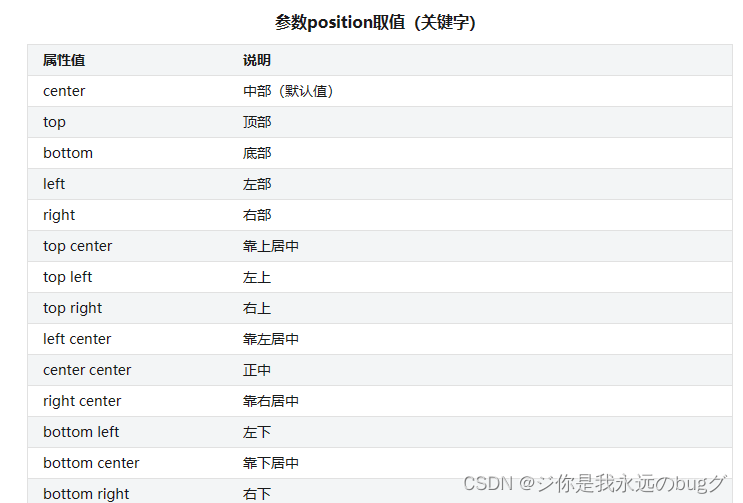
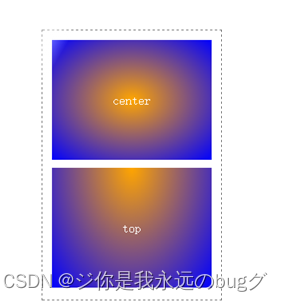
圆心位置position
参数position用于定义径向渐变的“圆心位置”,取值跟background-position属性取值一样。常用取值有两种:一种是“长度值”(如10px);另外一种是“关键字”(如top)
<!DOCTYPE html>
<html>
<head>
    <meta charset="utf-8" />
    <title></title>
    <style type="text/css">
        /*设置div公共样式*/
        div
        {

            width:200px;
            height:150px;
            margin-bottom:10px;
            line-height:150px;
            text-align:center;
            color:white;
        }
        #div1
        {

            background:-webkit-radial-gradient(center,orange,blue);
        }
        #div2
        {

            background:-webkit-radial-gradient(top,orange,blue);
        }
    </style>
</head>
<body>
    <div id="div1">center</div>
    <div id="div2">top</div>
</body>
</html>
<!DOCTYPE html>
<html>
<head>
    <meta charset="utf-8" />
    <title></title>
    <style type="text/css">
        /*设置div公共样式*/
        div
        {

            width:200px;
            height:150px;
            line-height:150px;
            margin-bottom:10px;
            text-align:center;
            color:white;
        }
        #div1
        {

            background:-webkit-radial-gradient(ellipse, orange,blue);
        }
        #div2
        {

            background:-webkit-radial-gradient(circle,orange,blue);
        }
    </style>
</head>
<body>
    <div id="div1">ellipse</div>
    <div id="div2">circle</div>
</body>
</html>
<!DOCTYPE html>
<html>
<head>
    <meta charset="utf-8" />
    <title></title>
    <style type="text/css">
        /*设置div公共样式*/
        div
        {

            width:120px;
            height:80px;
            line-height:80px;
            margin-top:10px;
            text-align:center;
            color:white;
        }
        #div1{background:-webkit-radial-gradient(circle closest-side, orange, blue);}
        #div2{background:-webkit-radial-gradient(circle closest-corner, orange, blue);}
        #div3{background:-webkit-radial-gradient(circle farthest-side, orange, blue);}
        #div4{background:-webkit-radial-gradient(circle farthest-corner, orange, blue);}
    </style>
</head>
<body>
    <div id="div1">closest-side</div>
    <div id="div2">closest-corner</div>
    <div id="div3">farthest-side</div>
    <div id="div4">farthest-corner
    </div>
</body>
</html>
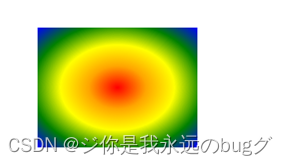
参数start-color用于定义径向渐变的“开始颜色”,而参数stop-color用于定义径向渐变的“结束颜色”。此外,径向渐变也可以接受一个“值列表”,用于同时定义多种颜色的径向渐变。
<!DOCTYPE html>
<html>
<head>
    <meta charset="utf-8" />
    <title></title>
    <style type="text/css">
        div
        {

            width:200px;
            height:150px;
            background:-webkit-radial-gradient(red, orange, yellow, green, blue);
        }
    </style>
</head>
<body>
    <div></div>
</body>
举例:不均匀分布
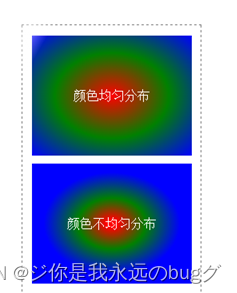
默认情况下,径向渐变的颜色节点是均匀分布的,不过我们可以为每一种颜色添加百分比,从而使得各个颜色节点不均匀分布。
<!DOCTYPE html>
<html>
<head>
    <meta charset="utf-8" />
    <title></title>
    <style type="text/css">
        div
        {

            width:200px;
            height:150px;
            line-height:150px;
            margin-top:10px;
            text-align:center;
            color:white;
        }
        #div1{background:-webkit-radial-gradient(red,green,blue);}
        #div2{background:-webkit-radial-gradient(red 5%,green 30%,blue 60%);}
    </style>
</head>
<body>
    <div id="div1">颜色均匀分布</div>
    <div id="div2">颜色不均匀分布</div>
</body>
</html>
十五、CSS3-变形
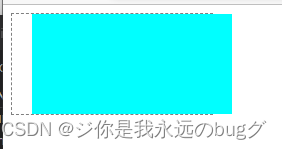
1、平移:translate()
两者的单位可以为px、em和百分比等
transform: translateX(x);         /*沿X轴方向平移*/
transform: translateY(y);         /*沿Y轴方向平移*/
transform: translate(x, y);        /*沿X轴和Y轴同时平移*/
<!DOCTYPE html>
<html>
<head>
    <meta charset="utf-8" />
    <title></title>
    <style type="text/css">

        div{

            width: 200px;
            height: 100px;
        }

        #d1{

            border: 1px dashed gray;
        }
        #d2{

            background-color: aqua;
            transform: translateX(20px);
        }

    </style>
</head>
<body>
    <div id="d1">
        <div id="d2"></div>
    </div>
</body>
</html>
注意
transform: translateX(x); 和 transform: translateY(y); 不能同时使用
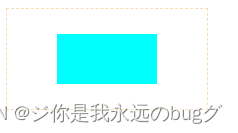
2、缩放:scale()
参数x表示元素在x轴方向的缩放倍数,参数y表示元素在y轴方向的缩放倍数。
当x或y取值为0~1之间时,元素进行缩小;当x或y取值大于1时,元素进行放大

transform: scaleX(x);         /*沿X轴方向缩放*/
transform: scaleY(y);         /*沿Y轴方向缩放*/
transform: scale(x, y);        /*沿X轴和Y轴同时缩放*/
<!DOCTYPE html>
<html>
<head>
    <meta charset="utf-8" />
    <title></title>
    <style type="text/css">

        div{

            width: 200px;
            height: 100px;
        }

        #d1{

            border: 1px dashed wheat;
        }
        #d2{

            background-color: aqua;
            transform:scale(0.5,0.5);
        }

    </style>
</head>
<body>
    <div id="d1">
        <div id="d2"></div>
    </div>
</body>
</html>
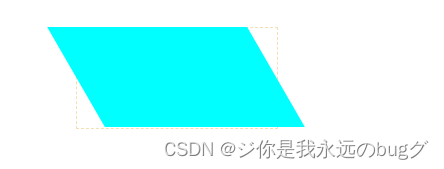
3、倾斜:skew()
参数x表示元素在x轴方向的倾斜度数,单位为deg(即degree的缩写)。
如果度数为正,则表示元素沿x轴方向逆时针倾斜;如果度数为负,则表示元素沿x轴方向顺时针倾斜。

transform: skewX(x);        /*沿X轴方向倾斜*/
transform: skewY(y);        /*沿Y轴方向倾斜*/
transform: skew(x, y);       /*沿X轴和Y轴同时倾斜*/
<!DOCTYPE html>
<html>
<head>
    <meta charset="utf-8" />
    <title></title>
    <style type="text/css">

        div{

            width: 200px;
            height: 100px;
            position: fixed;
            top: 50px;
            left: 200px;
        }

        #d1{

            border: 1px dashed wheat;
        }
        #d2{

            background-color: aqua;
            transform:skewX(30deg);
        }

    </style>
</head>
<body>
    <div id="d1">
        <div id="d2"></div>
    </div>
</body>
</html>
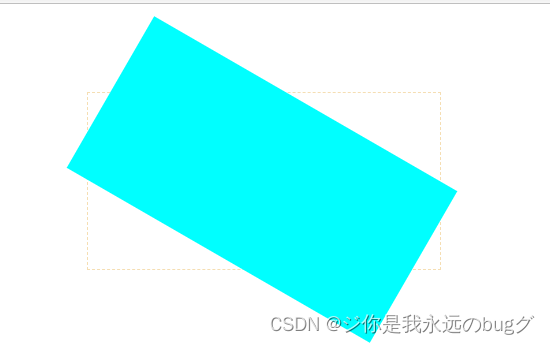
4、旋转:rotate()
参数angle表示元素相对于中心原点旋转的度数,单位为deg。
如果度数为正,则表示顺时针旋转;如果度数为负,则表示逆时针旋转

transform: rotate(angle);
<!DOCTYPE html>
<html>
<head>
    <meta charset="utf-8" />
    <title></title>
    <style type="text/css">

        div{

            width: 200px;
            height: 100px;
            position: fixed;
            top: 50px;
            left: 200px;
        }

        #d1{

            border: 1px dashed wheat;
        }
        #d2{

            background-color: aqua;
            transform:rotate(30deg)
        }

    </style>
</head>
<body>
    <div id="d1">
        <div id="d2"></div>
    </div>
</body>
</html>
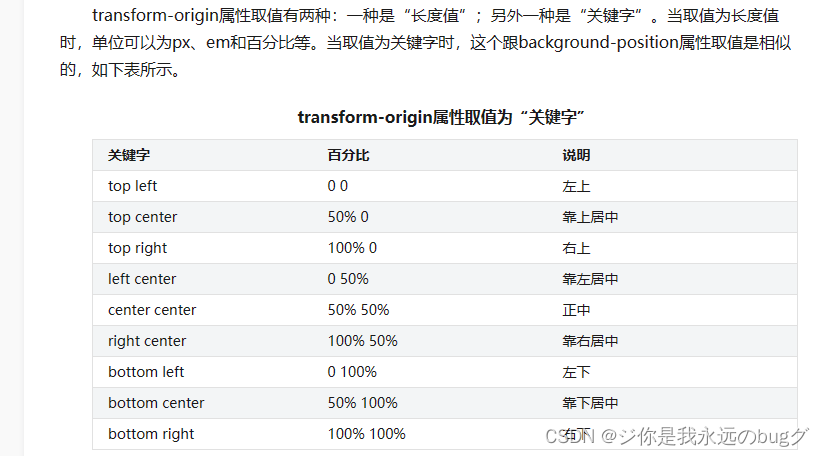
5、中心原点:transform-origin
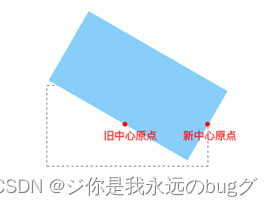
任何元素都有一个中心原点。默认情况下,元素的中心原点位于x轴和y轴的50%处。默认情况下,CSS3的各种变形(平移、缩放、倾斜等)都是以元素的中心原点进行变形的。
transform-origin: 取值;
<!DOCTYPE html>
<html>
<head>
    <meta charset="utf-8" />
    <title></title>
    <style type="text/css">
        /*设置原始元素样式*/
        #origin
        {

            width:200px;
            height:100px;
            border:1px dashed gray;
            margin:100px
        }
        /*设置当前元素样式*/
        #current
        {

            width:200px;
            height:100px;
            background-color: lightskyblue;
            transform-origin:right center;
            transform:rotate(30deg);
        }
    </style>
</head>
<body>
    <div id="origin">
        <div id="current"></div>
    </div>
</body>
</html>
十六、CSS3-过渡,时间内从1到2的转变过程
使用transition属性来将元素的某一个属性从“一个属性值”在指定的时间内平滑地过渡到“另一个属性值”,从而来实现动画效果。
凡是涉及CSS3过渡,我们都是结合:hover伪类,来实现过渡效果。
transition: height 0.5s linear 0s;
- transition-property 对元素的哪一个属性进行操作。通常用all,选中所有属性,在hover中指定属性变化
- transition-duration 过渡的持续时间
- transition-timing-function 过渡的速率方式
ease:由快到慢,逐渐变慢
linear 匀速
ease-in 速度越来越快
ease-out 速度越来越慢
ease-in-out 先加速后减速 - transition-delay 过渡的延迟时间(可选参数)
举例:
<!DOCTYPE html>
<html>
<head>
    <meta charset="utf-8" />
    <title></title>
    <style type="text/css">
        div
        {

            display:inline-block;
            width:100px;
            height:50px;
            background-color:lightskyblue;
            transition-property:height;
            transition-duration:0.5s ;
            transition-timing-function:linear;
            transition-delay:0s;
        }
        div:hover
        {

            height:100px;
        }
    </style>
</head>
<body>
    <div></div>
</body>
</html>
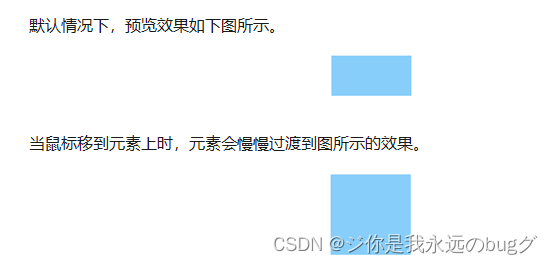
在这个例子中,我们使用transition-property属性指定了过渡效果所操作的属性是height。当鼠标移到元素上时,元素的height会在0.5秒内从50px平滑过渡到100px。
十七、CSS3-动画
使用animation属性来实现元素的动画效果。animation属性跟transition属性在功能实现上是非常相似的,都是通过改变元素的属性值来实现动画效果。但是这两者实际上有着本质上的区别。
(1)对于transition属性来说,它只能将元素的某一个属性从一个属性值过渡到另一个属性值。
(2)对于animation属性来说,它可以将元素的某一个属性从第1个属性值过渡到第2个属性值,然后还可以继续过渡到第3个属性值,以此类推。
-
@keyframes :定义动画名称
-
animation-name 对哪一个CSS属性进行操作
-
animation-duration 动画的持续时间
-
animation-timing-function 动画的速率方式 (同过度)
-
animation-delay 动画的延迟时间
-
animation-iteration-count 动画的播放次数
当取值是n(正整数)时,表示动画播放n次;
当取值为infinite时,表示动画循环播放。 -
animation-direction 动画的播放方向,正向还是反向
normal 正方向播放(默认值)
reverse 反方向播放
alternate 播放次数是奇数时,动画正方向播放;播放次数是偶数时,动画反方向播放 -
animation-play-state: 播放状态
running 播放(默认值)
paused 暂停
@keyframes 动画名
{

    0%{
   }
    ……
    100%{
   }
}
0%表示动画的开始,100%表示动画的结束,0%和100%是必须的。
不过在一个@keyframes规则中,可以由多个百分比组成,每一个百分比都可以定义自身的CSS样式,从而形成一系列的动画效果。
<!DOCTYPE html>
<html>
<head>
    <meta charset="utf-8" />
    <title></title>
    <style type="text/css">
        div
        {

            display:inline-block;
            width:100px;
            height:50px;
            background-color:wheat;
            transition-property:background-color;
            transition-duration:0.5s ;
            transition-timing-function:linear;
            transition-delay:0s;
        }
        div:hover
        {
     // 调用动画
            animation: mydh 5s linear;
            // 或者这样
            //  animation-name:mytransform;
             // animation-duration:5s;
             // animation-timing-function:linear;
        }
        // 定义动画
        @keyframes mydh{

            0%{
   background-color:white;}
            20%{
   background-color:red;}
            70%{
   background-color:blue;}
            100%{
   background-color:black;}
        }
    </style>
</head>
<body>
    <div></div>
</body>
</html>
当鼠标放到div中,5秒内会从白色-红色-蓝色-黑色的动画转变
 div:hover


            //  animation-name:mytransform;
             // animation-duration:5s;
             // animation-timing-function:linear;
        }
 // 或者这样
            //  animation-name:mytransform;
             // animation-duration:5s;
             // animation-timing-function:linear;
这俩效果是一样的
上面是鼠标触发,那么网页制动触发需要把animation-name 等写在div中
<!DOCTYPE html>
<html>
<head>
    <meta charset="utf-8" />
    <title></title>
    <style type="text/css">
        @keyframes mycolor
        {

            0%{
   background-color:red;}
            30%{
   background-color:blue;}
            60%{
   background-color:yellow;}
            100%{
   background-color:green;}
        }

        div
        {

            width:100px;
            height:100px;
            background-color:red;
            animation-name:mycolor;
            animation-duration:5s;
            animation-timing-function:linear;
        }
    </style>
</head>
<body>
    <div></div>
</body>
</html>
十八、CSS3-多列布局
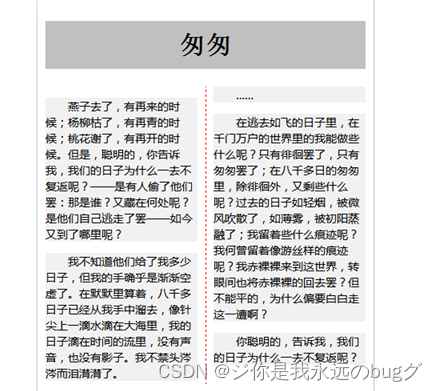
在CSS3之前,如果想要设计类似报纸那样的多列布局,有两种方式可以实现:一种是“浮动布局”;另外一种是“定位布局”。不过这两种方式弊端都很多:其中浮动布局比较灵活,但不容易控制;而定位布局可以精准定位,但是却不够灵活。
- column-count 列数
1、auto 列数由column-width属性决定(默认值)
2、n(正整数) 自动划分为n列 - column-width 每一列的宽度
1、auto 列数由column-count属性决定(默认值)
2、长度值 单位可以为px、em和百分比等 - column-gap 两列之间的距离
1、normal 浏览器默认长度值
2、长度值 单位可以为px、em和百分比等 - column-rule 两列之间的边框样式
column-rule: width style color;
- column-span 定义跨列样式
1、none 不跨列
2、all 跨所有列(跟none相反)
示例:
<!DOCTYPE html>
<html>
<head>
    <meta charset="utf-8" />
    <title></title>
    <style type="text/css">
        body
        {

            width:400px;
            padding:10px;
            border:1px solid silver;
            column-count:2;
            column-gap:20px;
            column-rule:1px dashed red;
        }
        h1
        {

            height:60px;
            line-height:60px;
            text-align:center;
            background-color:silver;
            column-span:all;
        }
        p
        {

            font-family:微软雅黑;
            font-size:14px;
            text-indent:28px;
            background-color:#F1F1F1;
        }
    </style>
</head>
<body>
    <h1>匆匆</h1>
    <p>燕子去了,有再来的时候;杨柳枯了,有再青的时候;桃花谢了,有再开的时 候。但是,聪明的,你告诉我,我们的日子为什么一去不复返呢?——是有人偷了他们罢:那是谁?又藏在何处呢?是他们自己逃走了罢——如今又到了哪里呢?</p>
    <p>我不知道他们给了我多少日子,但我的手确乎是渐渐空虚了。在默默里算着,八千多日子已经从我手中溜去,像针尖上一滴水滴在大海里,我的日子滴在时间的流里,没有声音,也没有影子。我不禁头涔涔而泪潸潸了。</p>
    <p>……</p>
    <p>在逃去如飞的日子里,在千门万户的世界里的我能做些什么呢?只有徘徊罢了,只有匆匆罢了;在八千多日的匆匆里,除徘徊外,又剩些什么呢?过去的日子如轻烟,被微风吹散了,如薄雾,被初阳蒸融了;我留着些什么痕迹呢?我何曾留着像游丝样的痕迹呢?我赤裸裸来到这世界,转眼间也将赤裸裸地回去罢?但不能平的,为什么偏要白白走这一遭啊?</p>
    <p>你聪明的,告诉我,我们的日子为什么一去不复返呢?</p>
</body>
</html>
十九、CSS3-滤镜效果
filter: 取值;
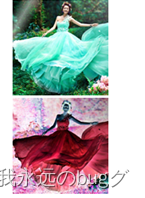
如:filter:brightness(120%) contrast(200%) blur(1px);
-
brightness() 亮度
brightness()方法的取值是一个百分比,
其中0%~100%表示减弱图片的亮度,例如0%就是完全黑色。100%以上表示增强图片的亮度,例如200%就是将亮度提高2倍。 -
grayscale() 灰度
grayscale()方法的取值是一个百分比,其中0%表示不做任何修改,100%表示完全灰度 -
sepia() 复古
sepia()方法的取值是一个百分比,取值范围为0%~100%。其中,0%表示没有转换,100%表示复古效果。 -
invert() 反色:指的是将红、绿、蓝3个通道的像素取各自的相反值。
invert()方法的取值是一个百分比,取值范围为0%~100%。其中,0%表示没有转换,100%表示反转所有颜色。
-
hue-rotate() 旋转(色相)
hue-rotate()方法的取值是一个度数,单位为deg(即degree的缩写)。其中,0deg表示不旋转,360deg表示旋转360°,也就是相当于一个循环。
-
drop-shadow() 阴影
filter: drop-shadow(x-offset y-offset blur color) 参数取值同 第五章边框样式中的边框阴影
-
opacity() 透明度
opacity()方法的取值是一个百分比,取值范围为0%~100%。其中,0%表示完全透明,100%表示完全不透明。
-
contrast() 对比度
contrast()方法的取值是一个百分比。其中,0%~100%表示减弱对比度,例如0%则是灰度图片。100%以上表示增强对比度,例如200%表示增强对比度为原来的2倍。
-
saturate() 饱和度
saturate()方法的取值是一个百分比。其中,0%~100%表示减弱饱和度,100%以上表示增强饱和度。
实例:
<!DOCTYPE html>
<html>
<head>
    <meta charset="utf-8" />
    <title></title>
    <style type="text/css">
    body{
   margin:100px;}
        #after
        {

            filter:brightness(120%) contrast(200%) blur(1px);
        }
    </style>
</head>
<body>
    <div id="before">
        <img src="img/princess.png" alt="">
    </div>
    <div id="after">
        <img src="img/princess.png" alt="">
    </div>
</body>
</html>
二十、CSS3-弹性盒子模型
通过弹性盒子模型,我们可以轻松地创建自适应浏览器窗口的“流动布局”以及自适应字体大小的弹性布局,使得响应式布局的实现更加容易。
在使用弹性盒子模型之前,你必须为父元素定义“display:flex;”或“display:inline-flex;”,这个父元素才具有弹性盒子模型的特点。
如:弹性盒子(父元素)的宽度为200px,而所有子元素宽度之和为300px,此时子元素宽度之和大于父元素宽度。因此,子元素会按比例来划分宽度。这就是弹性盒子的特点!
1、flex-grow 定义子元素的放大比例
当所有子元素宽度之和小于父元素的宽度时,flex-grow生效,子元素如何分配父元素的剩余空间。
flex-grow: 数值;
flex-grow属性取值是一个数值,默认值为0。当取值为0时,表示不索取父元素的剩余空间。当取值大于0时,表示索取父元素的剩余空间(即子元素放大)。取值越大,索取得越多。
举个例子
父元素下有两个子元素:A和 B。其中父元素宽400px,A宽为100px,B宽为200px。那么父元素的剩余空间为400-100-200=100px。
(1)如果A和B都不索取,也就是A和B的flex-grow为0,则父元素的剩余空间为100px。
(2)如果A索取,B不索取。其中A设置flex-grow:1,那么最终A的宽为100+100=200px,B的宽不变还是200px。
(3)·如果A和B同时索取剩余空间,其中A设置flex-grow:1,B设置flex-grow:1,那么最终A的宽为100+100×1/(1+1)=150px,B的宽为200+100×1/(1+1)=250px。
(4)如果A和B同时索取剩余空间,其中A设置flex-grow:1,B设置flex-grow:3,那么最终A的宽为100+100×1/(1+3)=125px,B的宽为200+100×3/(1+3)=275px。
<!DOCTYPE html>
<html>
<head>
    <meta charset="utf-8" />
    <title></title>
    <style type="text/css">
        #wrapper
        {

            display:flex;
            width:200px;
            height:150px;
        }
        #box1
        {

            background:red;
            flex-grow: 1;
        }
        #box2
        {

            background:blue;
            flex-grow: 2;
        }
        #box3
        {

            background:orange;
            flex-grow: 1;
        }
    </style>
</head>
<body>
    <div id="wrapper">
        <div id="box1"></div>
        <div id="box2"></div>
        <div id="box3"></div>
    </div>
</body>
</html>
2、flex-shrink 定义子元素的缩小比例
当所有子元素宽度之和大于父元素的宽度时,flex-shrink生效,子元素如何缩小自己的宽度。
flex-shrink: 数值;
举个例子
父元素下有两个子元素:A和 B。其中父元素宽400px,A宽为200px,B宽为300px。那么A和B宽度之和超出父元素宽度为:200+300-400=100px。
(1)如果A和B都不缩小,也就是A和B都设置flex-shrink:0,那么会有100px的宽度超出父元素。
(2)如果A不缩小,B缩小。其中A设置flex-shrink:0;,B设置flex-shrink:1;(默认值)。那么最终A的宽不变还是200px,B的宽为300-100=200px(自身宽度-超出父元素的宽度)。
(3)如果A和B同时缩小,其中A设置flex-shrink:1,B设置flex-shrink:1,那么最终A的宽为200-100×(200×1)/(200×1+300×1)=160px(A自身宽度-A减小的宽度),B的宽为300-100×(300×1)/(200×1+300×1)=240px(B自身宽度-B减小的宽度)。
(4)如果A和B同时缩小,其中A设置flex-shrink:3,B设置flex-shrink:2,那么最终A的宽为200-100×(200×3)/(200×3+300×2)=150px(A自身宽度-A减小的宽度),B的宽为300-100×(300×2)/(200×3+300×2)=250px(B自身宽度-B减小的宽度)。
<!DOCTYPE html>
<html>
<head>
    <meta charset="utf-8" />
    <title></title>
    <style type="text/css">
        #wrapper
        {

            display:flex;
            width:200px;
            height:150px;
        }
        #box1,#box2,#box3
        {

            width:100px;
        }
        #box1
        {

            background:red;
            flex-shrink:0;
        }
        #box2
        {

            background:blue;
            flex-shrink:1;
        }
        #box3
        {

            background:orange;
            flex-shrink:3;
        }
    </style>
</head>
<body>
    <div id="wrapper">
        <div id="box1"></div>
        <div id="box2"></div>
        <div id="box3"></div>
    </div>
</body>
</html>
3、 flex-basis 定义子元素的宽度
flex-basis就是width的替代品,这两个都用来定义子元素的宽度。只不过在弹性盒子中,flex-basis的语义会比width好一点而已。
flex-basis: 取值;
flex-basis属性取值有两个:一个是“auto”,即该子元素的宽度是根据内容多少来定的;另外一个是“长度值”,单位可以为px、em和百分比等。
flex-basis属性用来设置子元素的宽度,当然,width属性也可以用来设置子元素的宽度。如果某一个子元素同时设置flex-basis和width,那么flex-basis的值会覆盖width的值。
举例:子元素宽度之和大于父元素宽度
<!DOCTYPE html>
<html>
<head>
    <meta charset="utf-8" />
    <title></title>
    <style type="text/css">
        #wrapper
        {

            display:flex;
            width:200px;
            height:150px;
        }
        #box1,#box2,#box3
        {

            flex-basis:100px;
        }
        #box1
        {

            background:red;
            flex-shrink:0;
        }
        #box2
        {

            background:blue;
            flex-shrink:1;
        }
        #box3
        {

            background:orange;
            flex-shrink:3;
        }
    </style>
</head>
<body>
    <div id="wrapper">
        <div id="box1"></div>
        <div id="box2"></div>
        <div id="box3"></div>
    </div>
</body>
</html>
flex-basis是针对弹性盒子(父元素)下的子元素而已的,不能用于设置弹性盒子的宽度
你可以把它等价于width就可以了。只不过呢,在使用弹性布局时,虽然flex-basis和width都可以用来设置子元素的宽度,但是我们应该使用flex-basis而不是width,这也是为了更好的语义化。
4、 flex flex-grow、flex-shrink、flex-basis的复合属性
flex: grow shrink basis;
“flex:1;”其实等价于“flex:1 1 auto;”,而“flex:2;”等价于“flex:2 1 auto;”。也就是说flex取值只有一个数时,表示只设置了flex-grow这个属性的取值。事实上,在实际开发中我们一般也是只需要设置flex-grow属性,很少用得上另外两个属性。
5、flex-direction 定义子元素的排列方向
flex-direction属性是在弹性盒子(即父元素)上定义的。定义子元素是横着排,还是竖着排。
flex-direction: 取值;
row 横向排列(默认值)
row-reverse 横向反向排列
column 纵向排列
column-reverse 纵向反向排列
<!DOCTYPE html>
<html>
<head>
    <meta charset="utf-8" />
    <title></title>
    <style type="text/css">
        #wrapper
        {

            display:flex;
            flex-direction:row-reverse;
            width:200px;
            height:150px;
        }
        #box1,#box2,#box3
        {

            height:150px;
            line-height: 150px;
            text-align: center;
            font-size:30px;
            color:white;
        }
        #box1
        {

            background:red;
            flex: 1;
        }
        #box2
        {

            background:blue;
            flex: 2;
        }
        #box3
        {

            background:orange;
            flex: 3;
        }
    </style>
</head>
<body>
    <div id="wrapper">
        <div id="box1">1</div>
        <div id="box2">2</div>
        <div id="box3">3</div>
    </div>
</body>
</html>
6、 flex-wrap 定义子元素是单行显示,还是多行显示
定义在父元素中,定义弹性盒子内部“子元素”是单行显示还是多行显示。
flex-wrap: 取值;
nowrap 单行显示(默认值)
wrap 多行显示,也就是换行显示
wrap-reverse 多行显示,但是却是反向
<!DOCTYPE html>
<html>
<head>
    <meta charset="utf-8" />
    <title></title>
    <style type="text/css">
        /* 公用样式 */
        .wrapper1,.wrapper2,.wrapper3
        {

            display: flex;
            color: white;
            font-size:24px;
            width:400px;
            height: 100px;
            line-height:50px;
            border:1px solid gray;
            text-align: center;
        }
        .wrapper1 div,.wrapper2 div,.wrapper3 div
        {

            height: 50%;
            width: 50%;
        }
        .red {
   background: red;}
        .green {
   background: green;}
        .blue {
   background: blue;}
        /* 弹性盒子样式 */
        .wrapper1 {
   flex-wrap: nowrap;}
        .wrapper2 {
   flex-wrap: wrap;}
        .wrapper3 {
   flex-wrap: wrap-reverse;}
    </style>
</head>
<body>
    <h3>1、flex-wrap:nowrap(默认值)</h3>
    <div class="wrapper1">
        <div class="red">1</div>
        <div class="green">2</div>
        <div class="blue">3</div>
    </div>
    <h3>2、flex-wrap:wrap</h3>
    <div class="wrapper2">
        <div class="red">1</div>
        <div class="green">2</div>
        <div class="blue">3</div>
    </div>
    <h3>3、flex-wrap:wrap-reverse</h3>
    <div class="wrapper3">
        <div class="red">1</div>
        <div class="green">2</div>
        <div class="blue">3</div>
    </div>
</body>
</html>
7、flex-flow flex-direction、flex-wrap的复合属性
flex-flow: direction wrap;
参数direction是flex-direction的取值,参数wrap是flex-wrap的取值。因此,flex-flow属性的默认值为“row nowrap”。
8、 order 定义子元素的排列顺序
order属性来定义弹性盒子内部“子元素”的排列顺序。
order:整数
<!DOCTYPE html>
<html>
<head>
    <meta charset="utf-8" />
    <title></title>
    <style type="text/css">
        #wrapper
        {

            display:flex;
            width:200px;
            height:150px;
        }
        #box1,#box2,#box3
        {

            height:150px;
            line-height: 150px;
            text-align: center;
            font-size:30px;
            color:white;
        }
        #box1
        {

            background:red;
            flex: 1;
            order:2;
        }
        #box2
        {

            background:blue;
            flex: 2;
            order:3;
        }
        #box3
        {

            background:orange;
            flex: 3;
            order:1;
        }
    </style>
</head>
<body>
    <div id="wrapper">
        <div id="box1">1</div>
        <div id="box2">2</div>
        <div id="box3">3</div>
    </div>
</body>
</html>
9、justify-content 定义子元素在“横轴”上的对齐方式
justify-content: 取值;
flex-start 所有子元素在左边(默认值)
center 所有子元素在中间
flex-end 所有子元素在右边
space-between 所有子元素平均分布
space-around 所有子元素平均分布,但两边留有一定间距
<!DOCTYPE html>
<html>
<head>
	<meta charset="utf-8">
	<title></title>
    <style type="text/css">
        /*定义整体样式*/
        .flex
        {

            display: flex;
            flex-flow: row nowrap;
            background-color:lightskyblue;
            margin-bottom:5px;
        }
        .item
        {

            width: 80px;
            padding:10px;
            text-align: center;
            background-color:hotpink;
            box-sizing: border-box;
        }
        /*定义justify-content*/
        .start{
   justify-content: flex-start;}
        .center {
   justify-content: center;}
        .end {
   justify-content: flex-end;}
        .between {
   justify-content: space-between;}
        .around {
   justify-content: space-around;}
    </style>
</head>
<body>
    <h3>1、flex-start:</h3>
    <div class="flex start">
        <div class="item">1</div>
        <div class="item">2</div>
        <div class="item">3</div>
        <div class="item">4</div>
    </div>
    <h3>2、center:</h3>
    <div class="flex center">
        <div class="item">1</div>
        <div class="item">2</div>
        <div class="item">3</div>
        <div class="item">4</div>
    </div>
    <h3>3、flex-end:</h3>
    <div class="flex end">
        <div class="item">1</div>
        <div class="item">2</div>
        <div class="item">3</div>
        <div class="item">4</div>
    </div>
    <h3>4、space-between:</h3>
    <div class="flex between">
        <div class="item">1</div>
        <div class="item">2</div>
        <div class="item">3</div>
        <div class="item">4</div>
    </div>
    <h3>5、space-around:</h3>
    <div class="flex around">
        <div class="item">1</div>
        <div class="item">2</div>
        <div class="item">3</div>
        <div class="item">4</div>
    </div>
</body>
</html>
10、 align-items 定义子元素在“纵轴”上的对齐方式
align-items: 取值;
flex-start 所有子元素在上边(默认值)
center 所有子元素在中部
flex-end 所有子元素在下边
baseline 所有子元素在父元素的基线上
strecth 拉伸子元素以适应父元素高度
<!DOCTYPE html>
<html>
<head>
    <meta charset="utf-8" />
    <title></title>
    <style type="text/css">
        .box
        {

            /*去除默认样式*/
            list-style-type:none;
            margin:0;
            padding:0;
            /*定义flex布局*/
            display:flex;
            width:250px;
            height:150px;
            border:1px solid gray;
            font-size:24px;
        }
        h3{
   margin-bottom:3px;}
        /*定义子元素样式*/
        .box li
        {

            margin:5px;
            background-color:lightskyblue;
            text-align:center;
        }
        .box li:nth-child(1){
   padding:10px;}
        .box li:nth-child(2){
   padding:15px 10px;}
        .box li:nth-child(3){
   padding:20px 10px;}
        /*定义align-items*/
        #box1{align-items:flex-start;}
        #box2{align-items:center;}
        #box3{align-items:flex-end;}
        #box4{align-items:baseline;}
        #box5{align-items:strecth;}
    </style>
</head>
<body>
    <h3>1、align-items:flex-start</h3>
    <ul id="box1" class="box">
        <li>a</li>
        <li>b</li>
        <li>c</li>
    </ul>
    <h3>2、align-items:center</h3>
    <ul id="box2" class="box">
        <li>a</li>
        <li>b</li>
        <li>c</li>
    </ul>
    <h3>3、align-items:flex-end</h3>
    <ul id="box3" class="box">
        <li>a</li>
        <li>b</li>
        <li>c</li>
    </ul>
    <h3>4、align-items:baseline</h3>
    <ul id="box4" class="box">
        <li>a</li>
        <li>b</li>
        <li>c</li>
    </ul>
    <h3>5、align-items:strecth</h3>
    <ul id="box5" class="box">
        <li>a</li>
        <li>b</li>
        <li>c</li>
    </ul>
</body>
</html>
二一、CSS-其他样式
1、 outline属性定义表单中文本框的轮廓线样式。
当文本框获取焦点时,我们可以看到文本框周围会出现一条淡蓝色的轮廓线。很多小伙伴之前想要改变这条轮廓线默认的样式,却完全不知道怎么去实现。
outline: width style color;
第1个值指的是轮廓线宽度(outline-width),
第2个值指的是轮廓线样式(outline-sytle),
第3个值指的是轮廓线颜色(outline-color)。
<!DOCTYPE html>
<html>
<head>
    <meta charset="utf-8" />
    <title></title>
    <style type="text/css">
        input[type="text"]:focus
        {

            outline:1px solid red;
        }
    </style>
</head>
<body>
    <input id="txt" type="text">
</body>
</html>
2、 initial取值:某个CSS属性重新设置为它的默认值
property: initial;
property是一个CSS属性名,
“property:initial;”表示设置property这个属性的取值为默认值。
此外,initial取值可以用于任何HTML元素上的任何CSS属性。
<!DOCTYPE html>
<html>
<head>
    <meta charset="utf-8" />
    <title></title>
    <style type="text/css">
        div{
   color:red;}
        #select{color:initial;}
    </style>
</head>
<body>
    <div>绿叶学习网</div>
    <div>绿叶学习网</div>
    <div id="select">绿叶学习网</div>
</body>
</html>
3、calc()函数:定义某一个属性的取值。
使用calc()函数通过“计算”的方式来定义某一个属性的取值。
属性: calc(表达式)
其中,我们可以使用calc()函数以计算的方式给元素的width、margin、padding、font-size等来定义属性值。对于calc()函数,有以下5条运算规则。
(1)只能使用加(+)、减(-)、乘()和除(/)这4种运算。
(2)可以使用px、em、rem、百分比等单位。
(3)可以混合使用各种单位进行运算。
(4)表达式中有加号(+)和减号(-)时,其前后必须有空格。
(5)表达式中有乘号()和除号(/)时,其前后可以没有空格,但建议保留。
<!DOCTYPE html>
<html>
<head>
    <meta charset="utf-8" />
    <title></title>
    <style type="text/css">
        *{
   margin: 0; padding: 0;}
        .col-3
        {

            float: left;
            width: calc((100% - 10px) / 3);
            margin-right: 5px;
            height: 60px;
            line-height: 60px;
            text-align: center;
            font-size: 24px;
            background: #EEEEEE;
            color: #333333;
         }
	 .col-3:nth-child(3){
   margin-right: 0;}
    </style>
</head>
<body>
    <div class="container">
        <div class="col-3">1</div>
        <div class="col-3">2</div>
        <div class="col-3">3</div>
    </div>
</body>
</html>
上面这个例子实现的是3列平分的布局,中间间距为5px。这里涉及了不同单位之间的计算,使用calc()函数很轻松就实现了。如果使用其他方法,则很难实现。
4、overflow-x和overflow-y:定义内容超出元素大小时应该如何处理
overflow-x: 取值; :宽度”时应该如何处理
overflow-y: 取值; :“高度”时应该如何处理。
visible 内容超出时,不剪切内容,也不添加滚动条
hidden 内容超出时,剪切内容,但只显示y轴滚动条而不显示x轴滚动条
scroll 内容超出时,显示所有滚动条
auto 跟scroll效果一样
<!DOCTYPE html>
<html>
<head>
    <meta charset="utf-8" />
    <title></title>
    <style type="text/css">
        body{
   font-family:微软雅黑;font-size:14px;}
        #view
        {

            display:inline-block;
            width:160px;
            height:160px;
            background-color:#F1F1F1;
            border:1px solid gray;
            overflow-x:visible;
        }
        #circle
        {

            width:200px;
            height:200px;
            background-color:Red;
            border-radius:100px;
        }
    </style>
    <script>
        window.onload=function(){

            var oRadio=document.getElementsByName("group");
            var oDiv=document.getElementById("view");
            for(var i=0;i<oRadio.length;i++){

                oRadio[i].onclick=function(){

                    if(this.checked){

                        oDiv.style.overflowX=this.value;
                    }
                }
            }
        }
    </script>
</head>
<body>
    <div id="select">
        <h3>overflow-X取值:</h3>
        <label><input name="group" type="radio" value="visible" checked="checked"/><label for="ckb1">visible</label>
        <label><input name="group" type="radio" value="hidden"/><label for="ckb2">hidden</label>
        <label><input name="group" type="radio" value="scroll"/><label for="ckb3">scroll</label>
        <label><input name="group" type="radio" value="auto"/><label for="ckb4">auto</label>
    </div>
    <div id="view">
        <div id="circle"></div>
    </div>
</body>
</html>
5、pointer-events属性:定义元素是否禁用鼠标单击事件
pointer-events: 取值;
auto	不禁用鼠标单击事件(默认值)
none	禁用鼠标单击事件
auto 不禁用鼠标单击事件(默认值)
none 禁用鼠标单击事件
今天的文章css教程大全_css代码基础分享到此就结束了,感谢您的阅读。
版权声明:本文内容由互联网用户自发贡献,该文观点仅代表作者本人。本站仅提供信息存储空间服务,不拥有所有权,不承担相关法律责任。如发现本站有涉嫌侵权/违法违规的内容, 请发送邮件至 举报,一经查实,本站将立刻删除。
如需转载请保留出处:https://bianchenghao.cn/82229.html


