1 前言
老规矩,介绍前先简单聊一下为啥需要无锁队列,主要解决了哪些问题。首先是为啥需要无锁队列,我们最常见的就是利用锁保护临界资源,在多线程中进行队列操作,当并发量起来会带来大量的线程切换开销,而使得真正用于数据插入和读取的时间被挤压带来性能瓶颈。另一方面是常规线程的分配队列操作都是新增一个节点或者释放一个节点都需要进行内存分配和释放,内存分配对于当前的线程也是阻塞操作的,频繁的内存分配也会导致性能的下降。最后频繁的线程抢占会造成缓存的丢失,影响性能。
无锁队列就是为了解决这些问题 ,总结有锁队列的几大问题:
(1)频繁锁操作带来大量线程切换问题;
(2)频繁的内存分配释放问题;
(3)频繁的线程抢占造成cache丢失问题;
1.1无锁队列使用场景:
(1)处理数据非常多,一秒钟需要处理十几万元素;
(2)zmq无锁队列支持单线程读,单线程写的场景;
2 ZMQ无锁队列原理
整个无锁队列由两部分组成,一个是yqueue负责队列的组织和操作;另一个是ypipe负责外部读写交互和对内yqueue队列操作。实现无锁队列主要是利用CAS原子操作的完成,整体设计构思非常巧妙,高效的实现了数据的读写操作。
2.1 引入chunk机制
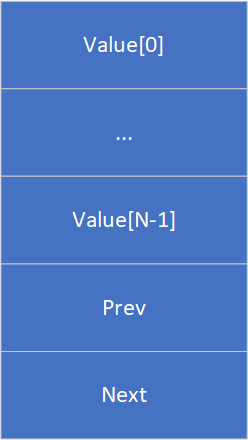
什么是chunk呢,就是一次性分配一个可以容纳多个元素的大块。其中容纳的元素由外部指定,根据不同的业务场景有所不同。同时chunk之间利用prev和next组织成一个双向的链表。chunk机制主要是为了解决频繁动态分配内存的问题,利用chunk可以减少分配内存的次数。当然除了chunk机制还有其他的机制也可以减少内存分配。
2.2 spare_chunk策略
spare是无锁队列的另一个精妙设计之处,利用的是内存的局部性原理,可以很好的解决无锁队列波动中内存分配的问题,主要的机制就是利用spare_chunk回收当前队列中被移除的最后一个节点,当需要重新分配chunk时直接可以将此chunk分配给新节点从而避免内存的重新分配。
2.3 yqueue队列的组织
	struct chunk_t
    {

        T values[N];
        chunk_t *prev;
        chunk_t *next;
    };
    chunk_t *_begin_chunk;
    int _begin_pos;
    chunk_t *_back_chunk;
    int _back_pos;
    chunk_t *_end_chunk;
    int _end_pos;
    atomic_ptr_t<chunk_t> _spare_chunk;
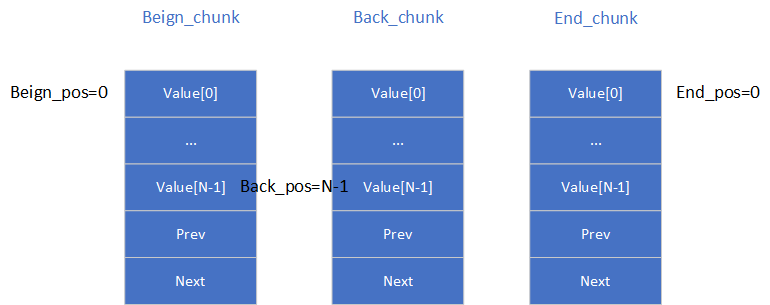
yqueue队列包含四个成员指针,分别是_begin_chunk指向队列的第一个chunk;_back_chunk指向队列最后的chunk;_end_chunk队列末尾的chunk;这里buck_chunk和end_chunk关系,主要是指针索引的位置:_back_pos + 1 = _end_pos;所以大部分时候back_chunk和end_chunk指向同一个chunk,当出现chunk需要新分配的情况,back_chunk和end_chunk会指向不同的chunk具体示意图如下:
2.5 yqueue具体实现
2.5.1 yqueue初始化
初始化:主要是是malloc分配一个chunk。所有索引指向0,end_chunk = begin_chunk;_back_chunk 暂时设置为空。
 inline yqueue_t ()
    {

        _begin_chunk = allocate_chunk ();
        alloc_assert (_begin_chunk);
        _begin_pos = 0;
        _back_chunk = NULL;
        _back_pos = 0;
        _end_chunk = _begin_chunk;
        _end_pos = 0;
    }
2.5.2 yqueue释放
释放遍历链表释放所有节点,同时需要注意释放spare的chunk。
inline ~yqueue_t ()
    {

        while (true) {

            if (_begin_chunk == _end_chunk) {

                free (_begin_chunk);
                break;
            }
            chunk_t *o = _begin_chunk;
            _begin_chunk = _begin_chunk->next;
            free (o);
        }

        chunk_t *sc = _spare_chunk.xchg (NULL);
        free (sc);
    }
2.5.3 yqueue获取头尾元素
获取头部元素和获取尾部元素。
inline T &front () {
    return _begin_chunk->values[_begin_pos]; }
inline T &back () {
    return _back_chunk->values[_back_pos]; }
2.5.4 yqueue 入队操作
这里是先设置back位置和chunk指针指针;end索引自增,当end_pos到达chunk最后一个元素时需要重新分配chunk;这时候有两种情况,一种是spare_chunk存在的情况,直接将spare_chunk取出加入到队列中。另一种情况是spare为空的情况需要重新malloc分配一个chunk并且加入队列中。
inline void push ()
    {

        _back_chunk = _end_chunk;
        _back_pos = _end_pos;

        if (++_end_pos != N)
            return;

        chunk_t *sc = _spare_chunk.xchg (NULL);
        if (sc) {

            _end_chunk->next = sc;
            sc->prev = _end_chunk;
        } else {

            _end_chunk->next = allocate_chunk ();
            alloc_assert (_end_chunk->next);
            _end_chunk->next->prev = _end_chunk;
        }
        _end_chunk = _end_chunk->next;
        _end_pos = 0;
    }
2.5.5 yqueue 出队操作
出队操作,当起始索引_begin_pos没有到达chunk最后位置时,只需要索引自增;当到达chunk最后一个位置需要将chunk移除队列;这时候是将chunk加入到spare_chunk中,如果本来有数据需要释放原来的spare数据。
inline void pop ()
    {

        if (++_begin_pos == N) {

            chunk_t *o = _begin_chunk;
            _begin_chunk = _begin_chunk->next;
            _begin_chunk->prev = NULL;
            _begin_pos = 0;

            // 'o' has been more recently used than _spare_chunk,
            // so for cache reasons we'll get rid of the spare and
            // use 'o' as the spare.
            chunk_t *cs = _spare_chunk.xchg (o);
            free (cs);
        }
    }
2.5 ypipe具体实现
2.5.1 ypipe初始化
主要初始化读写元素和刷新元素的位置;设置为队列尾部元素位置,同事将中间变量也设置为队列尾部元素。
ypipe_t ()
    {

        _queue.push ();
        _r = _w = _f = &_queue.back ();
        _c.set (&_queue.back ());
    }
2.5.2 ypipe 写数据
ypipe支持批量的写数据,写入数据时,将元素加入队列尾部。其中incomplete参数表示是否准备好,没有准备好的时候只是负责队列加入数据;直到设置flase时f刷新指针才被赋值为队列最后元素位置。
void write (const T &value_, bool incomplete_)
    {

        // Place the value to the queue, add new terminator element.
        _queue.back () = value_;
        _queue.push ();

        // Move the "flush up to here" poiter.
        if (!incomplete_)
            _f = &_queue.back ();
    }
2.5.3 ypipe 刷新数据
刷新数据是更新可写w指针的位置,当可写指针w等于刷新指针f表示没有可以更新的操作直接返回;这里会引入一个cas原子操作,当c值这是一个唯一会被两个线程同时操作的值,当c值不等于w值表示当前读缓冲区没有数据可以读,会返回一个false,这时候表示需要通知读线程已经来数据了。否则就是更新写指针w到刷新指针f的位置
bool flush ()
    {

        // If there are no un-flushed items, do nothing.
        if (_w == _f)
            return true;

        // Try to set 'c' to 'f'.
        if (_c.cas (_w, _f) != _w) {

            // Compare-and-swap was unseccessful because 'c' is NULL.
            // This means that the reader is asleep. Therefore we don't
            // care about thread-safeness and update c in non-atomic
            // manner. We'll return false to let the caller know
            // that reader is sleeping.
            _c.set (_f);
            _w = _f;
            return false;
        }

        // Reader is alive. Nothing special to do now. Just move
        // the 'first un-flushed item' pointer to 'f'.
        _w = _f;
        return true;
    }
2.5.4 ypipe 可读校验
读校验主要是进行读之前先判断是否可读,如果可以读的指针和当前头指针不相等,表示现在有数据可以读;同事更新读指针r的位置到最新的写指针的位置,这里有个CAS操作当写指针c和头指针相等表示已经读到队列尾部没有数据可读,c会被设置为NULL;这时候如果写数据flush ()就会触发一个flase信号。
bool check_read ()
    {

        if (&_queue.front () != _r && _r)
            return true;
        _r = _c.cas (&_queue.front (), NULL);

        if (&_queue.front () == _r || !_r)
            return false;

        return true;
    }
2.5.4 ypipe 读数据
读数据,先进行可读判断,然后yqueue队列弹出数据即可。
bool read (T *value_)
    {

        if (!check_read ())
            return false;

        *value_ = _queue.front ();
        _queue.pop ();
        return true;
    }
3 ZMQ无锁队列实践
利用生产消费队列进行200000万条数据添加;消费队列负责读取两百万条数据。这里使用了几个ypipe队列的特性,一个是支持多条数据同时插入;第二是利用ypipe.flush返回值可以判断当前消费者是否队列为空,当队列为空需要才通知对方触发等待,大大减少上锁次数。
static ypipe_t<int, 10000> ypipe;
static int s_queue_item_num = 2000000;
static int s_count_push = 0;
static int s_count_pop = 0;

void *ypipe_producer_thread_cond(void *argv)
{

	  int count = 0;
	  int item_num = s_queue_item_num / 10;
	  for (int i = 0; i < item_num;)
	  {

			ypipe.write(count, true);
		    count = atomic_add(&s_count_push, 1);
		    ypipe.write(count, true);
		    count = atomic_add(&s_count_push, 1);
		    ypipe.write(count, true);
		    count = atomic_add(&s_count_push, 1);
		    ypipe.write(count, true);
		    count = atomic_add(&s_count_push, 1);
		    ypipe.write(count, true);
		    count = atomic_add(&s_count_push, 1);
		    ypipe.write(count, true);
		    count = atomic_add(&s_count_push, 1);
		    ypipe.write(count, true);
		    count = atomic_add(&s_count_push, 1);
		    ypipe.write(count, true);
		    count = atomic_add(&s_count_push, 1);
		    ypipe.write(count, true);
		    count = atomic_add(&s_count_push, 1);
		    ypipe.write(count, false);
		    count = atomic_add(&s_count_push, 1);
		    i++;

		    if(!ypipe.flush()) {


				  pthread_mutex_lock(&ymutex);
				  pthread_cond_signal(&ycond);
				  pthread_mutex_unlock(&ymutex);
		    }
	  }

	  return NULL;
}

void *ypipe_consumer_thread_cond(void *argv)
{

  int last_value = 0;

  while (true)
  {

    int value = 0;
    if (ypipe.read(&value))
    {

      atomic_add(&s_count_pop, 1);
      last_value = value;
    }
    else
    {

		  pthread_mutex_lock(&ymutex);
		  pthread_cond_wait(&ycond, &ymutex);
		  pthread_mutex_unlock(&ymutex);
      // sched_yield();
    }

    if (s_count_pop >= s_queue_item_num * s_producer_thread_num)
    {

      break;
    }
  }
   printf("%s dequeue: last_value:%d, s_count_pop:%d, %d, %d\n", __FUNCTION__, last_value, s_count_pop, s_queue_item_num, s_consumer_thread_num);

  return NULL;
}

int main()
{

    int64_t start = get_current_millisecond();
    pthread_t tid_push;

    int ret = pthread_create(&tid_push, NULL, ypipe_producer_thread_cond, NULL);
    if (0 != ret)
    {

      printf("create thread failed\n");
    }

    pthread_t tid_pop;
    ret = pthread_create(&tid_pop, NULL, ypipe_consumer_thread_cond, NULL);
    if (0 != ret)
    {

      printf("create thread failed\n");
    }

    pthread_join(tid_push, NULL);
    pthread_join(tid_pop, NULL);

    int64_t end = get_current_millisecond();
    printf("spend time : %ldms\t, push:%d, pop:%d, ops:%lu\n", (end - start), s_count_push, s_count_pop);
  return 0;
}
测试两百万数据插入队列和读取队列时间,测试结果:
同一台电脑,对比链表队列时间有明显优势。
今天的文章地表最强队列-ZMQ无锁队列分享到此就结束了,感谢您的阅读。
版权声明:本文内容由互联网用户自发贡献,该文观点仅代表作者本人。本站仅提供信息存储空间服务,不拥有所有权,不承担相关法律责任。如发现本站有涉嫌侵权/违法违规的内容, 请发送邮件至 举报,一经查实,本站将立刻删除。
如需转载请保留出处:https://bianchenghao.cn/8761.html


