下一篇:odl自开发插件集成到发行版(opendaylight学习笔记二)
1、环境依赖
release/magnesium-sr3   jdk11/maven3.5.2以上
release/carbon-sr1      jdk1.8/maven3.1以上
2、setting配置
cp -n ~/.m2/settings.xml{
   ,.orig} ; wget -q -O - https://raw.githubusercontent.com/opendaylight/odlparent/master/settings.xml > ~/.m2/settings.xml
配置maven settings.xml 。
首先在odl的git中访问odl-parent项目,进入项目可以看到settings.xml,把这个项目拷贝到自己/etc/maven/文件夹下。(一定要注意自己拷贝的版本和要开发的版本必须要保持一致)
在使用maven-archetype-plugin:3.0.1插件创建项目时与之前版本略有不同,需要在setting.xml文件中添加odlarchtype标签。具体的配置信息如下。
    <profile>
      <id>odlarchtype</id>
      <repositories>
        <repository>
          <id>archetype</id>
          <url>http://nexus.opendaylight.org/content/repositories/opendaylight.snapshot/</url>
          <releases>
            <enabled>true</enabled>
            <checksumPolicy>fail</checksumPolicy>
          </releases>
          <snapshots>
            <enabled>true</enabled>
            <checksumPolicy>warn</checksumPolicy>
          </snapshots>
        </repository>
      </repositories>
    </profile>
mvn换源
<mirrors>
    <!-- mirror
     | Specifies a repository mirror site to use instead of a given repository. The repository that
     | this mirror serves has an ID that matches the mirrorOf element of this mirror. IDs are used
     | for inheritance and direct lookup purposes, and must be unique across the set of mirrors.
     |
    <mirror>
      <id>mirrorId</id>
      <mirrorOf>repositoryId</mirrorOf>
      <name>Human Readable Name for this Mirror.</name>
      <url>http://my.repository.com/repo/path</url>
    </mirror>
     -->
    <mirror>
      <id>alimaven</id>
      <name>aliyun maven</name>
      <url>http://maven.aliyun.com/nexus/content/groups/public/</url>
      <mirrorOf>central</mirrorOf>
    </mirror>
</mirrors>
3、构建一个示例模块
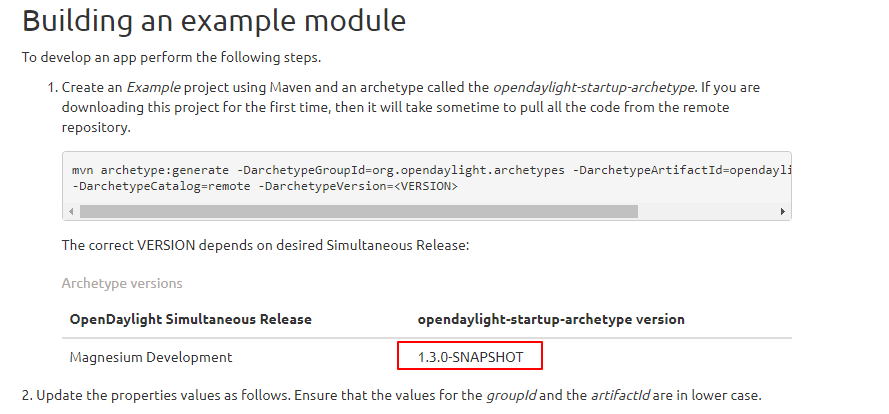
3.1、使用Maven和一个名为opendaylight-startup-archetype的原型创建一个Example项目
mvn archetype:generate -DarchetypeGroupId=org.opendaylight.archetypes -DarchetypeArtifactId=opendaylight-startup-archetype \
-DarchetypeCatalog=remote -DarchetypeVersion=<VERSION>
注:与原型版本一致,如:1.3.0-Carbon、1.3.0-SNAPSHOT
3.2、确保groupId和artifactId的值小写
Define value for property 'groupId': : org.opendaylight.example
Define value for property 'artifactId': : example
Define value for property 'version':  1.0-SNAPSHOT: : 1.0.0-SNAPSHOT
Define value for property 'package':  org.opendaylight.example: :
Define value for property 'classPrefix':  ${artifactId.substring(0,1).toUpperCase()}${artifactId.substring(1)}
Define value for property 'copyright': : Copyright (c) 2015 Yoyodyne, Inc.
3.3、生成项目
  mvn clean install
  # 可能需要注释以下内容
  #it/src/test/java/org/opendaylight/example/it/ExampleTest.java
  #//import org.junit.Ignore;
3.4、启动实例项目
  cd karaf/target/assembly/bin
  ls
  ./karaf
  opendaylight-user@root>log:display | grep Example#验证项目
  opendaylight-user@root>logout          #退出karaf
4、定义一个简单的Hello World
4.1入口点在impl项目中
impl/src/main/java/org/opendaylight/hello/impl/HelloProvider.java
4.2、实现正在执行的所有新操作HelloProvider.init
/** * Method called when the blueprint container is created. */
public void init() {

    LOG.info("HelloProvider Session Initiated");
}
5、添加一个简单的HelloWorld RPC
api/src/main/yang/hello.yang
module hello {

    yang-version 1;
    namespace "urn:opendaylight:params:xml:ns:yang:hello";
    prefix "hello";
    revision "2019-11-27" {

        description "Initial revision of hello model";
    }
    rpc hello-world {

        input {

            leaf name {

                type string;
            }
        }
        output {

            leaf greeting {

                type string;
            }
        }
    }
}
api目录下构建
mvn clean install
6、实现HelloWorld RPC
vim impl/src/main/java/org/opendaylight/hello/impl/HelloWorldImpl.java
package org.opendaylight.hello.impl;

import com.google.common.util.concurrent.ListenableFuture;
import org.opendaylight.yang.gen.v1.urn.opendaylight.params.xml.ns.yang.hello.rev191127.HelloService;
import org.opendaylight.yang.gen.v1.urn.opendaylight.params.xml.ns.yang.hello.rev191127.HelloWorldInput;
import org.opendaylight.yang.gen.v1.urn.opendaylight.params.xml.ns.yang.hello.rev191127.HelloWorldOutput;
import org.opendaylight.yang.gen.v1.urn.opendaylight.params.xml.ns.yang.hello.rev191127.HelloWorldOutputBuilder;
import org.opendaylight.yangtools.yang.common.RpcResult;
import org.opendaylight.yangtools.yang.common.RpcResultBuilder;

public class HelloWorldImpl implements HelloService {

    @Override
    public ListenableFuture<RpcResult<HelloWorldOutput>> helloWorld(HelloWorldInput input) {

        HelloWorldOutputBuilder helloBuilder = new HelloWorldOutputBuilder();
        helloBuilder.setGreeting("Hello " + input.getName());
        return RpcResultBuilder.success(helloBuilder.build()).buildFuture();
    }
}
vim impl/src/main/java/org/opendaylight/hello/impl/HelloProvider.java
/* * Copyright(c) Yoyodyne, Inc. and others. All rights reserved. * * This program and the accompanying materials are made available under the * terms of the Eclipse Public License v1.0 which accompanies this distribution, * and is available at http://www.eclipse.org/legal/epl-v10.html */
package org.opendaylight.hello.impl;

import org.opendaylight.mdsal.binding.api.DataBroker;
import org.opendaylight.mdsal.binding.api.RpcProviderService;
import org.opendaylight.yang.gen.v1.urn.opendaylight.params.xml.ns.yang.hello.rev191127.HelloService;
import org.opendaylight.yangtools.concepts.ObjectRegistration;
import org.slf4j.Logger;
import org.slf4j.LoggerFactory;

public class HelloProvider {


    private static final Logger LOG = LoggerFactory.getLogger(HelloProvider.class);

    private final DataBroker dataBroker;
    private ObjectRegistration<HelloService> helloService;
    private RpcProviderService rpcProviderService;

    public HelloProvider(final DataBroker dataBroker, final RpcProviderService rpcProviderService) {

        this.dataBroker = dataBroker;
        this.rpcProviderService = rpcProviderService;
    }

    /** * Method called when the blueprint container is created. */
    public void init() {

        LOG.info("HelloProvider Session Initiated");
        helloService = rpcProviderService.registerRpcImplementation(HelloService.class, new HelloWorldImpl());
    }

    /** * Method called when the blueprint container is destroyed. */
    public void close() {

        LOG.info("HelloProvider Closed");
        if (helloService != null) {

            helloService.close();
        }
    }
}
再次构建整个项目,这将提取您所做的更改并将其构建到项目中:
mvn clean install
7、通过REST测试Hello World RPC
7.1、api方式
访问http://localhost:8181/apidoc/explorer/index.html
hello(2015-01-05)
POST /operations/hello:hello-world
{
   "hello:input": {
    "name":"Your Name"}}
7.2、rest client方式
火狐https://github.com/chao/RESTClient
POST
http://localhost:8181/restconf/operations/hello:hello-world
Header:
Accept: application/json
Content-Type: application/json
Authorization: Basic admin admin
Body:
{
   "input": {

    "name": "Andrew"
  }
}
8、mvn命令使用
mvn clean install -DskipTests -Dmaven.javadoc.skip=true -Dcheckstyle.skip=true#跳过无用
mvn clean install --settings ./settings.xml 	完整编译
mvn clean --settings ./settings.xml  清除编译成果。
mvn clean install --settings ./settings.xml>trace-name.log 	保留log。
mvn clean install --settings ./settings.xml–errors    详细错误信息。
mvn clean install --settings ./settings.xml  -Dcheckstyle.skip  忽略检查,加快编译。
继续编译。编译过程中失败,无需从头开始再编译,从失败位置续编。以工程sal为例,在根目录下运行命令:
mvn clean install --settings ./ settings.xml-Dcheckstyle.skip–DskipTests -rf  :sal
9、附url
官方:
https://wiki-archive.opendaylight.org/view/GettingStarted:Pulling,_Hacking,_and_Pushing_All_the_Code_from_the_CLI#Gerrit_Setup
在OpenDaylight控制器上开发应用程序: https://docs.opendaylight.org/en/stable-magnesium/developer-guide/developing-apps-on-the-opendaylight-controller.html#
插件集成到发行版 https://docs.opendaylight.org/projects/integration-distribution/en/stable-magnesium/add-project-distribution.html#id1
个人:
https://www.sdnlab.com/11587.html
http://www.frank-durr.de/?p=84
https://www.sdnlab.com/19857.html (*)
https://account.fnedu.com/17399.html
今天的文章opendaylinght内核插件开发简单实现(opendaylight学习笔记一)分享到此就结束了,感谢您的阅读。
版权声明:本文内容由互联网用户自发贡献,该文观点仅代表作者本人。本站仅提供信息存储空间服务,不拥有所有权,不承担相关法律责任。如发现本站有涉嫌侵权/违法违规的内容, 请发送邮件至 举报,一经查实,本站将立刻删除。
如需转载请保留出处:https://bianchenghao.cn/88260.html

