前言
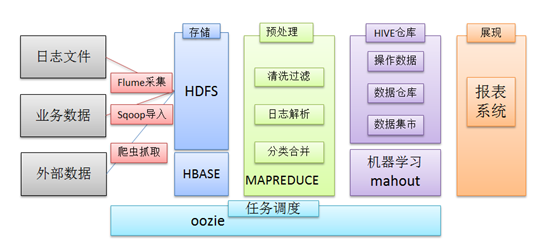
在一个完整的大数据处理系统中,除了hdfs+mapreduce+hive组成分析系统的核心之外,还需要数据采集、结果数据导出、任务调度等不可或缺的辅助系统,而这些辅助工具在hadoop生态体系中都有便捷的开源框架,如图所示:
1. 日志采集框架Flume
1.1 Flume介绍
1.1.1 概述
u Flume是Cloudera提供的一个分布式、可靠、和高可用的海量日志采集、聚合和传输的系统。
u Flume可以采集文件,socket数据包、文件夹等各种形式源数据,又可以将采集到的数据输出到HDFS、hbase、hive、kafka等众多外部存储系统中
u 一般的采集需求,通过对flume的简单配置即可实现
u Flume针对特殊场景也具备良好的自定义扩展能力,因此,flume可以适用于大部分的日常数据采集场景
当前Flume有两个版本:
Flume 0.9X版本的统称Flume-og,
Flume1.X版本的统称Flume-ng。
由于Flume-ng经过重大重构,与Flume-og有很大不同,使用时请注意区分。
1.1.2 运行机制
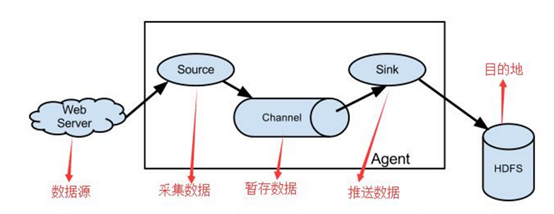
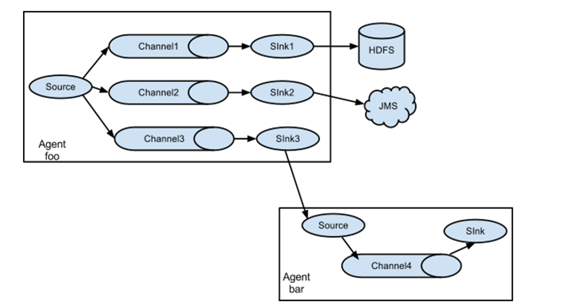
1、 Flume分布式系统中最核心的角色是agent,flume采集系统就是由一个个agent所连接起来形成
2、 每一个agent相当于一个数据传递员[M1] ,内部有三个组件:
a) Source:采集源,用于跟数据源对接,以获取数据
b) Sink:下沉地,采集数据的传送目的,用于往下一级agent传递数据或者往最终存储系统传递数据
c) Channel:angent内部的数据传输通道,用于从source将数据传递到sink
1.1.3 Flume采集系统结构图
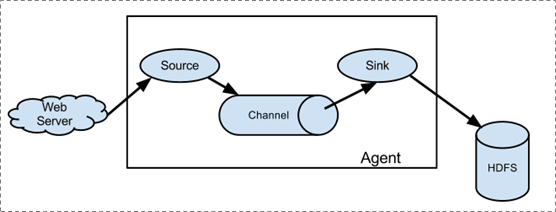
1.1.3.1. 简单结构
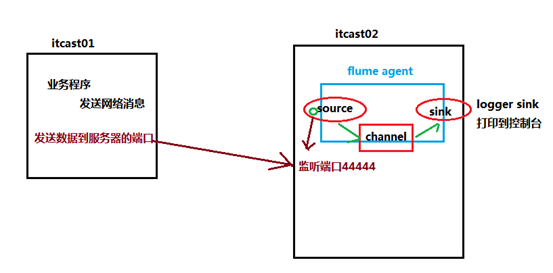
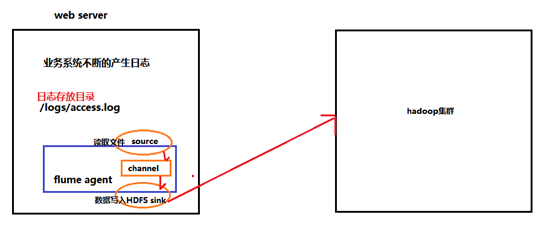
单个agent采集数据
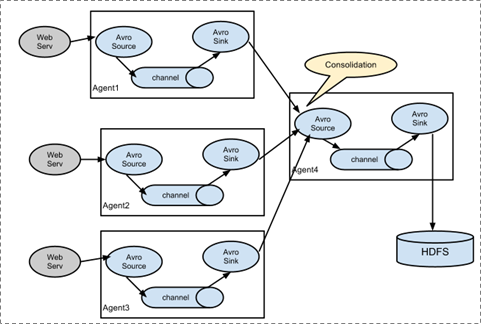
1.1.3.2. 复杂结构
多级agent之间串联
(1)第一种:2个agent串联
(2)第二种:多个agent的采集的数据进行汇总
(3)第三种:采集的数据可以下层到不同的系统中
1.2 Flume实战案例
1.2.1 Flume的安装部署
1、Flume的安装非常简单,只需要解压即可,当然,前提是已有hadoop环境
上传安装包到数据源所在节点上
然后解压 tar -zxvfapache-flume-1.6.0-bin.tar.gz
然后进入flume的目录,修改conf下的flume-env.sh,在里面配置JAVA_HOME
2、根据数据采集的需求配置采集方案,描述在配置文件中(文件名可任意自定义)
3、指定采集方案配置文件,在相应的节点上启动flume agent
先用一个最简单的例子来测试一下程序环境是否正常
1、先在flume的conf目录下新建一个文件
vi netcat-logger.conf
|
# 定义这个agent中各组件的名字 a1.sources = r1 a1.sinks = k1 a1.channels = c1
# 描述和配置source组件:r1 a1.sources.r1.type = netcat a1.sources.r1.bind = itcast01 a1.sources.r1.port = 44444
# 描述和配置sink组件:k1 a1.sinks.k1.type = logger
# 描述和配置channel组件,此处使用是内存缓存的方式 a1.channels.c1.type = memory a1.channels.c1.capacity = 1000 a1.channels.c1.transactionCapacity = 100
# 描述和配置source channel sink之间的连接关系 a1.sources.r1.channels = c1 a1.sinks.k1.channel = c1 |
2、启动agent去采集数据
|
bin/flume-ng agent -c conf -f conf/netcat-logger.conf -n a1 -Dflume.root.logger=INFO,console |
-c conf 指定flume自身的配置文件所在目录
-f conf/netcat-logger.con 指定我们所描述的采集方案
-n a1 指定我们这个agent的名字
3、测试
先要往agent采集监听的端口上发送数据,让agent有数据可采
随便在一个能跟agent节点联网的机器上
telnet anget-hostname port (telnetitcast01 44444)
1.2.2 Flume中常用的source、channel、sink组件
1.2.2.1 source组件
|
Source类型 |
说明 |
|
Avro Source |
支持Avro协议(实际上是Avro RPC),内置支持 |
|
Thrift Source |
支持Thrift协议,内置支持 |
|
Exec Source |
基于Unix的command在标准输出上生产数据 |
|
JMS Source |
从JMS系统(消息、主题)中读取数据,ActiveMQ已经测试过 |
|
Spooling Directory Source |
监控指定目录内数据变更 |
|
Twitter 1% firehose Source |
通过API持续下载Twitter数据,试验性质 |
|
Netcat Source |
监控某个端口,将流经端口的每一个文本行数据作为Event输入 |
|
Sequence Generator Source |
序列生成器数据源,生产序列数据 |
|
Syslog Sources |
读取syslog数据,产生Event,支持UDP和TCP两种协议 |
|
HTTP Source |
基于HTTP POST或GET方式的数据源,支持JSON、BLOB表示形式 |
|
Legacy Sources |
兼容老的Flume OG中Source(0.9.x版本) |
1.2.2.2 Channel组件
|
Channel类型 |
说明 |
|
Memory Channel |
Event数据存储在内存中 |
|
JDBC Channel |
Event数据存储在持久化存储中,当前Flume Channel内置支持Derby |
|
File Channel |
Event数据存储在磁盘文件中 |
|
Spillable Memory Channel |
Event数据存储在内存中和磁盘上,当内存队列满了,会持久化到磁盘文件(当前试验性的,不建议生产环境使用) |
|
Pseudo Transaction Channel |
测试用途 |
|
Custom Channel |
自定义Channel实现 |
1.2.2.3 sink组件
|
Sink类型 |
说明 |
|
HDFS Sink |
数据写入HDFS |
|
Logger Sink |
数据写入日志文件 |
|
Avro Sink |
数据被转换成Avro Event,然后发送到配置的RPC端口上 |
|
Thrift Sink |
数据被转换成Thrift Event,然后发送到配置的RPC端口上 |
|
IRC Sink |
数据在IRC上进行回放 |
|
File Roll Sink |
存储数据到本地文件系统 |
|
Null Sink |
丢弃到所有数据 |
|
HBase Sink |
数据写入HBase数据库 |
|
Morphline Solr Sink |
数据发送到Solr搜索服务器(集群) |
|
ElasticSearch Sink |
数据发送到Elastic Search搜索服务器(集群) |
|
Kite Dataset Sink |
写数据到Kite Dataset,试验性质的 |
|
Custom Sink |
自定义Sink实现 |
Flume支持众多的source、channel、sink类型,详细手册可参考官方文档
http://flume.apache.org/FlumeUserGuide.html
1.2.3 采集案例
1.2.3.1、采集目录到HDFS
采集需求:某服务器的某特定目录下,会不断产生新的文件,每当有新文件出现,就需要把文件采集到HDFS中去
根据需求,首先定义以下3大要素
l 采集源,即source——监控文件目录 : spooldir
l 下沉目标,即sink——HDFS文件系统 : hdfs sink
l source和sink之间的传递通道——channel,可用filechannel 也可以用内存memory channel
配置文件编写:
|
#定义三大组件的名称 agent1.sources = source1 agent1.sinks = sink1 agent1.channels = channel1
# 配置source组件 agent1.sources.source1.type = spooldir agent1.sources.source1.spoolDir = /root/data/ agent1.sources.source1.fileHeader = false
#配置拦截器 agent1.sources.source1.interceptors = i1 agent1.sources.source1.interceptors.i1.type = timestamp # 配置sink组件 agent1.sinks.sink1.type = hdfs agent1.sinks.sink1.hdfs.path =/weblog/flume-collection/%y-%m-%d/%H-%M agent1.sinks.sink1.hdfs.filePrefix = access_log agent1.sinks.sink1.hdfs.maxOpenFiles = 5000 agent1.sinks.sink1.hdfs.batchSize= 100 agent1.sinks.sink1.hdfs.fileType = DataStream agent1.sinks.sink1.hdfs.writeFormat =Text #滚动生成的文件按大小生成 agent1.sinks.sink1.hdfs.rollSize = 102400 #滚动生成的文件按行数生成 agent1.sinks.sink1.hdfs.rollCount = 1000000 #滚动生成的文件按时间生成 agent1.sinks.sink1.hdfs.rollInterval = 60 #开启滚动生成目录 agent1.sinks.sink1.hdfs.round = true #以10为一梯度滚动生成 agent1.sinks.sink1.hdfs.roundValue = 10 #单位为分钟 agent1.sinks.sink1.hdfs.roundUnit = minute
# Use a channel which buffers events in memory agent1.channels.channel1.type = memory agent1.channels.channel1.capacity = 500000 agent1.channels.channel1.transactionCapacity = 600 agent1.channels.channel1.keep-alive = 120
# Bind the source and sink to the channel agent1.sources.source1.channels = channel1 agent1.sinks.sink1.channel = channel1 |
flume的source采用spoodir时!目录下面不允许存放同名的文件,否则报错!
Channel参数解释:
capacity:默认该通道中最大的可以存储的event数量
trasactionCapacity:每次最大可以从source中拿到或者送到sink中的event数量
keep-alive:event添加到通道中或者移出的允许时间
其他组件:Interceptor(拦截器)
用于Source的一组Interceptor,按照预设的顺序在必要地方装饰和过滤events。
内建的Interceptors允许增加event的headers比如:时间戳、主机名、静态标记等等
定制的interceptors可以通过内省eventpayload(读取原始日志),实现自己的业务逻辑(很强大)
1.2.3.2、采集文件到HDFS
采集需求:比如业务系统使用log4j生成的日志,日志内容不断增加,需要把追加到日志文件中的数据实时采集到hdfs
根据需求,首先定义以下3大要素
l 采集源,即source——监控文件内容更新 : exec ‘tail -F file’
l 下沉目标,即sink——HDFS文件系统 : hdfs sink
l Source和sink之间的传递通道——channel,可用filechannel 也可以用内存channel
配置文件编写:
|
agent1.sources = source1 agent1.sinks = sink1 agent1.channels = channel1
# Describe/configure tail -F source1 agent1.sources.source1.type = exec agent1.sources.source1.command = tail -F /home/hadoop/logs/access_log agent1.sources.source1.channels = channel1
#configure host for source agent1.sources.source1.interceptors = i1 i2 agent1.sources.source1.interceptors.i1.type = host agent1.sources.source1.interceptors.i1.hostHeader = hostname
# Describe sink1 agent1.sinks.sink1.type = hdfs #a1.sinks.k1.channel = c1 agent1.sinks.sink1.hdfs.path=hdfs://itcast01:9000/file/%{hostname}/%y-%m-%d/%H-%M agent1.sinks.sink1.hdfs.filePrefix = access_log agent1.sinks.sink1.hdfs.batchSize= 100 agent1.sinks.sink1.hdfs.fileType = DataStream agent1.sinks.sink1.hdfs.writeFormat =Text agent1.sinks.sink1.hdfs.rollSize = 10240 agent1.sinks.sink1.hdfs.rollCount = 1000 agent1.sinks.sink1.hdfs.rollInterval = 10 agent1.sinks.sink1.hdfs.round = true agent1.sinks.sink1.hdfs.roundValue = 10 agent1.sinks.sink1.hdfs.roundUnit = minute
# Use a channel which buffers events in memory agent1.channels.channel1.type = memory agent1.channels.channel1.keep-alive = 120 agent1.channels.channel1.capacity = 500000 agent1.channels.channel1.transactionCapacity = 600
# Bind the source and sink to the channel agent1.sources.source1.channels = channel1 agent1.sinks.sink1.channel = channel1 |
1.2.3.3、多个agent串联
采集需求:比如业务系统使用log4j生成的日志,日志内容不断增加,需要把追加到日志文件中的数据实时采集到hdfs,使用agent串联
根据需求,首先定义以下3大要素
第一台flume agent
l 采集源,即source——监控文件内容更新 : exec ‘tail -F file’
l 下沉目标,即sink——数据的发送者,实现序列化 : avro sink
l Source和sink之间的传递通道——channel,可用filechannel 也可以用内存channel
第二台flume agent
l 采集源,即source——接受数据。并实现反序列化 : avro source
l 下沉目标,即sink——HDFS文件系统 : HDFS sink
l Source和sink之间的传递通道——channel,可用filechannel 也可以用内存channel
配置文件编写:
Flume-agent1
|
#tail-avro-avro-logger.conf # Name the components on this agent a1.sources = r1 a1.sinks = k1 a1.channels = c1
# Describe/configure the source a1.sources.r1.type = exec a1.sources.r1.command = tail -F /root/logs/test.log a1.sources.r1.channels = c1
# Describe the sink ##sink端的avro是一个数据发送者 a1.sinks.k1.type = avro a1.sinks.k1.hostname = itcast02 a1.sinks.k1.port = 41414 a1.sinks.k1.batch-size = 10
# Use a channel which buffers events in memory a1.channels.c1.type = memory a1.channels.c1.capacity = 1000 a1.channels.c1.transactionCapacity = 100
# Bind the source and sink to the channel a1.sources.r1.channels = c1 a1.sinks.k1.channel = c1 |
Flume-agent2:avro-hdfs.conf
|
a1.sources = r1 a1.sinks =s1 a1.channels = c1
##source中的avro组件是一个接收者服务 a1.sources.r1.type = avro a1.sources.r1.bind = 0.0.0.0 a1.sources.r1.port = 41414
a1.sinks.s1.type=hdfs a1.sinks.s1.hdfs.path=hdfs://itcast01:9000/flumedata a1.sinks.s1.hdfs.filePrefix = access_log a1.sinks.s1.hdfs.batchSize= 100 a1.sinks.s1.hdfs.fileType = DataStream a1.sinks.s1.hdfs.writeFormat =Text a1.sinks.s1.hdfs.rollSize = 10240 a1.sinks.s1.hdfs.rollCount = 1000 a1.sinks.s1.hdfs.rollInterval = 10 a1.sinks.s1.hdfs.round = true a1.sinks.s1.hdfs.roundValue = 10 a1.sinks.s1.hdfs.roundUnit = minute
a1.channels.c1.type = memory a1.channels.c1.capacity = 1000 a1.channels.c1.transactionCapacity = 100
a1.sources.r1.channels = c1 a1.sinks.s1.channel = c1 |
1.2.3.4、高可用配置案例
(一)、failover故障转移
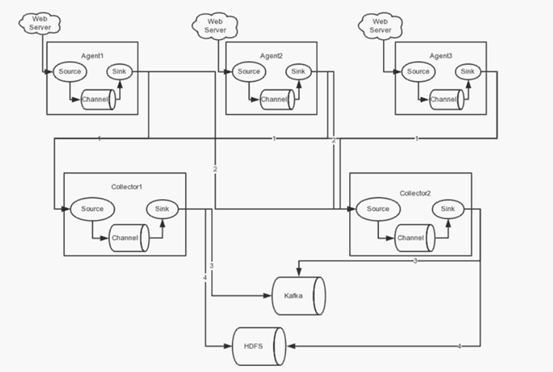
在完成单点的Flume NG搭建后,下面我们搭建一个高可用的Flume NG集群,架构图如下所示:
(1)节点分配
Flume的Agent和Collector分布如下表所示:
|
名称 |
Ip地址 |
Host |
角色 |
|
Agent1 |
192.168.200.101 |
Itcast01 |
WebServer |
|
Collector1 |
192.168.200.102 |
Itcast02 |
AgentMstr1 |
|
Collector2 |
192.168.200.103 |
Itcast03 |
AgentMstr2 |
Agent1数据分别流入到Collector1和Collector2,Flume NG本身提供了Failover机制,可以自动切换和恢复。下面我们开发配置Flume NG集群。
(2)配置
在下面单点Flume中,基本配置都完成了,我们只需要新添加两个配置文件,它们是flume-client.conf和flume-server.conf,其配置内容如下所示:
1、itcast01上的flume-client.conf配置
|
#agent1 name agent1.channels = c1 agent1.sources = r1 agent1.sinks = k1 k2
#set gruop agent1.sinkgroups = g1 #set sink group agent1.sinkgroups.g1.sinks = k1 k2
#set channel agent1.channels.c1.type = memory agent1.channels.c1.capacity = 1000 agent1.channels.c1.transactionCapacity = 100
agent1.sources.r1.channels = c1 agent1.sources.r1.type = exec agent1.sources.r1.command = tail -F /root/log/test.log
agent1.sources.r1.interceptors = i1 i2 agent1.sources.r1.interceptors.i1.type = static agent1.sources.r1.interceptors.i1.key = Type agent1.sources.r1.interceptors.i1.value = LOGIN agent1.sources.r1.interceptors.i2.type = timestamp
# set sink1 agent1.sinks.k1.channel = c1 agent1.sinks.k1.type = avro agent1.sinks.k1.hostname = itcast02 agent1.sinks.k1.port = 52020
# set sink2 agent1.sinks.k2.channel = c1 agent1.sinks.k2.type = avro agent1.sinks.k2.hostname = itcast03 agent1.sinks.k2.port = 52020
#set failover agent1.sinkgroups.g1.processor.type = failover agent1.sinkgroups.g1.processor.priority.k1 = 10 agent1.sinkgroups.g1.processor.priority.k2 = 5 agent1.sinkgroups.g1.processor.maxpenalty = 10000 #这里首先要申明一个sinkgroups,然后再设置2个sink ,k1与k2,其中2个优先级是10和5,#而processor的maxpenalty被设置为10秒,默认是30秒。‘ |
|
|
启动命令:
|
bin/flume-ng agent -n agent1 -c conf -f conf/flume-client.conf -Dflume.root.logger=DEBUG,console |
2、Itcast02和itcast03上的flume-server.conf配置
|
#set Agent name a1.sources = r1 a1.channels = c1 a1.sinks = k1
#set channel a1.channels.c1.type = memory a1.channels.c1.capacity = 1000 a1.channels.c1.transactionCapacity = 100
# other node,nna to nns a1.sources.r1.type = avro a1.sources.r1.bind = 0.0.0.0 a1.sources.r1.port = 52020 a1.sources.r1.channels = c1 a1.sources.r1.interceptors = i1 i2 a1.sources.r1.interceptors.i1.type = timestamp a1.sources.r1.interceptors.i2.type = host a1.sources.r1.interceptors.i2.hostHeader=hostname
#set sink to hdfs a1.sinks.k1.type=hdfs a1.sinks.k1.hdfs.path=/data/flume/logs/%{hostname} a1.sinks.k1.hdfs.filePrefix=%Y-%m-%d a1.sinks.k1.hdfs.fileType=DataStream a1.sinks.k1.hdfs.writeFormat=TEXT a1.sinks.k1.hdfs.rollInterval=10 a1.sinks.k1.channel=c1
|
启动命令:
|
bin/flume-ng agent -n agent1 -c conf -f conf/flume-server.conf -Dflume.root.logger=DEBUG,console |
(3)测试failover
1、先在itcast02和itcast03上启动脚本
|
bin/flume-ng agent -n a1 -c conf -f conf/flume-server.conf -Dflume.root.logger=DEBUG,console |
2、然后启动itcast01上的脚本
|
bin/flume-ng agent -n agent1 -c conf -f conf/flume-client.conf -Dflume.root.logger=DEBUG,console |
3、Shell脚本生成数据
|
while true;do date >> test.log; sleep 1s ;done |
4、观察HDFS上生成的数据目录。只观察到itcast02在接受数据
5、Itcast02上的agent被干掉之后,继续观察HDFS上生成的数据目录,itcast03对应的ip目录出现,此时数据收集切换到itcast03上
6、Itcast02上的agent重启后,继续观察HDFS上生成的数据目录。此时数据收集切换到itcast02上,又开始继续工作!
(二)、load balance负载均衡
(1)节点分配
如failover故障转移的节点分配
(2)配置
在failover故障转移的配置上稍作修改
itcast01上的flume-client-loadbalance.conf配置
|
#agent1 name agent1.channels = c1 agent1.sources = r1 agent1.sinks = k1 k2
#set gruop agent1.sinkgroups = g1
#set channel agent1.channels.c1.type = memory agent1.channels.c1.capacity = 1000 agent1.channels.c1.transactionCapacity = 100 agent1.sources.r1.channels = c1 agent1.sources.r1.type = exec agent1.sources.r1.command = tail -F /root/log/test.log
# set sink1 agent1.sinks.k1.channel = c1 agent1.sinks.k1.type = avro agent1.sinks.k1.hostname = itcast02 agent1.sinks.k1.port = 52020
# set sink2 agent1.sinks.k2.channel = c1 agent1.sinks.k2.type = avro agent1.sinks.k2.hostname = itcast03 agent1.sinks.k2.port = 52020
#set sink group agent1.sinkgroups.g1.sinks = k1 k2
#set load-balance agent1.sinkgroups.g1.processor.type = load_balance # 默认是round_robin,还可以选择random agent1.sinkgroups.g1.processor.selector = round_robin #如果backoff被开启,则 sink processor会屏蔽故障的sink agent1.sinkgroups.g1.processor.backoff = true
|
Itcast02和itcast03上的flume-server-loadbalance.conf配置
|
#set Agent name a1.sources = r1 a1.channels = c1 a1.sinks = k1
#set channel a1.channels.c1.type = memory a1.channels.c1.capacity = 1000 a1.channels.c1.transactionCapacity = 100
# other node,nna to nns a1.sources.r1.type = avro a1.sources.r1.bind = 0.0.0.0 a1.sources.r1.port = 52020 a1.sources.r1.channels = c1 a1.sources.r1.interceptors = i1 i2 a1.sources.r1.interceptors.i1.type = timestamp a1.sources.r1.interceptors.i2.type = host a1.sources.r1.interceptors.i2.hostHeader=hostname a1.sources.r1.interceptors.i2.useIP=false #set sink to hdfs a1.sinks.k1.type=hdfs a1.sinks.k1.hdfs.path=/data/flume/loadbalance/%{hostname} a1.sinks.k1.hdfs.fileType=DataStream a1.sinks.k1.hdfs.writeFormat=TEXT a1.sinks.k1.hdfs.rollInterval=10 a1.sinks.k1.channel=c1 a1.sinks.k1.hdfs.filePrefix=%Y-%m-%d |
(3)测试load balance
1、先在itcast02和itcast03上启动脚本
|
bin/flume-ng agent -n a1 -c conf -f conf/flume-server-loadbalance.conf -Dflume.root.logger=DEBUG,console |
2、然后启动itcast01上的脚本
|
bin/flume-ng agent -n agent1 -c conf -f conf/flume-client-loadbalance.conf -Dflume.root.logger=DEBUG,console |
3、Shell脚本生成数据
|
while true;do date >> test.log; sleep 1s ;done |
4、观察HDFS上生成的数据目录,由于轮训机制都会收集到数据
5、Itcast02上的agent被干掉之后,itcast02上不在产生数据
6、Itcast02上的agent重新启动后,两者都可以接受到数据
1.2.3.5、Flume日志分类采集汇总
<见案例资料>
1.2.3.6、Flume自定义拦截器
<见案例资料>
1.3、Flume实际使用时需要注意的事项
1) 注意启动脚本命令的书写
agent 的名称别写错了,后台执行加上nohup… &
2) channel参数
capacity:默认该通道中最大的可以存储的event数量
trasactionCapacity:每次最大可以从source中拿到或者送到sink中的event数量
keep-alive:event添加到通道中或者移出的允许时间
注意:capacity > trasactionCapacity
3) 日志采集到HDFS配置说明1(sink端)
#定义sink
a1.sinks.k1.type= hdfs
a1.sinks.k1.hdfs.path=hdfs://192.168.200.101:9000/source/logs/%{type}/%Y%m%d
a1.sinks.k1.hdfs.filePrefix=events
a1.sinks.k1.hdfs.fileType= DataStream
a1.sinks.k1.hdfs.writeFormat= Text
#时间类型
a1.sinks.k1.hdfs.useLocalTimeStamp= true
#生成的文件不按条数生成
a1.sinks.k1.hdfs.rollCount = 0
#生成的文件按时间生成
a1.sinks.k1.hdfs.rollInterval = 30
#生成的文件按大小生成
a1.sinks.k1.hdfs.rollSize =10485760
#批量写入hdfs的个数
a1.sinks.k1.hdfs.batchSize= 10000
flume操作hdfs的线程数(包括新建,写入等)
a1.sinks.k1.hdfs.threadsPoolSize=10
#操作hdfs超时时间
a1.sinks.k1.hdfs.callTimeout=30000
4) 日志采集到HDFS配置说明2(sink端)
|
hdfs.round |
false |
Should the timestamp be rounded down (if true, affects all time based escape sequences except %t) |
|
hdfs.roundValue |
1 |
Rounded down to the highest multiple of this (in the unit configured usinghdfs.roundUnit), less than current time. |
|
hdfs.roundUnit |
second |
The unit of the round down value – second, minute or hour. |
Ø round: 默认值:false 是否启用时间上的”舍弃”,这里的”舍弃”,类似于”四舍五入”
Ø roundValue:默认值:1 时间上进行“舍弃”的值;
Ø roundUnit: 默认值:seconds时间上进行”舍弃”的单位,包含:second,minute,hour
案例(1):
a1.sinks.k1.hdfs.path= /flume/events/%y-%m-%d/%H:%M/%S
a1.sinks.k1.hdfs.round= true
a1.sinks.k1.hdfs.roundValue= 10
a1.sinks.k1.hdfs.roundUnit= minute
当时间为2015-10-16 17:38:59时候,hdfs.path依然会被解析为:
/flume/events/2015-10-16/17:30/00
/flume/events/2015-10-16/17:40/00
/flume/events/2015-10-16/17:50/00
因为设置的是舍弃10分钟内的时间,因此,该目录每10分钟新生成一个。
案例(2):
a1.sinks.k1.hdfs.path= /flume/events/%y-%m-%d/%H:%M/%S
a1.sinks.k1.hdfs.round= true
a1.sinks.k1.hdfs.roundValue= 10
a1.sinks.k1.hdfs.roundUnit= second
现象:10秒为时间梯度生成对应的目录,目录下面包括很多小文件!!!
HDFS产生的数据目录格式如下:
/flume/events/2016-07-28/18:45/10
/flume/events/2016-07-28/18:45/20
/flume/events/2016-07-28/18:45/30
/flume/events/2016-07-28/18:45/40
/flume/events/2016-07-28/18:45/50
/flume/events/2016-07-28/18:46/10
/flume/events/2016-07-28/18:46/20
/flume/events/2016-07-28/18:46/30
/flume/events/2016-07-28/18:46/40
/flume/events/2016-07-28/18:46/50
5)日志采集使用tail -F 监控一个文件新增的内容(断点续传)
(详细见案例:flume的第6个配置案例-分类收集数据-使用static拦截器)
Source端的代码:
a1.sources.r2.type= exec
a1.sources.r2.command= tail -F /root/data/nginx.log
a1.sources.r2.interceptors= i2
a1.sources.r2.interceptors.i2.type= static
a1.sources.r2.interceptors.i2.key= type
a1.sources.r2.interceptors.i2.value= nginx
这里会出现这样一个情况,当你的这个flumeagent程序挂了或者是服务器宕机了,那么随着文件内容的增加,下次重启时,会消费到重复的数据, 怎么办呢?
解决方案:使用改进版的配置信息,修改信息
a1.sources.r2.command= tail -n +$(tail -n1 /root/log) -F /root/data/nginx.log | awk ‘ARGIND==1{i=$0;next}{i++;if($0~/^tail/){i=0};print $0;print i >> “/root/log”;fflush(“”)}’ /root/log-
意思就是说:Source每次读取一条信息,就往/root/log文件记住当前消息的行数。这样的话当你的程序挂了之后,重启时先获取上次读取所在的行数,依次从下读,这样避免了数据重复。
而在flume1.7已经集成了该功能
配置文件:
|
配置案例: a1.channels = ch1 a1.sources = s1 a1.sinks = hdfs-sink1 #channel a1.channels.ch1.type = memory a1.channels.ch1.capacity=100000 a1.channels.ch1.transactionCapacity=50000 #source a1.sources.s1.channels = ch1 #监控一个目录下的多个文件新增的内容 a1.sources.s1.type = taildir #通过 json 格式存下每个文件消费的偏移量,避免从头消费 a1.sources.s1.positionFile = /var/local/apache-flume-1.7.0-bin/taildir_position.json a1.sources.s1.filegroups = f1 f2 f3 a1.sources.s1.filegroups.f1 = /root/data/access.log a1.sources.s1.filegroups.f2 = /root/data/nginx.log a1.sources.s1.filegroups.f3 = /root/data/web.log a1.sources.s1.headers.f1.headerKey = access a1.sources.s1.headers.f2.headerKey = nginx a1.sources.s1.headers.f3.headerKey = web a1.sources.s1.fileHeader = true ##sink a1.sinks.hdfs-sink1.channel = ch1 a1.sinks.hdfs-sink1.type = hdfs a1.sinks.hdfs-sink1.hdfs.path =hdfs://master:9000/demo/data a1.sinks.hdfs-sink1.hdfs.filePrefix = event_data a1.sinks.hdfs-sink1.hdfs.fileSuffix = .log a1.sinks.hdfs-sink1.hdfs.rollSize = 10485760 a1.sinks.hdfs-sink1.hdfs.rollInterval =20 a1.sinks.hdfs-sink1.hdfs.rollCount = 0 a1.sinks.hdfs-sink1.hdfs.batchSize = 1500 a1.sinks.hdfs-sink1.hdfs.round = true a1.sinks.hdfs-sink1.hdfs.roundUnit = minute a1.sinks.hdfs-sink1.hdfs.threadsPoolSize = 25 a1.sinks.hdfs-sink1.hdfs.useLocalTimeStamp = true a1.sinks.hdfs-sink1.hdfs.minBlockReplicas = 1 a1.sinks.hdfs-sink1.hdfs.fileType =DataStream a1.sinks.hdfs-sink1.hdfs.writeFormat = Text a1.sinks.hdfs-sink1.hdfs.callTimeout = 60000 |
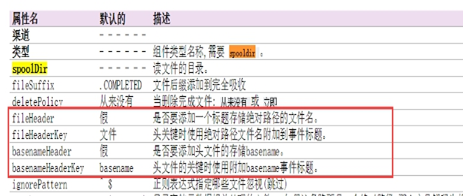
6)flume的header参数配置讲解
|
#配置信息test-header.conf a1.channels = c1 a1.sources = r1 a1.sinks = k1 #channel a1.channels.c1.type = memory a1.channels.c1.capacity=100000 a1.channels.c1.transactionCapacity=50000 #source a1.sources.r1.channels = c1 a1.sources.r1.type = spooldir a1.sources.r1.spoolDir = /var/tmp a1.sources.r1.batchSize= 100 a1.sources.r1.inputCharset = UTF-8 a1.sources.r1.fileHeader = true a1.sources.r1.fileHeaderKey = mmm a1.sources.r1.basenameHeader = true a1.sources.r1.basenameHeaderKey = nnn #sink a1.sinks.k1.type = logger a1.sinks.k1.channel = c1 |
执行脚本:
bin/flume-ng agent -c conf -f conf/test-header.conf -name a1 -Dflume.root.logger=DEBUG,console
看到内容控制台打印的信息:
Event: { headers:{mmm=/var/tmp/bbb, nnn=bbb} body: 30 30 30 000 }
Event: { headers:{mmm=/var/tmp/aaa, nnn=aaa} body: 31 31 31 111 }
其中aaa bbb 为目录/var/tmp 下面的2个文件名称
官网描述:
今天的文章Flume 使用总结分享到此就结束了,感谢您的阅读。
版权声明:本文内容由互联网用户自发贡献,该文观点仅代表作者本人。本站仅提供信息存储空间服务,不拥有所有权,不承担相关法律责任。如发现本站有涉嫌侵权/违法违规的内容, 请发送邮件至 举报,一经查实,本站将立刻删除。
如需转载请保留出处:https://bianchenghao.cn/10133.html

