我曾写过两篇文章:jQuery进阶:用最优雅的方式写ajax请求, axios进阶:用最优雅的方式写ajax请求, 原理都是在将使用配置文件的方式,自动生成接口方法。 在多个项目中,我曾使用这种配置的方式批量生成ajax接口,但是每次都要造轮子是很繁琐的,索性自己发布一个npm包吧,于是xfire出来了。
将配置数据从代码中分离出来 — 《编写可维护的JavaScript》–Nicholas C. Zakas,我是看了这本书,才激发出用配置文件生成各种接口的想法。
xfire地址:点击到达
觉得不错的话,可以给xfire点个赞或者开个issue,或者提个建议。谢谢。
xfire
非常简单,高度可配置的fetch接口批量生成工具。
特点
非常简单: 提供配置文件,自动生成接口提前验证:支持请求体格式验证报错详细: 给出具体的报错位置,字段信息
安装
npm install -S xfire

yarn add xfire
demo
首先需要一个配置文件
// api.config.js

export default {
  prefix: 'http://localhost:80',
  list: [
    {
      name: 'login',
      desp: 'sercurity login',
      path: '/agent/login',
      method: 'post',
      contentType: 'formData',
      bodyStruct: {
        username: 'string',
        password: 'string',
        namespace: 'string'
      },
      defaultBody: {
        password: 'Aa123456'
      },
      status: {
        401: 'username or password wrong'
      }
    },
    {
      name: 'heartBeat',
      path: '/sdk/api/csta/agent/heartbeat/{{agentId}}',
    },
    {
      name: 'setAgentState',
      desp: 'set agent state',
      path: '/sdk/api/csta/agent/state/{{namespace}}',
      method: 'post',
      bodyStruct: {
        agentId: 'string?',
        loginId: 'string',
        func: 'string',
        agentMode: 'string?',
        device: 'string?',
        password: 'string'
      }
    }
  ]
}
然后引入xfire
import xfire from 'xfire'
import apiConfig from './api.config.js'

const API = xfire.init(apiConfig)
POTS 发送formData类型的数据示例
API.login.fire({}, {
  username: 'wangduanduan',
  password: '123456',
  namespace: 'dd.com'
})
.then((res) => {
  console.log(res)
})
.catch((err) => {
  console.log(err)
})
GET 数据示例
API.heartBeat.fire({
  agentId: '5001@dd.com'
})
.then((res) => {
  console.log(res)
})
.catch((err) => {
  console.log(err)
})
POST json类型数据示例
API.setAgentState.fire({
  namespace: 'windows'
}, {
  agentId: '5001@dd.com',
  loginId: '5001@dd.com',
  func: 'login',
  agentMode: 'Ready',
  device: '8001@dd.com',
  password: '123456'
})
.then((res) => {
  console.log(res)
})
.catch((err) => {
  console.log(err)
})
xfire API
const API = xfire.init(config)
config 字段说明
注意:如果config无法通过下面的格式验证,则会直接报错
| 字段名 | 类型 | 是否必须 | 默认值 | 说明 |
|---|---|---|---|---|
| config.prefix | string | 是 | 无 | 接口url公用的前缀 |
| config.list | array | 是 | 无 | 接口数组 |
config list字段说明
| 字段名 | 类型 | 是否必须 | 默认值 | 说明 |
|---|---|---|---|---|
name |
string | 是 |
无 | 接口名 |
| desp | string | 否 | 无 | 接口描述 |
path |
string | 是 |
无 | 接口路径 |
| method | enum string | 否 | get | 请求方式: get, post, put, delete |
| contentType | enum string | 否 | json | 请求体类型: json, formData。json会被渲染: application/json; charset=UTF-8, formData会被渲染成: application/x-www-form-urlencoded; charset=UTF-8 |
| bodyStruct | object | 否 | 无 | 请求体格式验证结构, 如果bodyStruct存在,则使用bodyStruct验证body: 具体格式参考superstruct |
| defaultBody | object | 否 | 无 | 默认请求体。bodyStruct存在的情况下才有效 |
| status | object | 否 | 无 | 响应状态码及其含义 |
当某个list对象的 name 不存在时,config验证时的报错:
Uncaught StructError: Expected a value of type `string` for `name` but received `undefined`.
当发送请求时,请求体不符合bodyStruct时, 报错如下
...
name: 'login',
desp: 'sercurity login',
path: '/agent/login',
method: 'post',
contentType: 'formData',
bodyStruct: {
  username: 'string',
  password: 'string',
  namespace: 'string'
},
...

API.login.fire({}, {
  // username: '5001',
  password: 'Aa123456',
  namespace: 'zhen04.cc'
})

Uncaught StructError: Expected a value of type `string` for `username` but received `undefined`.
xfire 实例 API
xfire.init()方法会返回xfire实例对象,该对象上有一个特殊方法$setHeaders, 还有其他的由配置文件产生的方法。
const API = xfire.init(apiConfig)
$setHeaders(): 设置请求头部信息
$setHeaders()用来设置除了contentType以外的请求头, 一旦设置请求头部信息,所有的实例接口在发送请求时,都会带有该头部信息。
API.$setHeaders({sessionId: 'jfsldkf-sdflskdjf-sflskfjlsf'})
api方法: fire(pathParm, body)
pathParm对象上的数据最终会被渲染到请求路径上, body是请求体。
...
    {
      name: 'heartBeat',
      desp: 'agent heart beat',
      path: '/sdk/api/csta/agent/heartbeat/{{agentId}}',
      method: 'post'
    },
...
类似上面的对象,会产生一个以heartBeat为名称的方法,所有请求方法都是fire()方法。
API.xxx.fire(pathParm, body)

// 不需要请求体时, body可以不传
API.xxx.fire(pathParm)

// 不需要参数渲染到路径时,pathParm必须传空对象:{}
API.xxx.fire({}, body)
例子:
API.heartBeat({
  agentId: '5001@ee.com'
})
.then((res) => {
  console.log(res)
})
.catch((err) => {
  console.log(err)
})
关于path和 fire的 pathParm参数:
// path 如下
path: '/store/order/{{type}}/{{age}}'

// 则pathParm应该是
{
  type: 'dog',
  age: 14
}
注意: pathParm不支持复杂的数据类型。
// 原始数据类型 string, number, boolean 都是可以的
{
  key1: 'string',
  key2: number,
  key3: boolean
}

// 复杂的数据类型,如数组和嵌套对象, 函数, 将导致渲染失败
// bad
{
  key1: [1, 3, 3],
  key2: {
    key3: 'string'
  },
  key4: function(){}
}
polyfill
xfire底层使用了浏览器原生的Promise, fetch, Object.keys(), Object.assign() 所以对浏览器是有要求的。xfire本身不带有任何polyfill。
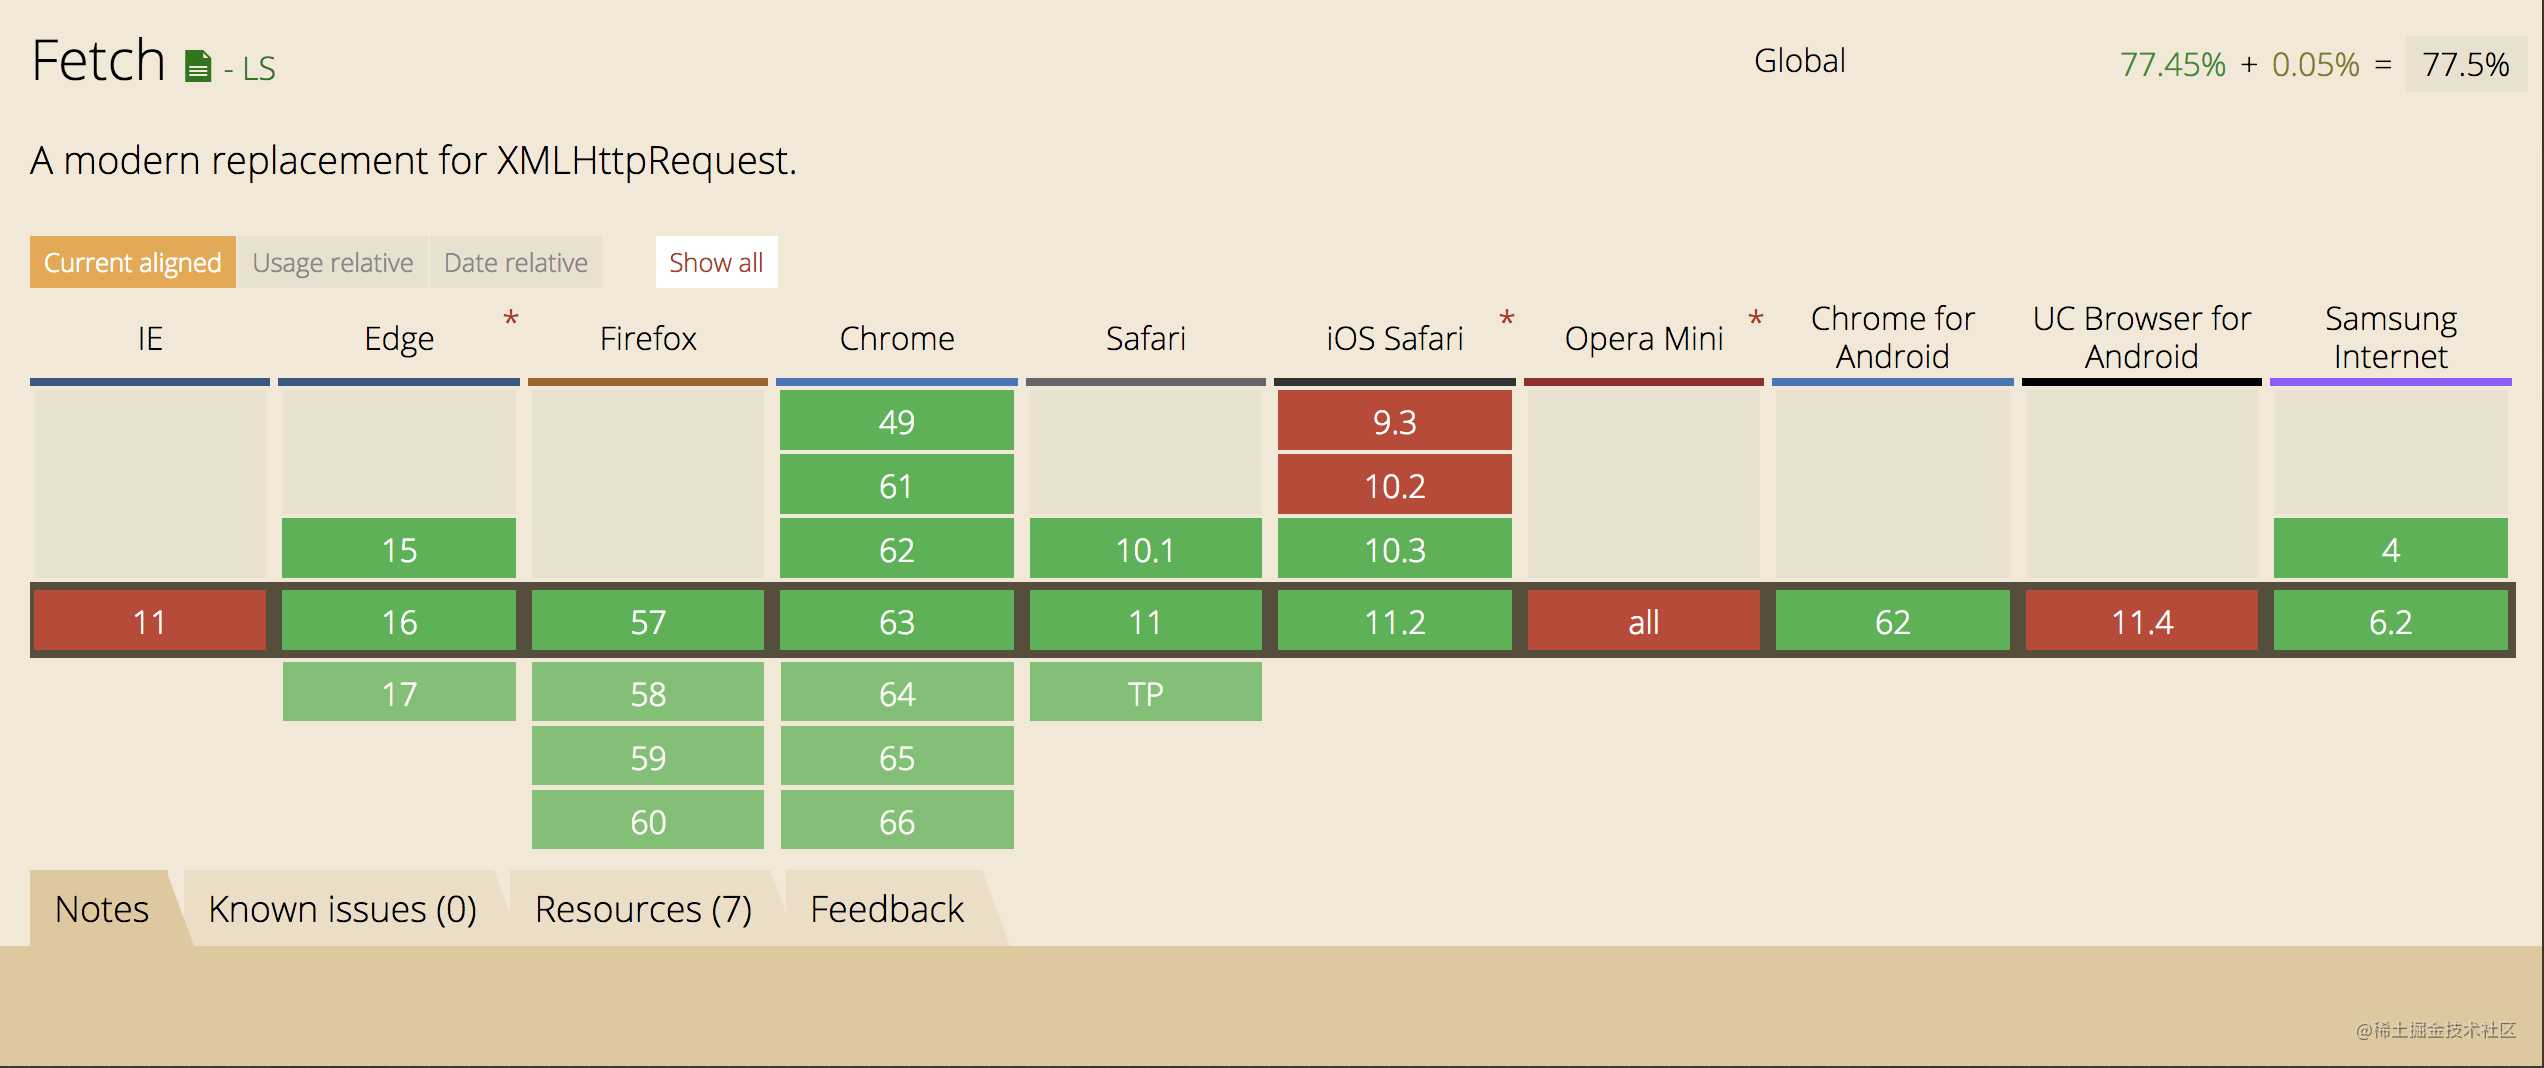
目前IE11以及以下是不支持Promise和fetch的。
在此给出两个方案:
方案1: babel-polyfill
通过引入babel-polyfill, 让浏览器支持xfire所需要的原生方法。
方案2: polyfill.io

只需要为您的网站,为每个浏览器量身定制的polyfills。 复制代码释放魔法:
<script src="https://cdn.polyfill.io/v2/polyfill.min.js"></script>
Polyfill.io读取每个请求的User-Agent头并返回适合请求浏览器的polyfill。 根据您在应用中使用的功能量身定制响应,并查看我们的实例以快速入门。
ajax Vs fetch
与其使用各种ajax第三方库,不如使用原始fetch。ajax是过去,fetch是现在和将来。
总结一下,Fetch 优点主要有:
语法简洁,更加语义化 基于标准 Promise 实现,支持 async/await 同构方便,使用 isomorphic-fetch —传统 Ajax 已死,Fetch 永生 未来更容易扩展 — by me
我使用ajax经历过三个阶段:
- jQuery时期,我用jQuery的
ajax - 类似Vue的现代框架时,使用axio
- 再后来我就使用浏览器原生的
fetch
Fetch API 提供了一个 JavaScript接口,用于访问和操纵HTTP管道的部分,例如请求和响应。它还提供了一个全局 fetch()方法,该方法提供了一种简单,合乎逻辑的方式来跨网络异步获取资源。– MDN
这种功能以前是使用 XMLHttpRequest实现的。Fetch提供了一个更好的替代方法,可以很容易地被其他技术使用,例如 Service Workers。Fetch还提供了单个逻辑位置来定义其他HTTP相关概念,例如 CORS和HTTP的扩展。– MDN
从caniuse的数据来看,fetch方法除IE11不支持以外,大部分常用浏览器都支持了。

fetch接口示例:
fetch('/users.json')
  .then(function(response) {
    return response.json()
  }).then(function(json) {
    console.log('parsed json', json)
  }).catch(function(ex) {
    console.log('parsing failed', ex)
  })


  fetch('/users.html')
  .then(function(response) {
    return response.text()
  }).then(function(body) {
    document.body.innerHTML = body
  })
fetch相关文章
fetch相关库
进阶书籍
ie 8/9/10 早已被微软放弃
微软公司正式宣布:从当地时间2016年1月12日,停止对IE 8/9/10三个版本的技术支持,相应的用户将不会再收到任何来自微软官方的IE安全更新。– Support for older versions of Internet Explorer ended


今天的文章xfire: 简单优雅、高度可配置的fetch(ajax) 接口批量生成工具分享到此就结束了,感谢您的阅读。
版权声明:本文内容由互联网用户自发贡献,该文观点仅代表作者本人。本站仅提供信息存储空间服务,不拥有所有权,不承担相关法律责任。如发现本站有涉嫌侵权/违法违规的内容, 请发送邮件至 举报,一经查实,本站将立刻删除。
如需转载请保留出处:https://bianchenghao.cn/14532.html
