前言
不得不说,Flutter 绘制 UI 的速度和原生根本不是一个量级的,Flutter 要快的多了,比如常用的 ListView 控件,原生写的话,比如 Android,如果不封装的话,需要一个 Adapter、ViewHolder,再加个 xml 布局文件,而 Flutter 可能就几十行。
对于越常用的控件,越要熟悉它的原理。Flutter 中的 ScrollView 家族,成员的划分其实和 Android 还是非常类似的,除了 ListView、GridView,还有 CustomScrollView 和 NestedScrollView。今天我们要讲主角就是 ListView。
ListView
ListView 和 GridView 都继承于 BoxScrollView,但这里并不是绘制和布局的地方,Flutter 和原生不太一样,以 Android 为例,Android 上绘制和布局的单位是 View 和 ViewGroup,Flutter 则要复杂一点,首先我们用的最多的是各种 Widget,比如 ListView,但 Widget 可以理解为一个配置描述文件,比如以下代码:
Container {
  width: 100,
  height: 100,
  color: Colors.white,
}
这里描述了我们需要一个宽高为 100,颜色为白色的容器,最后真正去绘制的是 RenderObject。而在 Widget 和 RenderObject 之间还有个 Element,它的职责是,将我们配置的 Widget Tree 转换成 Element Tree,Element 是对 Widget 的进一步抽象,Element 有两个子类,一个是 RenderObjectElement,它持有 RenderObject,还有一个 ComponentElement ,用于组合多个 RenderObjectElement。这个是 Flutter UI 的核心,要理解好这三个类。
回到我们的主题上来,我们前面说到 ListView 继承于 BoxScrollView,而 BoxScrollView 又继承于 ScrollView,ScrollView 是一个 StatelessWidget,它依靠 Scrollable 实现滚动效果,而滚动容器中的 Widget,称为 slivers。sliver 用于消费滚动事件。
@override
Widget build(BuildContext context) {
  // slivers
  final List<Widget> slivers = buildSlivers(context);
  final AxisDirection axisDirection = getDirection(context);

  // 省略
  return primary && scrollController != null
    ? PrimaryScrollController.none(child: scrollable)
    : scrollable;
}
BoxScrollView 实现了 buildSlivers(),它只有一个 sliver,也就是滚动容器中,只有一个消费者。这里又是通过调用 buildChildLayout 抽象方法创建。
@override
List<Widget> buildSlivers(BuildContext context) {
  // buildChildLayout
  Widget sliver = buildChildLayout(context);
  EdgeInsetsGeometry effectivePadding = padding;
  // 省略
  return <Widget>[ sliver ];
}
最后我们的 ListView 就实现了 buildChildLayout():
@override
Widget buildChildLayout(BuildContext context) {
  if (itemExtent != null) {
    // 如果子项是固定高度的
    return SliverFixedExtentList(
      delegate: childrenDelegate,
      itemExtent: itemExtent,
    );
  }
  // 默认情况
  return SliverList(delegate: childrenDelegate);
}
SliverList 是一个 RenderObjectWidget,上面我们也说到了,最终绘制和布局都是交与 RenderObject 去实现的。ListView 也不例外:
@override
RenderSliverList createRenderObject(BuildContext context) {
  final SliverMultiBoxAdaptorElement element = context;
  return RenderSliverList(childManager: element);
}
RenderSliverList 是 ListView 的核心实现,也是我们本文的重点。
RenderSliverList
有过 Android 自定义控件经验的同学会知道,当我们自定义一个控件时,一般会涉及这几个步骤:measure 和 draw,如果是自定义 ViewGroup 还会涉及 layout 过程,Flutter 也不例外,但它将 measure 和 layout 合并到 layout,draw 称为 paint。虽然叫法不一样,但作用是一样的。系统会调用 performLayout() 会执行测量和布局,RenderSliverList 主要涉及布局操作,所以我们主要看下这个方法即可。
performLayout() 代码比较长,所以我们会省略一些非核心代码。
final double scrollOffset = constraints.scrollOffset + constraints.cacheOrigin;
assert(scrollOffset >= 0.0);
final double remainingExtent = constraints.remainingCacheExtent;
assert(remainingExtent >= 0.0);
final double targetEndScrollOffset = scrollOffset + remainingExtent;
final BoxConstraints childConstraints = constraints.asBoxConstraints();
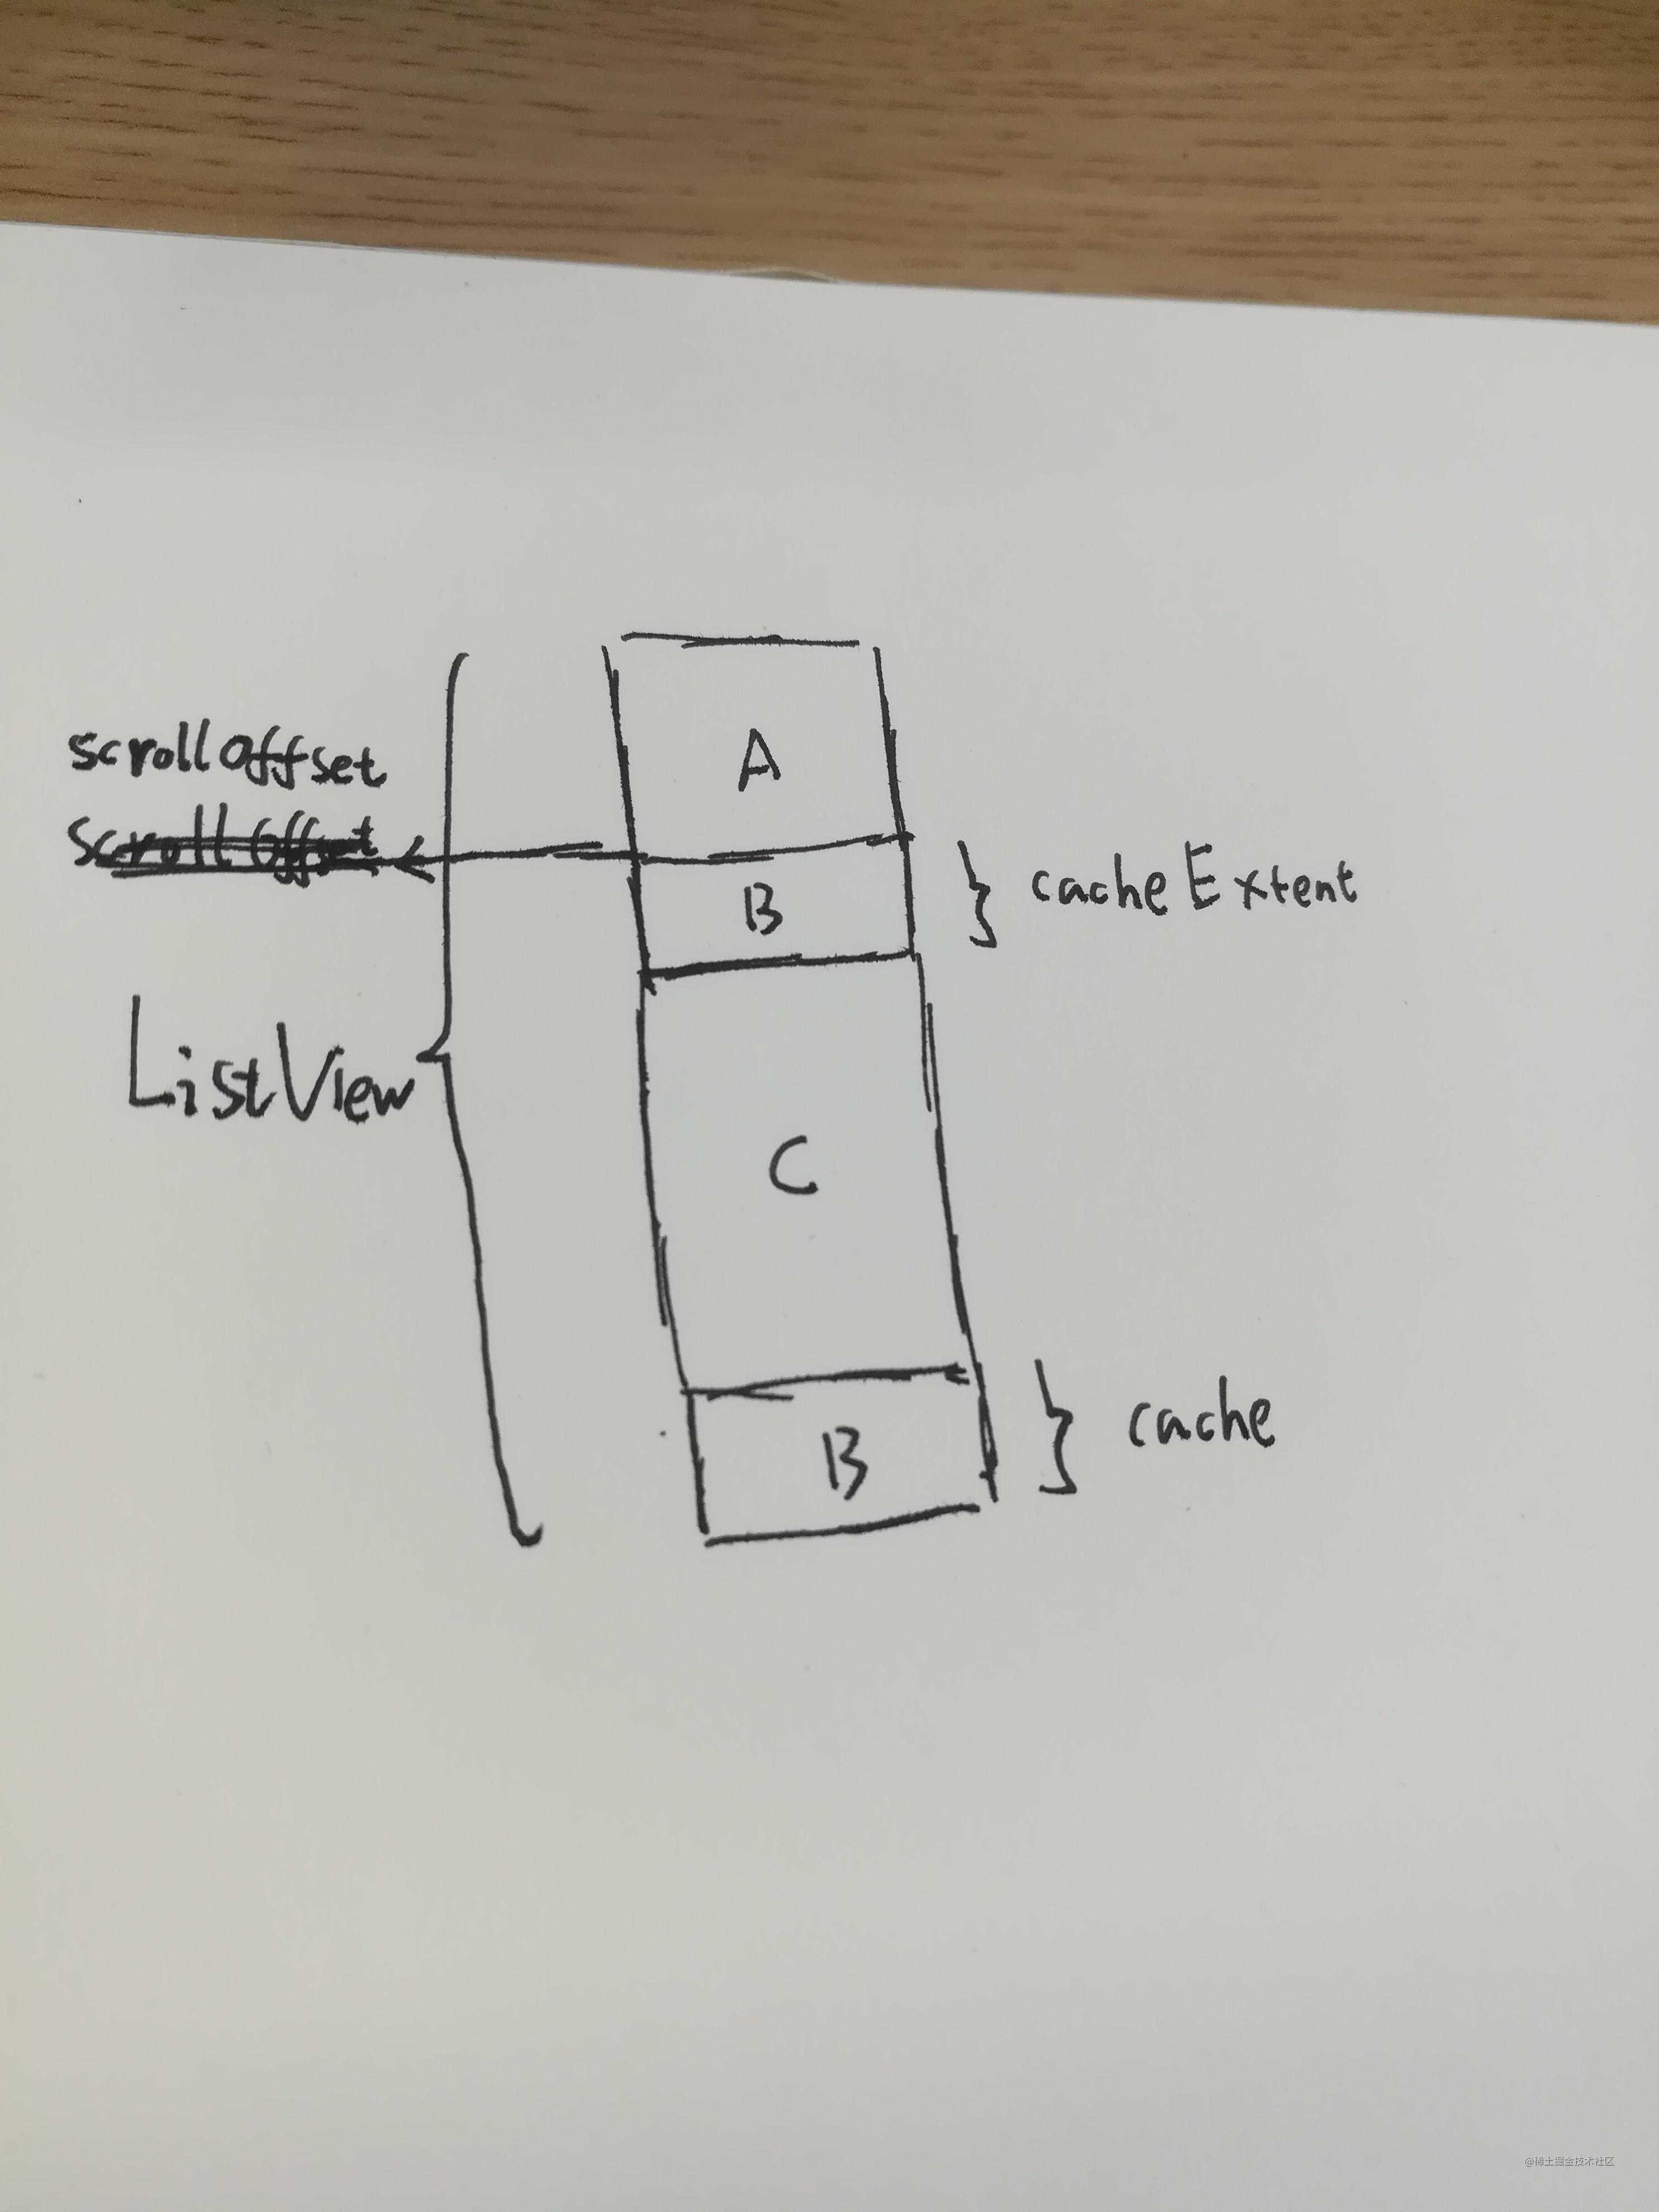
scrollOffset 表示已滚动的偏移量,cacheOrigin 表示预布局的相对位置。为了更好的视觉效果,ListView 会在可见范围内增加预布局的区域,这里表示下一次滚动即将展示的区域,称为 cacheExtent。这个值可以配置,默认为 250。
// viewport.dart
double get cacheExtent => _cacheExtent;
double _cacheExtent;
set cacheExtent(double value) {
  value = value ?? RenderAbstractViewport.defaultCacheExtent;
  assert(value != null);
  if (value == _cacheExtent)
    return;
  _cacheExtent = value;
  markNeedsLayout();
}

static const double defaultCacheExtent = 250.0;
remainingCacheExtent 是当前该 sliver 可使用的偏移量,这里包含了预布局的区域。这里我们用一张非常粗糙的图片来解释下。

C 区域表示我们的屏幕,这里我们认为是可见区域,实际情况下,可能还要更小,因为 ListView 可能有些 padding、magin 或者其他布局等。B 区域有两个分别表示头部的预布局和底部的预布局区域,它的值就是我们设置的 cacheExtent,A 区域回收区域。
final double scrollOffset = constraints.scrollOffset + constraints.cacheOrigin;
这里的 constraints.scrollOffset 就是 A + B,即可不见区域。constraints.cacheOrigin 在这里,如果使用默认值,它等于 -250,意思就是说 B 的区域高度有 250,所以它完全不可见时,它的相对位置 y 值就是 -250,这里算出的 scrollOffset 其实就是开始布局的起始位置,如果 cacheExtent = 0,那么它会从 C 的顶部开始布局,即 constraints.scrollOffset 否则就是 constraints.scrollOffset + constraints.cacheOrigin。
 if (firstChild == null) {
   // 如果没有 children
   if (!addInitialChild()) {
     // There are no children. geometry = SliverGeometry.zero;
     childManager.didFinishLayout();
     return;
   }
 }

 // 至少存在一个 children
 // leading 头部,trailing 尾部
 RenderBox leadingChildWithLayout, trailingChildWithLayout;

 // Find the last child that is at or before the scrollOffset.
 RenderBox earliestUsefulChild = firstChild;
 for (double earliestScrollOffset = childScrollOffset(earliestUsefulChild);
 earliestScrollOffset > scrollOffset;
 earliestScrollOffset = childScrollOffset(earliestUsefulChild)) {
   // 在头部插入新的 children
   earliestUsefulChild =
       insertAndLayoutLeadingChild(childConstraints, parentUsesSize: true);

   if (earliestUsefulChild == null) {
     final SliverMultiBoxAdaptorParentData childParentData = firstChild
         .parentData;
     childParentData.layoutOffset = 0.0;

     if (scrollOffset == 0.0) {
       earliestUsefulChild = firstChild;
       leadingChildWithLayout = earliestUsefulChild;
       trailingChildWithLayout ??= earliestUsefulChild;
       break;
     } else {
       // We ran out of children before reaching the scroll offset.
       // We must inform our parent that this sliver cannot fulfill
       // its contract and that we need a scroll offset correction. geometry = SliverGeometry(
         scrollOffsetCorrection: -scrollOffset,
       );
       return;
     }
   }

   final double firstChildScrollOffset = earliestScrollOffset -
       paintExtentOf(firstChild);
   if (firstChildScrollOffset < -precisionErrorTolerance) {
     // 双精度错误
   }

   final SliverMultiBoxAdaptorParentData childParentData = earliestUsefulChild
       .parentData;
   // 更新 parentData
   childParentData.layoutOffset = firstChildScrollOffset;
   assert(earliestUsefulChild == firstChild);
   // 更新头尾
   leadingChildWithLayout = earliestUsefulChild;
   trailingChildWithLayout ??= earliestUsefulChild;
 }
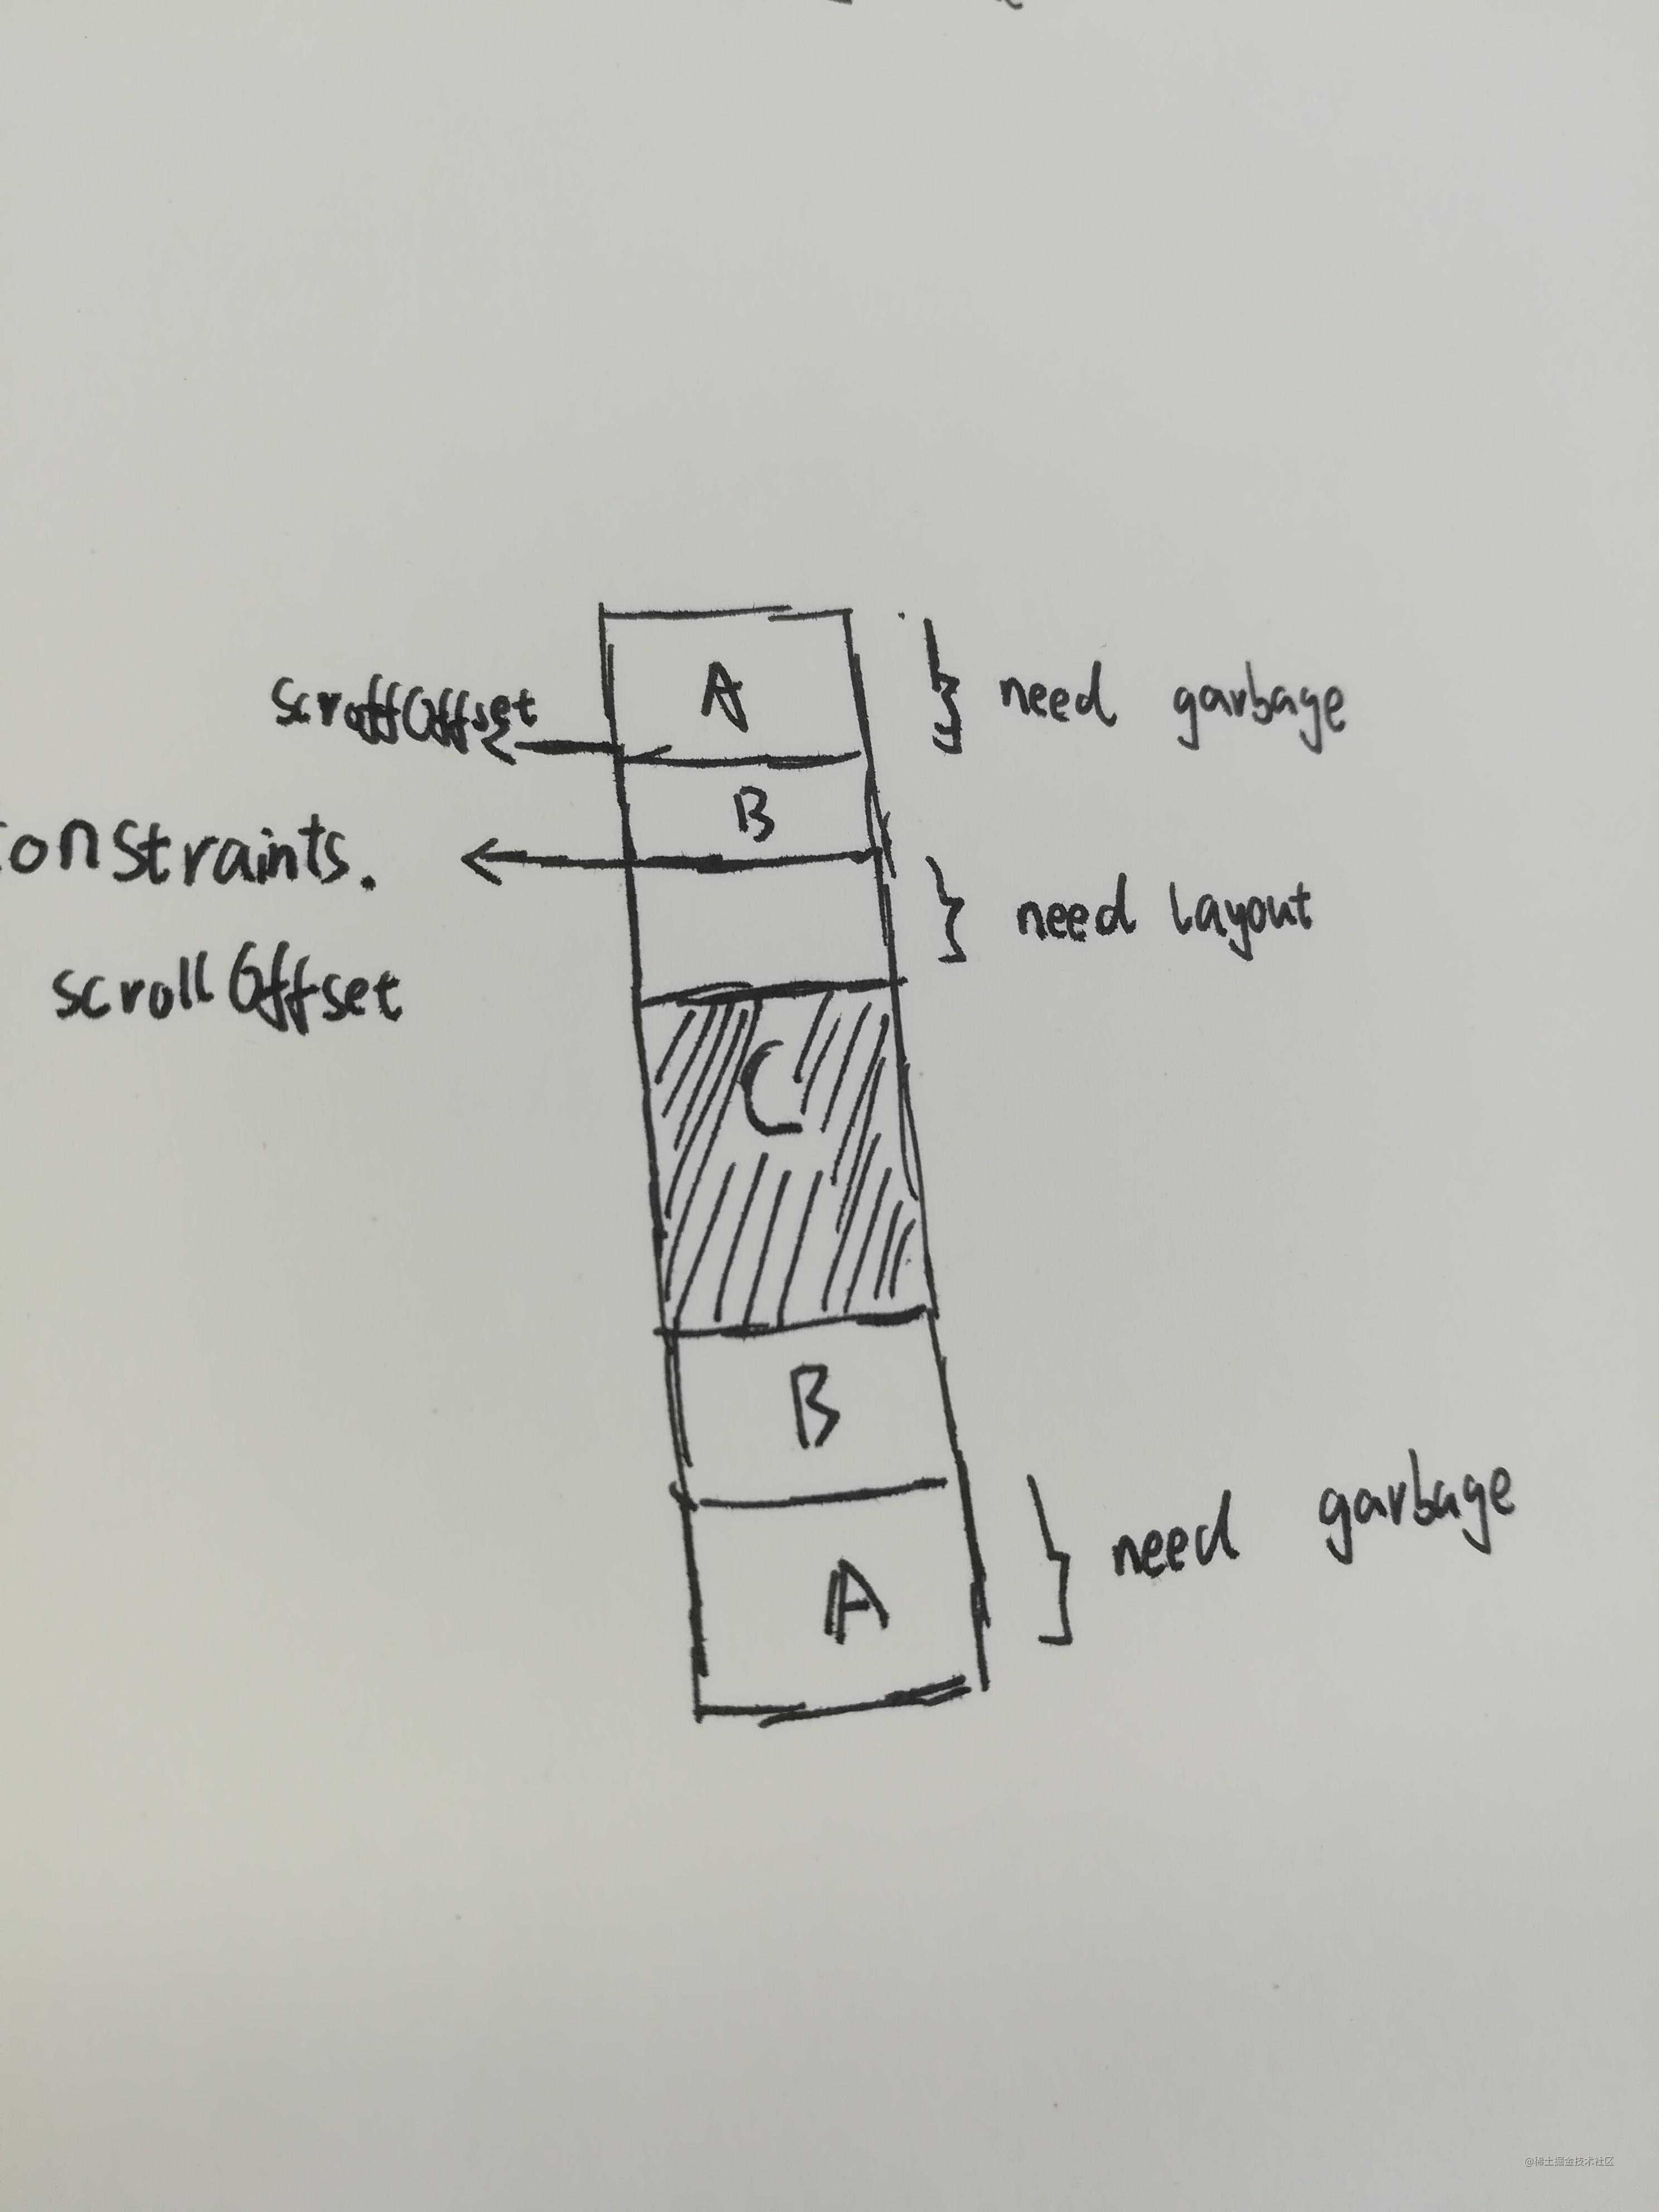
上面的代码是处理以下这种情况,即 earliestScrollOffset > scrollOffset,即头部的 children 和 scrollOffset 之间有空间,没有填充。画个简单的图形。

这块区域就是 needLayout。当从下向上滚动时候,就是这里在进行布局。
bool inLayoutRange = true;
RenderBox child = earliestUsefulChild;
int index = indexOf(child);
// endScrollOffset 表示当前已经布局 children 的偏移量
double endScrollOffset = childScrollOffset(child) + paintExtentOf(child);
bool advance() {
  assert(child != null);
  if (child == trailingChildWithLayout)
    inLayoutRange = false;
  child = childAfter(child);
  if (child == null)
    inLayoutRange = false;
  index += 1;
  if (!inLayoutRange) {
    if (child == null || indexOf(child) != index) {
      // 需要布局新的 children,在尾部插入一个新的
      child = insertAndLayoutChild(childConstraints,
        after: trailingChildWithLayout,
        parentUsesSize: true,
      );
      if (child == null) {
        // We have run out of children.
        return false;
      }
    } else {
      // Lay out the child.
      child.layout(childConstraints, parentUsesSize: true);
    }
    trailingChildWithLayout = child;
  }
  assert(child != null);
  final SliverMultiBoxAdaptorParentData childParentData = child.parentData;
  childParentData.layoutOffset = endScrollOffset;
  assert(childParentData.index == index);
  // 更新 endScrollOffset,用当前 child 的偏移量 + child 所需要的范围
  endScrollOffset = childScrollOffset(child) + paintExtentOf(child);
  return true;
}
// Find the first child that ends after the scroll offset.
while (endScrollOffset < scrollOffset) {
  // 记录需要回收的项目
  leadingGarbage += 1;
  if (!advance()) {
    assert(leadingGarbage == childCount);
    assert(child == null);
    // we want to make sure we keep the last child around so we know the end scroll offset
    collectGarbage(leadingGarbage - 1, 0);
    assert(firstChild == lastChild);
    final double extent = childScrollOffset(lastChild) +
        paintExtentOf(lastChild);
    geometry = SliverGeometry(
      scrollExtent: extent,
      paintExtent: 0.0,
      maxPaintExtent: extent,
    );
    return;
  }
}
不在可见视图,不在缓存区域的,记录头部需要回收的。
// Now find the first child that ends after our end.
while (endScrollOffset < targetEndScrollOffset) {
  if (!advance()) {
    reachedEnd = true;
    break;
  }
}
从上往下滚动时,调用 advance() 不断在底部插入新的 child。
// Finally count up all the remaining children and label them as garbage.
if (child != null) {
  child = childAfter(child);
  while (child != null) {
    trailingGarbage += 1;
    child = childAfter(child);
  }
}
// 回收
collectGarbage(leadingGarbage, trailingGarbage);
记录尾部需要回收的,全部一起回收。上图中用 nedd grabage 标记的区域。
double estimatedMaxScrollOffset;
if (reachedEnd) {
  // 没有 child 需要布局了
  estimatedMaxScrollOffset = endScrollOffset;
} else {
  estimatedMaxScrollOffset = childManager.estimateMaxScrollOffset(
    constraints,
    firstIndex: indexOf(firstChild),
    lastIndex: indexOf(lastChild),
    leadingScrollOffset: childScrollOffset(firstChild),
    trailingScrollOffset: endScrollOffset,
  );
  assert(estimatedMaxScrollOffset >=
      endScrollOffset - childScrollOffset(firstChild));
}
final double paintExtent = calculatePaintOffset(
  constraints,
  from: childScrollOffset(firstChild),
  to: endScrollOffset,
);
final double cacheExtent = calculateCacheOffset(
  constraints,
  from: childScrollOffset(firstChild),
  to: endScrollOffset,
);
final double targetEndScrollOffsetForPaint = constraints.scrollOffset +
    constraints.remainingPaintExtent;
// 反馈布局消费请求
geometry = SliverGeometry(
  scrollExtent: estimatedMaxScrollOffset,
  paintExtent: paintExtent,
  cacheExtent: cacheExtent,
  maxPaintExtent: estimatedMaxScrollOffset,
  // Conservative to avoid flickering away the clip during scroll.
  hasVisualOverflow: endScrollOffset > targetEndScrollOffsetForPaint ||
      constraints.scrollOffset > 0.0,
);

// 布局结束
childManager.didFinishLayout();
总结
在分析完 ListView 的布局流程后,可以发现整个流程还是比较清晰的。
- 需要布局的区域包括可见区域和缓存区域
- 在布局区域以外的进行回收
今天的文章Flutter ListView 源码分析分享到此就结束了,感谢您的阅读。
版权声明:本文内容由互联网用户自发贡献,该文观点仅代表作者本人。本站仅提供信息存储空间服务,不拥有所有权,不承担相关法律责任。如发现本站有涉嫌侵权/违法违规的内容, 请发送邮件至 举报,一经查实,本站将立刻删除。
如需转载请保留出处:https://bianchenghao.cn/18581.html
