前面两篇,我们了解了fish-redux并实现了简单的功能,这次我们再了解fish-redux一些其他的特点。看一下结果图:
1 使用 Component 和 Adapter 做一个列表
1.1 创建列表页、定义数据
页面创建的过程跟之前一样,就省略啦。我创建了名为 List 的页面,结果如下
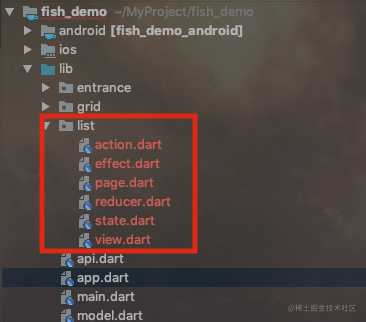
在 app.dart 中加入我们的这个页面。修改过的 app.dart 如下
Widget createApp() {
  final AbstractRoutes routes = PageRoutes(
    pages: <String, Page<Object, dynamic>>{
      'entrance_page': EntrancePage(),
      'grid_page': GridPage(),
      'list_page':ListPage(),   //此处加入我们新建的页面
    },
  );
//省略...
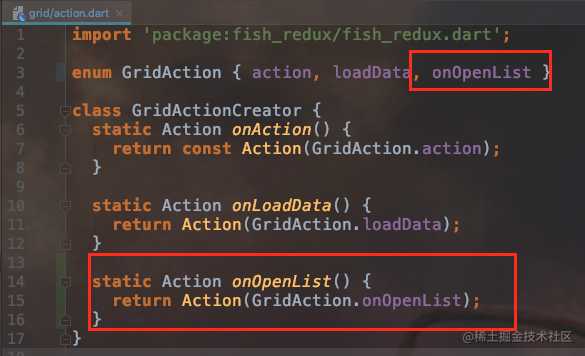
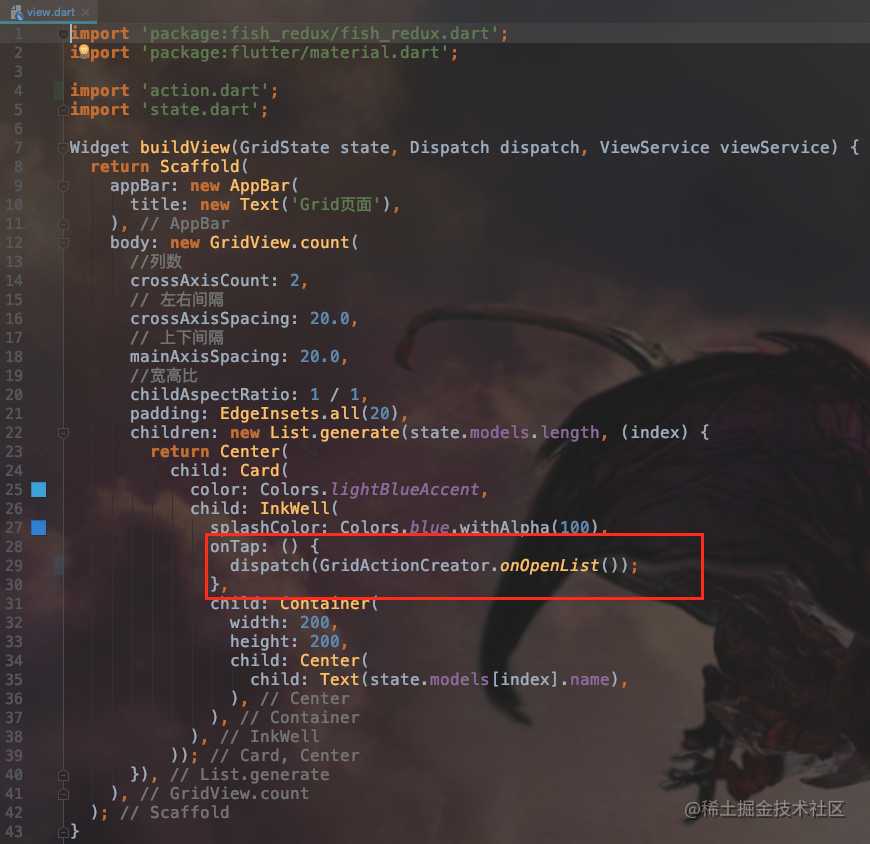
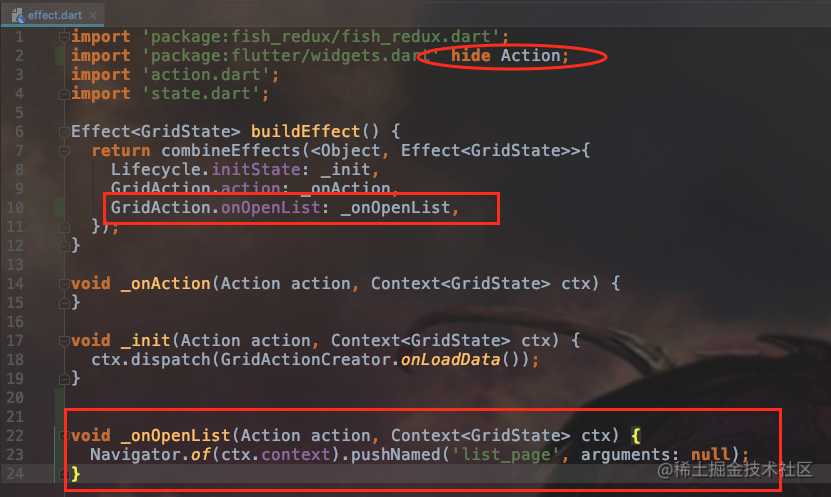
然后实现从 Grid 页面跳转到这个页面,(页面跳转上一篇讲过了,这里不详细说。就是创建action、在view中dispatch action、effect中接收到action并跳转页面)代码如下
1.2 创建 component
然后我们在 list 包下面创建一个 Component 作为列表的每个 item 。
第一步 通过插件新建Component
首先创建一个名为 item 的包,然后在 item 下创建FishReduxTemplate,这次我们选择 Component。
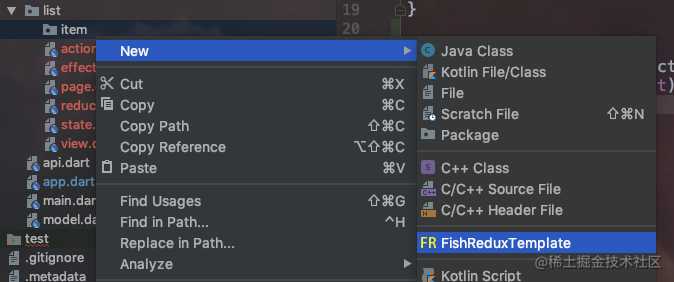
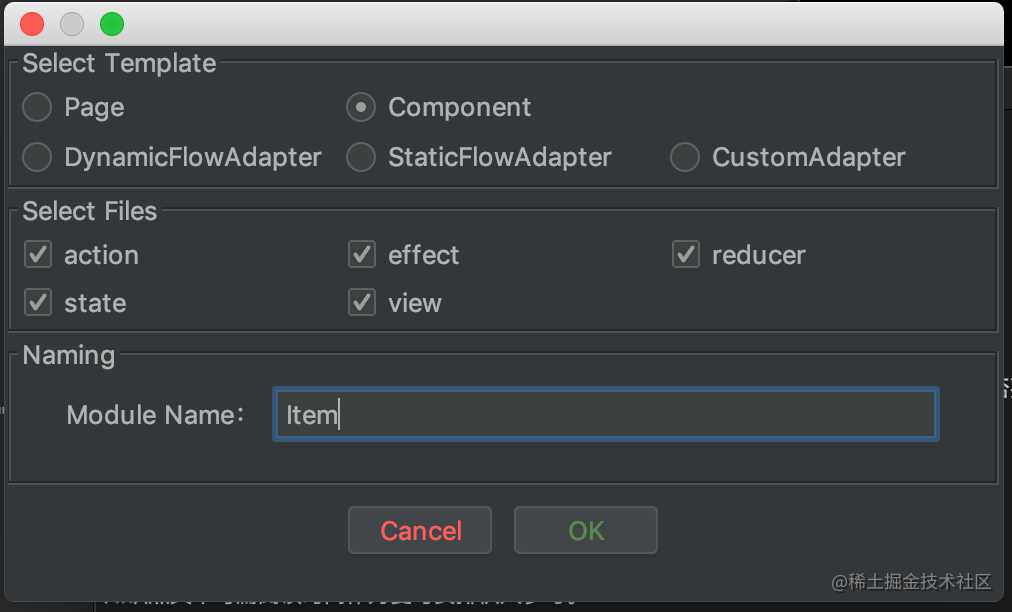
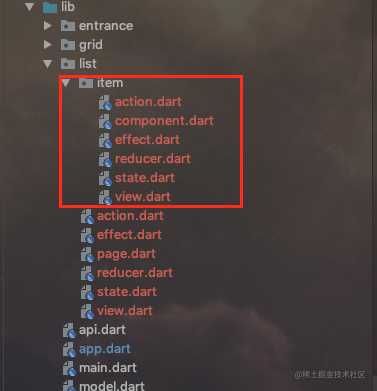
创建结果如下,可以看到组件中的 component.dart 类似页面中的 page.dart。
第二步 定义组件数据和ui
我们给 state 三个字段 type(图标的形状),title(标题),content(内容)。修改 /list/item/state.dart 如下
import 'package:fish_redux/fish_redux.dart';

class ItemState implements Cloneable<ItemState> {

  int type;
  String title;
  String content;

  ItemState({this.type, this.title, this.content});

  @override
  ItemState clone() {
    return ItemState()
    ..type = type
    ..title = title
    ..content = content;
  }
}

ItemState initState(Map<String, dynamic> args) {
  return ItemState();
}
然后我们来实现 item 的视图,使用上面 state 的数据,并且根据 type 不同显示不同的 icon 图标(详见注释)。/list/item/view.dart 如下
import 'package:fish_redux/fish_redux.dart';
import 'package:flutter/material.dart';

import 'action.dart';
import 'state.dart';

Widget buildView(ItemState state, Dispatch dispatch, ViewService viewService) {
  return Container(
    margin: EdgeInsets.fromLTRB(0, 0, 0, 10),
    height: 120.0,
    color: Colors.white,
    child: GestureDetector(
      child: Row(
        crossAxisAlignment: CrossAxisAlignment.start,
        children: <Widget>[
          //左侧图标
          Container(
            padding: const EdgeInsets.only(right: 5.0),
            child: Center(
              child: Icon(
              //不同type显示不同icon
                state.type == 1 ? Icons.account_circle : Icons.account_box,
                size: 50.0,
              ),
            ),
          ),
          //右侧
          Expanded(
            child: Column(
              mainAxisAlignment: MainAxisAlignment.start,
              crossAxisAlignment: CrossAxisAlignment.start,
              children: <Widget>[
                //标题部分
                Container(
                  height: 30,
                  child: Text(
                    state.title,
                    style: TextStyle(fontSize: 22.0),
                  ),
                ),
                //内容部分
                Text(
                  state.content,
                  style: TextStyle(fontSize: 16.0),
                ),
              ],
            ),
          ),
        ],
      ),
      onTap: () {
        //todo 点击事件
      },
    ),
  );
}
1.3 关联组件和页面
Component告一段落。接着我们在列表中使用组件。
第一步 创建adapter
首先在 List 的 State 中存储每一个 Item 的 State 数据。/list/state.dart/ 如下
import 'package:fish_demo/list/item/state.dart';
import 'package:fish_redux/fish_redux.dart';

class ListState implements Cloneable<ListState> {

  List<ItemState> items;    //保存item的state

  @override
  ListState clone() {
    return ListState()
    ..items = items;
  }
}

ListState initState(Map<String, dynamic> args) {
  return ListState();
}
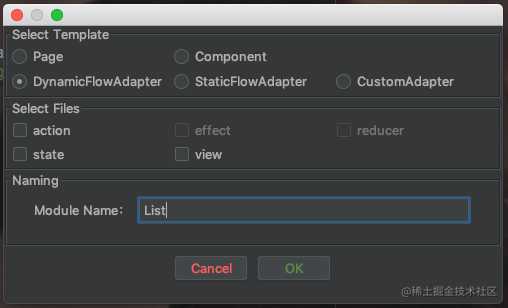
然后把 list 和 item 关联,我们使用 fish-redux 的一个组件叫 adapter。首先在 list 包下用插件创建 FishReduxTemplate,然后选中 DynamicFlowAdapter,并取消其他的勾选,取名 List,如下
第二步 实现connector
看到默认的 adapter 代码中为我们准备了两个类:一个 ListAdapter 和一个 _ListConnector。其中 ListAdapter 中我们配置需要关联的组件,即把组件添加到 pool。以及列表和组件的数据适配关系,通过实现一个 connector 。完成的 /list/adapter.dart 如下
import 'package:fish_demo/list/state.dart';
import 'package:fish_redux/fish_redux.dart';

import 'item/component.dart';
import 'item/state.dart';

class ListAdapter extends DynamicFlowAdapter<ListState> {
  ListAdapter()
      : super(
          pool: <String, Component<Object>>{
            "MyItem": ItemComponent(),  //引用组件
          },
          connector: _ListConnector(),
        );
}

class _ListConnector extends ConnOp<ListState, List<ItemBean>> {
  @override
  List<ItemBean> get(ListState state) {
    //判断ListState里面的items数据是否为空
    if (state.items?.isNotEmpty == true) {
      //若不为空,把item数据转化成ItemBean的列表
      return state.items
        .map<ItemBean>((ItemState data) => ItemBean('MyItem', data))
        .toList(growable: true);
    }else{
      //若为空,返回空列表
      return <ItemBean>[];
    }
  }

  @override
  void set(ListState state, List<ItemBean> items) {
    //把ItemBean的变化,修改到item的state的过程
    if (items?.isNotEmpty == true) {
      state.items = List<ItemState>.from(
        items.map<ItemState>((ItemBean bean) => bean.data).toList());
    } else {
      state.items = <ItemState>[];
    }
  }

  @override
  subReducer(reducer) {
    // TODO: implement subReducer
    return super.subReducer(reducer);
  }
}
第三步 把adapter添加到列表页的依赖中
我们打开 List 页面的 page 文件,然后吧adapter添加到页面的 dependencies 中。如下
import 'package:fish_demo/list/adapter.dart';//注意1
import 'package:fish_redux/fish_redux.dart' hide ListAdapter;//注意1

import 'effect.dart';
import 'reducer.dart';
import 'state.dart';
import 'view.dart';

class ListPage extends Page<ListState, Map<String, dynamic>> {
  ListPage()
      : super(
            initState: initState,
            effect: buildEffect(),
            reducer: buildReducer(),
            view: buildView,
            dependencies: Dependencies<ListState>(
                adapter: NoneConn<ListState>() + ListAdapter(),//注意2
                slots: <String, Dependent<ListState>>{
                }),
            middleware: <Middleware<ListState>>[
            ],);

}
上面的代码我标注了两点注意。
注意1:我们这里引用的是刚才自定义的ListAdapter而不是fish-redux自带的ListAdapter类,这里要处理一下引用。(早知道就起名字的时候就不叫ListAdapter了。。。)
注意2:这里使用的”加号”是 fish-redux 重载的操作符。后者是我们自定义的 adapter ,而由于我们在外层已经不需要使用 connector,所以前者传入一个 NoneConn 。
第四步 列表ui
最后我们在 /list/view.dart 获取到 adapter 并完成列表页的UI。/list/view.dart 如下
import 'package:fish_redux/fish_redux.dart';
import 'package:flutter/material.dart';
import 'state.dart';

Widget buildView(ListState state, Dispatch dispatch, ViewService viewService) {

  ListAdapter adapter = viewService.buildAdapter();     //创建adapter

  return Scaffold(
      appBar: new AppBar(
        title: new Text('列表页'),
      ),
      body: Container(
        child: ListView.builder(
          itemBuilder: adapter.itemBuilder, //把adapter配置到list
          itemCount: adapter.itemCount,     //
        ),
      ));
}
1.4 配上假数据
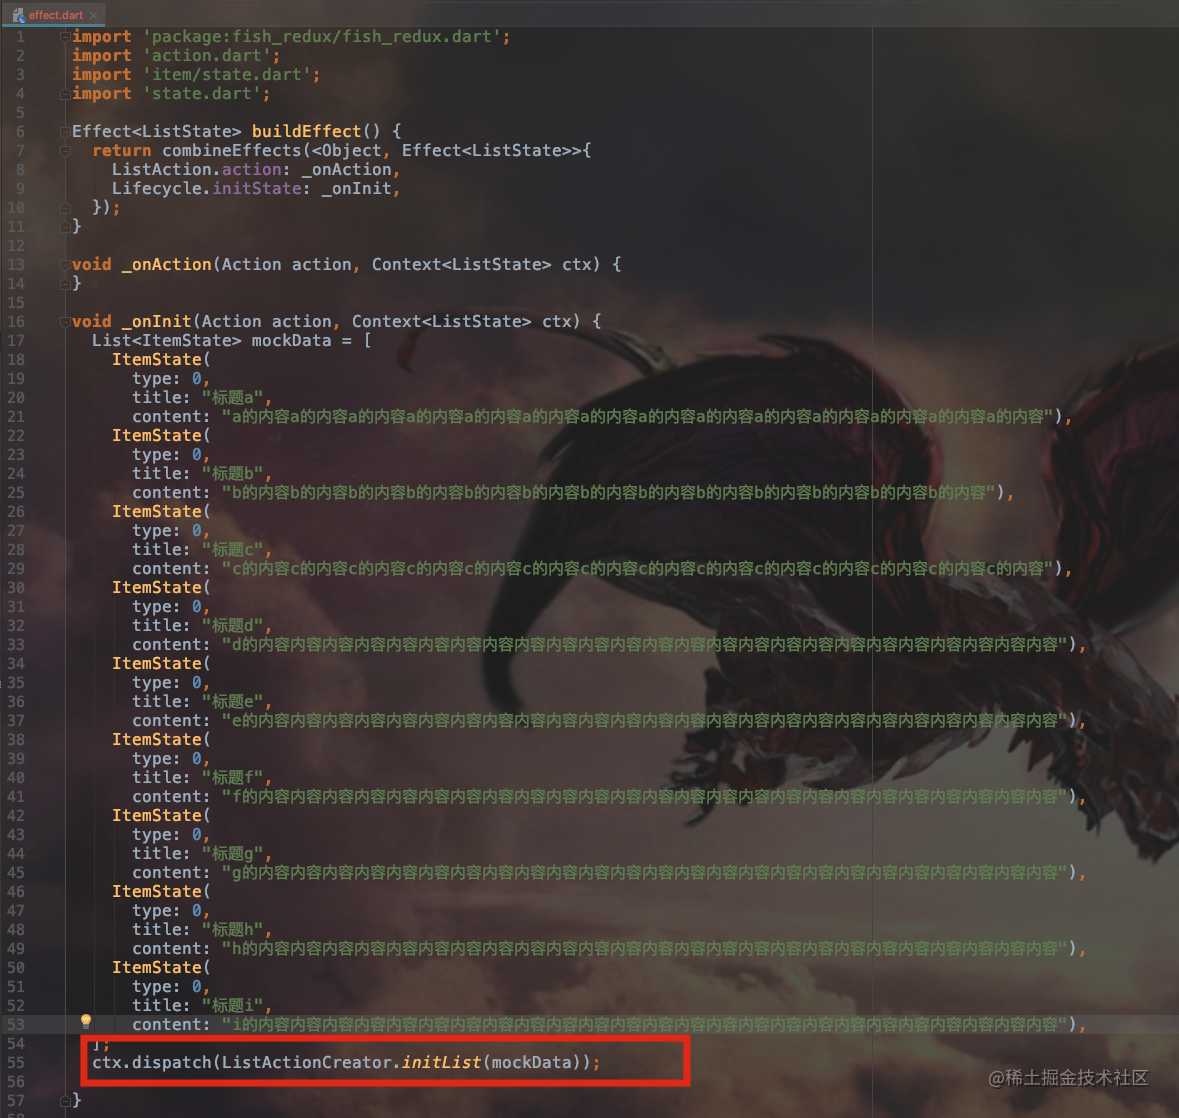
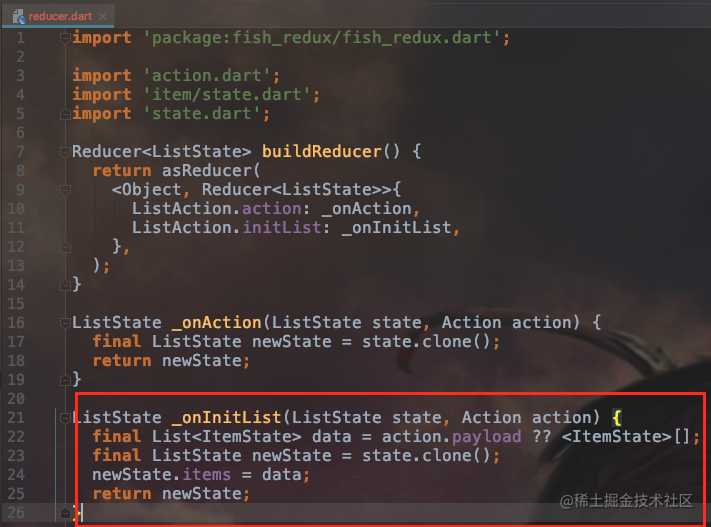
最后我们给 List 页面配上一些假数据来看看效果。具体过程我们已经学过了
- effect 在页面初始化时创建假数据
- effect 把发送携带假数据的 action
- reducer 接收 action,通过假数据更新state
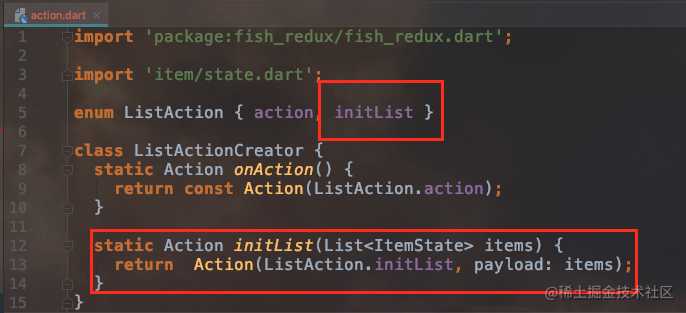
大家基本都会了,要注意一点这次 action 携带了参数。贴一下代码
最后运行一下看看效果
2 使用全局 store 更换主题
这次我们来接触一下 store。它负责管理全局的状态,我们以主题颜色为例进行演示。
2.1 创建全局state
之前页面和组件的创建都是通过插件模板,store 这次手动创建。 创建名为 store 的 package。然后创建一个 state.dart,我们用它来保存全局状态。本例中就是保存主题颜色。/store/state.dart 如下
import 'dart:ui';
import 'package:fish_redux/fish_redux.dart';

abstract class GlobalBaseState {
  Color get themeColor;
  set themeColor(Color color);
}

class GlobalState implements GlobalBaseState, Cloneable<GlobalState> {
  @override
  Color themeColor;

  @override
  GlobalState clone() {
    return GlobalState();
  }
}
注意这里我们先定义了一个抽象类 GlobalBaseState 包含 themeColor 字段。一会儿我们会让所有页面的 state 继承它。另外上面我们还写了一个它的实现类 GlobalState,即全局的 state。
2.2 创建store
我们再新建一个 store.dart,作为 App的Store。/store/store.dart 如下
import 'package:fish_redux/fish_redux.dart';
import 'state.dart';

class GlobalStore {
  static Store<GlobalState> _globalStore;

  static Store<GlobalState> get store =>
    _globalStore ??= createStore<GlobalState>(GlobalState(), buildReducer());

}
可以看到 store 保存了全局 state,并且它也能拥有 reducer 来处理事件。接下来我们就定义它的 action 和 reducer。
2.3 创建store的action和reducer
创建 action.dart ,定义一个改变主题颜色的事件。/store/action.dart 如下
import 'package:fish_redux/fish_redux.dart';

enum GlobalAction { changeThemeColor }

class GlobalActionCreator {
  static Action onchangeThemeColor() {
    return const Action(GlobalAction.changeThemeColor);
  }
}
创建 reducer.dart,接收事件并修改 GlobalState 的主题色。(这里我们让主题色在蓝色和绿色中来回切换)/store/reducer.dart 如下
import 'dart:ui';
import 'package:fish_redux/fish_redux.dart';
import 'package:flutter/material.dart' hide Action;
import 'action.dart';
import 'state.dart';

Reducer<GlobalState> buildReducer() {
  return asReducer(
    <Object, Reducer<GlobalState>>{
      GlobalAction.changeThemeColor: _onchangeThemeColor,
    },
  );
}

GlobalState _onchangeThemeColor(GlobalState state, Action action) {
  final Color color =
  state.themeColor == Colors.green ? Colors.blue : Colors.green;
  return state.clone()..themeColor = color;
}
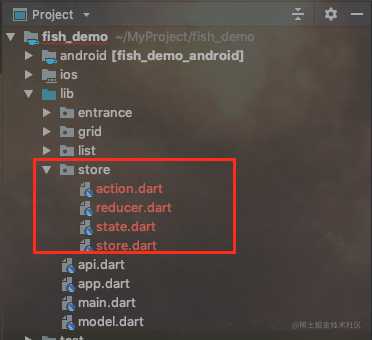
这样整个 store 就写好了。全家福
2.4 继承GlobalBaseState
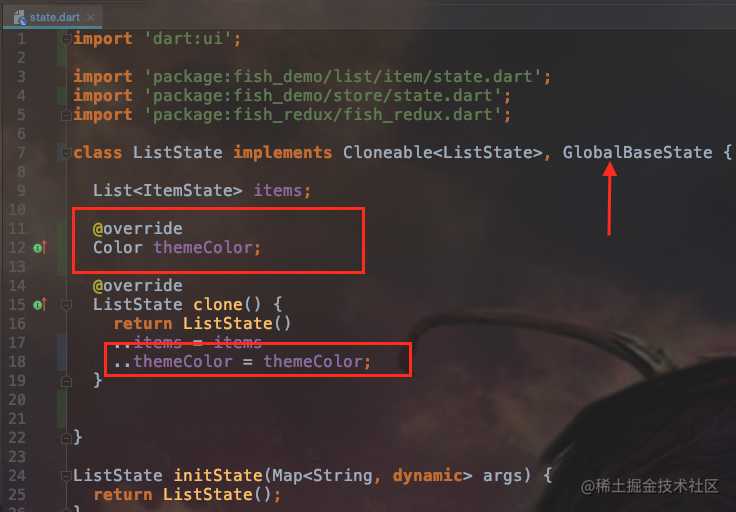
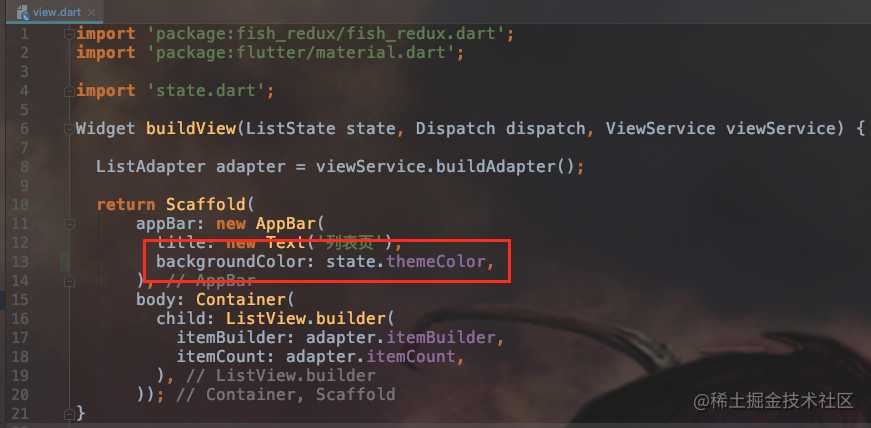
我们让所有页面的 state 继承 GlobalBaseState,并在页面视图中吧标题栏的颜色设置为 themeColor。我们一共有三个界面(entrance、grid、list)需要修改,以 list 页面为例,首先是 /list/state.dart
然后是 /list/view.dart
其他两个页面同理,不一一展示了。
2.5 关联state
如何把各个页面的 state 和全局 GlobalState 联系起来呢?我们要在 app.dart 中配置 visitor。在这里,我们判断页面是否继承了 GlobalBaseState,然后跟全局 store 建立联系,即该页面的 state 随全局state更新而更新。修改好的 app.dart如下
Widget createApp() {
  final AbstractRoutes routes = PageRoutes(
    pages: <String, Page<Object, dynamic>>{
      'entrance_page': EntrancePage(),
      'grid_page': GridPage(),
      'list_page': ListPage(),
    },
    visitor: (String path, Page<Object, dynamic> page) {
      /// 满足条件 Page<T> ,T 是 GlobalBaseState 的子类。
      if (page.isTypeof<GlobalBaseState>()) {
        /// 建立 AppStore 驱动 PageStore 的单向数据连接
        /// 1. 参数1 AppStore
        /// 2. 参数2 当 AppStore.state 变化时, PageStore.state 该如何变化
        page.connectExtraStore<GlobalState>(
          GlobalStore.store, (Object pagestate, GlobalState appState) {
          final GlobalBaseState p = pagestate;
          if (p.themeColor != appState.themeColor) {
            if (pagestate is Cloneable) {
              final Object copy = pagestate.clone();
              final GlobalBaseState newState = copy;
              newState.themeColor = appState.themeColor;
              return newState;
            }
          }
          return pagestate;
        });
      }
    },
  );
//以下省略...
}
2.6 触发主题修改
最后我希望通过点击 List 页面的 item,来实现主题色的切换。
第一步
首先我们定义一个 action,/list/item/action.dart 如下
import 'package:fish_redux/fish_redux.dart';

enum ItemAction { action, onThemeChange }

class ItemActionCreator {
  static Action onAction() {
    return const Action(ItemAction.action);
  }

  static Action onThemeChange() {
    return const Action(ItemAction.onThemeChange);
  }
}
第二步
我们在 item 点击时,发送这个事件。/list/item/view.dart 如下
Widget buildView(ItemState state, Dispatch dispatch, ViewService viewService) {
  return Container(
    margin: EdgeInsets.fromLTRB(0, 0, 0, 10),
    height: 120.0,
    color: Colors.white,
    child: GestureDetector(
      child: Row(
        //省略...
      ),
      onTap: () {
        dispatch(ItemActionCreator.onThemeChange());
      },
    ),
  );
}
第三步
在 effect 接收事件,并发送我们之前定义的全局修改主题色事件。/list/item/effect.dart 如下
import 'package:fish_demo/store/action.dart';
import 'package:fish_demo/store/store.dart';
import 'package:fish_redux/fish_redux.dart';
import 'action.dart';
import 'state.dart';

Effect<ItemState> buildEffect() {
  return combineEffects(<Object, Effect<ItemState>>{
    ItemAction.action: _onAction,
    ItemAction.onThemeChange: _onThemeChange,
  });
}

void _onAction(Action action, Context<ItemState> ctx) {
}

void _onThemeChange(Action action, Context<ItemState> ctx) {
  GlobalStore.store.dispatch(GlobalActionCreator.onchangeThemeColor());
}
最后运行看下效果: 一步步进入列表页,多次点击item,主题色随之变化。返回上级页面,主题色也被改变。

总结
至此,我们了解了 fish-redux 的一些基本的使用。由于客户端同学对 redux 类框架接触不多,所以在使用时要转变思路、多看文档、多思考。
🤗如果我的内容对您有帮助,欢迎点赞、评论、转发、收藏。
今天的文章手把手入门Fish-Redux开发flutter(下)分享到此就结束了,感谢您的阅读。
版权声明:本文内容由互联网用户自发贡献,该文观点仅代表作者本人。本站仅提供信息存储空间服务,不拥有所有权,不承担相关法律责任。如发现本站有涉嫌侵权/违法违规的内容, 请发送邮件至 举报,一经查实,本站将立刻删除。
如需转载请保留出处:http://bianchenghao.cn/22064.html
