问题的引入
import threading
total = 0

def add():
    global total
    for i in range(1000000):
        total += 1

def desc():
    global total
    for i in range(1000000):
        total -= 1

thread1 = threading.Thread(target=add)
thread2 = threading.Thread(target=desc)
thread1.start()
thread2.start()

thread1.join()
thread2.join()
print(total)
以上代码对同一个全局变量total 在两个线程中分别进行100万次的+1 和-1操作,理论上最终的打印结果应该是0。但真是这样吗?
让我们来运行一下,得到的结果如下所示,每次得到的结果都不是0,而且每次结果都不一样!
-708472
-268843
555135
以上就是多线程编程中的经典问题,在多线程编程中,对一个全局变量的修改,在不加任何限制的情况下,返回结果是未知的。
Python提供了多种线程间机制来保证多线程的同步。
1.Lock
下面我们对代码进行改造,导入threading中的Lock,并在每次+1 或是-1操作时获取锁,结束后释放锁。
import threading
from threading import Lock
lock = Lock()
total = 0

def add():
    global total
    global lock
    for i in range(1000000):
        lock.acquire()
        #lock.acquire() #如果此处acquire多次,程序陷入死锁,不会有输出
        total += 1
        lock.release()

def desc():
    global total
    global lock
    for i in range(1000000):
        lock.acquire()
        total -= 1
        lock.release()

thread1 = threading.Thread(target=add)
thread2 = threading.Thread(target=desc)
thread1.start()
thread2.start()

thread1.join()
thread2.join()
print(total)
重新运行结果,现在每次得到的结果都是0。
不知你是否发现,程序的执行时间变长了。这是因为线程在每次获取锁和释放锁的过程中会造成资源的消耗。
2.Rlock
Rlock是为了解决在同一个线程中锁的多次acquire问题(如上面代码注释段)。但是一定要注意acquire和release的次数要一样。
import threading
from threading import RLock
lock = RLock()
total = 0

def add():
    global total
    global lock
    for i in range(1000000):
        lock.acquire()
        lock.acquire()
        total += 1
        lock.release()
        lock.release()

def desc():
    global total
    global lock
    for i in range(1000000):
        lock.acquire()
        total -= 1
        lock.release()

thread1 = threading.Thread(target=add)
thread2 = threading.Thread(target=desc)
thread1.start()
thread2.start()

thread1.join()
thread2.join()
print(total)
3.Condition
我们再来看一个复杂点的例子,如何实现两个线程间的对话?
import threading
import time

cond = threading.Condition()

class MyThread1(threading.Thread):
    def __init__(self,name):
        super().__init__(name=name)

    def run(self):
        cond.acquire()

        print('%s: Hello, how are you?' %self.name)
        cond.notify()
        cond.wait()

        time.sleep(2)
        print("%s: I'm fine too." %self.name)
        cond.notify()
        cond.wait()

        time.sleep(2)
        print('%s: Yes, me too, byebye!' %self.name)
        cond.notify()

        cond.release()

class MyThread2(threading.Thread):
    def __init__(self, name):
        super().__init__(name=name)

    def run(self):
        time.sleep(1) #启动顺序很重要,此处先等一秒,避免和线程1竞争锁
        cond.acquire()

        time.sleep(2)
        print("%s: I'm fine, thank you, and you?" %self.name)
        cond.notify()
        cond.wait()

        time.sleep(2)
        print("%s: It' nice to meet you." %self.name)
        cond.notify()
        cond.wait()

        time.sleep(2)
        print('%s: Bye!' %self.name)

        cond.release()


MyThread1('LiLei').start()
MyThread2('HanMeimei').start()
运行结果如下
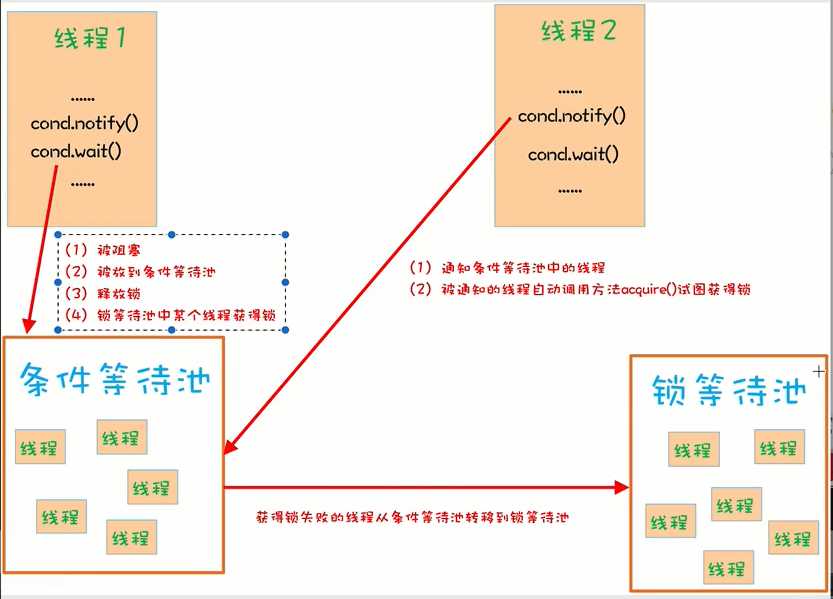
我们来看一下实现原理。关键在于notify 和wait方法。
condition有两层锁
一把底层锁会在线程调用了wait方法的时候释放,上面的锁会在每次调用wait的时候分配一把,并放入到cond的等待队列中,等待notify方法的唤醒。
4.Semaphore
我们来模拟一个多线程爬取网站的例子。
import threading
import time

class HtmlSpider(threading.Thread):
    def __init__(self,url):
        super().__init__()
        self.url = url

    def run(self):
        time.sleep(2)
        print("got html text success!")

class UrlProducer(threading.Thread):
    def run(self):
        for i in range(20):
            html_thread = HtmlSpider("https://baidu.com/{}".format(i))
            html_thread.start()

if __name__ == '__main__':
    url_producer = UrlProducer()
    url_producer.start()
输出如下
那如何来控制一个并发数呢,通过以下代码能每次并发3个线程来执行。
import threading
import time

class HtmlSpider(threading.Thread):
    def __init__(self,url,sem):
        super().__init__()
        self.url = url
        self.sem = sem

    def run(self):
        time.sleep(2)
        print("got html text success!")
        self.sem.release() #注意在此处释放sem

class UrlProducer(threading.Thread):
    def __init__(self,sem):
        super().__init__()
        self.sem = sem

    def run(self):
        for i in range(20):
            self.sem.acquire() #这里获取sem
            html_thread = HtmlSpider("https://baidu.com/{}".format(i),sem)
            html_thread.start()

if __name__ == '__main__':
    sem = threading.Semaphore(3)
    url_producer = UrlProducer(sem)
    url_producer.start()
5.Event
最后介绍通过标志位来实现线程同步的方法
from threading import Thread,Event,current_thread
import time

event = Event()
print(event.is_set()) #False

def do_sth():
    print('%s开始等待' % current_thread().getName())
    event.wait() #内部标志为False时,调用该方法的线程会被阻塞
    print('%s结束等待' % current_thread().getName())

for i in range(3):
    Thread(target=do_sth).start()

time.sleep(2)
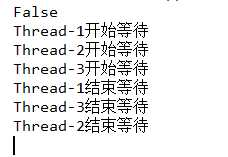
event.set() #父线程发送事件信号,此时被设置为True
版权声明:本文内容由互联网用户自发贡献,该文观点仅代表作者本人。本站仅提供信息存储空间服务,不拥有所有权,不承担相关法律责任。如发现本站有涉嫌侵权/违法违规的内容, 请发送邮件至 举报,一经查实,本站将立刻删除。
如需转载请保留出处:https://bianchenghao.cn/34503.html


