企业微信 网页授权登入
官网地址:https://work.weixin..com/api/doc/90000/90135/91020
企业微信提供了OAuth的授权登录方式,可以让从企业微信终端打开的网页获取成员的身份信息,从而免去登录的环节。
企业应用中的URL链接(包括自定义菜单或者消息中的链接),均可通过OAuth2.0验证接口来获取成员的UserId身份信息。
OAuth2简介
OAuth2的设计背景,在于允许用户在不告知第三方自己的帐号密码情况下,通过授权方式,让第三方服务可以获取自己的资源信息。
详细的协议介绍,开发者可以参考RFC 6749。
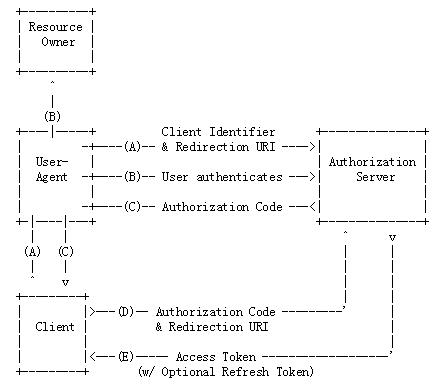
下面简单说明OAuth2中最经典的Authorization Code模式,流程如下:
流程图中,包含四个角色。
- ResourceOwner为资源所有者,即为用户
- User-Agent为浏览器
- AuthorizationServer为认证服务器,可以理解为用户资源托管方,比如企业微信服务端
- Client为第三方服务
调用流程为:
A) 用户访问第三方服务,第三方服务通过构造OAuth2链接(参数包括当前第三方服务的身份ID,以及重定向URI),将用户引导到认证服务器的授权页
B) 用户选择是否同意授权
C) 若用户同意授权,则认证服务器将用户重定向到第一步指定的重定向URI,同时附上一个授权码。
D) 第三方服务收到授权码,带上授权码来源的重定向URI,向认证服务器申请凭证。
E) 认证服务器检查授权码和重定向URI的有效性,通过后颁发AccessToken(调用凭证)
D)与E)的调用为后台调用,不通过浏览器进行
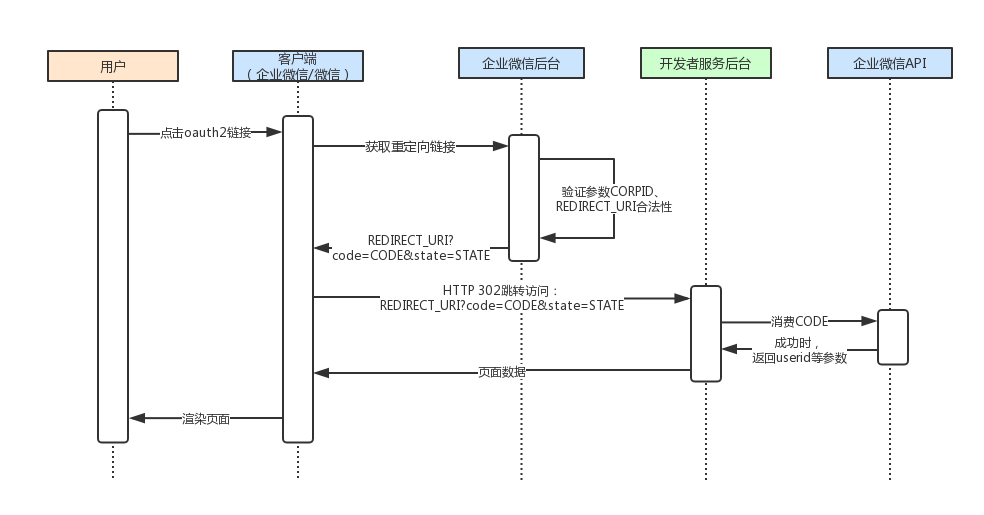
企业微信OAuth2接入流程
图1 企业微信OAuth2流程图
使用OAuth2前须知
关于网页授权的可信域名
REDIRECT_URL中的域名,需要先配置至应用的“可信域名”,否则跳转时会提示“redirect_uri参数错误”。
要求配置的可信域名,必须与访问链接的域名完全一致;若访问链接URL带了端口号,端口号也需要登记到可信域名中。举个例子:
- 假定重定向访问的链接是:http://mail..com:8080/cgi-bin/helloworld:
| 配置域名 | 是否正确 | 原因 |
|---|---|---|
| mail..com:8080 |  |
配置域名与访问域名完全一致 |
| email..com |  |
配置域名必须与访问域名完全一致 |
| support.mail..com |  |
配置域名必须与访问域名完全一致 |
| *..com |  |
不支持泛域名设置 |
| mail..com |  |
配置域名必须与访问域名完全一致,包括端口号 |
- 假定配置的可信域名是 mail..com:
| 访问链接 | 是否正确 | 原因 |
|---|---|---|
| https://mail..com/cgi-bin/helloworld |  |
配置域名与访问域名完全一致 |
| http://mail..com/cgi-bin/redirect |  |
配置域名与访问域名完全一致,与协议头/链接路径无关 |
| https://exmail..com/cgi-bin/helloworld |  |
配置域名必须与访问域名完全一致 |
关于UserID机制
UserId用于在一个企业内唯一标识一个用户,通过网页授权接口可以获取到当前用户的UserId信息,如果需要获取用户的更多信息可以调用 通讯录管理 – 成员接口 来获取。
缓存方案建议
通过OAuth2.0验证接口获取成员身份会有一定的时间开销。对于频繁获取成员身份的场景,建议采用如下方案:
1、企业应用中的URL链接直接填写企业自己的页面地址
2、成员操作跳转到步骤1的企业页面时,企业后台校验是否有标识成员身份的cookie信息,此cookie由企业生成
3、如果没有匹配的cookie,则重定向到OAuth验证链接,获取成员的身份信息后,由企业后台植入标识成员身份的cookie信息
4、根据cookie获取成员身份后,再进入相应的页面
实践
maven依赖
<?xml version="1.0" encoding="UTF-8"?> <project xmlns="http://maven.apache.org/POM/4.0.0" xmlns:xsi="http://www.w3.org/2001/XMLSchema-instance" xsi:schemaLocation="http://maven.apache.org/POM/4.0.0 https://maven.apache.org/xsd/maven-4.0.0.xsd"> <modelVersion>4.0.0</modelVersion> <parent> <groupId>org.springframework.boot</groupId> <artifactId>spring-boot-starter-parent</artifactId> <version>2.1.1.RELEASE</version> <relativePath/> <!-- lookup parent from repository --> </parent> <groupId>com.kuang</groupId> <artifactId>spring-outh</artifactId> <version>0.0.1-SNAPSHOT</version> <name>spring-outh</name> <description>Demo project for Spring Boot</description> <properties> <java.version>1.8</java.version> </properties> <dependencies> <dependency> <groupId>org.springframework.boot</groupId> <artifactId>spring-boot-starter-web</artifactId> </dependency> <!-- redis 缓存操作 --> <dependency> <groupId>org.springframework.boot</groupId> <artifactId>spring-boot-starter-data-redis</artifactId> </dependency> <dependency> <groupId>org.springframework.boot</groupId> <artifactId>spring-boot-devtools</artifactId> <scope>runtime</scope> <optional>true</optional> </dependency> <dependency> <groupId>org.projectlombok</groupId> <artifactId>lombok</artifactId> <optional>true</optional> </dependency> <dependency> <groupId>org.springframework.boot</groupId> <artifactId>spring-boot-starter-test</artifactId> <scope>test</scope> </dependency> <dependency> <groupId>org.apache.commons</groupId> <artifactId>commons-pool2</artifactId> <version>2.0</version> </dependency> <dependency> <groupId>cn.hutool</groupId> <artifactId>hutool-all</artifactId> <version>5.4.1</version> </dependency> <!--常用工具类 --> <dependency> <groupId>org.apache.commons</groupId> <artifactId>commons-lang3</artifactId> </dependency> </dependencies> <build> <plugins> <plugin> <groupId>org.springframework.boot</groupId> <artifactId>spring-boot-maven-plugin</artifactId> </plugin> </plugins> </build> </project> application.yml
wechat: cp: # 企业ID corpId: xxxxxxx # 应用的id agentId: xxxx # 应用的凭证密钥 secret: xxxxxxx spring: # redis 配置 redis: # 地址 host: localhost # 端口,默认为6379 port: 6379 # 密码 password: # 连接超时时间 timeout: 10s lettuce: pool: # 连接池中的最小空闲连接 min-idle: 0 # 连接池中的最大空闲连接 max-idle: 8 # 连接池的最大数据库连接数 max-active: 8 # #连接池最大阻塞等待时间(使用负值表示没有限制) max-wait: -1ms controller
package com.kuang.springouth.controller; import cn.hutool.http.HttpUtil; import cn.hutool.json.JSONUtil; import com.kuang.springouth.pojo.UserBean; import com.kuang.springouth.utils.GetAcessTokenUtil; import lombok.extern.slf4j.Slf4j; import org.springframework.beans.factory.annotation.Autowired; import org.springframework.beans.factory.annotation.Value; import org.springframework.stereotype.Controller; import org.springframework.validation.annotation.Validated; import org.springframework.web.bind.annotation.GetMapping; import org.springframework.web.bind.annotation.RequestMapping; import org.springframework.web.bind.annotation.RequestParam; import org.springframework.web.bind.annotation.ResponseBody; import javax.servlet.http.HttpServletRequest; import javax.servlet.http.HttpSession; import java.io.UnsupportedEncodingException; import java.util.HashMap; /** * @Author: Abe * Date: 2020/12/5 16:27 * 企业微信网页授权登入 */ @Controller @RequestMapping("/wechat") @Validated @Slf4j public class SimpleOuthController {
    @Value("${wechat.cp.corpId}") private String appid; // 企业的CorpID @Value("${wechat.cp.agentId}") private String agentId; //自建应用的id @Value("${wechat.cp.secret}") private String secret; //自建应用的密钥 @Autowired private GetAcessTokenUtil acessTokenUtil; /** * 构造网页授权链接 */ @GetMapping("") public Object outhApi(HttpServletRequest request) {
    //获取项目域名 String requestUrl = request.getServerName(); String contextPath = request.getContextPath(); log.info("domain name: " + requestUrl + " project name: " + contextPath); //拼接微信回调地址 String backUrl ="http://" + requestUrl + contextPath + "/oauth2me"; //因为我是本地测试,没有真正的域名,所以使用ngrok内网穿透工具获得一个域名, //你要是实际项目,并且有域名的情况下,就用你自己实际能用的域名 backUrl = "http://域名/wechat/oauth2me"; String redirect_uri = ""; try {
    redirect_uri = java.net.URLEncoder.encode(backUrl, "utf-8"); } catch (UnsupportedEncodingException e) {
    e.printStackTrace(); log.error("ecdoe error: " + e.getMessage()); } String oauth2Url = "https://open.weixin..com/connect/oauth2/authorize?appid=" + appid + "&redirect_uri=" + redirect_uri + "&response_type=code&scope=snsapi_base&state=STATE#wechat_redirect"; //重定向到构建好的链接 return "redirect:" + oauth2Url; } /** * 授权回调请求地址 * @return */ @GetMapping("/oauth2me") @ResponseBody public Object oAuth2Url(@RequestParam String code, HttpSession session){
    try {
    String acessToken = (String) acessTokenUtil.getAcessToken(); if(acessToken != null) {
    //url获取用户信息的请求地址 String requestUrl = "https://qyapi.weixin..com/cgi-bin/user/getuserinfo"; HashMap<String, Object> paramMap = new HashMap<>(); paramMap.put("access_token", acessToken); paramMap.put("code", code); String s = HttpUtil.get(requestUrl, paramMap); UserBean userBean = JSONUtil.toBean(s, UserBean.class); if(userBean.getErrcode().equals("0")) {
   //调用成功 //我这边是把userId存在session session.setAttribute("userId", userBean.getUserId()); } //这边一般就是重定向 前台页面首页的地址 这边方便测试我直接返回得到的数据 //String url = "http://localhost:6255/#/"; //return "redirect:" + url; return userBean; } }catch (Exception e){
    e.printStackTrace(); } return ""; } /** * 测试userId是否已经存在sesiion中 * @param session * @return */ @GetMapping("/getUserId") @ResponseBody public Object getuserId(HttpSession session) {
    String userId = (String) session.getAttribute("userId"); return userId; } }
pojo
package com.kuang.springouth.pojo; import lombok.AllArgsConstructor; import lombok.Data; import lombok.NoArgsConstructor; import java.io.Serializable; /** * @Author: Abe * Date: 2020/12/5 18:12 */ @Data @AllArgsConstructor @NoArgsConstructor public class UserBean implements Serializable {
    private String errcode; private String errmsg; private String OpenId; private String DeviceId; private String external_userid; private String UserId; }
package com.kuang.springouth.pojo; import lombok.AllArgsConstructor; import lombok.Data; import lombok.NoArgsConstructor; import java.io.Serializable; /** * @Author: Abe * Date: 2020/12/5 17:55 */ @Data @AllArgsConstructor @NoArgsConstructor public class ResutlBean implements Serializable {
private String errcode; private String errmsg; private String access_token; private Long expires_in; } redis
package com.kuang.springouth.redis; import org.springframework.beans.factory.annotation.Autowired; import org.springframework.data.redis.core.HashOperations; import org.springframework.data.redis.core.RedisTemplate; import org.springframework.data.redis.core.ValueOperations; import org.springframework.stereotype.Component; import java.util.Collection; import java.util.List; import java.util.Map; import java.util.Set; import java.util.concurrent.TimeUnit; /** * spring redis 工具类 * * @author ruoyi **/ @SuppressWarnings(value = {
    "unchecked", "rawtypes" }) @Component public class RedisCache {
    @Autowired public RedisTemplate redisTemplate; /** * 缓存基本的对象,Integer、String、实体类等 * * @param key 缓存的键值 * @param value 缓存的值 */ public <T> void setCacheObject(final String key, final T value) {
    redisTemplate.opsForValue().set(key, value); } /** * 缓存基本的对象,Integer、String、实体类等 * * @param key 缓存的键值 * @param value 缓存的值 * @param timeout 时间 * @param timeUnit 时间颗粒度 */ public <T> void setCacheObject(final String key, final T value, final Integer timeout, final TimeUnit timeUnit) {
    redisTemplate.opsForValue().set(key, value, timeout, timeUnit); } /** * 设置有效时间 * * @param key Redis键 * @param timeout 超时时间 * @return true=设置成功;false=设置失败 */ public boolean expire(final String key, final long timeout) {
    return expire(key, timeout, TimeUnit.SECONDS); } /** * 设置有效时间 * * @param key Redis键 * @param timeout 超时时间 * @param unit 时间单位 * @return true=设置成功;false=设置失败 */ public boolean expire(final String key, final long timeout, final TimeUnit unit) {
    return redisTemplate.expire(key, timeout, unit); } /** * 获得缓存的基本对象。 * * @param key 缓存键值 * @return 缓存键值对应的数据 */ public <T> T getCacheObject(final String key) {
    ValueOperations<String, T> operation = redisTemplate.opsForValue(); return operation.get(key); } /** * 删除单个对象 * * @param key */ public boolean deleteObject(final String key) {
    return redisTemplate.delete(key); } /** * 删除集合对象 * * @param collection 多个对象 * @return */ public long deleteObject(final Collection collection) {
    return redisTemplate.delete(collection); } /** * 缓存List数据 * * @param key 缓存的键值 * @param dataList 待缓存的List数据 * @return 缓存的对象 */ public <T> long setCacheList(final String key, final List<T> dataList) {
    Long count = redisTemplate.opsForList().rightPushAll(key, dataList); return count == null ? 0 : count; } /** * 获得缓存的list对象 * * @param key 缓存的键值 * @return 缓存键值对应的数据 */ public <T> List<T> getCacheList(final String key) {
    return redisTemplate.opsForList().range(key, 0, -1); } /** * 缓存Set * * @param key 缓存键值 * @param dataSet 缓存的数据 * @return 缓存数据的对象 */ public <T> long setCacheSet(final String key, final Set<T> dataSet) {
    Long count = redisTemplate.opsForSet().add(key, dataSet); return count == null ? 0 : count; } /** * 获得缓存的set * * @param key * @return */ public <T> Set<T> getCacheSet(final String key) {
    return redisTemplate.opsForSet().members(key); } /** * 缓存Map * * @param key * @param dataMap */ public <T> void setCacheMap(final String key, final Map<String, T> dataMap) {
    if (dataMap != null) {
    redisTemplate.opsForHash().putAll(key, dataMap); } } /** * 获得缓存的Map * * @param key * @return */ public <T> Map<String, T> getCacheMap(final String key) {
    return redisTemplate.opsForHash().entries(key); } /** * 往Hash中存入数据 * * @param key Redis键 * @param hKey Hash键 * @param value 值 */ public <T> void setCacheMapValue(final String key, final String hKey, final T value) {
    redisTemplate.opsForHash().put(key, hKey, value); } /** * 获取Hash中的数据 * * @param key Redis键 * @param hKey Hash键 * @return Hash中的对象 */ public <T> T getCacheMapValue(final String key, final String hKey) {
    HashOperations<String, String, T> opsForHash = redisTemplate.opsForHash(); return opsForHash.get(key, hKey); } /** * 获取多个Hash中的数据 * * @param key Redis键 * @param hKeys Hash键集合 * @return Hash对象集合 */ public <T> List<T> getMultiCacheMapValue(final String key, final Collection<Object> hKeys) {
    return redisTemplate.opsForHash().multiGet(key, hKeys); } /** * 获得缓存的基本对象列表 * * @param pattern 字符串前缀 * @return 对象列表 */ public Collection<String> keys(final String pattern) {
    return redisTemplate.keys(pattern); } }
utils
package com.kuang.springouth.utils; import cn.hutool.http.HttpUtil; import cn.hutool.json.JSONUtil; import com.kuang.springouth.pojo.ResutlBean; import com.kuang.springouth.redis.RedisCache; import lombok.extern.slf4j.Slf4j; import org.springframework.beans.factory.annotation.Autowired; import org.springframework.beans.factory.annotation.Value; import org.springframework.stereotype.Component; import java.util.HashMap; /** * @Author: Abe * Date: 2020/12/5 16:48 */ @Component @Slf4j public class GetAcessTokenUtil {
    @Value("${wechat.cp.corpId}") private String appid; // 企业的CorpID @Value("${wechat.cp.agentId}") private String agentId; //自建应用的id @Value("${wechat.cp.secret}") private String secret; //自建应用的密钥 @Autowired private RedisCache redisCache; private String url = "https://qyapi.weixin..com/cgi-bin/gettoken"; public Object getAcessToken() {
    try {
    String access_token = redisCache.getCacheObject("access_token"); if(access_token == null) {
    log.info("重新获取token"); HashMap<String, Object> paramMap = new HashMap<>(); paramMap.put("corpid", appid); paramMap.put("corpsecret", secret); System.out.println(paramMap); String s = HttpUtil.get(url, paramMap); ResutlBean resutlBean = JSONUtil.toBean(s, ResutlBean.class); if(resutlBean.getErrcode().equals("0")) {
   //成功 //access_token存到redis中 redisCache.setCacheObject("access_token", resutlBean.getAccess_token()); return resutlBean.getAccess_token(); } }else {
    return access_token; } }catch (Exception e){
    e.printStackTrace(); } return null; } }
总结
- 上边配置文件中redis中用lettuce,这个对springboot的版本是有要求的
- access_token需要缓存下来,不能频繁调用官网的接口
- 每个应用有独立的secret,获取到的access_token只能本应用使用,所以每个应用的access_token应该分开来获取
- 需要在自建应用中的网页授权及JS-SDK配置可信域名,必须是域名。我是使用ngrok内网穿透工具实现的。
今天的文章
企业微信 网页授权登入失败_微信如何授权分享到此就结束了,感谢您的阅读。
版权声明:本文内容由互联网用户自发贡献,该文观点仅代表作者本人。本站仅提供信息存储空间服务,不拥有所有权,不承担相关法律责任。如发现本站有涉嫌侵权/违法违规的内容, 请发送邮件至 举报,一经查实,本站将立刻删除。
如需转载请保留出处:https://bianchenghao.cn/60282.html


