一.Spring Cloud简介
先来看看官网对spring cloud的定义:
Spring Cloud offers a simple and accessible programming model to the most common distributed system patterns, helping developers build resilient, reliable, and coordinated applications.
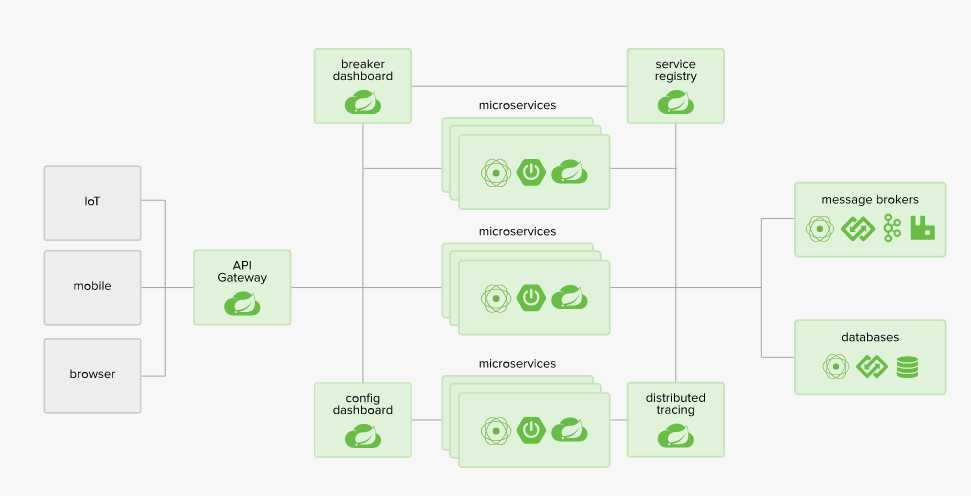
再来看看整个spring cloud的architecture

可以看出spring cloud的意义在于推出了一个基于spring的全链路方案,包括gateway,tracing,microservices,configCenter,service registry等等,中小型公司在基于spring cloud和springBoot的基础上进行搭建系统的话,只要稍作定制化便能很快的搭建起一个能支撑一定量qps和数据的系统
二.基于Spring Cloud搭建分布式配置中心
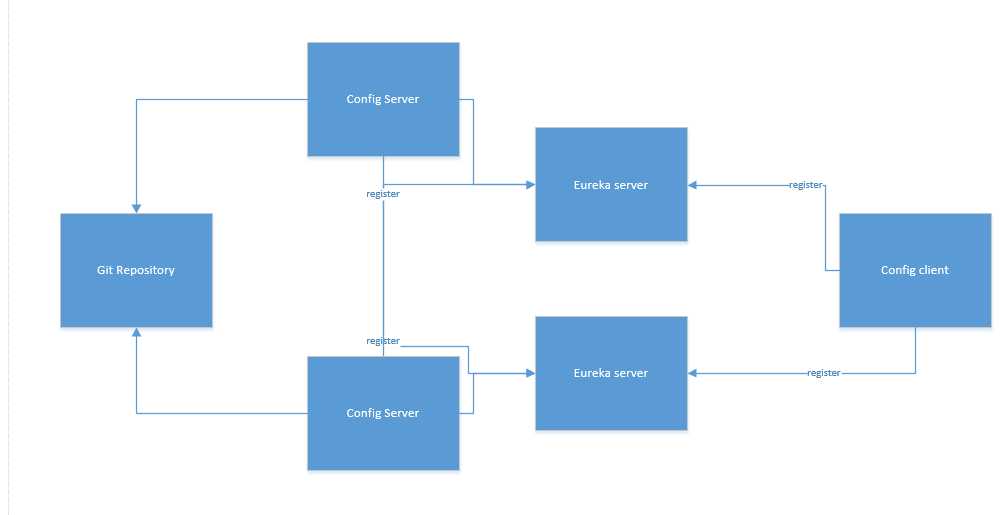
(1)首先简单浏览一下我们要搭建的config center的architecture:

1.git repository作为配置的存储地
2.Config Server设置两台作为高可用
3.eureka server设置两台注册中心作为高可用
4.config client作为客户端获取配置
(2)下面看看关键代码:
1.配置eureka注册中心
EurekaServiceApplication:
package com.andrew.eureka.server;

import org.springframework.boot.SpringApplication;
import org.springframework.boot.autoconfigure.SpringBootApplication;
import org.springframework.cloud.netflix.eureka.server.EnableEurekaServer;

@EnableEurekaServer
@SpringBootApplication
public class EurekaServiceApplication {
    public static void main(String[] args) {
        SpringApplication.run(EurekaServiceApplication.class, args);
    }
}
application-peer1.properties配置:
server.port=8761

eureka.client.register-with-eureka=true
eureka.client.fetch-registry=true
eureka.client.service-url.defaultZone=http://peer2:8762/eureka
eureka.instance.appname=eureka-server
eureka.instance.hostname=peer1

logging.level.com.netflix.eureka=OFF
logging.level.com.netflix.discovery=OFF
application-peer2.properties配置:
server.port=8762

eureka.client.register-with-eureka=true
eureka.client.fetch-registry=true
eureka.client.service-url.defaultZone=http://peer1:8761/eureka
eureka.instance.appname=eureka-server
eureka.instance.hostname=peer2

logging.level.com.netflix.eureka=OFF
logging.level.com.netflix.discovery=OFF
通过mvn clean install命令打包成jar之后,跑命令
java -jar eureka-service-0.0.1-SNAPSHOT.jar --spring.profiles.active=peer1
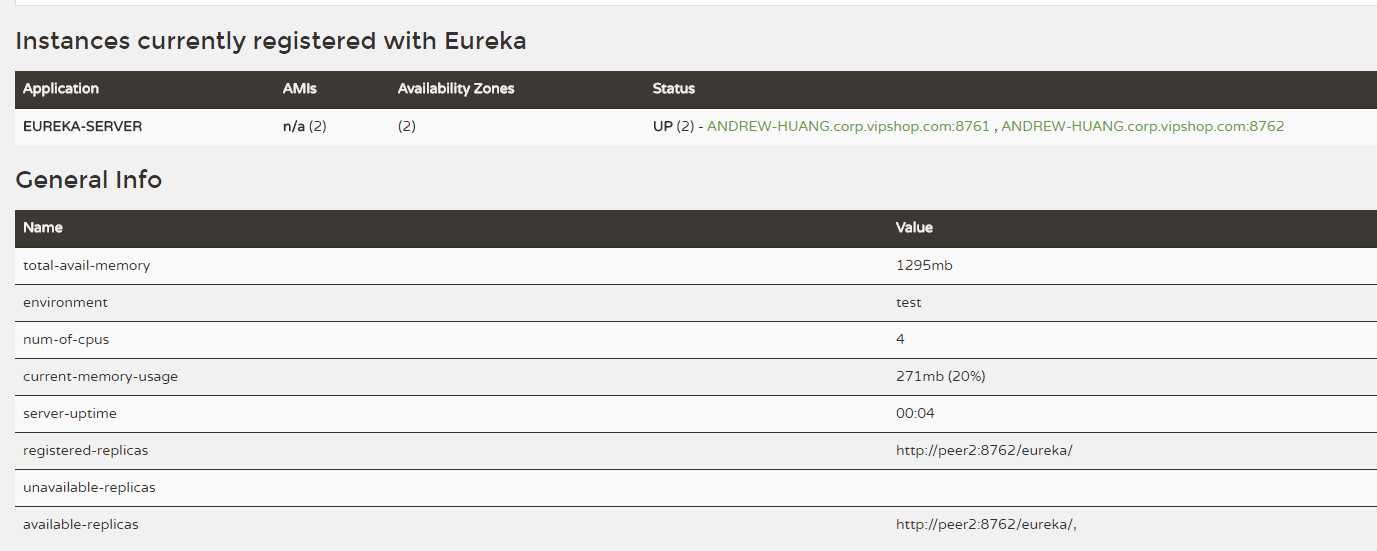
java -jar eureka-service-0.0.1-SNAPSHOT.jar --spring.profiles.active=peer2输入http://localhost:8761/之后,可以看到
里面的available-replicas可以看到拥有peer2这个备份service
2.配置config server
ConfigServerApplication:
package com.andrew.config.server;

import org.springframework.boot.autoconfigure.SpringBootApplication;
import org.springframework.boot.builder.SpringApplicationBuilder;
import org.springframework.cloud.config.server.EnableConfigServer;
import org.springframework.cloud.netflix.eureka.EnableEurekaClient;

@EnableConfigServer
@SpringBootApplication
@EnableEurekaClient
public class ConfigServerApplication {
    public static void main(String[] args) {
        new SpringApplicationBuilder(ConfigServerApplication.class).run(args);
    }
}
每个eureka client都必须有@EnableEurekaClient这个注解,每个config server必须有@EnableConfigServer这个注解
application.yml配置文件:
spring:
  application:
    name: config-server
  cloud:
    config:
      server:
        git:
          uri: F:\\public-projects\\spring-cloud\\spring-cloud-config\\gs-centralized-configuration-master\\config

eureka:
  client:
    service-url:
      defaultZone: http://localhost:8761/eureka,http://localhost:8762/eureka
注意spring cloud使用git做配置的存储仓库,这里我是用了本地的git仓库,一般来说是通过远程仓库作为配置的存储
跑下面两个命令起两个config server:
java -jar config-server-0.0.1-SNAPSHOT.jar --server.port=8888
java -jar config-server-0.0.1-SNAPSHOT.jar --server.port=8889
可以看到两个config server已经注册到eureka server上了
3.配置config client
package com.andrew.config.client;

import org.springframework.beans.factory.annotation.Value;
import org.springframework.boot.autoconfigure.SpringBootApplication;
import org.springframework.boot.builder.SpringApplicationBuilder;
import org.springframework.cloud.context.config.annotation.RefreshScope;
import org.springframework.cloud.netflix.eureka.EnableEurekaClient;
import org.springframework.web.bind.annotation.RequestMapping;
import org.springframework.web.bind.annotation.RestController;

@EnableEurekaClient
@SpringBootApplication
public class ConfigClientApplication {

    public static void main(String[] args) {
        new SpringApplicationBuilder(ConfigClientApplication.class).run(args);
    }
}

@RefreshScope
@RestController
class MessageRestController {

    @Value("${message:Hello default}")
    private String message;

    @RequestMapping("/message")
    String getMessage() {
        return this.message;
    }
}
@RefreshScope是因为config client只会在第一次初始化bean的时候获取一次配置,后面如果需要更新的话,需要设置这个注解在controller上面,并且引入spring actuator的包,通过发送post请求来更新bean里面的值
@Value注解表示要获取的是key为message的值,默认值是Hello default
配置application.properties:
management.endpoints.web.exposure.include=*

spring.application.name=config-client
spring.cloud.config.discovery.enabled=true
spring.cloud.config.discovery.serviceId=config-server
eureka.client.service-url.defaultZone=http://localhost:8761/eureka,http://localhost:8762/eureka
spring.cloud.config.discovery.enabled=true能够让config client自动去发现config server
spring.cloud.config.discovery.serviceId=config-server是根据configServer在配置文件里面的applicationName设置,configClient根据serviceId去探测configServer
PS:每个configClient会在第一次初始化之后从eureka service获取到注册在上面的服务器信息,后面即使eureka service down掉,仍然能够根据本地缓存去访问到config server
运行下面命令启动config-client:
java -jar config-client-0.0.1-SNAPSHOT.jar --server.port=8081
可以看到config-client已经注册上去
4.Test Application
applicationContext.properties文件:
hello=helloWorld
message = congratulation success在浏览器输入:http://localhost:8081/message 可以看到结果是:
当我们修改文件内容为
hello=helloWorld
message = haha we change the value
git commit之后,通过postman发送post请求到http://localhost:8081/actuator/refresh,再去调用http://localhost:8081/message ,可以看到新的配置值:

通过这我们就可以成功获取到更新后的配置
5.优点和缺点
优点:
1.eureka作为注册中心,不像zk需要选举master,eureka是peer形式的,那么即使出现网络变化导致注册中心实例少于一定数量,eureka也可以保证一直的提供服务
2.当网络变化的时候,eureka会有一个Self Preservation Mode的机制,如果15%的注册实例在短时间内出现down的情况(通过heartbeat确认),那么eureka不会移除实例的注册信息,而是等到网络恢复之后仍然以这个实例信息去提供给调用方
具体可以通过:https://github.com/Netflix/eureka/wiki/Server-Self-Preservation-Mode这里了解
缺点:
1.需要自己定制化一个流程审批界面,没有一个完整的权限控制流程
2.缺少一个界面去维护管理配置
3.不像zk是使用观察者模式,每个client可以去监听配置的变化,每次更新都需要主动去发送一次post请求更新或者必须通过git webhook加上消息队列做热更新,需要另外做一个封装的api使得更新配置对上层无感知
4.全程都是用http去实现,不如zk通过tcp长连接来的更有效率
5.基于git仓库保存配置,从文件系统在io上性能没有从mysql读快,并且可以在文件系统前加入redis之类的缓存机制提供更强的性能
6.附记
demo代码:https://github.com/AndrewHuangMiao/spring-cloud-config-eureka
业界基于springboot和springcloud做了定制化之后的使用:https://github.com/ctripcorp/apollo/
7.参考:
https://spring.io/guides/gs/service-registration-and-discovery/
https://spring.io/guides/gs/centralized-configuration/
https://www.aliyun.com/jiaocheng/820688.html
written by:黄文岳
今天的文章基于Spring Cloud搭建分布式配置中心分享到此就结束了,感谢您的阅读,如果确实帮到您,您可以动动手指转发给其他人。
版权声明:本文内容由互联网用户自发贡献,该文观点仅代表作者本人。本站仅提供信息存储空间服务,不拥有所有权,不承担相关法律责任。如发现本站有涉嫌侵权/违法违规的内容, 请发送邮件至 举报,一经查实,本站将立刻删除。
如需转载请保留出处:https://bianchenghao.cn/32115.html


