上次可视化系列说了瀑布图。它可以用于展示拥有相同的X轴变量数据(如相同的时间序列)、不同的Y轴离散型变量(如不同的类别变量)和Z轴数值变量。
本节使用的峰峦图也可以很好地展示瀑布图的数据信息。它们对于可视化随时间或空间分布的变化非常有用。本节主要使用ggridges包中的geom_density_ridges()进行绘制峰峦图。详细介绍如下:
1.数据结构
这里使用base包中的diamonds数据集做例子。
# library
library(ggridges) # Ridgeline Plots in 'ggplot2', CRAN v0.5.2
library(ggplot2) # Create Elegant Data Visualisations Using the Grammar of Graphics, CRAN v3.3.2
head(diamonds)
2.绘图教程
2.1基础版本
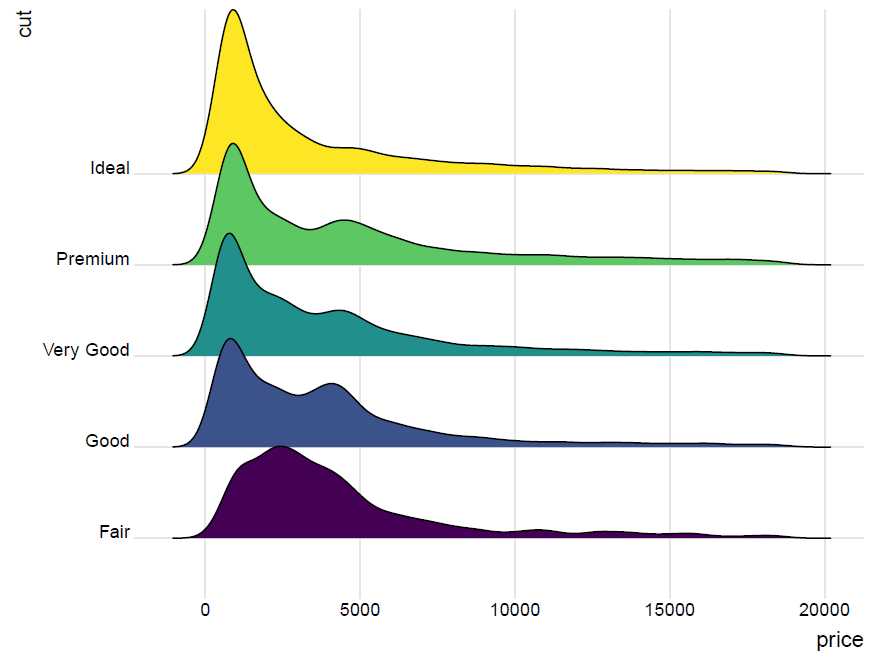
使用price作为x轴, cut为y轴,fill参数也是设定为cut。geom_density_ridges()内部全部使用默认参数,并使用了gridges包中theme_ridges()主题。
ggplot(diamonds, aes(x = price, y = cut, fill = cut)) +
	geom_density_ridges() +
	theme_ridges() +
	theme(legend.position = "none")
2.2形状变化
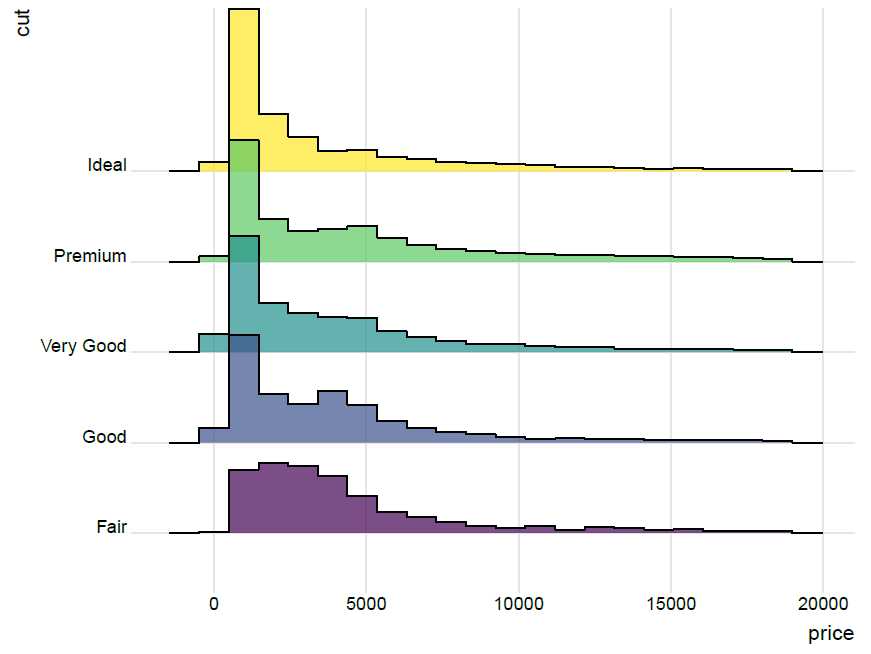
如果不想绘制密度图,则可以使用stat="binline", bins=20绘制柱形图,其中bins=20表示每格格子大小。为了防止上下图片重叠,这里使用了透明度参数:alpha=0.7。
ggplot(diamonds, aes(x = price, y = cut, fill = cut)) +
	geom_density_ridges(alpha=0.7, stat="binline", bins=20) +
	theme_ridges() +
	theme(legend.position = "none")
2.3根据第三变量进行分面
可以使用facet_wrap()进行分面处理。
ggplot(diamonds, aes(x = price, y = cut,fill = cut)) +
	geom_density_ridges(alpha=0.7) +
	facet_wrap(~color) +
  theme_ridges() +
	theme(legend.position = "none")
在这里插入图片描述
2.4加入统计量
设置选项quantile_lines = TRUE,可以使stat_density_ridges计算指示分位数的线的位置。 默认情况下,绘制了三行,分别对应于第一,第二和第三四分位数:
ggplot(diamonds, aes(x = price, y = cut,fill = cut)) +
	geom_density_ridges(alpha=0.7,quantile_lines = TRUE) +
  theme_ridges() +
	theme(legend.position = "none")
注意:
quantiles=2意味着在两个分位数之间的边界上有一条线(即中位数)。
我们还可以通过切点而不是数字来指定分位数。例如,我们可以指出2.5%和97.5%(quantiles = c(0.025, 0.975))。
ggplot(diamonds, aes(x = price, y = cut,fill = cut)) +
	geom_density_ridges(alpha=0.7,quantile_lines = TRUE,quantiles = c(0.025, 0.975)) +
  theme_ridges() +
	theme(legend.position = "none")
使用stat_density_ridges,计算stat(quantile),通过分位数进行着色。 注意,仅当calc_ecdf = TRUE时才能计算。
ggplot(diamonds, aes(x = price, y = cut,fill = factor(stat(quantile)))) +
	stat_density_ridges(
	  geom = "density_ridges_gradient",
	  calc_ecdf = TRUE,
    quantiles = 4, quantile_lines = TRUE) +
  theme_ridges() +
  scale_fill_viridis_d(name = "Quartiles")
我们可以使用相同的方法来突出分布的尾部。
ggplot(diamonds, aes(x = price, y = cut,fill = factor(stat(quantile)))) +
	stat_density_ridges(
	  geom = "density_ridges_gradient",
	  calc_ecdf = TRUE,
    quantiles = c(0.025, 0.975)) +
  theme_ridges() +
    scale_fill_manual(
    name = "Probability", values = c("#FF0000A0", "#A0A0A0A0", "#0000FFA0"),
    labels = c("(0, 0.025]", "(0.025, 0.975]", "(0.975, 1]")
  )
最后,当calc_ecdf = TRUE时,我们还可以计算stat(ecdf),它表示该分布的经验累积密度函数。 我们将其概率直接映射到颜色上。
ggplot(diamonds, aes(x = price, y = cut,fill = 0.5 - abs(0.5 - stat(ecdf)))) +
	stat_density_ridges(geom = "density_ridges_gradient", calc_ecdf = TRUE) +
  scale_fill_viridis_c(name = "Tail probability", direction = -1)
2.5加入抖动点
stat_density_ridges()还提供了可视化生成分布的原始数据点的选项。可以通过设置jittered_points = TRUE实现。为了简单起见,我们这里使用iris数据集。
ggplot(iris, aes(x = Sepal.Length, y = Species)) +
  geom_density_ridges(jittered_points = TRUE)+
	theme_ridges() +
	theme(legend.position = "none")
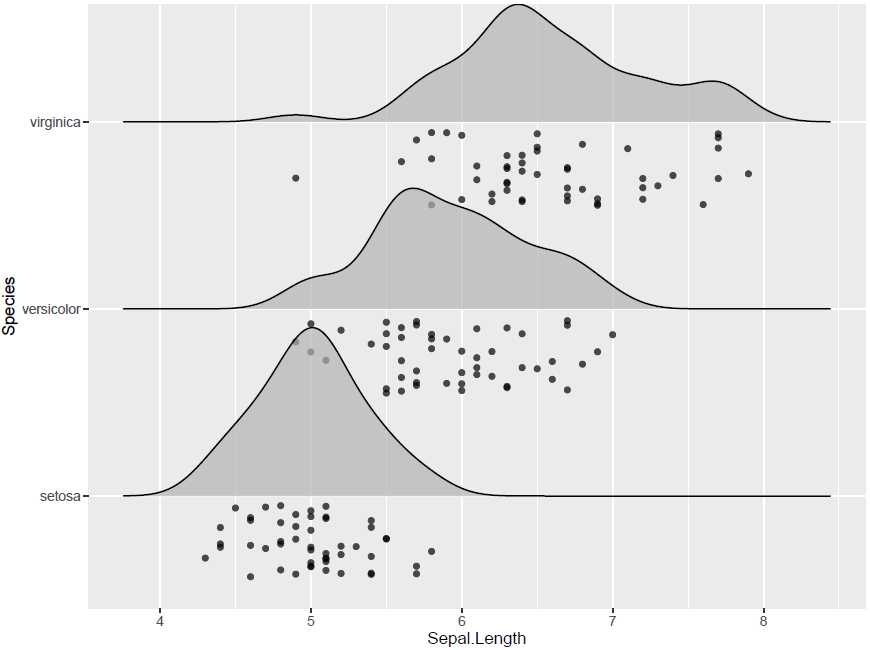
当然可以将其放在密度函数的下方,通过使用position = "raincloud"参数。
ggplot(iris, aes(x = Sepal.Length, y = Species)) +
  geom_density_ridges(
    jittered_points = TRUE, position = "raincloud",
    alpha = 0.7, scale = 0.9
  )
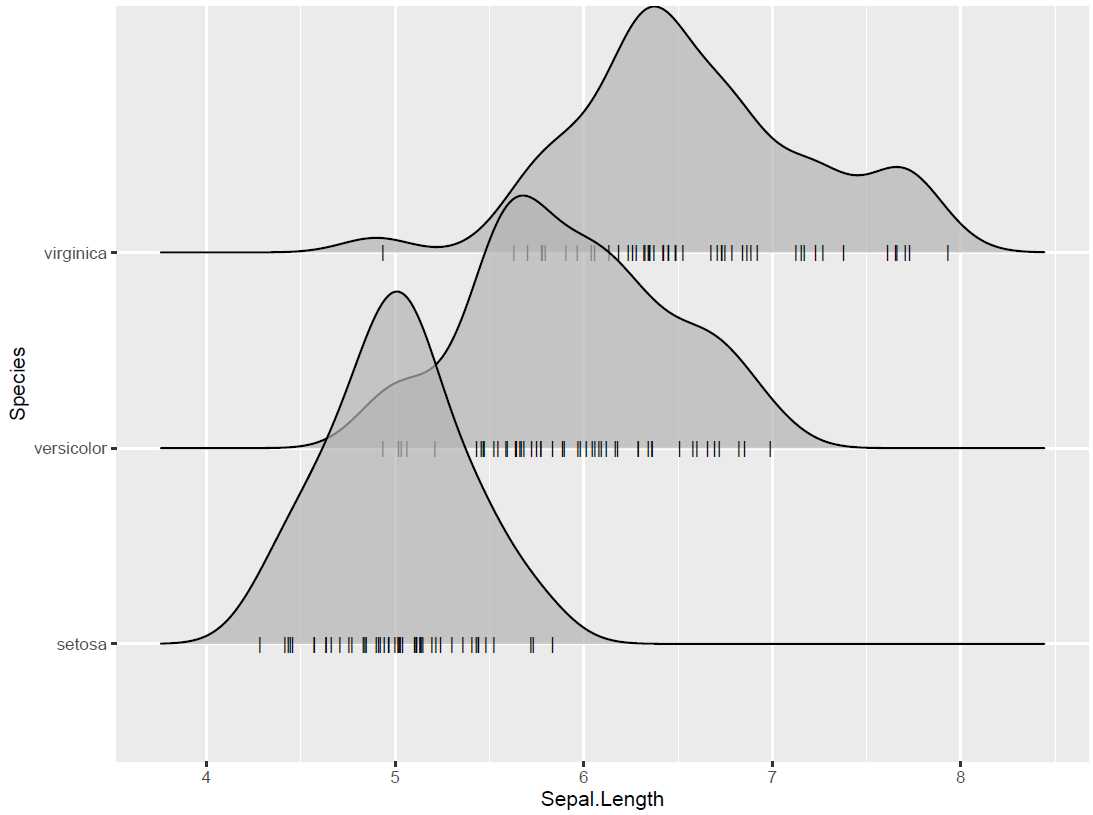
我们还可以模拟地毯形式:
ggplot(iris, aes(x = Sepal.Length, y = Species)) +
  geom_density_ridges(
    jittered_points = TRUE,
    position = position_points_jitter(width = 0.05, height = 0),
    point_shape = '|', point_size = 3, point_alpha = 1, alpha = 0.7,
  )
可以使用ggridges提供的特殊比例来设置抖动点的样式。 scale_discrete_manual()可用于制作具有任意形状和比例的图形。
ggplot(iris, aes(x = Sepal.Length, y = Species, fill = Species)) +
  geom_density_ridges(
    aes(point_color = Species, point_fill = Species, point_shape = Species),
    alpha = .2, point_alpha = 1, jittered_points = TRUE
  ) +
  scale_point_color_hue(l = 40) +
  scale_discrete_manual(aesthetics = "point_shape", values = c(21, 22, 23))
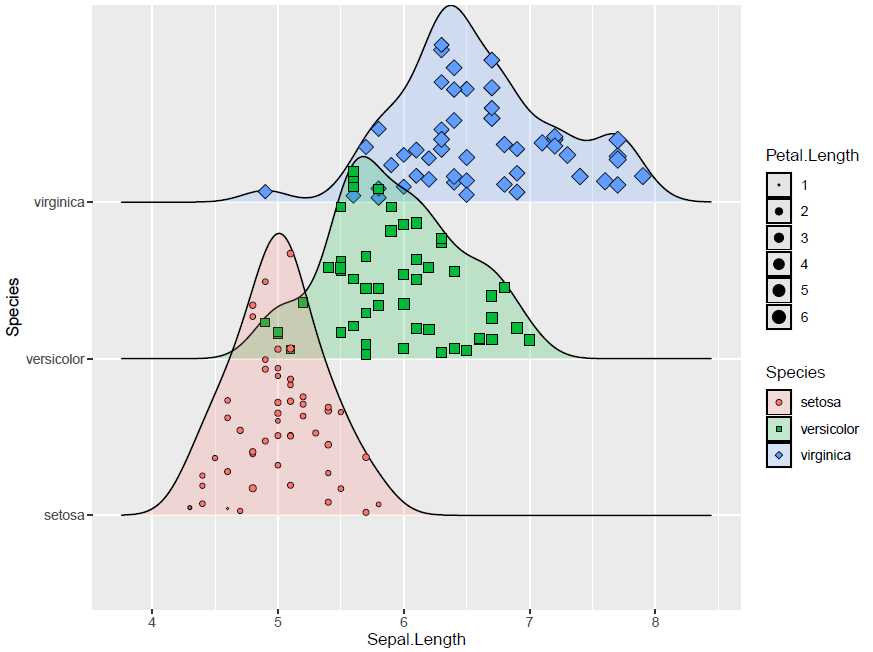
如果你还想再加入一个变量进行可视化,可以在geom_density_ridges()加入。
ggplot(iris, aes(x = Sepal.Length, y = Species, fill = Species)) +
  geom_density_ridges(
    aes(point_shape = Species, point_fill = Species, point_size = Petal.Length),
    alpha = .2, point_alpha = 1, jittered_points = TRUE
  ) +
  scale_point_color_hue(l = 40) + scale_point_size_continuous(range = c(0.5, 4)) +
  scale_discrete_manual(aesthetics = "point_shape", values = c(21, 22, 23))
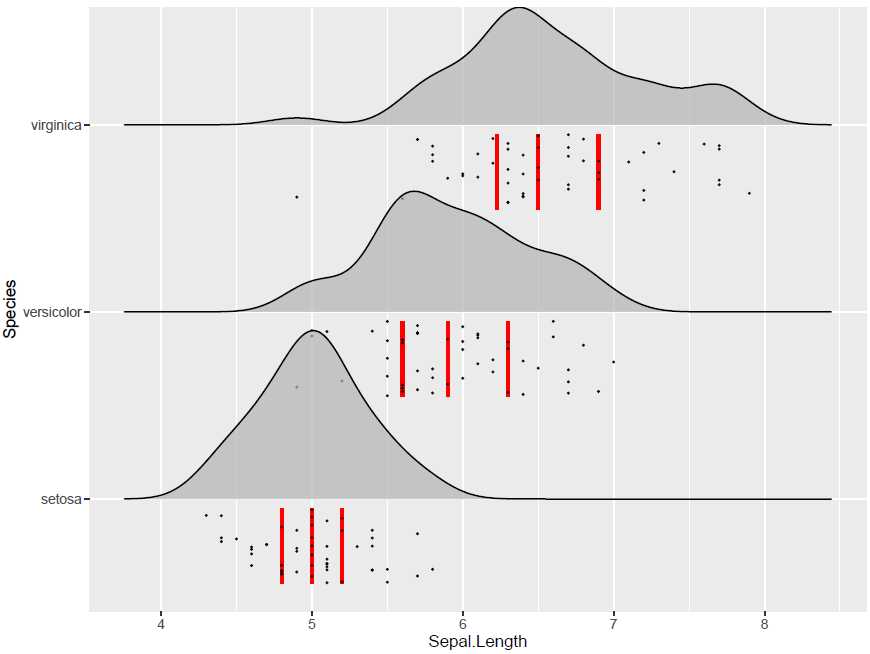
另外一种有趣的可视化是通过vline_xxx构造以下图形。
ggplot(iris, aes(x = Sepal.Length, y = Species)) +
  geom_density_ridges(
    jittered_points = TRUE, quantile_lines = TRUE, scale = 0.9, alpha = 0.7,
    vline_size = 1, vline_color = "red",
    point_size = 0.4, point_alpha = 1,
    position = position_raincloud(adjust_vlines = TRUE)
  )
其他资料
对于该包的其他有趣函数与可视化可参考以下资料:
-
Introduction to ggridges
-
RDocumentation-ggridges
-
Basic ridgeline plot
今天的文章山脉骨架图_GG Multicolor系列肩背包「建议收藏」分享到此就结束了,感谢您的阅读。
版权声明:本文内容由互联网用户自发贡献,该文观点仅代表作者本人。本站仅提供信息存储空间服务,不拥有所有权,不承担相关法律责任。如发现本站有涉嫌侵权/违法违规的内容, 请发送邮件至 举报,一经查实,本站将立刻删除。
如需转载请保留出处:https://bianchenghao.cn/64708.html


