spring项目:
1、pom.xml文件
(1)xml文件被编译
代码中的<include>**/*.properties</include>可以让spring项目中的的properties也被编译,如果写的是 <include>**/*.xml</include>那就是让spring项目中的的xml也被编译。
 <build>
 <resources>

      <resource>
        <directory>src/main/java</directory>
        <!--所在的目录-->
        <includes>
          <!--包括目录下的.properties,.xml 文件都会扫描到-->
          <include>**/*.properties</include>
          <include>**/*.xml</include>
        </includes>
        <filtering>false</filtering>
      </resource>


      <resource>
        <directory>src/main/resources</directory>
        <!--所在的目录-->
        <includes>
          <!--包括目录下的.properties,.xml 文件都会扫描到-->
          <include>**/*.properties</include>
          <include>**/*.xml</include>
        </includes>
        <filtering>false</filtering>
      </resource>

    </resources>
      </build>
2、application.yml配置
(1)端口配置
server:
  port: 8080
(2)mysql配置
spring:
  datasource:
    username:
    password:
    driver-class-name: com.mysql.cj.jdbc.Driver
    url: jdbc:mysql://localhost/byd
(3)日期格式全局配置
spring:
  jackson:
    date-format: yyyy-MM-dd
    time-zone: GMT+8
(4)相同的Bean可以重复注入
spring:
  main:
    allow-bean-definition-overriding: true
3、配置类
(1)开启异步请求
@Configuration
@EnableAsync
@Slf4j
public class ExecutorConfig {

    /** 核心线程数(默认线程数) */
    private int corePoolSize = 10;
    /** 最大线程数 */
    private int maxPoolSize = 20;
    /** 允许线程空闲时间(单位:默认为秒) */
    private static final int keepAliveTime = 60;
    /** 缓冲队列大小 */
    private int queueCapacity = 10;

    @Bean
    public Executor asyncServiceExecutor(){
        log.info("start asyncServiceExecutor");
        ThreadPoolTaskExecutor executor=new ThreadPoolTaskExecutor();
        //配置核心线程数
        executor.setCorePoolSize(corePoolSize);
        //配置最大线程数
        executor.setMaxPoolSize(maxPoolSize);
        //配置空闲时间
        executor.setKeepAliveSeconds(keepAliveTime);
        //配置队列大小
        executor.setQueueCapacity(queueCapacity);
        //配置线程前缀名
        executor.setThreadNamePrefix("async-service-");

        // rejection-policy:当pool已经达到max size的时候,如何处理新任务
        // CALLER_RUNS:不在新线程中执行任务,而是有调用者所在的线程来执行
        executor.setRejectedExecutionHandler(new ThreadPoolExecutor.CallerRunsPolicy());

        //执行初始化
        executor.initialize();
        return executor;
    }
}
写在需要异步方法上的注解
@Async("asyncServiceExecutor")
(2)开启跨域支持
@Configuration
public class CorsConfig implements WebMvcConfigurer {
    // 设置跨域
    @Override
    public void addCorsMappings(CorsRegistry registry) {
        // 设置允许跨域的路径
        registry.addMapping("/**")
                // 设置允许跨域请求的域名
                .allowedOriginPatterns("*")
                // 设置是否允许cookie
                .allowCredentials(true)
                // 设置允许的请求的方式
                .allowedMethods("GET","POST","DELETE","PUT")
                // 设置允许的header的属性
                .allowedHeaders("*")
                // 设置允许时间
                .maxAge(3600);
    }
}
(3)开启全局异常处理
1、全局异常处理器
@RestControllerAdvice
public class MyExceptionHandler extends RuntimeException{

    //@ExceptionHandler用于设置当前处理器类对应的异常类型
    @ExceptionHandler(SystemException.class)
    public Result doSystemException(SystemException ex){
        //记录日志
        //发送消息给运维
        //发送邮件给开发人员,ex对象发送给开发人员
        return new Result(ex.getCode(),null,ex.getMessage());
    }
    @ExceptionHandler(BusinessException.class)
    public Result doBusinessException(BusinessException ex){
        return new Result(ex.getCode(),null,ex.getMessage());
    }
    //除了自定义的异常处理器,保留对Exception类型的异常处理,用于处理非预期的异常
    @ExceptionHandler(Exception.class)
    public Result doOtherException(Exception ex){
        //记录日志
        //发送消息给运维
        //发送邮件给开发人员,ex对象发送给开发人员
        return new Result(Code.SYSTEM_UNKNOW_ERR,null,"系统繁忙,请稍后再试!");
    }


}
2、其它自定义异常
业务异常
public class BusinessException extends RuntimeException{
    private Integer code;
    public Integer getCode() {
        return code;
    }
    public void setCode(Integer code) {
        this.code = code;
    }
    public BusinessException(Integer code, String message) {
        super(message);
        this.code = code;
    }
    public BusinessException(Integer code, String message, Throwable cause) {
        super(message, cause);
        this.code = code;
    }
}
系统异常
public class SystemException extends RuntimeException{
    private Integer code;
    public Integer getCode() {
        return code;
    }
    public void setCode(Integer code) {
        this.code = code;
    }
    public SystemException(Integer code, String message) {
        super(message);
        this.code = code;
    }
    public SystemException(Integer code, String message, Throwable cause) {
        super(message, cause);
        this.code = code;
    }
}
reids项目:
1、redis.conf
(1)连接配置
# 允许访问的地址,默认是127.0.0.1,会导致只能在本地访问。修改为0.0.0.0则可以在任意IP访问,生产环境不要设置为0.0.0.0  第75行
bind 0.0.0.0
# 守护进程,修改为yes后即可后台运行   第257行
daemonize yes
# 监听的端口
port 6379
# 工作目录,默认是当前目录,也就是运行redis-server时的命令,日志、持久化等文件会保存在这个目录
dir .
# 数据库数量,设置为1,代表只使用1个库,默认有16个库,编号0~15
databases 1
# 设置redis能够使用的最大内存
maxmemory 512mb
# 日志文件,默认为空,不记录日志,可以指定日志文件名
logfile "redis.log"
(2)RDB持久化配置
# 是否压缩 ,建议不开启,压缩也会消耗cpu,磁盘的话不值钱
# 360 行
rdbcompression yes
# RDB文件名称
dbfilename dump.rdb
# 文件保存的路径目录
dir ./
(3)AOF持久化配置
# 是否开启AOF功能,默认是no
# 1251 行
appendonly yes
# AOF文件的名称
appendfilename "appendonly.aof"
# 表示每执行一次写命令,立即记录到AOF文件
appendfsync always
# 写命令执行完先放入AOF缓冲区,然后表示每隔1秒将缓冲区数据写到AOF文件,是默认方案
appendfsync everysec
# 写命令执行完先放入AOF缓冲区,由操作系统决定何时将缓冲区内容写回磁盘
appendfsync no
# AOF文件比上次文件 增长超过多少百分比则触发重写
auto-aof-rewrite-percentage 100
# AOF文件体积最小多大以上才触发重写
auto-aof-rewrite-min-size 64mb
2、application.yml配置
(1)java连接redis
该配置的作用是使java和redis可以连接,主要配置了redis的地址和端口。
spring:
  # 配置连接redis的主机地址、端口
  redis:
    host: 127.0.0.1
    port: 6379
(2)java连接redis 哨兵
spring:
  redis:
    sentinel:
      master: mymaster
      nodes:
        - 192.168.60.129:27001
        - 192.168.60.129:27002
        - 192.168.60.129:27003
3、配置类
(1)序列化配置
该配置类的作用是让redis中键和值的序列化保持不一致。因为redis中默认键和值的序列化方式是一致的,要么是字符串序列化,要么是对象序列化。但是实际开发中键的数据类型往往是字符串,而值的数据类型往往是对象,因此要在这里配置,使键和值的序列化方式分离避免出现序列化失误的情况。
package com.woniu.config;
import org.springframework.context.annotation.Bean;
import org.springframework.context.annotation.Configuration;
import org.springframework.data.redis.connection.RedisConnectionFactory;
import org.springframework.data.redis.core.RedisTemplate;
import org.springframework.data.redis.serializer.GenericJackson2JsonRedisSerializer;
import org.springframework.data.redis.serializer.StringRedisSerializer;

/**
 * @author vampire
 * @date 2022-05-26
 * @desc
 */
@Configuration
public class RedisConfig {
    /**
     * 给RedisTemplate配置序列化工具
     *
     */
    @Bean
    public RedisTemplate  redisTemplate(RedisConnectionFactory redisConnectionFactory){

        RedisTemplate redisTemplate = new RedisTemplate();

        redisTemplate.setConnectionFactory(redisConnectionFactory);


        //设置key的序列化
        StringRedisSerializer stringRedisSerializer = new StringRedisSerializer();
        redisTemplate.setKeySerializer(stringRedisSerializer);

        //设置value的序列化
        GenericJackson2JsonRedisSerializer genericJackson2JsonRedisSerializer = new GenericJackson2JsonRedisSerializer();

        // Jackson2JsonRedisSerializer 这个完成序列化操作
        // 不能把 序列化字符串 转成 java 对象
        redisTemplate.setValueSerializer(genericJackson2JsonRedisSerializer);

        // hash类型key的序列化方式
        redisTemplate.setHashKeySerializer(stringRedisSerializer);
        // hash类型value的序列化方式
        redisTemplate.setHashValueSerializer(genericJackson2JsonRedisSerializer);

        return redisTemplate;
    }
}
(2)读写分离配置
该类写在RedisConfig 这个配置类中,配置redis的读写分离,其中包括了四种读写策:(1)MASTER:从主节点读取。(2)MASTER_PREFERRED:优先从master节点读取,master不可用才读取replica。(3)REPLICA:从slave(replica)节点读取。(4)REPLICA _PREFERRED:优先从slave(replica)节点读取,所有的slave都不可用才读取master。
@Bean
public LettuceClientConfigurationBuilderCustomizer clientConfigurationBuilderCustomizer(){
    return clientConfigurationBuilder -> clientConfigurationBuilder.readFrom(ReadFrom.REPLICA_PREFERRED);
}
3、访问分片集群
(1)读写分离配置
@Bean
public LettuceClientConfigurationBuilderCustomizer clientConfigurationBuilderCustomizer(){
        return clientConfigurationBuilder -> clientConfigurationBuilder.readFrom(ReadFrom.REPLICA_PREFERRED);
}
(2)application.yml配置
spring:
  redis:
    cluster:
      nodes:
        - 192.168.60.129:7001
        - 192.168.60.129:7002
        - 192.168.60.129:7003
        - 192.168.60.129:8001
        - 192.168.60.129:8002
        - 192.168.60.129:8003
Shiro项目:
1、配置类
package com.woniu.config;
import com.woniu.realm.MyRealm;
import org.apache.shiro.authc.credential.CredentialsMatcher;
import org.apache.shiro.authc.credential.HashedCredentialsMatcher;
import org.apache.shiro.mgt.SecurityManager;
import org.apache.shiro.spring.security.interceptor.AuthorizationAttributeSourceAdvisor;
import org.apache.shiro.spring.web.ShiroFilterFactoryBean;
import org.apache.shiro.web.mgt.DefaultWebSecurityManager;
import org.springframework.aop.framework.autoproxy.DefaultAdvisorAutoProxyCreator;
import org.springframework.context.annotation.Bean;
import org.springframework.context.annotation.Configuration;
import java.util.HashMap;

/**
 * @author vampire
 * @date 2022-05-16
 * @desc
 */
@Configuration
public class ShiroConfig {

    //进行加密的设置
    @Bean
    public CredentialsMatcher credentialsMatcher(){
        HashedCredentialsMatcher matcher = new HashedCredentialsMatcher();
        // 指定加密算法
        matcher.setHashAlgorithmName("md5");
        // 迭代次数
        matcher.setHashIterations(3);
        return matcher;
    }

    // 新建MyRealm对象的方法
    @Bean
    public MyRealm createMyRealm(CredentialsMatcher credentialsMatcher){

        MyRealm myRealm = new MyRealm();
        myRealm.setCredentialsMatcher(credentialsMatcher);

        return myRealm;
    }

    // 新建SecurityManager对象
    @Bean
    public SecurityManager createSecurityManager(MyRealm myRealm){

        DefaultWebSecurityManager dwsm = new DefaultWebSecurityManager();
        dwsm.setRealm(myRealm);

        return dwsm;
    }

    // 往容器中丢入过滤器
    @Bean
    public ShiroFilterFactoryBean createShiroFilterFactoryBean(SecurityManager securityManager){

        // 新建ShiroFilterFactoryBean对象
        ShiroFilterFactoryBean sffb = new ShiroFilterFactoryBean();
        sffb.setSecurityManager(securityManager);

        HashMap<String, String> map = new HashMap<>();

        // 设置登录页面
        sffb.setLoginUrl("/login.html");

        // 开放资源
        // 1、开发静态资源
        map.put("/css/**","anon");
        map.put("/img/**","anon");
        map.put("/js/**","anon");
        map.put("/pages/**","anon");
        map.put("/plugins/**","anon");
        map.put("/test/**","anon");

        // 2、放行登录方法
        map.put("/psychological_evaluation/big_and_animal.html","anon");
        map.put("/loginServe","anon");
        map.put("/userServe","anon");
        map.put("/roleServe","anon");
        map.put("/container","anon");


        // 将所有资源封闭,除了放行的
        map.put("/**","authc");


        // 将规则放入控制器中
        sffb.setFilterChainDefinitionMap(map);


        return sffb;
    }


    /**
     * 4、开启权限校验注解支持
     *
     * aop 的实现 2个方式
     *
     * jdk
     *
     * Aspect
     *
     */
    //5.1 开启Aop自动代理
    @Bean
    public DefaultAdvisorAutoProxyCreator defaultAdvisorAutoProxyCreator(){
        DefaultAdvisorAutoProxyCreator proxy =
                new DefaultAdvisorAutoProxyCreator();
        // 设置true表示使用子类代理
        proxy.setProxyTargetClass(true);
        return proxy;
    }

    //5.2 匹配所有加了权限注解的方法,让权限校验注解生效。注入SecurityManager
    @Bean
    public AuthorizationAttributeSourceAdvisor advisor(SecurityManager securityManager){
        AuthorizationAttributeSourceAdvisor advisor =
                new AuthorizationAttributeSourceAdvisor();
        advisor.setSecurityManager(securityManager);
        return advisor;
    }


}
2、自定义realm
package com.woniu.realm;

import com.baomidou.mybatisplus.core.conditions.query.QueryWrapper;
import com.woniu.bean.Permission;
import com.woniu.bean.RolePermission;
import com.woniu.bean.User;
import com.woniu.bean.UserRole;
import com.woniu.mapper.UserMapper;
import com.woniu.service.IPermissionService;
import com.woniu.service.IRolePermissionService;
import com.woniu.service.IUserRoleService;
import com.woniu.service.IUserService;
import lombok.extern.slf4j.Slf4j;
import org.apache.shiro.authc.AuthenticationException;
import org.apache.shiro.authc.AuthenticationInfo;
import org.apache.shiro.authc.AuthenticationToken;
import org.apache.shiro.authc.SimpleAuthenticationInfo;
import org.apache.shiro.authz.AuthorizationInfo;
import org.apache.shiro.authz.SimpleAuthorizationInfo;
import org.apache.shiro.realm.AuthorizingRealm;
import org.apache.shiro.subject.PrincipalCollection;
import org.apache.shiro.util.ByteSource;
import org.springframework.beans.factory.annotation.Autowired;
import org.springframework.context.annotation.Lazy;

import java.util.List;

/**
 * @author vampire
 * @date 2022-05-16
 * @desc
 */
@Slf4j
public class MyRealm extends AuthorizingRealm {

    @Lazy
    @Autowired
    IUserService userService;

    @Lazy
    @Autowired
    IUserRoleService userRoleService;

    @Lazy
    @Autowired
    IPermissionService permissionService;

    @Lazy
    @Autowired
    IRolePermissionService rolePermissionService;

    @Autowired
    UserMapper userMapper;

    @Override
    protected AuthorizationInfo doGetAuthorizationInfo(PrincipalCollection principalCollection) {

        // 拿到User,并拿到uid
        User user = (User) principalCollection.getPrimaryPrincipal();
        Integer uid = user.getUid();

        // 拿到rids
        QueryWrapper<UserRole> qw = new QueryWrapper<>();
        qw.eq("uid",uid);
        qw.select("rid");
        List<Object> rids = userRoleService.listObjs(qw);

        // 拿到pids
        QueryWrapper<RolePermission> rolePermissionWQ = new QueryWrapper<>();
        rolePermissionWQ.in("rid",rids);
        rolePermissionWQ.select("pid");
        List<Object> pids = rolePermissionService.listObjs(rolePermissionWQ);


        // 拿到对应的Permission
        QueryWrapper<Permission> permissionWQ = new QueryWrapper<>();
        permissionWQ.in("pid",pids);
        List<Permission> permissions = permissionService.list(permissionWQ);

        //为权限对象添加字符串许可
        SimpleAuthorizationInfo info = new SimpleAuthorizationInfo();

        for (Permission permission : permissions) {
            info.addStringPermission(permission.getPcode());
        }

        return info;
    }


    @Override
    protected AuthenticationInfo doGetAuthenticationInfo(AuthenticationToken authenticationToken) throws AuthenticationException {

        // 拿到前端发送的用户名,authenticationToken是一个Token因此可以拿到用户名
        String username = (String)authenticationToken.getPrincipal();
        System.out.println("username = " + username);

        // 新建查询语句
        QueryWrapper<User> qw = new QueryWrapper();
        qw.eq("username",username);


        // 进行查询
        User user = userMapper.selectOne(qw);
        // 拿到盐并进行转换
        String salt = user.getSalt();
        ByteSource bytes = ByteSource.Util.bytes(salt);

        // 把数据库中的数据打包到SimpleAuthenticationInfo当中去
        AuthenticationInfo info = new SimpleAuthenticationInfo(
                user,
                user.getPassword(),
                bytes,
                getName()

        );


        return info;
    }


}
Nginx项目:
nginx主要修改的配置文件是nginx.conf,nginx的三大主要功能是反向代理、负载均衡和动静分离三个方面,因此我从这三个方面对项目配置文件进行介绍。
1、反向代理
(1)单服务器
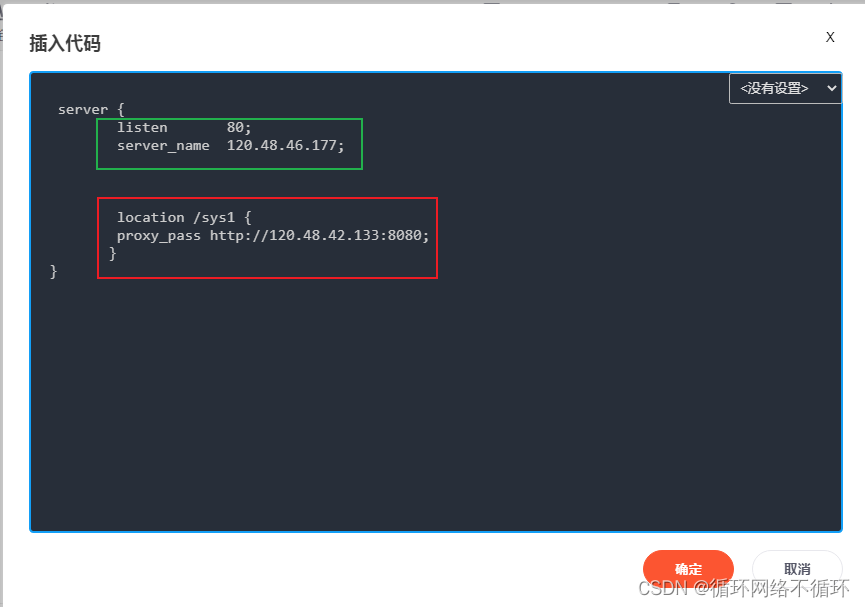
nginx.conf配置类最主要修改的地方主要有两个,下图绿色框标记的地方是配置nginx主机的地址和端口。而红色框的位置配置的是要反向代理的服务器的位置。
 server {
        listen       80;
        server_name  120.22.22.177;


        location /sys1 {
        proxy_pass http://120.22.22.133:8080;
       }
}
(2)多服务器
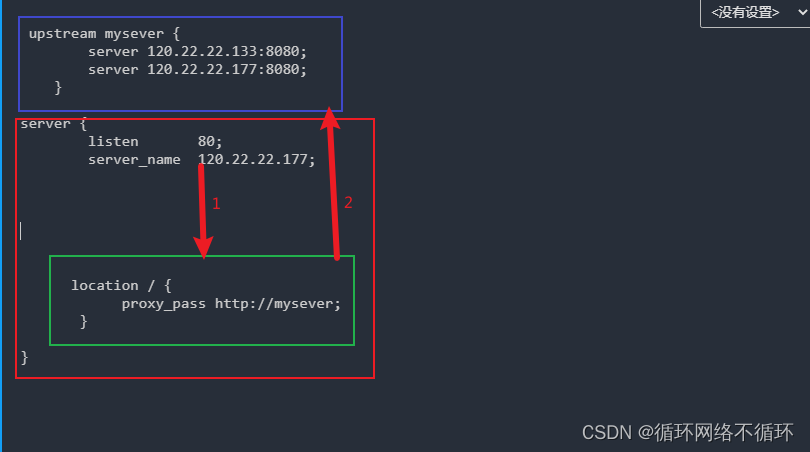
多服务器配置与单服务器略有不同。被代理的服务器写在外部,即下图红框外部。并用绿框的代码代替外部红框的代码。当外部有请求时,会先找到nginx的地址,之后再找到被代理服务器的位置,寻找顺序如下图所示。
 upstream mysever {
	    server 120.22.22.133:8080;
	    server 120.22.22.177:8080;
	}

server {
        listen       80;
        server_name  120.22.22.177;


      location / {
	        proxy_pass http://mysever;
       }

}
2、负载均衡
(1)轮巡
 upstream mysever {
	    server 120.22.22.133:8080;
	    server 120.22.22.177:8080;
	}

server {
        listen       80;
        server_name  120.22.22.177;


      location / {
	        proxy_pass http://mysever;
       }

}
(2)权重
weight权重,默认为1,权重越高被分配的客户端越多。指定轮询几率,weight和访问比率成正比,用于后端服务器性能不均的情况。
 upstream mysever {
	    server 120.22.22.133:8080 weight=1;
	    server 120.22.22.177:8080 weight=2;
	}

server {
        listen       80;
        server_name  120.22.22.177;


      location / {
	        proxy_pass http://mysever;
       }

}
(3)哈希
每个请求按访问ip的hash结果分配,这样每个访客固定访问一个后端服务器,可以解决session的问题。
 upstream mysever {
    ip_hash;
	    server 120.22.22.133:8080 weight=1;
	    server 120.22.22.177:8080 weight=2;
	}

server {
        listen       80;
        server_name  120.22.22.177;


      location / {
	        proxy_pass http://mysever;
       }

}
(4)第三方
fair(第三方): 在 Nginx 中使用 fair 模块(第三方)来实现负载均衡,fair 采用的不是内建负载均衡使用的轮换的均衡算法,而是可以根据页面大小、响应时间智能的进行负载均衡。按后端服务器的响应时间来分配请求,响应时间短的优先分配。
upstream mysever {
    fair;
    server 192.168.12.136:8080;
    server 192.168.12.136:8081;
}

nginx-upstream-fair-master.zip
3、动静分离
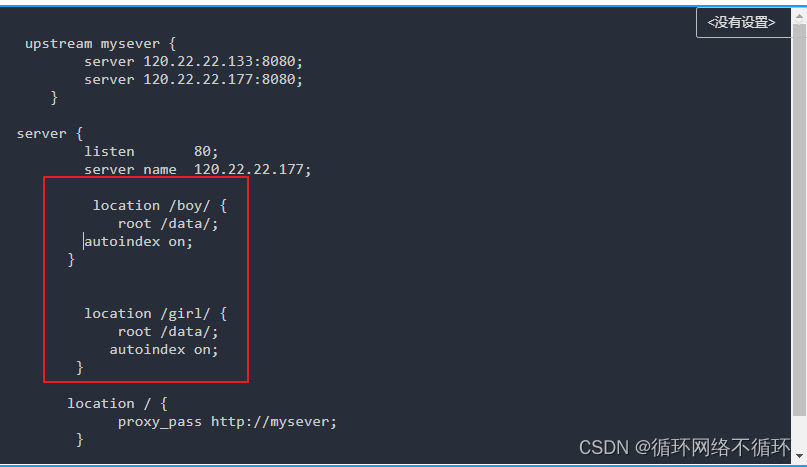
红框的位置配置 nginx内部服务器的位置
 upstream mysever {
	    server 120.22.22.133:8080;
	    server 120.22.22.177:8080;
	}

server {
        listen       80;
        server_name  120.22.22.177;


      location / {
	        proxy_pass http://mysever;
       }

}
docker 项目
1、Dockerfile 文件
FROM centos:7
MAINTAINER he <scott@woniu.cn>
RUN yum install -y vim
WORKDIR /usr
CMD /bin/bash
mybatis-plus项目
1、自动代码生成器
(1)运行类
该类写在启动类的文件夹下。
public class AutoGenerator {
    public static void main(String[] args) {
        FastAutoGenerator.create(
                "jdbc:mysql://localhost/byd",
                "1234",
                "1234")
                // 全局配置
                .globalConfig(builder -> {
                    builder.author("vampire") // 设置作者
                            .enableSwagger() // 开启 swagger 模式
                            .outputDir("D:\\code\\java\\smart_sys_baidu\\src\\main\\java"); // 指定输出目录
                })
                // 包配置
                .packageConfig(builder -> {
                    builder.parent("com.woniu") // 设置父包名
                            .controller("controller") //controller
                            .service("service")       //service
                            .serviceImpl("service.impl")
                            .mapper("mapper")
                            .xml("mapper")
                            .entity("bean");
                })
                //表的配置
                .strategyConfig(builder -> {
                    builder.addInclude("comprehensive"); // 设置需要生成的表名
                })
                .templateEngine(new FreemarkerTemplateEngine()) // 使用Freemarker引擎模板,默认的是Velocity引擎模板
                .execute();
        System.out.println("成功了...");
    }
}
(2)maven依赖
不添加此依赖会报错。
 <dependency>
   <groupId>org.freemarker</groupId>
   <artifactId>freemarker</artifactId>
   <version>2.3.28</version>
</dependency>
2、日志配置
写在pom.xml文件中作为日志的配置。
mybatis-plus:
  configuration:
    log-impl: org.apache.ibatis.logging.stdout.StdOutImpl
3、常用注解
(1)逻辑删除注解
@TableLogic(2)日期格式化注解
@JsonFormat(pattern = "yyyy:MM:dd HH:mm:ss", timezone = "GMT+8")(3)配置主键
@TableId(value = "id", type = IdType.AUTO)
ElasticSearch项目
1、配置类
该配置类保证了java可以连接ES并进行操作。
package com.hk.hotel.config;

import org.apache.http.HttpHost;
import org.elasticsearch.client.RestClient;
import org.elasticsearch.client.RestHighLevelClient;
import org.springframework.context.annotation.Bean;
import org.springframework.context.annotation.Configuration;


@Configuration
public class EsConfig {

    @Bean
    public RestHighLevelClient restHighLevelClient(){
        return  new RestHighLevelClient(RestClient.builder(
                HttpHost.create("http://120.22.22.177:9200")
        ));
    }

}
JWT项目:
1、依赖
<dependency>
     <groupId>com.auth0</groupId>
     <artifactId>java-jwt</artifactId>
     <version>3.10.3</version>
</dependency>
2、工具类
public class JwtTokenUtils {
    // 携带token的请求头名字
    public final static String TOKEN_HEADER = "Authorization";
    //token的前缀
    public final static String TOKEN_PREFIX = "Bearer ";
    // 默认密钥
    public final static String DEFAULT_SECRET = "abcdefghijklmnoqprstuvwxyz";
    // 一分钟
    public final static long ONE_MINUTES = 60 * 1000;
    // token有效期 30 分钟
    public final static long TOKEN_EXPIRATION = 1 * ONE_MINUTES;
    // 具体加密的算法
    private static final  Algorithm algorithm = Algorithm.HMAC256(DEFAULT_SECRET);
    // json解析 对象
    private static ObjectMapper objectMapper = new ObjectMapper();
    /**
     *  登录用户
     *
     * @return
     */
    public static String createToken(User user) throws JsonProcessingException {
        // 2:创建token
        Map<String, Object> headerClaims = new HashMap<>();
        // 类型 zip
        headerClaims.put("typ", "JWT");
        return JWT.create()
                // 放进去的目的,方便你获取用户信息,避免查询,最后是去掉,
                // 后续可能会根据id去查询数据,实时的获取用户信息
                .withClaim("token", objectMapper.writeValueAsString(user))
                .withHeader(headerClaims)
                // 放一份在主题里
                .withSubject(user.getId() + "")
                // 签发token作者
                .withIssuer(user.getUserName())
                //设置签发时间:iat
                .withIssuedAt(generateCurrentDate())
                //设置过期时间:exp,必须要大于签发时间
                .withExpiresAt(generateExpirationDate())
                //签名信息,采用secret作为私钥
                .sign(algorithm);
    }
    /**
     * 检验token是否正确
     * @param token
     * @return
     */
    public static User parseToken(String token) throws JsonProcessingException {
        String tokenInfo = getJWTFromToken(token).getClaim("token").asString();
        return objectMapper.readValue(tokenInfo, User.class);
    }
    /**
     * 验证是否token过期
     *
     * @param token
     * @return
     */
    public static boolean isverfiy(String token) {
        try {
            JWTVerifier verifier = JWT.require(algorithm).build();
            // 如果token失效了,verify就会出现异常
            verifier.verify(token);
            return true;
        } catch (Exception ex) {
            return false;
        }
    }
    /**
     * 拿到 jwt存储的数据
     * @param token
     * @return
     */
    public static DecodedJWT getJWTFromToken(String token) {
        DecodedJWT jwt;
        try {
            JWTVerifier verifier = JWT.require(algorithm).build();
            jwt = verifier.verify(token);
            return jwt;
        } catch (Exception ex) {
            jwt = null;
            log.info("token is expired....");
        }
        return jwt;
    }
    /**
     * 从请求头中获取token
     *
     * @param request
     * @return
     */
    public static String getJwtToken(HttpServletRequest request) {
        // 如果cookie中没有,就去header里面获取
        String header = request.getHeader(TOKEN_HEADER);
        if (header == null || !header.startsWith(TOKEN_PREFIX)) {
            log.info("请求头不含JWT token, 调用下个过滤器");
            return null;
        }
        //去掉token prefix
        String token = header.split(" ")[1].trim();
        return token;
    }
    /**
     * 当前时间
     *
     * @return
     */
    private static Date generateCurrentDate() {
        return new Date();
    }
    /**
     * 过期时间
     *
     * @return
     */
    private static Date generateExpirationDate() {
        return new Date(new Date().getTime() + TOKEN_EXPIRATION);
    }
}
注意事项: public final static String TOKEN_PREFIX = “Bearer “;这句代码中Bearer后面是有空格的,这是官方文档让我们这么写的,大家不要忘记了token前缀后面要加一个空格。
3、配置类(拦截器)
(1)拦截器定义
public class JwtInterceptor implements HandlerInterceptor {
    /**
     * 拦截器 拦截的方法
     *
     * 01  如果 结果为true     放行 会执行 controller 的对应方法
     * 01  如果 结果为false    不放行  不会执行 controller
     *
     *
     *
     * @param request
     * @param response
     * @param handler
     * @return
     * @throws Exception
     */
    @Override
    public boolean preHandle(HttpServletRequest request, HttpServletResponse response, Object handler) throws Exception {
        // 每次请求 会携带token
        //通过 request 来获取
        String token = JwtTokenUtils.getJwtToken(request);
        if (token == null) {
            throw new Exception("判断toten 是否存在...");
        }
        //isverfiy=false代表过期
        boolean isverfiy = JwtTokenUtils.isverfiy(token);
        if(!isverfiy){
            throw new Exception("判断是否过期...");
        }
        return true;
    }
    @Override
    public void postHandle(HttpServletRequest request, HttpServletResponse response, Object handler, ModelAndView modelAndView) throws Exception {
    }
    @Override
    public void afterCompletion(HttpServletRequest request, HttpServletResponse response, Object handler, Exception ex) throws Exception {
    }
}
(2)拦截器注册
@Configuration
public class WebMvcConfiguration implements WebMvcConfigurer {
    // 注册
    @Bean
    public JwtInterceptor jwtInterceptor() {
        return new JwtInterceptor();
    }
    @Override
    public void addInterceptors(InterceptorRegistry registry) {
        // 给jwt指定拦截规则 未来以/api/开头的资源接口全部要token鉴权
        registry.addInterceptor(jwtInterceptor()).addPathPatterns("/api/**");
    }
}今天的文章java项目中常用配置与使用说明怎么写_java可以做什么项目分享到此就结束了,感谢您的阅读。
版权声明:本文内容由互联网用户自发贡献,该文观点仅代表作者本人。本站仅提供信息存储空间服务,不拥有所有权,不承担相关法律责任。如发现本站有涉嫌侵权/违法违规的内容, 请发送邮件至 举报,一经查实,本站将立刻删除。
如需转载请保留出处:https://bianchenghao.cn/83773.html


