Route-Map:功能性非常强的策略列表,可以用来过滤路由也可以调整路由的属性,自身具备过滤功能。
Route-Map的作用:
1.在重发布的过程中做route-map,重发布过程中可以改变路由的属性;(次要作用)
例如希望在路由被注入RIP后,192.168.1.0路由的metric为1,2.0的metric为2如此这般呢?传统的重发布是没办法做到的。 那么就可以使用route-map这个工具,也就是说,我们可以在执行重发布的时候,关联一个route-map,来实现刚才的这个功能。
2.NAT(网络地址转换); (次要作用)
3.PBR 策略路由;(次要作用)
4.BGP(基于属性的路由选路) ;(主要作用)
应用在重分布,接口( PBR), BGP。
Route-map用在重分布中,
Route-Map的逻辑语句:
利用 ACL 抓取路由条目,
Access-list 1 permit 12.1.1.1 0.0.0.0(路由条目)
配置 route-map
route-map test permit/deny 10 ( 创建route-map 名字为test 允许或拒绝序号为10
match x1(ip address access-list 1)
match x2,x3
set Y
route-map test permit/deny 20
match x4
set Y
应用 route-map,
Router ospf 100
Redistribute rip subnets route-map test
注意:
1.Route-Map末尾隐含拒绝所有,所以最后要写允许所有的语句;
Route-map test permit 20
代表允许所有。
2.如果没有set语句的话,set nothing(什么都不做);
3.如果没有match语句的话,match all(匹配所有);
4.在重发布过程中使用Route-Map,切记在使用ACL或Prefix-List抓取路由的时候只能使用permit,策略的制定执行由Route-Map完成。
1.Match语句,匹配的作用,自上而下的匹配顺序;
匹配动作将会从最小的序列号开始执行,如果该序列号中的条件都被匹配了则执行set命令,如果条件不匹配,则切换到下一个序列号继续进行匹配动作。
2.Set语句,执行的作用;
set tag 99 打标99
set type 1
Set metric1 度量值1
setmetric-typetype-1 (设置OSPF 的开销类型、分为类型1(type-1和类型2(type-2。类型1的计算方法是外部开销(即重发布路由时开销)再加上路由器到ASBR的开销,类型2的计算方法是开销=外部开销。
v如下:
A—B—-C
比如C引入一个外部路由到ospf,设定metric为100
默认引入的时候是type2的,这样B计算出的花费就是100,A也是100
如果设置成type1的,B计算的是100+1=101,A计算的是100+2=102。
定义匹配条件
match ip address access-list 1 (prefix-list 1) 匹配访问列表或前缀列表
match length 根据分组的第三层长度进行匹配
match interface 匹配下一跳出接口为指定接口之一的路由
match ip next-hop 匹配下一跳地址为特定访问列表中被允许的那些路由
match metric 匹配具有指定度量值的路由
match route-type 匹配指定类型的路由
match community 匹配BGP共同体
match tag 根据路由的标记进行匹配
定义set动作
set metric 设置路由协议的度量值
set metric-type 设置目标路由协议的度量值类型
set default interface 指定如何发送这样的分组
set interface 指定如何发送这样的分组
set ip default next-hop指定转发的下一跳
set ip next-hop 指定转发的下一跳
set next-hop 指定下一跳的地址,指定BGP的下一跳
set as-path
set community
set local-preference
set weight
set origin
set tag
default 关键字优先级低于明细路由
1.Access-list
Access-lsit 1 permit/deny 12.1.1.0
Router ospf 1
Distribute-list 1
2.Prefix-list
ip prefix-list test permit/deny 12.1.1.0 255.255.255.0
Route-map test permit 10
Match ip address prefix-list test
3.Metric(RIP和OSPF间路由重发布)
Route-map rip2ospf permit 10
Match metric 6
Router ospf 1
Redistribute rip subnets route-map rip2ospf
4.metric(rip和ospf间路由重发布)
Route-map ospf2rip permit 10
Match metric 101
Router rip
redistribute ospf route-map ospf2rip metric 1
5.metric(bgp和ospf间路由重发布)
Route-map bgp2ospf1 permit 10
Match metric 200
Router-map bgp2ospf2 permit 10
Match metric 100
Router ospf 1
Redistribute bgp 1 subnets route-map bgp2ospf1
Router ospf 2
Redistribute bgp 1 subnets route-map bgp2ospf2
6.tag
就是在重发布时给路由打标签
redistribute rip subnet tag 1
意味着把rip重发布进入ospf,然后给所有重发布的rip路由打上tag 为 1 ,做个标记,方便在做策略时整个调用(在抓路由时可以规定抓取所有tag=1 的路由)
Redistribute bgp 1 subnets tag 10
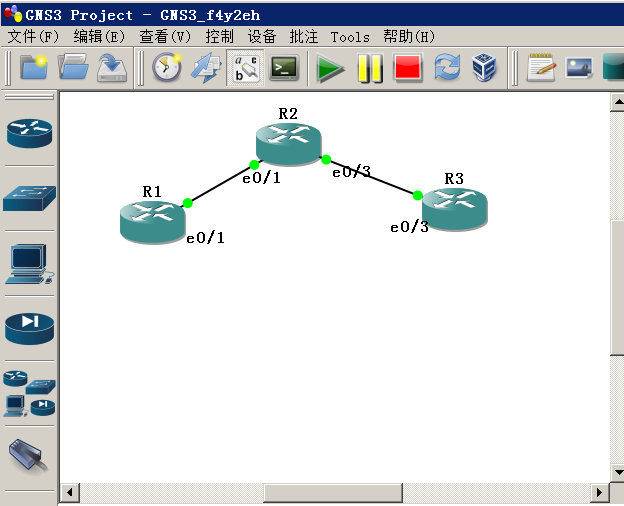
route-map实例:
R1(config)#
interface e 0/1
ip address 12.1.1.1 255.255.255.0
no shutdown
interface lo 0
ip address 1.1.0.1 255.255.255.0
interface lo 1
ip address 1.1.1.1 255.255.255.0
interface lo 2
ip address 1.1.2.1 255.255.255.0
interface lo 3
ip address 1.1.3.1 255.255.255.0
router rip
version 2
network 12.1.1.0
network 1.1.0.0
network 1.1.1.0
network 1.1.2.0
network 1.1.3.0
no auto-summary
R2(config)#
interface e 0/1
ip address 12.1.1.2 255.255.255.0
no shutdown
interface e 0/3
ip address 23.1.1.2 255.255.255.0
no shutdown
router rip
version 2
network 12.1.1.0
no auto-summary
interface e 0/3
router ospf 100
router-id 2.2.2.2
network 23.1.1.0 0.0.0.255 area 1
R3(config)#
interface e 0/3
ip address 23.1.1.3 255.255.255.0
no shutdown
router ospf 100
router-id 3.3.3.3
network 23.1.1.0 0.0.0.255 area 1
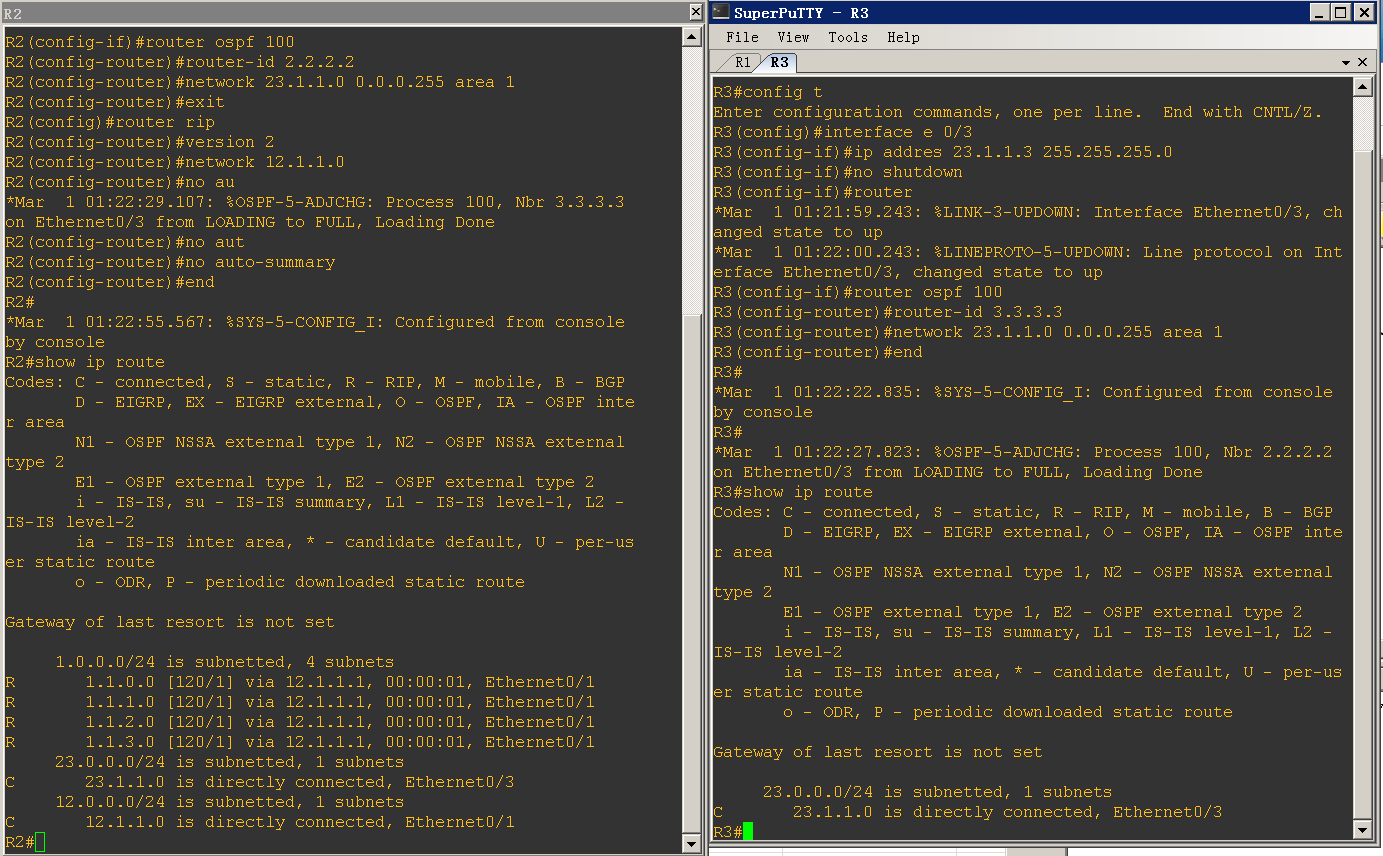
查看R2、R3 路由图
show ip route
发现R3 并没有R1 的路由信息
现在通过在R2 重发布把RIP 信息发布到OSPF 里面、并且调用 route-map定制的好的控制列表、使得R3 有规则的仿问R1 。
R2(config)#
1.抓取路由条目:
ip prefix-list permit0 permit 1.1.0.0/24
命名为permit0前缀列表允许1.1.0.0/24网段通过
ip prefix-list permit1 permit 1.1.1.0/24
ip prefix-list permit2 permit 1.1.2.0/24
ip prefix-list permit3 permit 1.1.3.0/24
access-list 1 permit 12.1.1.0 0.0.0.255
访问控制列表1 允许12.1.1.0网段通过
2.制定Route-Map:
route-map rip2ospf deny 10
( 创建route-map 名字为rip2ospf 拒绝 序号为10
match ip address prefix-list permit0
(匹配 permit0名的前缀列表
route-map rip2ospf permit 20
match ip address prefix-list permit1
set metric-type type-1
(设置OSPF 的开销类型为类型1
route-map rip2ospf permit 30
match ip address prefix-list permit2
set metric 200
(设置度量值200
route-map rip2ospf permit 40
match ip address prefix-list permit3
set tag 333
(打标333
route-map rip2ospf permit 50
match ip address 1
set tag 111
3.重发布过程中调用Route-Map:
exit
router ospf 100
redistribute rip subnets route-map rip2ospf
(把rip重发布到ospf中、发布过程中调用<rip2ospf名的>Route-Map
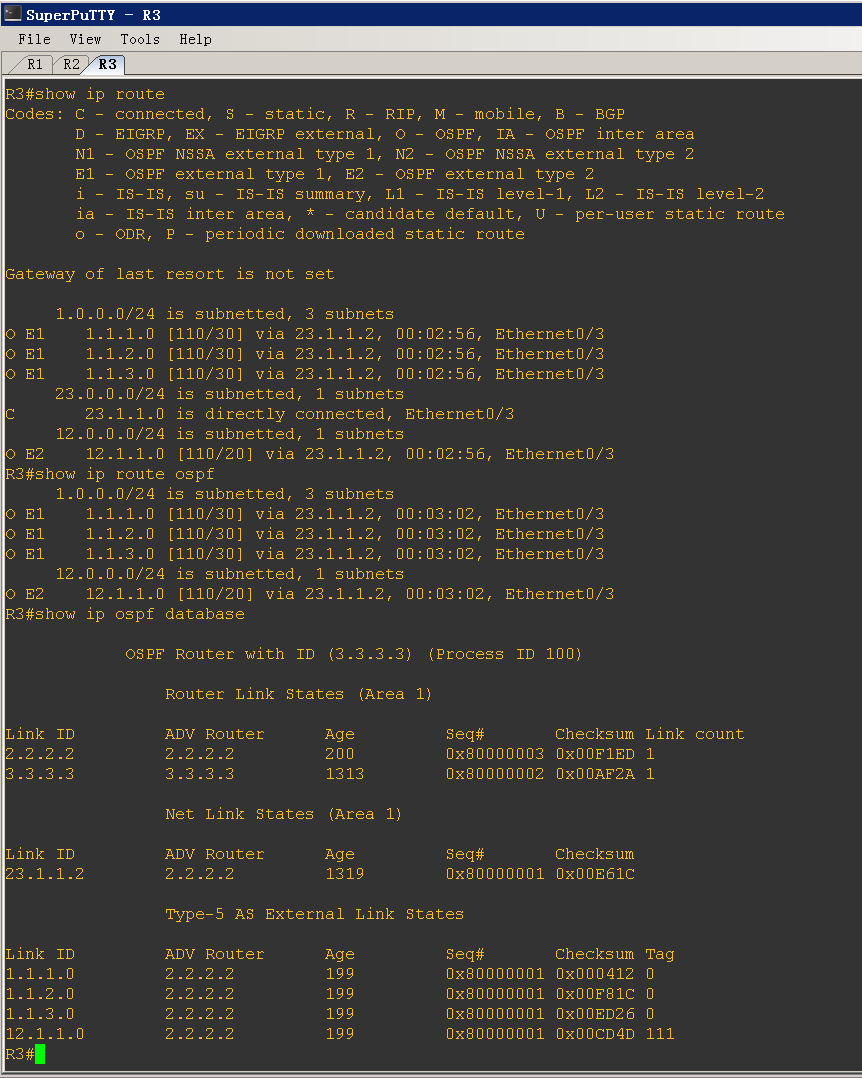
查看R3 路由表。
         show ip route
         show ip route ospf
         show ip  ospf database
]
今天的文章route-map的详解和使用分享到此就结束了,感谢您的阅读。
版权声明:本文内容由互联网用户自发贡献,该文观点仅代表作者本人。本站仅提供信息存储空间服务,不拥有所有权,不承担相关法律责任。如发现本站有涉嫌侵权/违法违规的内容, 请发送邮件至 举报,一经查实,本站将立刻删除。
如需转载请保留出处:https://bianchenghao.cn/8535.html


