一、js的特效
1、offset含义:offset的含义是偏移量,使用offset的相关属性可以动态地获取该元素的位置、大小等。
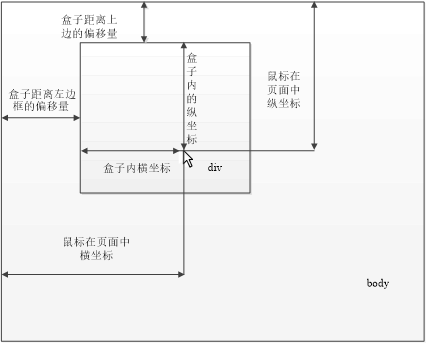
offsetLeft:相对于父元素左边框的偏移量
offsetTop:相对于父元素上边框的偏移量
offsetWidth:返回元素自身的宽度(padding、边框、内容区域),不带单位
offsetHeight:返回元素自身的高度(padding、边框、内容区域),不带单位
offsetParent:返回元素的父元素
(1)通过offset获取鼠标的位置
案例实现:获取鼠标在盒子内的坐标位置的值。
<style>
    #box{
        position: absolute;
        left: 50px;
        top: 20px;
        width: 200px;
        height: 200px;
        background-color: thistle;
    }
</style>
<body>
    <div id="box"></div>
    <script>
        var box = document.querySelector('#box')
        //1、输出 盒子的宽度和 高度
        console.log("宽度:",box.offsetWidth);
        console.log("高度:",box.offsetHeight);
        //2、给box绑定 鼠标移动的事件
        box.addEventListener('mousemove',function(e){
            //2.1获取box的左右上下偏移量
            var left = box.offsetLeft;
            var top = box.offsetTop;
            // console.log("偏移量:",left,top);
            //2.2计算鼠标指针在box中的坐标
            var x = e.pageX - left;
            var y = e.pageY - top;
            console.log("x的坐标:"+x+",y的坐标:",+y)
        })
    </script>
</body>(2)【案例】模态框拖曳效果
<style>
    /*单击弹出遮罩层的样式*/
    .login-header{
        width: 100%;
        text-align: center;
        font-size: 20pt;
        position: absolute;
        cursor: pointer;
    }
    /*模态对话框的样式*/
    .modal{
        width: 500px;
        height: 200px;
        position: absolute;
        left: 50%;
        top: 50%;
        transform: translate(-50%,-50%);
        display: none;
        box-shadow: 0px 0px 20px #ddd;
        z-index: 999;
        cursor: move;
    }
    /*表单结构*/
    .modal form{
        display: flex;
        flex-direction: column;
        width: 100%;
        height: 100%;
    }
    /*表单标题*/
    .modal form .item1{
        flex: 1;
        display: flex;
        justify-content: center;
        align-items: center;
        font-weight: bold;
    }
    .modal form .item2{
        margin: 0 auto;
        width: 70%;
        display: flex;
        flex: 1;
        flex-direction: column;
        justify-content: space-around;
        align-items: center;
    }
    .username{
        margin-left: 16px;
    }
    .vip{
        border: 1px solid #ccc;
        border-radius: 20px;
        padding: 3px 40px;
        background-color: orange;
        color: #fff;
    }
    /*关闭按钮样式*/
    .close{
        position: absolute;
        right: -10px;
        top: -10px;
        border: 1px solid #ccc;
        width: 20px;
        height: 20px;
        text-align: center;
        line-height: 17px;
        border-radius: 50%;
        background-color: #fff;
    }
    /*遮罩层样式*/
    .login-bg{
        position: absolute;
        left: 0;
        top: 0;
        width: 100%;
        height: 100%;
        background-color: #ccc;
        display: none;
    }
    </style>
<body>
    <div class="login-bg"></div>
    <!--模态对话框-->
    <div class="modal">
        <form >
            <div class="item1">登陆会员</div>
            <div class="item2">
                <div class="username">
                    <label for="">
                        用户名:
                        <input type="text" name="username">
                    </label>
                </div>
                <div class="password">
                    <label for="">
                        登录密码:<input type="text" name="password">
                    </label>
                </div>
            </div>
            <div class="item1">
                <div class="vip">登录会员</div>
                <div>
                    <!---->
                    <div class="close">X</div>

                </div>
            </div>
        </form>
    </div>
    <!--单击,弹出登录窗口-->
    <div class="login-header">单击,登录会员...</div>
    <script>
        //1.获取对象元素
        var modal = document.querySelector('.modal');
        var close = document.querySelector('.close');
        var login = document.querySelector('.login-header');
        var bg = document.querySelector('.login-bg');
        //2.单击遮罩层注册click事件
        login.addEventListener('click',function(){
            modal.style.display = 'block';
            bg.style.display = 'block';
            modal.style.backgroundColor = 'white';
        });
        //3.关闭模态对话框,给close注册click事件
        close.addEventListener('click',function(){
            modal.style.display = 'none';
            bg.style.display = 'none';
        });
        //4.给modal注册mousedown事件
        modal.addEventListener('mousedown',function(e){
            //4.1获取鼠标按下 时,鼠标指针在模态框中的坐标
            var x = e.pageX - modal.offsetLeft;
            var y = e.pageY - modal.offsetTop;
            //4.2 定义移动的函数
            var move = function(){
                modal.style.left = e.pageX - x + 'px';
                modal.style.top = e.pageY - y + 'px';
            }
            //4.3给文档对象注册鼠标移动事件(mousemove)
            document.addEventListener('mousemove',move);
            //4.4给文档对象注册鼠标弹起事件(mouseup)
            document.addEventListener('mouseup',function(){
                document.addEventListener('mousemove',move)
            });
        });

    </script>
</body>
模态对话框:必须进行响应的对话框,否则不能进行其他操作
非模态对话框:不响应对话框,也可以进行其他操作
【案例】放大镜效果
<style>
...(省略图片预览区)
 /* 放大镜 */
  .mask {
    display: none;width: 200px;height:200px;
  background-color: red;opacity: 0.5;position: absolute;
  }
  ...(省略大图片外部区域样式代码)
</style>
<script>
  // 获取元素对象
  var mask = document.querySelector('.mask');
  var preview = document.querySelector('.preview_img');
  var big = document.querySelector('.big');
  var bigIMg = document.querySelector('.bigIMg');
...(省略了事件逻辑代码)
</script>
2、client系列:client中文意思是客户端,通过使用client系列的相关属性可以获取元素可视区的相关信息。
clientLeft:返回元素左边框的大小
clientTop:返回元素上边框的大小
clientWidth:返回元素自身的宽度(padding、内容的宽度),不带单位
clientHeight:返回元素自身的高度(padding、内容的宽度),不带单位
获取元素client代码实现
<div>我是内容...</div>
<style>...(省略了样式代码)</style>
<script>
  var div = document.querySelector('div');
  console.log(div.clientHeight);console.log(div.clientTop);
  console.log(div.clientLeft);
</script>
3、scroll含义:scroll的含义是滚动,使用scroll系列的相关属性可以动态地获取该元素的滚动距离、大小等。
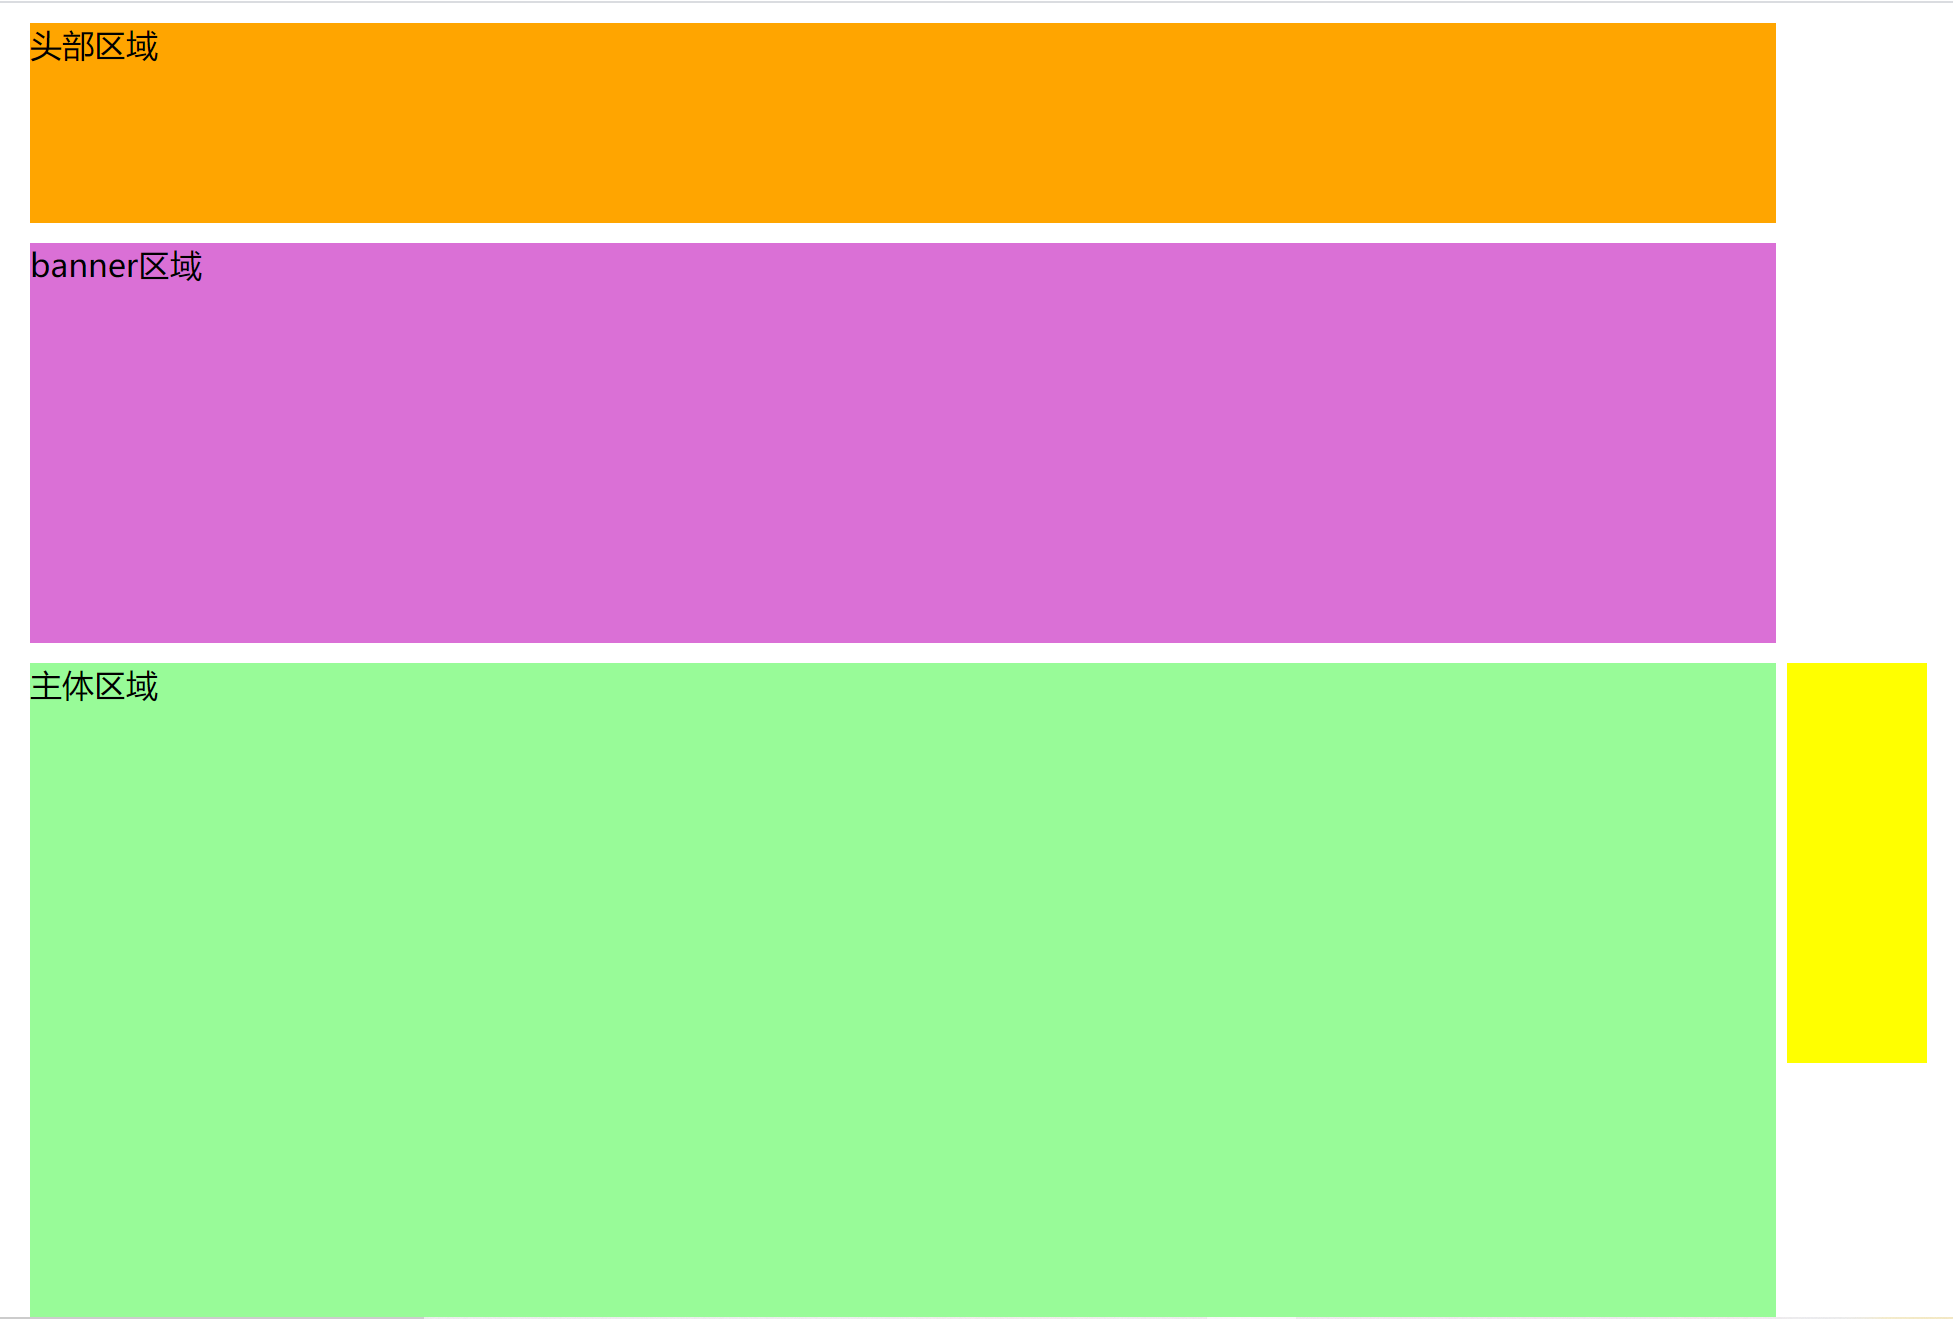
【案例】固定侧边栏效果
<style>
    .w{
        width: 70%;
        margin: 0 auto;
        margin-top: 10px;
    }
    .header{
        height: 100px;
        background-color: orange;
    }
    .banner{
        height: 200px;
        background-color: orchid;
    }
    .main{
        height:1300px ;
        background-color: palegreen;
    }
    .slider-bar{
        height: 200px;
        width: 70px;
        background-color: yellow;
        position: absolute;
        left: 85%;
        top: 330px;
    }
    .goback{
        display: none;
        position: absolute;
        bottom: 0;
    }
</style>
<body>
    <div class="header w">头部区域</div>
    <div class="banner w">banner区域</div>
    <div class="main w">主体区域</div>
    <div class="slider-bar">
        <span class="goback">返回顶部</span>
    </div>
    <script>
        //1.获取元素
        var header = document.querySelector('.header')
        var banner = document.querySelector('.banner')
        var slider = document.querySelector('.slider-bar')
        var goback = document.querySelector('.goback')
        //2.给goback注册click事件
        goback.addEventListener('click',function(){
            window.scrollTo(0,0)
        })
        //3.给整个页面绑定 scroll滚动事件
        document.addEventListener('scroll',function(){
            //3.1获取页面左侧和顶部卷去的距离
            slider.style.top = window.pageYOffset;
            if(window.pageYOffset > (header.scrollHeight+banner.scrollHeight + 30)){
                goback.style.display = 'block';
                slider.style.position = 'fixed';
                slider.style.left = '85%'
                slider.style.top = '0px';
            }else{
                slider.style.position = 'absolute'
                slider.style.left = '85%'
                slider.left.top = (header.scrollHeight+banner.scrollHeight + 30) + 'px';
                goback.style.display = 'none'
            }
        })

    </script>
</body>
今天的文章js的特效分享到此就结束了,感谢您的阅读。
版权声明:本文内容由互联网用户自发贡献,该文观点仅代表作者本人。本站仅提供信息存储空间服务,不拥有所有权,不承担相关法律责任。如发现本站有涉嫌侵权/违法违规的内容, 请发送邮件至 举报,一经查实,本站将立刻删除。
如需转载请保留出处:https://bianchenghao.cn/8575.html


