目录
几个相关的类
WaveFormat
 public class WaveFormat
    {
        /// <summary>format type</summary>
        protected WaveFormatEncoding waveFormatTag;
        /// <summary>number of channels</summary>
        protected short channels;
        /// <summary>sample rate</summary>
        protected int sampleRate;
        /// <summary>for buffer estimation</summary>
        protected int averageBytesPerSecond;
        /// <summary>block size of data</summary>
        protected short blockAlign;
        /// <summary>number of bits per sample of mono data</summary>
        protected short bitsPerSample;
        /// <summary>number of following bytes</summary>
        protected short extraSize;
        //省略属性及函数描述
    }
这个类非常关键,在waveInOpen和waveOutOpen函数中都需要用到这个类。
这个类对应的C++结构为WAVEFORMATEX,定义如下。
C++
typedef struct {
  WORD  wFormatTag;
  WORD  nChannels;
  DWORD nSamplesPerSec;
  DWORD nAvgBytesPerSec;
  WORD  nBlockAlign;
  WORD  wBitsPerSample;
  WORD  cbSize;
} WAVEFORMATEX;
| 参数 | C++数据类型 | Net数据类型 | 说明 |
|---|---|---|---|
| waveFormatTag | WORD | ushort | 格式类型,例如pcm格式、adpcm等 |
| channels | WORD | sort | 通道数量,例如单声道,双声道,多声道 |
| sampleRate | DWORD | int | 采样率,例如8000,16000,44100等。 |
| averageBytesPerSecond | DWORD | int | 平均数据传输率,每秒的字节数 |
| blockAlign | WORD | short | 数据块的大小,特定声音格式下的最小数据单元的大小(字节数),程序每次处理的数据必须是这个大小的倍数。 |
| bitsPerSample | WORD | short | 没采样的位数,这个参数和格式有关,8位、16位、20位或者24位等等。 |
| extraSize | WORD | short | 额外信息的字节数,和格式类型有关。 |
更详细的参数说明,参考WAVEFORMATEX structure
IWavePlayer接口
这个接口,定义了播放相关的类要实现的功能,包括初始化(Init)、打开(Open)、关闭(Close)和暂停(Pause),还包括两个属性(Volume和PlaybackState)和一个播放停止事件(PlaybackStopped)。从下图可以看出,WaveOut、WaveOutEvent都实现本接口。
IWavePosition接口
这个接口只有一个只读属性(WaveFormat OutputWaveFormat)和一个函数(long GetPosition())。GetPosition函数获得已经播放的位置(字节数)。WaveOut和WaveOutEvent实现了本接口。
IWaveProvider接口
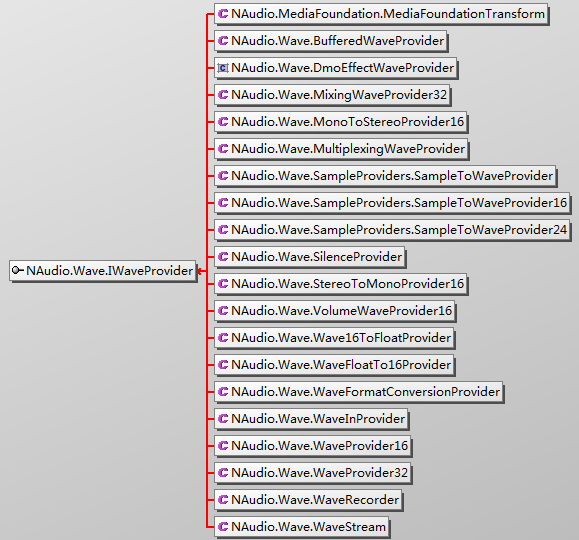
这个接口是所有WaveProvider的通用接口,例如WaveInProvider,
ISampleProvider
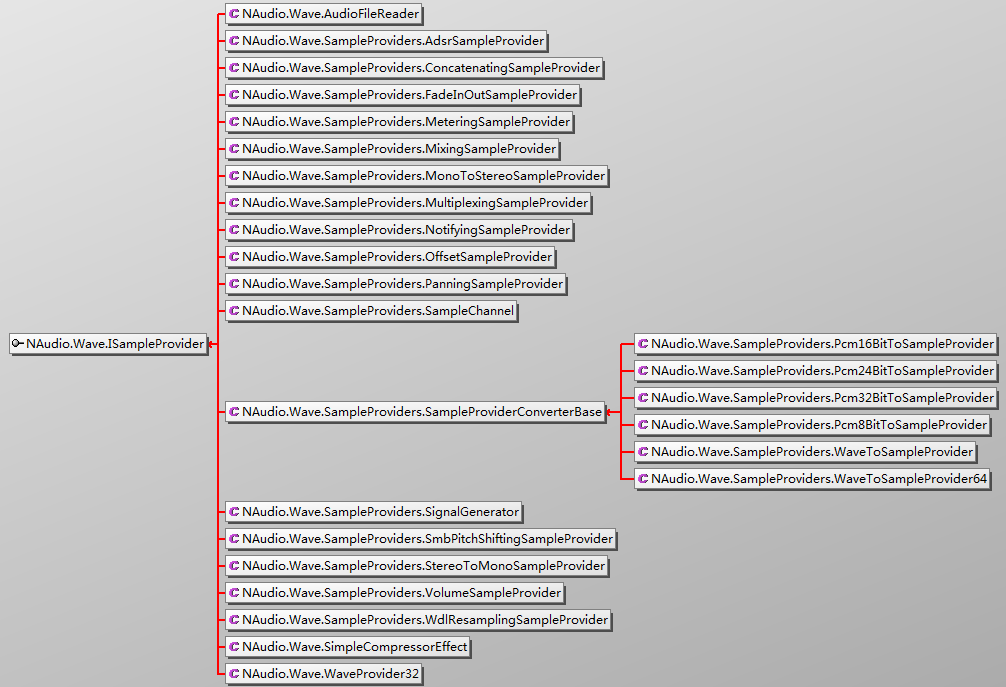
ISampleProvider和IWaveProvider接口从结构上没有任何区别。区别在于Read函数的参数类型。一个缓冲为Int型,一个缓冲为float型。
| 接口 | Read函数 |
|---|---|
| IWaveProvider | int Read(byte[] buffer, int offset, int count); |
| ISampleProvider | int Read(float[] buffer, int offset, int count); |
WaveOutEvent播放文件过程分析
由于WaveOutEvent是WaveOut播放方式的默认方法,因此,首先分析基于本类的播放过程。掌握了本类的播放过程后,其它类的播放过程也就迎刃而解了。
准备声音文件(AudioFileReader )
private AudioFileReader audioFileReader;
audioFileReader = new AudioFileReader(fileName);
AudioFileReader的继承关系如下图所示。
在分析播放过程时,再详细说明本类的功能。
播放类(WaveOutEvent )初始化
只需要给waveOutEvent类在初始化时传入AudioFileReader 对象即可。
private WaveOutEvent waveOutEvent = new WaveOutEvent();
waveOutEvent.Init(audioFileReader);
waveOutEvent.Init()函数说明
细心的读者会看到WaveOutEvent的Init()函数的声明如下。
public void Init(IWaveProvider waveProvider)
里边需要传入IWaveProvider类型的对象,而上面的代码调用中,传入的是AudioFileReader对象,而AudioFileReader实现的是ISampleProvider接口。这有没有问题?
其实NAudio在Init中使用的是扩展方法。
public static class WaveExtensionMethods
{
......
        public static void Init(this IWavePlayer wavePlayer, ISampleProvider sampleProvider, bool convertTo16Bit = false)
        {
            IWaveProvider provider = convertTo16Bit ? (IWaveProvider)new SampleToWaveProvider16(sampleProvider) : new SampleToWaveProvider(sampleProvider);
            wavePlayer.Init(provider);
        }
......
}
从上面的代码可以看出,首先对sampleProvider转换成waveProvider,然后再调用WaveOutEvent的Init方法。
WaveOutEvent.Init()过程分析
为了代码注释说明的方便,下面将代码断开。
        public void Init(IWaveProvider waveProvider)
        {
            if (playbackState != PlaybackState.Stopped)
            {
                throw new InvalidOperationException("Can't re-initialize during playback");
            }
            if (hWaveOut != IntPtr.Zero)
            {
                // normally we don't allow calling Init twice, but as experiment, see if we can clean up and go again
                // try to allow reuse of this waveOut device
                // n.b. risky if Playback thread has not exited
                DisposeBuffers();
                CloseWaveOut();
            }
相关初始化
callbackEvent = new AutoResetEvent(false);
回调事件信号
            waveStream = waveProvider;
            int bufferSize = waveProvider.WaveFormat.ConvertLatencyToByteSize((DesiredLatency + NumberOfBuffers - 1) / NumberOfBuffers);
根据设定的延迟时间,计算缓冲区的大小。
            MmResult result;
            lock (waveOutLock)
            {
                result = WaveInterop.waveOutOpenWindow(out hWaveOut, (IntPtr)DeviceNumber, waveStream.WaveFormat, callbackEvent.SafeWaitHandle.DangerousGetHandle(), IntPtr.Zero, WaveInterop.WaveInOutOpenFlags.CallbackEvent);
            }
调用
winmm.dll的waveOutOpen函数,fdwOpen参数传入的是CallbackEvent标识,因此是事件机制。回调函数并非某个直接的函数,而是AutoResetEvent对象。
根据回调机制,播放中,播放缓冲区有变化时,会触发回调函数,在回调处理过程中,需要给播放缓冲区读入新的数据,但是AutoResetEvent对象显然没法实现读入新数据的能力。那么WaveOutEvent究竟是如何实现这个功能呢?
NAudiio是在播放线程中,根据AutoResetEvent对象的信号量状态读取新的数据
            MmException.Try(result, "waveOutOpen");

            buffers = new WaveOutBuffer[NumberOfBuffers];
            playbackState = PlaybackState.Stopped;
            for (var n = 0; n < NumberOfBuffers; n++)
            {
                buffers[n] = new WaveOutBuffer(hWaveOut, bufferSize, waveStream, waveOutLock);
            }
        }
初始化缓冲区
播放过程
播放过程看起来非常简单:
            waveOutEvent.Play();
            waveOutEvent.Volume = 0.3f;
        public void Play()
        {
            if (buffers == null || waveStream == null)
            {
                throw new InvalidOperationException("Must call Init first");
            }
            if (playbackState == PlaybackState.Stopped)
            {
                playbackState = PlaybackState.Playing;
                callbackEvent.Set(); // give the thread a kick
               ThreadPool.QueueUserWorkItem(state => PlaybackThread(), null);
            }
            else if (playbackState == PlaybackState.Paused)
            {
                Resume();
                callbackEvent.Set(); // give the thread a kick
            }
        }
核心就是这句:ThreadPool.QueueUserWorkItem(state => PlaybackThread(), null);线程函数如下:
        private void PlaybackThread()
        {
            Exception exception = null;
            try
            {
                DoPlayback();
            }
            catch (Exception e)
            {
                exception = e;
            }
            finally
            {
                playbackState = PlaybackState.Stopped;
                // we're exiting our background thread
                RaisePlaybackStoppedEvent(exception);
            }
        }
真正的线程函数如下:
        private void DoPlayback()
        {
            while (playbackState != PlaybackState.Stopped)
            {
                if (!callbackEvent.WaitOne(DesiredLatency))
                {
                    if (playbackState == PlaybackState.Playing)
                    {
                        Debug.WriteLine("WARNING: WaveOutEvent callback event timeout");
                    }
                }


                // requeue any buffers returned to us
                if (playbackState == PlaybackState.Playing)
                {
                    int queued = 0;
                    foreach (var buffer in buffers)
                    {
                        if (buffer.InQueue || buffer.OnDone())
                        {
                            queued++;
                        }
                    }
                    if (queued == 0)
                    {
                        // we got to the end
                        playbackState = PlaybackState.Stopped;
                        callbackEvent.Set();
                    }
                }
            }
        }
核心语句就是if (buffer.InQueue || buffer.OnDone())
先说buffer.OnDone()
        internal bool OnDone()
        {
            int bytes;
            lock (waveStream)
            {
                bytes = waveStream.Read(buffer, 0, buffer.Length);
            }
            if (bytes == 0)
            {
                return false;
            }
            for (int n = bytes; n < buffer.Length; n++)
            {
                buffer[n] = 0;
            }
            WriteToWaveOut();
            return true;
        }
从代码可以看出来,从waveStream中读取数据,waveStream实际指向audioFileReader,因此是执行audioFileReader.Read功能。
最后调用WriteToWaveOut发送到声音设备。
        private void WriteToWaveOut()
        {
            MmResult result;

            lock (waveOutLock)
            {
                result = WaveInterop.waveOutWrite(hWaveOut, header, Marshal.SizeOf(header));
            }
            if (result != MmResult.NoError)
            {
                throw new MmException(result, "waveOutWrite");
            }

            GC.KeepAlive(this);
        }
最终调用winmm.dll库的waveOutWrite函数。
WaveInterop.waveOutWrite(hWaveOut, header, Marshal.SizeOf(header));
播放结束
直接调用WaveOutEvent的Stop方法即可。
        public void Stop()
        {
            if (playbackState != PlaybackState.Stopped)
            {
                // in the call to waveOutReset with function callbacks
                // some drivers will block here until OnDone is called
                // for every buffer
                playbackState = PlaybackState.Stopped; // set this here to avoid a problem with some drivers whereby
                MmResult result;
                lock (waveOutLock)
                {
                    result = WaveInterop.waveOutReset(hWaveOut);
                }
                if (result != MmResult.NoError)
                {
                    throw new MmException(result, "waveOutReset");
                }
                callbackEvent.Set(); // give the thread a kick, make sure we exit
            }
        }
最终调用 winmm.dll库的waveOutReset(hWaveOut)函数。
以上就是播放过程的主体流程分析,读者如果要分析播放缓冲的数据内容,可以再深入分析WaveOutBuffer、SampleChannel及AudioFileReader等相关的类。
今天的文章react native教程_react native教程分享到此就结束了,感谢您的阅读。
版权声明:本文内容由互联网用户自发贡献,该文观点仅代表作者本人。本站仅提供信息存储空间服务,不拥有所有权,不承担相关法律责任。如发现本站有涉嫌侵权/违法违规的内容, 请发送邮件至 举报,一经查实,本站将立刻删除。
如需转载请保留出处:https://bianchenghao.cn/84905.html


