参考:看完就明白/dev/sda、/dev/hda是什么了 – 知乎 (zhihu.com)
在嵌入式开发中有时需要通过SD卡来启动linux系统,ubuntu系统提供了一些工具来进行SD卡的分区和格式化。
系统:Ubuntu 22.04.3 LTS
命令行工具fdisk等
查看磁盘设备文件
首先需要确定SD卡对应的磁盘设备文件,可以通过以下命令查看:
- sudo fdisk -l
white@ubuntu:~$ sudo fdisk -l
Disk /dev/loop0: 349.7 MiB, 366682112 bytes, 716176 sectors
Units: sectors of 1 * 512 = 512 bytes
Sector size (logical/physical): 512 bytes / 512 bytes
I/O size (minimum/optimal): 512 bytes / 512 bytes
...
Device     Boot   Start      End Sectors  Size Id Type
/dev/sdc1          2048  9768959 9766912  4.7G  c W95 FAT32 (LBA)
/dev/sdc2       9768960 19535871 9766912  4.7G 83 Linux
- lsblk
white@ubuntu:~$ lsblk
NAME   MAJ:MIN RM   SIZE RO TYPE MOUNTPOINT
loop0    7:0    0 349.7M  1 loop /snap/gnome-3-38-2004/143
...
sda      8:0    0   150G  0 disk
└─sda1   8:1    0   150G  0 part /
sdc      8:32   1  31.3G  0 disk
├─sdc1   8:33   1   4.7G  0 part /media/white/BOOT
└─sdc2   8:34   1   4.7G  0 part /media/white/ROOTFS
sr0     11:0    1  1024M  0 rom
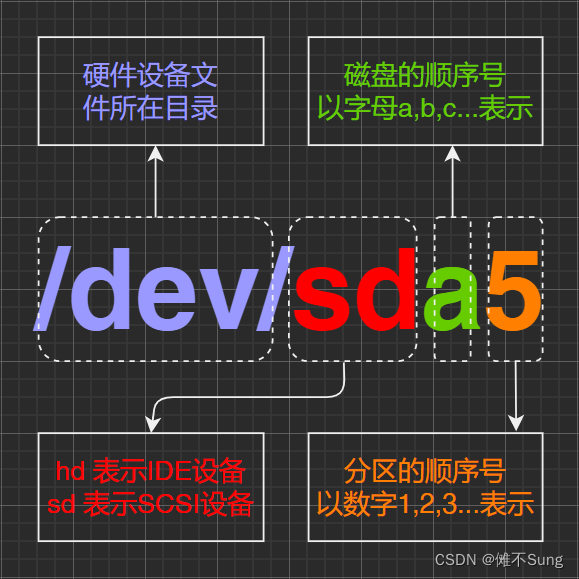
比如上面例子中的的/dev/sdc就是SD卡对应的磁盘设备文件,后面的1、2代表分区。
磁盘是一种计算机的外部存储器设备,主要可以分为以下几类:
- IDE磁盘:价格低廉,兼容性强,性价比高,但是数据传输慢,不支持热插拔等。
- SCSI磁盘:传输速率高,读写性能好,运行稳定,可连接多个设备,支持热插拔,占用CPU低,但是价格相对较贵,一般用于工作站或服务器上。
- SATA磁盘:结构简单、支持热插拔。
Linux中硬盘以及分区等设备均表示为文件,其命名规则如下:
- IDE磁盘的文件名为:/dev/hdxx
- SCSI/SATA/USB磁盘文件名为:/dev/sdxx
在Linux系统中,磁盘设备文件的命名方式通常遵循一定的规则。对于”sd”,这是”SCSI disk”的缩写。尽管最初是为SCSI(Small Computer System Interface)设备设计的,但在Linux中,sd”设备命名约定被广泛用于表示各种类型的块设备,包括SATA(Serial ATA)硬盘、SAS(Serial Attached SCSI)硬盘以及一些其他类型的块设备。因此,”sd”实际上成为了一种通用的、用于表示块设备的前缀,而不仅限于SCSI。
使用fdisk分区
ubuntu下可以使用的命令工具主要有fdisk和parted,这里主要介绍fdisk。
还是以上面的/dev/sdc为例继续介绍,分区前需要取消SD卡的挂载。
white@ubuntu:~$ sudo umount /dev/sdc1
white@ubuntu:~$ sudo umount /dev/sdc2
进入fdisk交互界面:
white@ubuntu:~$ sudo fdisk /dev/sdc

Welcome to fdisk (util-linux 2.31.1).
Changes will remain in memory only, until you decide to write them.
Be careful before using the write command.


Command (m for help):
输入命令p可以查看当前分区信息:
Command (m for help): p
Disk /dev/sdc: 31.3 GiB, 33607909376 bytes, 65640448 sectors
Units: sectors of 1 * 512 = 512 bytes
Sector size (logical/physical): 512 bytes / 512 bytes
I/O size (minimum/optimal): 512 bytes / 512 bytes
Disklabel type: dos
Disk identifier: 0xb839501e

Device     Boot   Start      End Sectors  Size Id Type
/dev/sdc1          2048  9768959 9766912  4.7G  c W95 FAT32 (LBA)
/dev/sdc2       9768960 19535871 9766912  4.7G 83 Linux
输入命令d可以删除已有分区:
Command (m for help): d
Partition number (1,2, default 2):

Partition 2 has been deleted.

Command (m for help): d
Selected partition 1
Partition 1 has been deleted.

Command (m for help): d
No partition is defined yet!
Could not delete partition 94216366571289
输入命令n创建新分区:
Command (m for help): n
Partition type
   p   primary (0 primary, 0 extended, 4 free)
   e   extended (container for logical partitions)
Select (default p):

Using default response p.
Partition number (1-4, default 1):
First sector (2048-65640447, default 2048):
Last sector, +sectors or +size{
   K,M,G,T,P} (2048-65640447, default 65640447): +5000M

Created a new partition 1 of type 'Linux' and of size 4.9 GiB.
Partition #1 contains a vfat signature.

Do you want to remove the signature? [Y]es/[N]o: Y

The signature will be removed by a write command.
- 分区顺序号一般默认就行了。
- 一般只分配1-2个分区的话,默认主分区就行,关于主分区与拓展分区的区别,可以阅读看完就明白/dev/sda、/dev/hda是什么了 – 知乎 (zhihu.com)。
- First sector (2048-65640447, default 2048) 表示默认的分区起始位置(扇区号)是2048号扇区,即1MB(2048×512)大小的位置。
- 这个默认值确保了硬盘上的分区在1MB的边界上对齐,以最大程度地提高性能。
- 这里通过+5000M给1分区分配了5000MB的大小,如果单纯输入数字的话就是扇区数(1扇区包括512字节)。
- 这里删除了已有的分区标签,下面可以重新设置。
输入命令t设置分区标签类型:
Command (m for help): t

Selected partition 1
Hex code (type L to list all codes):
提示可以输入L来查看可以采用的标签码:
Hex code (type L to list all codes): L

 0  Empty           24  NEC DOS         81  Minix / old Lin bf  Solaris
 1  FAT12           27  Hidden NTFS Win 82  Linux swap / So c1  DRDOS/sec (FAT-
 2  XENIX root      39  Plan 9          83  Linux           c4  DRDOS/sec (FAT-
 3  XENIX usr       3c  PartitionMagic  84  OS/2 hidden or  c6  DRDOS/sec (FAT-
 4  FAT16 <32M      40  Venix 80286     85  Linux extended  c7  Syrinx
 5  Extended        41  PPC PReP Boot   86  NTFS volume set da  Non-FS data
 6  FAT16           42  SFS             87  NTFS volume set db  CP/M / CTOS / .
 7  HPFS/NTFS/exFAT 4d  QNX4.x          88  Linux plaintext de  Dell Utility
 8  AIX             4e  QNX4.x 2nd part 8e  Linux LVM       df  BootIt
 9  AIX bootable    4f  QNX4.x 3rd part 93  Amoeba          e1  DOS access
 a  OS/2 Boot Manag 50  OnTrack DM      94  Amoeba BBT      e3  DOS R/O
 b  W95 FAT32       51  OnTrack DM6 Aux 9f  BSD/OS          e4  SpeedStor
 c  W95 FAT32 (LBA) 52  CP/M            a0  IBM Thinkpad hi ea  Rufus alignment
 e  W95 FAT16 (LBA) 53  OnTrack DM6 Aux a5  FreeBSD         eb  BeOS fs
 f  W95 Ext'd (LBA) 54  OnTrackDM6      a6  OpenBSD         ee  GPT
10  OPUS            55  EZ-Drive        a7  NeXTSTEP        ef  EFI (FAT-12/16/
11  Hidden FAT12    56  Golden Bow      a8  Darwin UFS      f0  Linux/PA-RISC b
12  Compaq diagnost 5c  Priam Edisk     a9  NetBSD          f1  SpeedStor
14  Hidden FAT16 <3 61  SpeedStor       ab  Darwin boot     f4  SpeedStor
16  Hidden FAT16    63  GNU HURD or Sys af  HFS / HFS+      f2  DOS secondary
17  Hidden HPFS/NTF 64  Novell Netware  b7  BSDI fs         fb  VMware VMFS
18  AST SmartSleep  65  Novell Netware  b8  BSDI swap       fc  VMware VMKCORE
1b  Hidden W95 FAT3 70  DiskSecure Mult bb  Boot Wizard hid fd  Linux raid auto
1c  Hidden W95 FAT3 75  PC/IX           bc  Acronis FAT32 L fe  LANstep
1e  Hidden W95 FAT1 80  Old Minix       be  Solaris boot    ff  BBT
- 如果是想设置为FAT32的话,输入为c就行了。
- 如果是想设置为EXT4(常用的Linux文件系统),输入83就行了。
Hex code (type L to list all codes): c
Changed type of partition 'Linux' to 'W95 FAT32 (LBA)'.
后面新增分区也是一样的方式,比如再新增一个5000M大小的EXT4分区。
Command (m for help): n
Partition type
   p   primary (1 primary, 0 extended, 3 free)
   e   extended (container for logical partitions)
Select (default p):

Using default response p.
Partition number (2-4, default 2):
First sector (10242048-65640447, default 10242048):
Last sector, +sectors or +size{
   K,M,G,T,P} (10242048-65640447, default 65640447): +5000M

Created a new partition 2 of type 'Linux' and of size 4.9 GiB.

Command (m for help): t
Partition number (1,2, default 2): 2
Hex code (type L to list all codes): 83

Changed type of partition 'Linux' to 'Linux'.

Command (m for help): p
Disk /dev/sdc: 31.3 GiB, 33607909376 bytes, 65640448 sectors
Units: sectors of 1 * 512 = 512 bytes
Sector size (logical/physical): 512 bytes / 512 bytes
I/O size (minimum/optimal): 512 bytes / 512 bytes
Disklabel type: dos
Disk identifier: 0xb839501e

Device     Boot    Start      End  Sectors  Size Id Type
/dev/sdc1           2048 10242047 10240000  4.9G  c W95 FAT32 (LBA)
/dev/sdc2       10242048 20482047 10240000  4.9G 83 Linux
确定好分区设置后,输入w命令写入写入磁盘并退出。
Command (m for help): w
The partition table has been altered.
Calling ioctl() to re-read partition table.
Syncing disks.
格式化
分区结束后,可以将分区格式化为指定的文件系统。
比如下面分别将分区1和分区2格式化为FAT32和EXT4文件系统:
white@ubuntu:~$ sudo mkfs.vfat -F 32 /dev/sdc1
mkfs.fat 4.1 (2017-01-24)
white@ubuntu:~$ sudo mkfs.ext4 /dev/sdc2
mke2fs 1.44.1 (24-Mar-2018)
Creating filesystem with 1280000 4k blocks and 320000 inodes
Filesystem UUID: 96c128d9-d0bc-48ed-92d1-d7da3bd67c2f
Superblock backups stored on blocks:
	32768, 98304, 163840, 229376, 294912, 819200, 884736

Allocating group tables: done
Writing inode tables: done
Creating journal (16384 blocks): done
Writing superblocks and filesystem accounting information: done
设置文件系统标签(label)
设置文件系统标签有助于更方便地识别和管理存储设备,特别是在挂载文件系统时,设置完标签后,挂载文件系统时路径名就会是设置的标签而不是系统生成的复杂字符串。
比如下面的 BOOT 和 ROOTFS 是要设置的卷标的名称,即文件系统的标识符。
white@ubuntu:~$ sudo fatlabel /dev/sdc1 BOOT
white@ubuntu:~$ sudo e2label /dev/sdc2 ROOTFS
重新插上SD卡。
white@ubuntu:~$ lsblk
NAME   MAJ:MIN RM   SIZE RO TYPE MOUNTPOINT
loop0    7:0    0   2.5M  1 loop /snap/gnome-calculator/884
...
sdc      8:32   1  31.3G  0 disk
├─sdc1   8:33   1   4.9G  0 part /media/white/BOOT
└─sdc2   8:34   1   4.9G  0 part /media/white/ROOTFS
sr0     11:0    1  1024M  0 rom
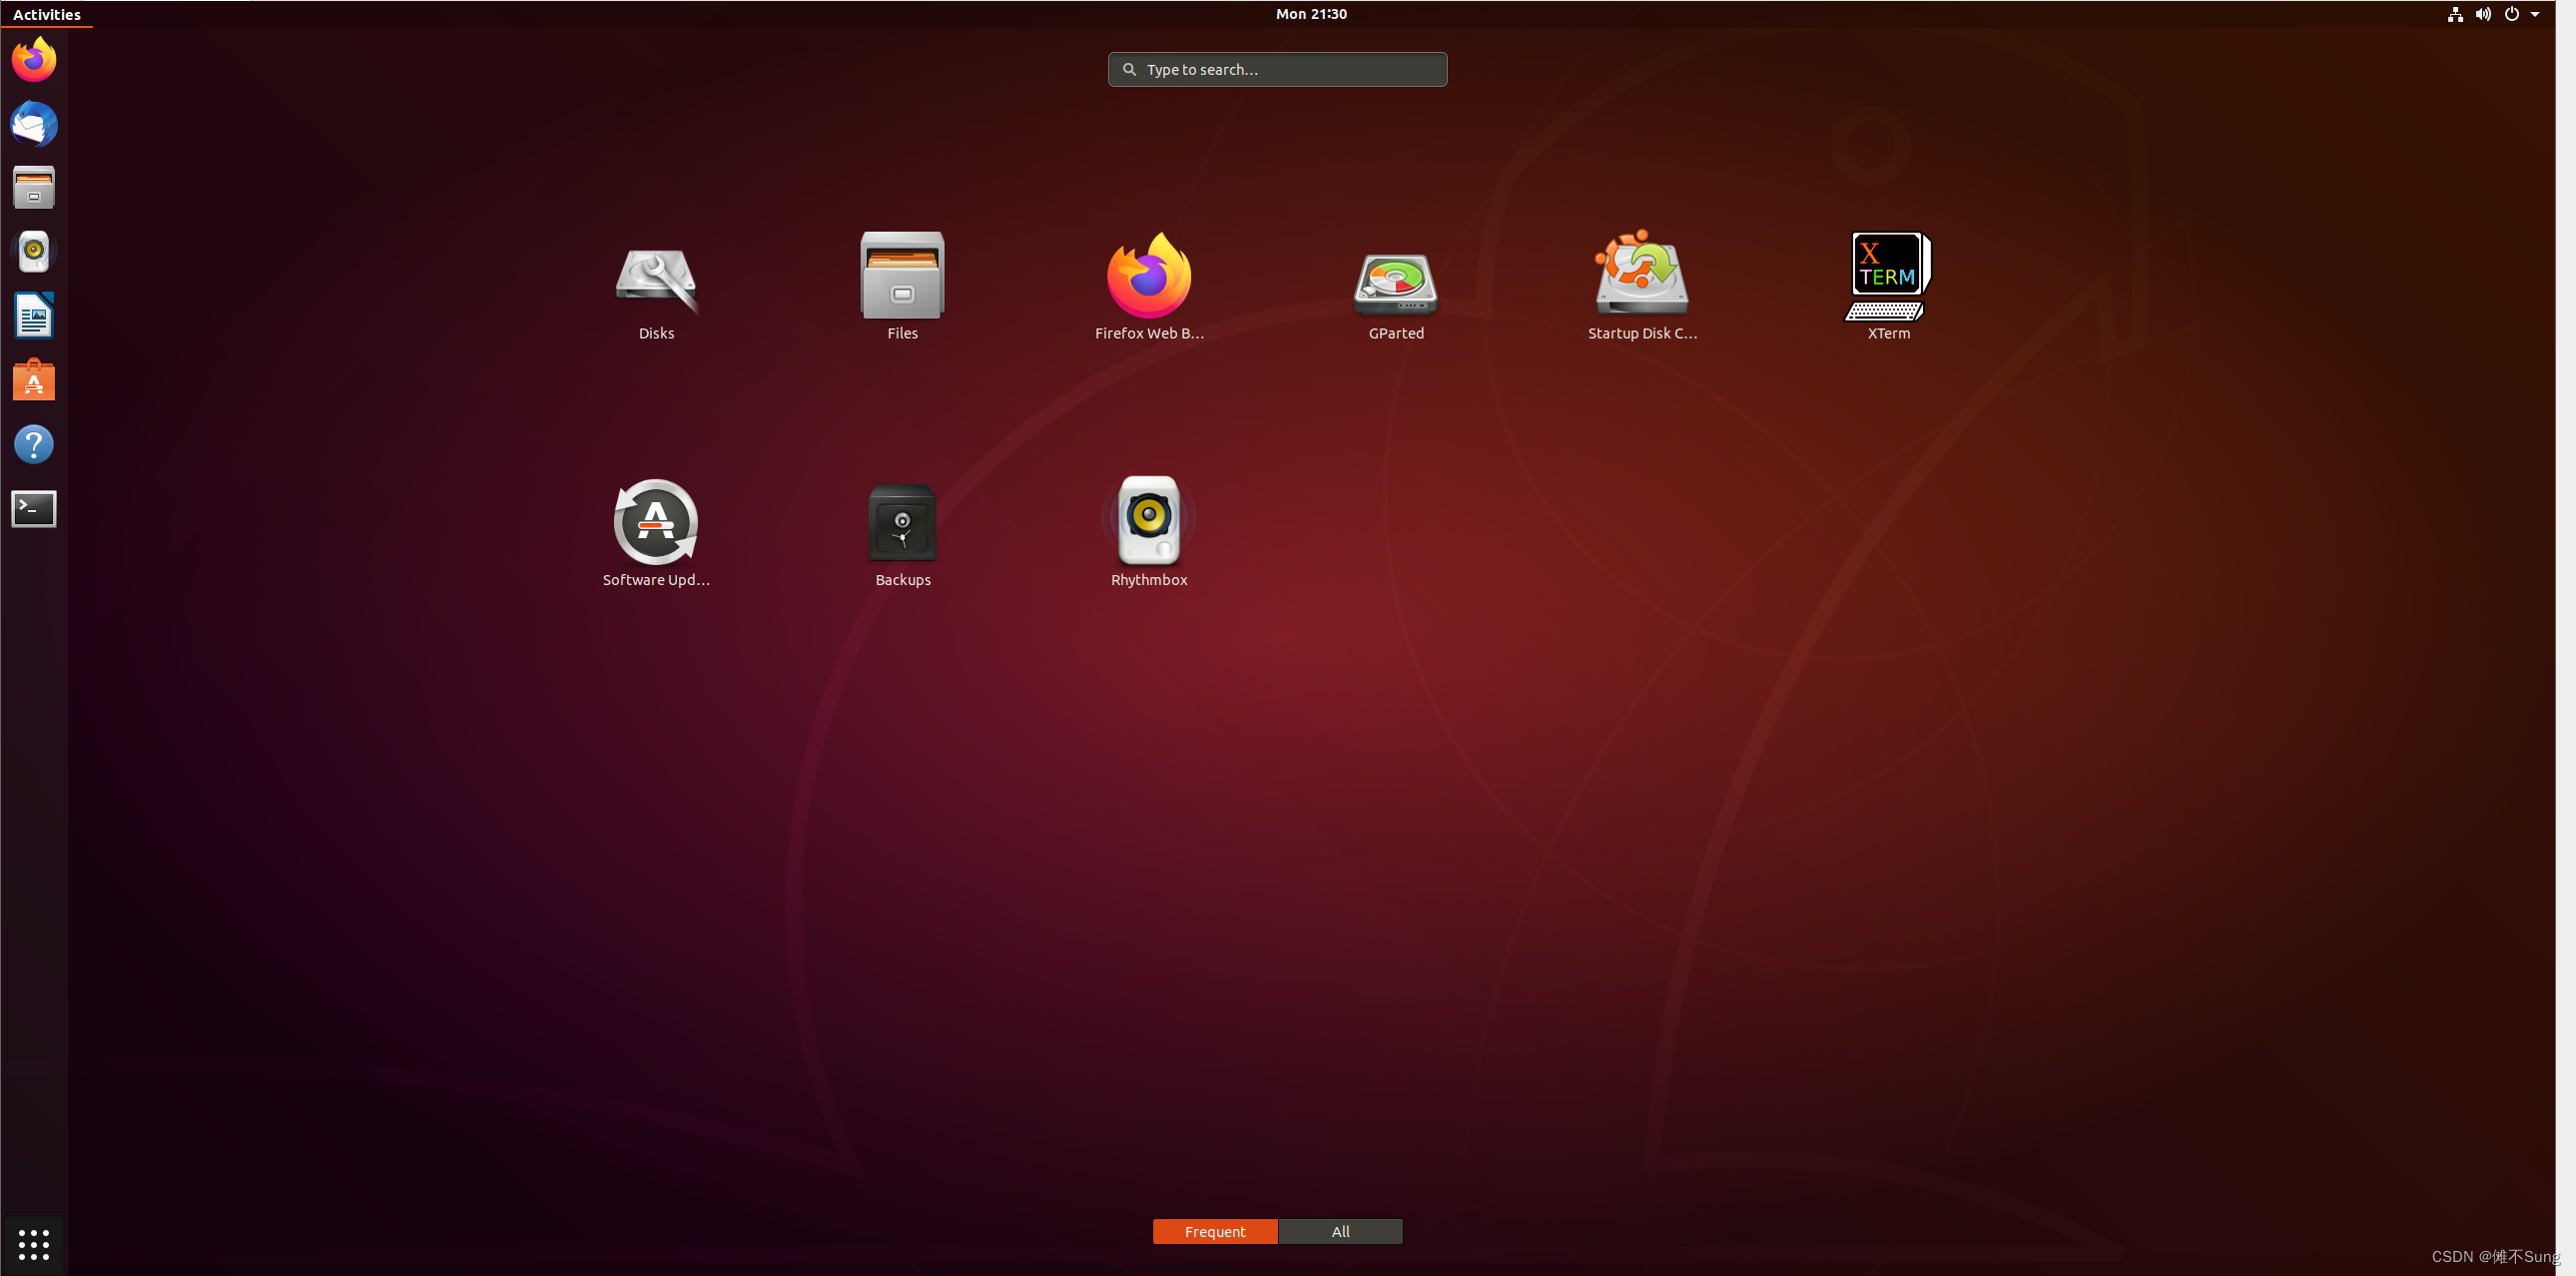
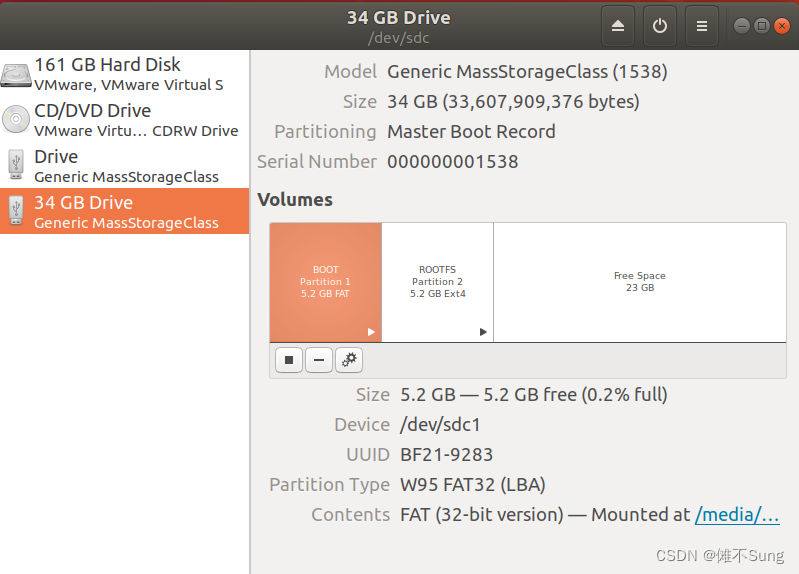
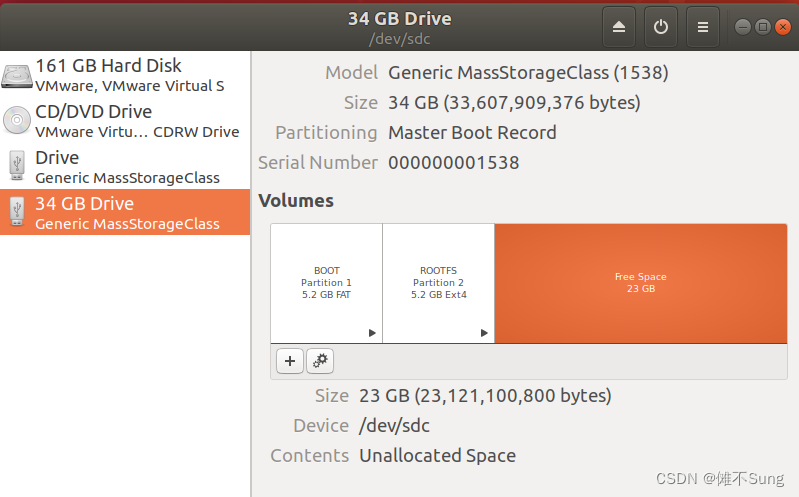
使用Ubuntu自带GUI工具Disks
Disks相比命令行工具更加简单无脑,用户体验良好。
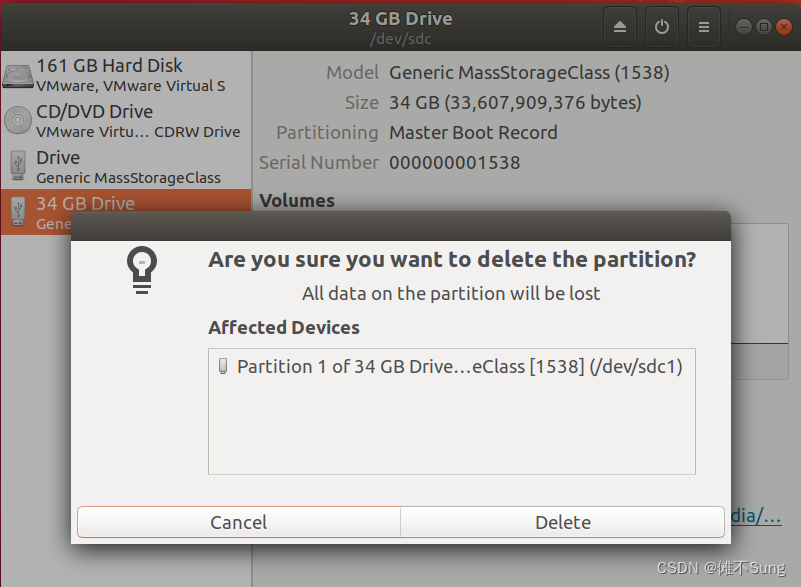
选中分区,点击图中的减号,就可以删除该分区。
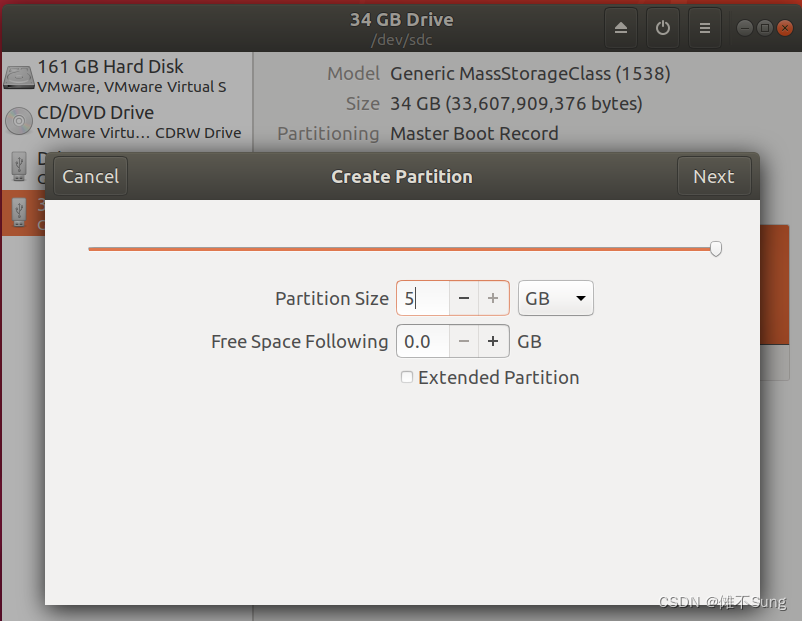
选中空白区域,点击图中加号,就可以添加一个新的分区。
选择分区大小(默认为主分区),next
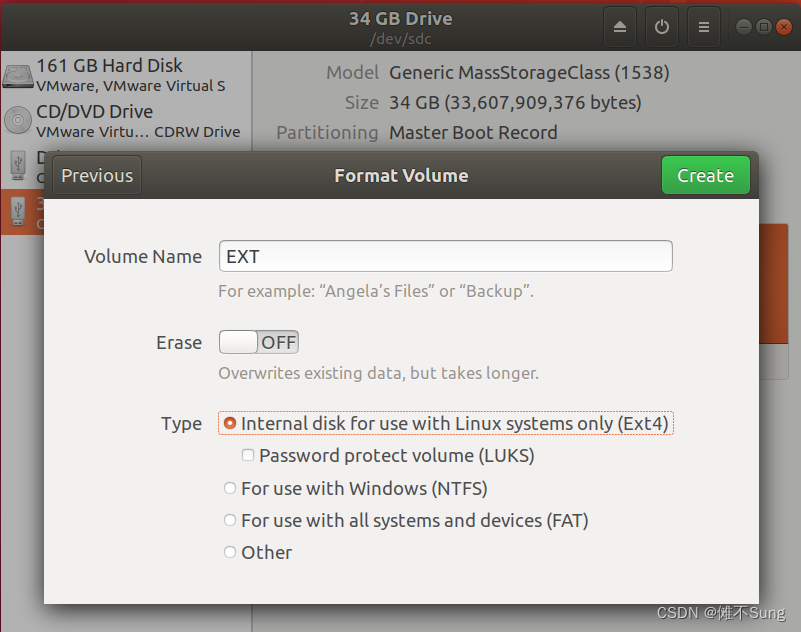
输入卷名,选择文件系统,点击Create即可创建。
sync与安全数据操作
往SD卡写入数据后,拔出SD卡前需要执行sync,强制将文件系统缓冲区中的数据写入磁盘。
white@ubuntu:~$ sync
sync 命令用于强制将文件系统缓冲区中的数据写入磁盘。在 Linux 系统中,文件系统通常会将写入磁盘的数据暂时存储在内存缓冲区中,以提高性能。然而,这样的设计可能导致在文件系统缓冲区中的数据还没有完全写入磁盘时系统发生崩溃或断电的情况下,数据丢失或损坏。
在系统关机之前,通常会自动执行 sync 操作,以确保所有挂载的文件系统中的数据都已经写入磁盘。
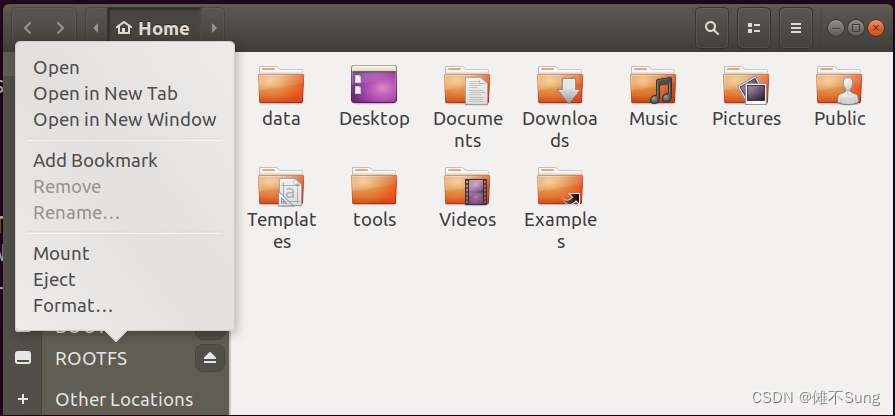
除了使用sync命令强制数据写入SD卡,在手动拔出SD卡时,最好通过文件资源管理器退出(Eject),系统提示可以安全拔出后再拔出(虽然直接拔了好像也没出过啥问题)。
今天的文章ubuntu sd卡_efi系统分区能删除吗分享到此就结束了,感谢您的阅读。
版权声明:本文内容由互联网用户自发贡献,该文观点仅代表作者本人。本站仅提供信息存储空间服务,不拥有所有权,不承担相关法律责任。如发现本站有涉嫌侵权/违法违规的内容, 请发送邮件至 举报,一经查实,本站将立刻删除。
如需转载请保留出处:https://bianchenghao.cn/84200.html

